background image

16

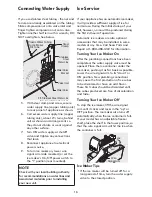
5.  With steel clamp and screw, secure 

water supply line (copper tubing only) 
to rear panel of appliance as shown.

6.  Coil excess water supply line (copper 

tubing only), about 2½ turns, behind 
unit as shown and arrange coils so 
they do not vibrate or wear against 
any other surface.

7.  Turn ON water supply at shutoff 

valve and tighten any connections 
that leak.

8.  Reconnect appliance to electrical 

power source.

9.  To turn ice maker on, lower wire 

signal arm (side mounted) or set the 

ice maker’s On/Off power switch to 
the “I” position (rear mounted).

Steel

Clamp

Stainless

Steel

Water Line

Water Valve

Bracket

Valve Inlet

Water Valve

6 ft. Stainless Steel Water Line

from household water supply

Plastic Water Tubing

 to Ice Maker

  Fill Tube

If you use stainless steel tubing - the nut and 
ferrule are already assembled on the tubing. 
Slide compression nut onto valve inlet and 
finger tighten compression nut onto valve. 
Tighten another half turn with a wrench; DO 
NOT overtighten. See below.

NOTE

Check with your local building authority 
for recommendations on water lines and 
associated materials prior to installing 
your new unit.

Connecting Water Supply

Ice Service

If your appliance has an automatic ice maker, 
it will provide a sufficient supply of ice for 
normal use. During the initial startup of your 
unit, however, no ice will be produced during 
the first 24 hours of operation.
Automatic ice makers are also optional 
accessories that may be installed in some 
models at any time. Call Sears Parts and 
Repair at 1-800-488-1222 for information.

Turning Your Ice Maker On

After the plumbing connections have been 
completed, the water supply valve must be 
opened. Place the ice container under the 
ice maker, pushing it as far back as possible. 
Lower the wire signal arm to its “down” or 
ON position. New plumbing connections 
may cause the first production of ice cubes 
to be discolored or have an odd flavor. 
These first cubes should be discarded until 
the cubes produced are free of discoloration 
and taste.

Turning Your Ice Maker Off

To stop the ice maker, lift the wire signal 
arm until it clicks and locks in the “up” or 
OFF position. The ice maker also turns off 
automatically when the ice container is full. 
If your model has an adjustable freezer 
shelf, place the shelf in the lower position, so 
that the wire signal arm will hit the ice when 
the container is full.

Wire

Signal Arm

Ice Maker Tips

• 

If the ice maker will be turned off for a 
long period of time, turn the water supply 
valve to the closed position.

Summary of Contents for 970F44853 Series

Page 1: ... English Français P N A01061103 1712 Sears Brands Management Corporation Hoffman Estates IL 60179 U S A www kenmore com www sears com Sears Canada Inc Toronto Ontario Canada M5B 2C3 www sears ca Kenmore Elite Freezer Congélateur Model Modèle 970F44853 ...

Page 2: ...situation which if not avoided could result in death or serious injury DANGER DANGER indicates an imminently hazardous situation which if not avoided will result in death or serious injury Please read and save these instructions This Use Care Guide provides specific operating instructions for your model Use your unit only as instructed in this guide These instructions are not meant to cover every ...

Page 3: ... technician If you intentionally release refrigerant you may be subject to fines and imprisonment under the provisions of environmental legislation Child Safety Destroy or recycle the carton plastic bags and any exterior wrapping material immediately after the unit is unpacked Children should never use these items to play Cartons covered with rugs bedspreads plastic sheets or stretch wrap may beco...

Page 4: ...it into an outlet controlled by a wall switch or pull cord to prevent the appliance from being turned off accidentally Avoid connecting unit to a Ground Fault Circuit Interruptor GFCI WARNING Important Safety Notice The California Safe Drinking Water and Toxic Enforcement Act requires the governor of California to publish a list of substances known to cause cancer birth defects or other reproducti...

Page 5: ...l Ice Maker Ice Bin Electronic Control Air Filter Air Baffle LED Lighting LED Lighting Glass Shelves Upper Freezer Basket Lower Freezer Basket Light Switch Kick Plate Adjustable Bottom Hinge Full Width Door Bins Tw o Liter Adjustable Door Bins Soft Freeze Bin ...

Page 6: ...irculation is essential for the proper operation of your unit Installation Allow the following clearances for ease of installation proper air circulation and plumbing and electrical connections Sides Top 9 5 mm Back 1 25 4 mm 1 25 mm 1 25 mm 10 mm 10 mm Freezer NOTE If your appliance is placed with the door hinge side against a wall you may have to allow additional space so the door can be opened ...

Page 7: ...len wrench 4 Repeat steps 2 and 3 to install refrigerator handle if installing the matching refrigerator Ensure the holes for the set screws are facing towards the freezer door NOTE All set screws should be tightened and sub flush of handle end cap set screw is seated just below the surface of handle end cap The end caps should be drawn tight to appliance door with no gaps A B Single Unit Installa...

Page 8: ...ble Hinge Use the lower hinge adjustment to fine tune the door alignment Use a 7 16 socket or wrench to adjust the screw at the bottom of the lower hinge Adjusting Doors For Matching Refrigerator Tall Freezer Pair The doors may also be adjusted side to side with the slotted hinge for aligning the doors parallel to each other Loosen the 3 screws with a wrench Shift the doors until parallel and then...

Page 9: ...ve the 2 hex head screws from the top hinge with a wrench or socket 5 Lift the door upwards and pull up and away from the cabinet until free of the bottom hinge pin mounted on the front of the cabinet 6 To replace the door reverse the above procedures and securely tighten all screws to prevent hinge slippage CAUTION Doors are heavy It is recommended to have two people to remove or replace the door...

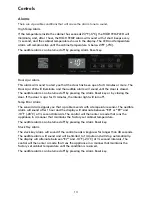
Page 10: ... the appliance Temperature is factory preset to provide satisfactory food storage temperatures However the temperature control is adjustable to provide a range of temperatures for your personal satisfaction To adjust the temperature setting press the UP key for warmer temperature and DOWN v key for colder temperature on the control panel Allow several hours for the temperature to stabilize between...

Page 11: ...OCK key for 3 seconds The display will show UL for 1 second Power Fail The POWER FAIL indicator light informs you that due to a power failure the cabinet temperature exceeded 23 F 5 C If the power failure lasted more than 1 hour the display alternates between showing the power failure duration Hours and DURATION LED illuminate in the display and the cabinet temperature F or C illuminates every sec...

Page 12: ...the door is closed without any violation of the Sabbath holidays The High Temp alarm is permitted when the cabinet temperature is outside the safe zone for 20 minutes The alarm silences itself after 10 minutes while the High Temp icon stays lit until the Sabbath mode is exited For further assistance guidelines of proper usage and a complete list of models with the Sabbath feature please visit the ...

Page 13: ... door If the door is ajar for 15 minutes the interior light will turn off Temp Error Alarm The sensor alarm signals you that a problem exists with a temperature sensor The audible alarm will sound after 1 hour and the display will alternate between E8 or E9 and 10 F 23 C at second intervals The control will then enter a mode that runs the appliance in a manner that maintains the factory set cabine...

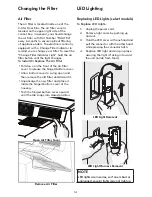
Page 14: ... the hinged bottom cover Allow bottom cover to swing open and then remove the old filter and discard it Unpackage the new filter and place it inside the hinged bottom cover of the housing Push the hinged bottom cover upward until the tab snaps into closed position Open Air Filter Cover Remove Air Filter Replacing LED Lights select models To Replace LED Lights 1 Unplug the power cord 2 Remove light...

Page 15: ...r or stainless steel tubing To determine the length of tubing needed measure the distance from the ice maker inlet valve at the back of the unit to your cold water pipe Then add approximately 7 feet 2 1 meters so the appliance can be moved out for cleaning as shown A shutoff valve to connect the water supply line to your household water system DO NOT use a self piercing type shutoff valve A compre...

Page 16: ...rvice If your appliance has an automatic ice maker it will provide a sufficient supply of ice for normal use During the initial startup of your unit however no ice will be produced during the first 24 hours of operation Automatic ice makers are also optional accessories that may be installed in some models at any time Call Sears Parts and Repair at 1 800 488 1222 for information Turning Your Ice M...

Page 17: ... top and bottom then ice maker is level If the ice maker is not level loosen the screw and slide the bracket to the correct position to make it level Retighten the screw You will need a inch socket wrench for this task Ice Container Leveling Bracket CAUTION DO NOT place the ice container in dishwasher Wash the ice container in warm water with mild detergent Rinse well and dry Stop the ice maker wh...

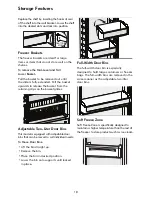
Page 18: ...ps on the basket glides Adjustable Two Liter Door Bins This model is equipped with adjustable door bins that can be moved to suit individual needs To Move Door Bins Lift the bin straight up Remove the bin Place the bin in desired position Lower the bin onto supports until locked in place Full Width Door Bins The full width door bin is especially designed to hold large containers or freezer bags Th...

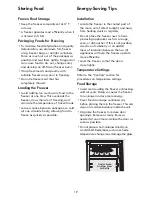
Page 19: ...o Not block Air Flow From Air Baffle Energy Saving Tips Installation Locate the freezer in the coolest part of the room out of direct sunlight and away from heating ducts or registers Do not place the freezer next to heat producing appliances such as a range oven or dishwasher If this is not possible a section of cabinetry or an added layer of insulation between the two 2 appliances will help the ...

Page 20: ...set your temperature controls to turn off cooling power to lights and other electrical components will continue until you unplug the power cord from the wall outlet Remove adhesive labels by hand Do not use razor blades or other sharp instruments which can scratch the appliance surface Do not remove the serial plate Removal of your serial plate voids your warranty Before moving your appliance rais...

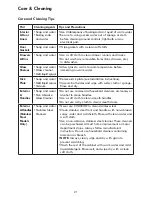
Page 21: ... sides and wipe with sudsy cloth or sponge Rinse and dry Exterior Handles Soap and water Non Abrasive Glass Cleaner Do not use commercial household cleaners ammonia or alcohol to clean handles Use a soft cloth to clean smooth handles Do not use a dry cloth to clean smooth doors Exterior Handles Stainless Steel Models Only Soap and water Stainless Steel Cleaners Never use CHLORIDE to clean stainles...

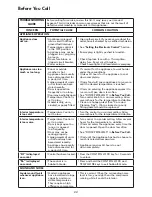
Page 22: ... causes it to run more Open doors less often See DOOR PROBLEMS in Before You Call Turn control knob to a warmer setting Allow several hours for the temperature to stabilize Clean or change gasket See Care and Cleaning Tips Worn cracked or poorly fitting gaskets should be replaced Interior temperature is too cold Temperature Control is set too low Turn the control to a warmer setting Allow several ...

Page 23: ...CE Moisture forms on inside walls Weather is hot and humid which increases internal rate of frost build up Door may not be seating properly Door is kept open too long or is opened too frequently This is normal See DOOR PROBLEMS in Before You Call Open the door less often ODOR IN APPLIANCE Odor in appliance Interior needs to be cleaned Foods with strong odors are in the appliance Clean interior wit...

Reviews: