background image

- 8 -

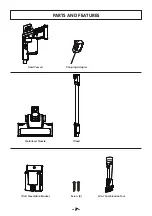
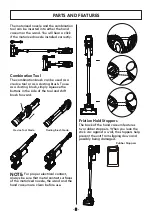
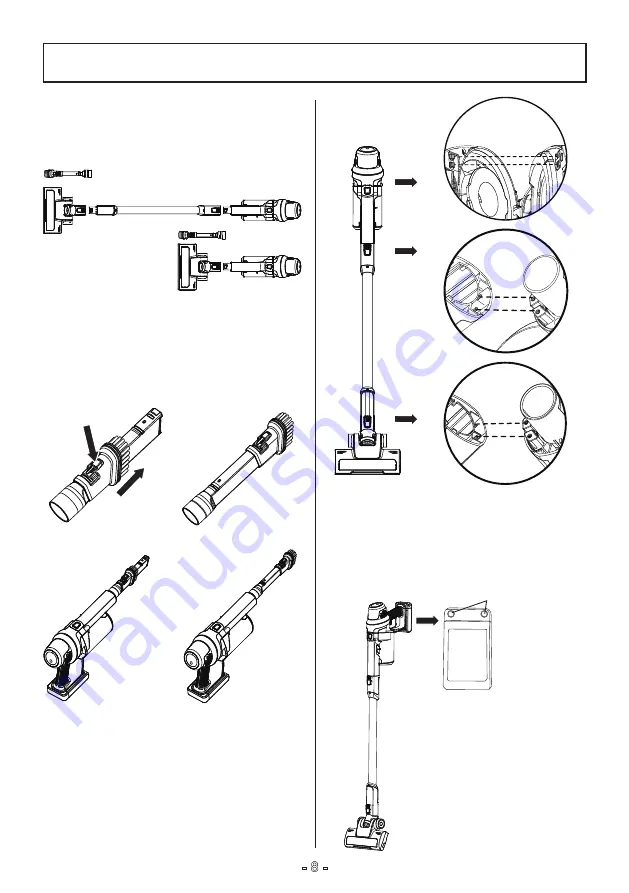
The motorized nozzle and the combination 

tool can be inserted into either the hand 

vacuum or the wand. You will hear a click 

if the motorized nozzle installed correctly.

Combination Tool

The combination brush can be used as a 

crevice tool or as a dusting brush. To use 

as a dusting brush, simply squeeze the 

buttons in the side of the tool and shift 

brush forward.

Friction Hold Stoppers

The back of the hand vacuum features 

two rubber stoppers. When you lean the 

stick vac against a wall, the stoppers help 

prevent the unit from slipping down and 

possibly being damaged.

NOTE:


For proper electrical contact, 

always be sure that metal contact surfaces 

of the motorized nozzle, the wand and the 

hand vacuum are clean before use.  
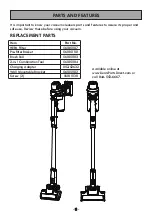
PARTS AND FEATURES

Rubber Stoppers

Crevice Tool Mode

Dusting Brush Mode

Summary of Contents for CSV Go 125.10438910

Page 1: ...e Guide Kenmore CSV Go Cordless Stick Vac Model Modelo 125 10438910 Vacuum Cleaner Help Line 1 877 531 7321 8 00am 5 00pm EST M F Transform SR Brands Management LLC Hoffman Estates IL 60179 USA www kenmore com ...

Page 2: ...in the safest and most effective way For more information about vacuum cleaner care and operation call the Vacuum Cleaner Help Line at 1 877 531 7321 You will need the complete model and serial numbers when requesting information Your vacuum cleaner s model and serial numbers are located on the Model and Serial Number Plate Use the space below to record the model number and serial number of your n...

Page 3: ...uch as cigarettes matches or hot ashes Do not pick toxic solution such as chlorine bleach ammonia or drain cleaner Do not use without dust cup and HEPA filter in place Do not charge the unit outdoors Prevent unintentional starting Ensure the product does not operate before connecting to hand vacuum picking up or carrying the appliance Do not carry the appliance with your finger on the switch or en...

Page 4: ...ot expressly approved by the party responsible for compliance could void the user s authority to operate the equipment Charging improperly or at temperatures outside of the specified range may damage the battery and increase the risk of fire You are responsible for making sure that your vacuum cleaner is not used by anyone who is unable to operate it properly Have servicing performed by a qualifie...

Page 5: ...e of charge For warranty coverage details to obtain free replacement visit the web page www kenmore com warranty This warranty does not cover filters or belts which are expendable parts that can wear out from normal use within the warranty period This warranty is void if this product is ever used for other than private household purposes This warranty gives you specific legal rights and you may al...

Page 6: ...e Review these before using your vacuum REPLACEMENT PARTS Available online at www SearsPartsDirect com or call 844 553 6667 Item Part No HEPA Filter 561051107 Pre filter Basket 561051101 Brush Roll 561051103 2 in 1 Combination Tool 561051104 Charging Adapter 052 52632 Wall Mountable Bracket 561051102 Screw 2 561011130 ...

Page 7: ... 7 PARTS AND FEATURES Hand Vacuum 2 in 1 Combination Tool Screw 2 Motorized Nozzle Charging Adapter Wand Wall Mountable Bracket ...

Page 8: ... squeeze the buttons in the side of the tool and shift brush forward Friction Hold Stoppers The back of the hand vacuum features two rubber stoppers When you lean the stick vac against a wall the stoppers help prevent the unit from slipping down and possibly being damaged NOTE For proper electrical contact always be sure that metal contact surfaces of the motorized nozzle the wand and the hand vac...

Page 9: ...ews provided to mount the bracket on the wall but not to drywall only Secure the screws to a stud Mount at a recommended height of 59 and no less than 44 above the floor Ensure that no plumbing or electrical cables wires or ductwork are located directly behind the mounting area 4 Hang the hand vacuum on the wall mount Align the base of the hand vacuum with the wall mount and slide in as shown in t...

Page 10: ... the wall outlet and the charging port on the hand vacuum For better battery performance it is recommended to charge the unit when the battery indicator shows a continuous yellow light during operation and remove the charging adapter from the unit after the battery is fully charged Never charge the batteries in temperatures above 104 F 40 C or below 39 2 F 4 C It is normal for the charger to becom...

Page 11: ...attery Power Level Indicator The battery power level indicator lights up to give you an idea of how much battery power remains at any given time CAUTION Operate the appliance at room temperature between 39 2 F 4 C and 104 F 40 C in order to ensure safe and normal function VACUUM OPERATION Before vacuuming floors connect the motorized nozzle to the wand Then connect the hand vacuum to the wand The ...

Page 12: ...To start the vacuum press the on off trigger button Once turned on the battery level indicator will be lit The vacuum starts in the ECO speed position To switch the speed to HIGH press the speed change button Press the speed change button again to switch back to ECO speed To turn the vacuum off press the on off trigger button again When vacuuming on plush carpet use ECO mode for best performance N...

Page 13: ... Cup Emptying For best performance empty dust cup after every use or once dust reaches max fill line Never operate the vacuum cleaner without dust cup and filter in place Before emptying the dust cup ensure the vacuum is turned off 1 Position dust cup lid area of vacuum over a waste receptacle Press down the dust cup release latch to open dust cup lid and allow cup contents to drop into waste rece...

Page 14: ...the pre filter basket back into the dust cup then place the HEPA filter back into the pre filter basket 2 Remove the HEPA filter and pre filter basket from the dust cup 5 To reassemble the dust cup to the hand vacuum align the tabs on the dust cup with slots in the hand vacuum Once aligned attach the dust cup to the hand vacuum until you hear a click 14 HEPA Filter Pre filter Basket Dust Cup EMPTY...

Page 15: ...f the nozzle Then push the unlock tab to the left and hold it Align the square end of the brush roll with the left end of the nozzle and insert it into place Release the tab to lock the brush roll Brush Roll Reset If the brush roll is blocked or overloaded the unit will automatically stop power Switch the unit off and remove the obstruction Hose Blockage Removal 1 To clean out the hose press the w...

Page 16: ...y remove any debris or blockage from the inside of the hose Reattach the motorized nozzle onto the wand 3 Once the blockage is removed start the vacuum to ensure air flow through the hose 16 CAUTION Do not use scissors or other sharp objects to remove a blockage from the hose CLEANING THE MOTORIZED NOZZLE BLOCKAGES ...

Page 17: ...ed on the charging port of the hand vacuum No power at electrical outlet Check circuit breakers The battery is damaged Call 1 877 531 7321 for assistance The battery indicator is damaged Call 1 877 531 7321 for assistance Battery indicator does not illuminate when using the vacuum Battery may be depleted Charge the battery as instructed on page 10 The battery indicator is damaged Call 1 877 531 73...

Page 18: ...purchase parts visit www searspartsdirect com or call 1 844 553 6667 Battery may be depleted Charge the battery as instructed on page 10 Dust cup is not installed well Check the dust cup for correct installation and ensure it is snapped firmly in place Dust escapes from vacuum Filter is missing or installed incorrectly Check the filter for correct installation See page 13 14 Filter is damaged and ...

Page 19: ... ...

Reviews: