background image

Summary of Contents for Elite 625.385560

Page 1: ... 7 AM 6 PM CST Repair or Parts Call toll free 1 800 469 4663 See back cover for other Sears service numbers SAVE THIS MANUAL Warranty Installation How It Works Care Of Specifications Repair Parts System tested and certified by NSF International against NSF ANSI Standard 42 and 58 See performance data sheet for details Printed on recycled paper Sears Brands Management Corporation Hoffman Estates IL...

Page 2: ...ranty does not cover the filter cartridges or the reverse osmosis membrane which are expend able items that can wear out from normal use within the warranty period This warranty applies only while this product is in use in the United States or Canada This warranty gives you specific legal rights and you may also have other rights which vary from state to state Sears Brands Management Corporation H...

Page 3: ...You must follow their guides as you install the system Follow your local codes if they differ with guides in this manual This system shall only be used for arsenic reduction on chlorinated water supplies containing detectable resid ual free chlorine at the system inlet Water systems using an inline chlorinator should provide a one minute chlorine contact time before the RO system This system is ac...

Page 4: ...gh out this manual Keep the small parts in the parts bag until you are ready to install them NOTE Codes in the state of Massachusetts require instal lation by a licensed plumber and do not permit the use of saddle valves If you live in the state of Massachusetts review plumbing code 248 CMR of the Commonwealth of Massachusetts before proceeding with the installation _q Reverse Osmosis Assembly Wat...

Page 5: ...ecommended to read through the entire manual before beginning your installation Follow all steps exact ly Reading this manual will also help you get all the ben efits from your system Your Reverse Osmosis Drinking Water System can be installed under a sink or in a remote location Typical remote sites are a laundry room or utility room Review the location options below and determine where you are g...

Page 6: ...r Typical Remote Installation Outside Faucet Hard Water Outside Faucet Hard Water To Reverse Osmosis Air Gap Faucet Soft Hot Water Additional Parts required Sediment Filter_ Water Softener Air Gap Soft Cold Reverse Osmosis System Water Meter Main Shutoff It Valve Storage Tank Figure 3 Questions Call The Kenmore Water Line 1 800 426 9345 or visit KenmoreWater com 6 ...

Page 7: ...the entire manual before beginning your installation Follow all steps exact ly Reading this manual will also help you receive and use all the benefits your Reverse Osmosis System can give yOU PREPARE SITE FOR INSTALLATION 1 Before starting close the hot and cold water shutoff valves See Figure 5 2 Temporarily place tank and filter assembly into cabi net Double check position of items and space req...

Page 8: ...quired that the cold water line be soft water Complete the following steps to install the water supply fitting 1 Close the water shut off valve that is immediately before supply fitting and open faucets to drain water from the sink cold water pipe 2 Remove nut that connects the cold water faucet to cold water plumbing 3 Thread water supply fitting onto pipe and reconnect nut to bottom of fitting O...

Page 9: ...he sink tailpiece See Figures 6 8 2 Clean the sink tailpiece to assure a leak tight fit 3 Install drain adapter directly onto the sink tailpiece using the ferrule and nut Snug the nut but do not tight en See Figure 7 4 Assemble the drain tubing connector to the drain adapter using the ferrule and nut Snug the nut but do not tighten See Figure 7 NOTE Locate so drain tubing from the Reverse Osmosis ...

Page 10: ...ways be sure to provide an air gap between the end of the hose and the drain point This will prevent water from backing up into the system Airgaps are required code in most areas To install a remote drain point complete the following steps 1 Locate the 1 4 red tubing on the Reverse Osmosis fil ter assembly See Figure 9 2 Determine if this length is long enough to reach the drain point 3 If not dis...

Page 11: ...the threads on the nipple at the top of the tank max 2 wraps See Figure 12 2 Locate the tubing connector Tighten the tubing connec tor with a wrench onto the tank nipple 7 8 turns being careful not to cross thread or overtighten See Figure 12 3 Do not connect the tube at this time This will occur later in the assembly 4 Place the storage tank next to the Reverse Osmosis Assembly The tank can be pl...

Page 12: ...ian TM or other plastic resin products or sinks made of porcelain and stainless steel may cause permanent irreparable damage to the sink or countertop surface INSTALL REVERSE OSMOSIS FAUCET 1 Locate and organize your RO faucet install parts Refer to Figure 13 2 Mount faucet base to sink hole until the faucet base is square against the sink surface The rubber washer should be between the sink surfa...

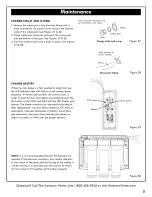
Page 13: ...NSTALL BATTERY When the coin battery is first applied at initial start up the LED indicator light will flash in a red amber green sequence All timers and counters are reset to zero In order to reset the time and gallon count feature push the the button on the PWA and hold until the LED flashes and release The battery needs to be replaced at the time of filter replacement Use only lithium batteries...

Page 14: ...ut against the back of the fitting See Figure 18 A common mistake is to stop pushing when the tube engages the o ring This will lead to future leaks When a 1 4 tube is fully engaged 11 16 of the tube has entered the fitting When a 3 8 tube is fully engaged 3 4 of the tube has entered the fitting See Figures 17 18 2 If using tubing other than tubing supplied with the sys tem be sure it is of high q...

Page 15: ...izing step CONNECT GREEN TUBE TO COLD WATER SUPPLY PIPE 1 Run one end of the 1 4 green tube to the fitting on the water supply pipe See Figure 21 2 Cut tube square and to length See Figure 16 3 Connect to cold water supply fitting See Figure 5 CONNECT RED TUBE TO REVERSE OSMOSIS FAUCET The red tube connection was completed in the faucet assembly steps CONNECT BLUETUBE TO REVERSEOSMOSIS ASSEMBLY Th...

Page 16: ... is not already empty allow the water to empty 3 Locate the eyedropper that is included in package and common household bleach 5 25 4 Add 3 ml of bleach into open end of yellow tank tub ing Handle bleach according to bleach manufacturer s recommendations See Figure 22 5 Connect yellow tank tubing to tank connector See Figures 12 and 22 6 Sanitizing the system will be completed during the pressure ...

Page 17: ...s faucet Water Pressure from the Reverse Osmosis faucet will be less than your standard faucet Water will run to the drain while the Reverse Osmosis system is producing water even if you are not drawing water from the Reverse Osmosis faucet You may hear a small quantity of water going to the drain for a cou ple of hours Water going to the drain will automati cally shut off when the storage tank is...

Page 18: ...ee Figure 24 The postfilter is an activated carbon type filter Any remaining tastes and odors are reduced from the product water Clean high quality drinking water is available at the faucet Reverse Osmosis Faucet The sink or countertop faucet has a hand operated knob to access drinking water See Figure 24 An air gap is built into the faucet drain water connection to comply with plumbing codes See ...

Page 19: ...ter leaves prefilter and proceeds to the Reverse Osmosis Cartridge 3 Water enters the Reverse Osmosis membrane Dissolved solids are reduced 4 Processed water leaves the Reverse Osmosis Membrane and flows to the storage tank 5 Waste water with dissolved solids leave the Reverse Osmosis membrane and flows to the drain 6 Faucet is activated 7 Processed water leaves the storage tank and flows to the p...

Page 20: ...roduct water may begin to taste different or bad indicating solids and organics are passing through the Reverse Osmosis membrane See Reverse Osmosis cartridge replacement REVERSE OSOMOSIS CARTRIDGE REPLACEMENT Complete the following steps to replace the cartridges 1 If possible turn off the water supply to the RO system 2 Remove turn to the left the pre filter cartridge from the filter head to rel...

Page 21: ...reen sequence All timers and counters are reset to zero In order to reset the time and gallon count feature push the the button on the PWA and hold until the LED flashes and release The battery needs to be replaced at the time of filter replacement Use only lithium batteries CR 2032 or equivalent Improper placement of battery could dam age electronics Use care when inserting the battery to align i...

Page 22: ...Arsenic Reduction This system shall only be used for arsenic reduction on chlorinated water supplies containing detectable residual free chlorine at the system inlet Water systems using an inline chlorinator should provide a one minute chlorine contact time before the reverse osmosis system Nitrate Nitrite Test Kit This system is acceptable for treatment of influent concentrations of no more than ...

Page 23: ...Questions Call The I enmore Water Line 1 800 426 9345 or visit I enmoreWater com 23 ...

Page 24: ...ns to conform before doing maintenance on the Reverse Osmosis system Cause Prefilter or Reverse Osmosis membrane Correction Replace the prefilter cartridge If rate does not increase replace cartridges plugged with sediments the postfilter cartridge and Reverse Osmosis membrane cartridge See page 20 Cause Storage tank air charge less than I Correction Open Reverse Osmosis faucet and drain tank unti...

Page 25: ...3 or 21 11 _lem_ _le push _onn_ Cause Tubing not cut square Correction Cut tubing square See page 14 Cause Tubing not pushed in all the way Correction Push tubing in all the way See page 14 Cause Tubing nicked Correction Remove tube from connection Remove nicked portion by cutting tube to shorter length Re insert in connection See page 14 Cause Outer tubing surface finish not smooth Correction Rem...

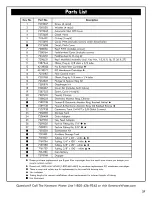
Page 26: ...18 19 i I I 2O I I 22 _ 14 1 4 red tubing 15 4 f 24 _ 2 Manifold Housing PUSH IN FITTINGS o ring seat coltet o 13 25 11 Questions Call The Kenmore Water Line 1 800 426 9345 or visit KenmoreWater com 26 ...

Page 27: ...289728 Faucet Electronic Monitor Ring Brushed Nickel 7289736 Faucet Electronic Monitor Ring Oil Rubbed Bronze 22 7207938 Connector Tank 1 4 NPT x 3 8 Quick Connect 23 7256018 Storage Tank 24 7208489 Drain Adaptor 25 7227310 Tee Feed Adapter 26 7281005 Push in Fitting Kit 1 4 27 7281013 Push in Fitting Kit 3 8 7301203 Sanitization Kit 7315189 Auxiliary Storage Tank 7161823 Tubing 1 4 x 20 white 716...

Page 28: ...ment on a product serviced by Sears 1 800 827 6655 U S A 1 800 361 6665 Canada Para pedir servicio de reparaci6n a domicilio y para ordenar piezas 1 888 SU HOGAR 1 888 784 6427 www sears com Au Canada pour service en frangais 1 800 LE FOYER Mc 1 800 533 6937 www sears ca Registered Trademark TNTrademark of KCD IP LLC in the United States or Sears Brands LLC in other countries Marca Registrada TNMa...

Reviews: