background image

Summary of Contents for HE3

Page 1: ...UMBERS 110 42822200110 42832200 110 42824200110 42826200 110 42834200 110 42836200 110 42922200110 42932200 110 42924200 110 4293 4200 110 42926200 110 42936200 HE Developmental Resources 2001Sears RoebuckandCo HEt Front LoadingAutomat ic Washer FIELD COURSE9373 ...

Page 2: ...MPoNENT TEST NG 4 1 Central Gontrol Unit 4 1 Component Checks 4 2 MotorControl Unit 4 4 LineFilter 4 s Dispenser 4 5 Pressure Switch 4 6 Heating Element andTemperature Sensor 4 6 DIAGNOSIS ANDTROUBLESHOOTING 5 1 SudsDetection 5 1 DoorLockingandUnlocking 5 2 Unbalance Detection Routine 5 3 ErrorCodes 5 4 Diagnostic Test 5 B Troubleshooting Chart 5 10 Cycle Charts 5 12 wtRtNG DTAGRAM 6 1 TECH T PS 7...

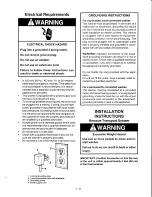
Page 3: ...on t immediatelyfollow instructions You can be killedor seriouslyinjuredif you don t follow instructions Allsafety messages willtellyou what thepotential hazard is tellyou howtoreduce thechance ofinjury andtellyouwhatyoucanhappen iftheinstructions arenotfollowed g ELECTRICAL SHOCKHAZARD Disconnectpower before servicing Replaceall panelsbeforeoperating Failureto do so can resultin deathor electrica...

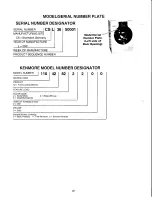
Page 4: ...l Serial Number Plate Left side of Door Opening WEEK OFMANUFACTURE PRODUCT SEQUENCE NUMBER KENMORE MODEL NUMBER DESIGNATOR MopELNUMBER 110 42 g2 PRODUCT 42 Front Loading Washer COLORCODE 2 WhileMhite 6 Graphile Graphite YEAROF INTRODUCTION 2 2001 DECADE 0 2000 ENGINEERING CHANGE 0 BasicRelease 1 FirstRevision 2 SecondRevision IV ...

Page 5: ...y be purchasedseparately for this washer Thispedestalwilladd about14inches tothe height ofyourunitfora totalvertical height ofapproxi mately 52 inches 132cm Optional Pedestal Thispedestal isavailable inthree colors White PartNumber 4282 Bisque PartNumber 4284 Graphite PartNumber 4286 Toorder callyourlocal Sears store orSears Service Center Location Requirements Selecting theproper location foryour...

Page 6: ...narefortheminimum spacing allowed tf Fr il l 2 r S x1r gu c sr n rsrfr t ff6f I qare dftn w t r 4r Additional spacing should beconsidered forease ofinstallation andservicing Additional clearances might berequired forwall doorandfloor moldings Additionalspacing of1 in 2 5 cm onallsides of thewasher isrecommended toreduce noise trans fer Forcloset installation witha door theminimum ventilation openi...

Page 7: ... trn rp g nrgr 4 fiil er safig r c rs GROUNDING INSTRUCTIONS Fora grounded cord connected washer Thiswashermustbe grounded Intheeventof a malfunction or breakdown grounding willreduce the riskof electrical shockby providing a pathof leastresistance for electric current Thiswasher is equippedwith a cord havingan equipment grounding conductor anda grounding plug The plugmustbe pluggedintoan appropri...

Page 8: ...erence Periodically inspect andreplace hoses ifbulges kinks cuts wear orleaks arefound Secure the DrainHose 1 Drape thepower cordoverthewasher top 2 Secure thedrain hose tothelaundry tublegor standpipe withthebeaded strapprovided See illustration 1 r 1 lfthewasher faucets andthedrain standpipe are recessed putthehooked endofthedrain hosein thestandpipe Tightly wrap thebeaded strap around thewateri...

Page 9: ...ents Besurethat youhavelhe correctelectrical supplyandthe recommended grounding method See Electri calRequirements 2 Checkto be sureallpartsarenowinstalled lf thereisan extrapart go backthroughthesteps to seewhichstepwasskipped 3 Check tobesure youhave allofyour tools 4 Dispose recycle allpackaging materials 5 Check tobesure thewater faucets areon 6 Check forleaks around faucets andinlet hoses 7 P...

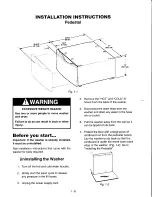
Page 10: ...sher onitsbacksothatthe cardboard isunder theentire lowerback edgeofthewasher Fig 1 2 Goto lnstalling thePedestal l o l Fig 1 l 4 5 6 7 2 EXCESSIVE WEIGHTHAZARD Use two or more people to move washer and dryer Failureto do so can resultin backor other injury Before you start lmportant lf the washeris already installed it mustbeuninstalled Seeinstallation instructions thatcamewiththe washer fortools...

Page 11: ...led screws Fig 1 5 Fig 1 5 Liftthe pedestal towardthefrontof the washerandinstall thetwo 2 remaining hex headsheetmetalscrews Do not tiqhten completely 6 Tipthewasherandpedestal assembly backto an upright position Removeprotective cardboard 7 Slidethewashercloseto itsfinal location HelpfulTip to makesliding thewasherto itsfinallocation easier spraythefloorbehind thewasherwithwindowcleaner lf thewa...

Page 12: ...tighten allfour 4 feetlocknuts against thepedestal Fig 1 7 The locknutsmustbetightened loc nul l 11 Pullbothdrawer slides outandreas semble thedrawer tothedrawer slides withthetwo 2 Phillips headscrews Fig 1 8 Useofthetwo 2 dividers is optional Close thedrawer Fig t 7 Fig t 8 1 8 ...

Page 13: ...bythespecific washcycle selected andatemperature sensor located inthewashtub Toimprove cleaning ofheavily soiled clothing andtoprovide a sanitizing feature thewater tempera turecanbeincreased through theuseofa heating element located inthebottom ofthetub HFtmodel only Flowmeter Waterflow or thequantity of waterintroduced throughout anycycleis monitored bya flowmeter andCentral Control Unit When th...

Page 14: ...sition A toaccommo datestacking a matching dryer ontopofthewasher Fig 2 4 Refer to UseandCareGuide fortheFront Loading Auto matic washer PN461970203971 forproper useof laun dryproducts Therearetworoutes forthewater toenterthewashtub Mostofthewaterflowsthrough thedispenser assembly A smallportion ofthewaterflowaround thedi pensers andisusedtowashthedoorwindow 1 MainInlet Tube Fig 2 5 A 2 Window Was...

Page 15: ...dtimetoa normal washcycle lightwillshorten a normal washcycle Pause Cancel Pressing thisbutton willallow changing anyoption or changing a washcycle afterthe washcyclehasbegun Pressthe PAUSE CANCEL button select thedesired Op tion press andholdtheSTART button forone 1 second Tocancel a cycle andselect a newone press thePAUSE CANCEL button select thenew cycle select thedesired options press andhold ...

Page 16: ... t l t l 4 o s J 8 6 l t u I I J J c I o E I o o I E o J o 2 o o 1 E o P D Y q o I z z D U J o o U d cl z 1 c I U g c d a E o z c E o i E o J 6 r E F I e t E o t o FE 5 I E 2 e I t t 6 e o t c 4 u E o I A i E att P c 3 o C G t I a E l in l l f l D n I E n x f a l f n g I i I L I U t l l l w l it ajt n tlit x J c J J D D I g I 3 l f I n i ru w 3 I a 2 5 J J tr t n I r E l E g G n E o 2 a tr P D i I...

Page 17: ...spenser Drawer Whenusing Prewash donotuseliquid de tergent intheMainWashcompartment Use powdered detergent forthemain washcycle NOTE ThePrewash andAutoSoak options can notbeselected inthesamecycle StainTreat Usethisoption forheavily soiled loads thatneed improved staintreatment WhenStainTreatis selected thewatertemperature of theselected washcycleis automatically setto warm The waterwillthen behea...

Page 18: ...g glows Tochange thespinspeed select theSPIN SPEED button until thedesired setting glows Tochange theloudness oftheEndofCycle Signal select ENDofCYCLE SIGNAL Wash Rinse Temp Select a watertemperature based onthetype ofloadyouarewashing Usethewarmest water safeforfabrics Follow garment label instructions Warmrinses leave theloadsdryerthancold rinses Warmrinses increase wrinkling Incold climates a w...

Page 19: ...eMotor Control Unit forproper motor operation MotorGontrol Unit MCU The MotorControl Unit is located is insidea plastic control box locatedin the lowerfrontcornerof the washercabinet Fig 2 12 The controlbox is shownwiththe accessdoor open The MCU operatesthe drivemotorat varyingspeedsand direction basedon inputsreceived by theCCUto complete the cycleselected The MCUalsomonitors a tachomeler on the...

Page 20: ... insures thatnowater ordetergent is wasred Fig 2 1a 2 16 Suspension System Thewashtubisheldinitshorizontal position withfour pneumatic shockabsorbers attached tothebottom fourcorners ofthetubassembly Inaddition thewash tubissuspended fromthetopframeofthewasher with twosprings attached tothesidesoftheunit Stability forthissuspension system isprovided by threeconcrete counter weights Twoarelocated a...

Page 21: ...oorduring certain operations ina washcycle Heating Element Relay A relay isused toturntheheating element on andoff Theheating element relay islocated in thelower right hand sideofthewasher cabinet Fig 2 21 TheCCUoperates a solenoid to close themainrelay contacts providing 120 VACtotheheating element Heating Element Solenoid Fig 2 21 Panel Interlock Switches The frontand rearinterlock switches Fig ...

Page 22: ...OSE CONSOLE F TUB ASSEMBLYi DRIVE MOTOR SectionThree GOMPONENT ACCESS COMPONENT LOCATION DETERGENT DISPENSER PULLEY DRAINPUMP ASSEMBLY HEATING ELEMENT IELAY WASHER BACK WASHER FRONT MOrOR l CONTROL UNIT 3 1 ...

Page 23: ...ad LED Assembly ribbon connector fromthe leftsideof the CentralCon trol Unit Fig 3 5 and releaseit fromthe wiring harnessbrackets on the rightsideof thewasher top Ribbon Gonnector Remove the detergent dispenser drawerby pressing downontherelease tabatthebackof thedrawer Fig 3 6 andpulling itcompletely out ofthewasher Gonsole Release Tab Fig 3 O Oncethedrawer is removed remove thescrew intherecesse...

Page 24: ...ltheretainer forward andthenofftheperimeter oftheboot Release thesetabsinsequence fromleftto right aroundtheTouchPad LED Assembly untilallof thetabsarefreeandtheAssembly canbe lifted fromtheconsole Fig 3 9 Tab Tabl DOOR ANDDOOR SWITCH Easetheedgeof the bootoff of the lip of the washer frontnearthedoorswitch Fig 3 12 Remove enough of the bootto gainaccessto thedoorswitch behind thewasher frontpanel...

Page 25: ...tubopening Theboot can nowberemoved fromthetub REPLACING THEBOOT ANDDOOR SWITCH Whenreplacing thebootandwasher front panel special caremustbetaken to assure a proper water sealandoperation Carefully pullthe nozzle fromthe window washer tube Separate theplastic gasket ring fromthenozzle lnsert thenozzle through the holeinthebootandslidetheplastic gasket ringdowntheshaftofthenozzle sothatthe bootiss...

Page 26: ...ubewiththeindentation onthedispenser con nector andslide thetubeontothedetergent dis penser assembly Remove thescrewsecuring thefrontof thede tergent dispenser assembly tothetopfront frame member Fig 3 16 Water lnlet Tube Fig 3 16 Disconnect theoverflow hose fromthedetergent dispenser assembly Fig 3 17 Remove thescrewsecuring thedetergent dis penser assembly to thetopleftframemember Fig 3 17 Slide...

Page 27: ...kwise to release it fromthe cabinet Fig 3 21 Pressure Switch REMOVING THEDRIVE MOTOR Thedrivemotor canberemoved oncetheback panel hasbeenremoved Twelve screws secure the backpanelto the washer Remove the12screws andremove the back panel Remove theDrive Belt Disconnect thewiringharness connectors and ground wires fromthedrive motor terminals Push thewiring harness tiefromthemotormounting bracket Re...

Page 28: ...tuponthe plastic tabunder thefrontright corner ofthe motor controller box Fig 3 26 INSET Fig 3 24 REMOVING THESHOCK ABSORBERS Thetubisheldinposition byfourshock absorb ers twoinfront Fig 3 25 and twoattheback Each shock absorber canbedisconnected from thetubby turning thetopof theshockmount counter clockwise 90 Theshockcanbe re moved fromthewasher by turning thebottom shock mount counterclockwise ...

Page 29: ...sembly Allthree mustberemoved forsafe removal ofthetubassembly Access to theweight onthetopfrontof thetub requires removing the sixscrews securing the topfront frame member fromthewasher andre moving theframemember Fig 3 30A Fig 3 304 Access totheweight onthetopbackofthetub requires removing thetwoscrews securing the topframemember to thewasher andremoving theframemember Fig 3 308 Top Frame Back s...

Page 30: ...pcabinet frame To release thespring attheright sideofthecabinet it maybe necessary to remove thewiringhar nessretainer fromthecabinet Once thefinalspring isreleased thetubislreeto beremoved fromthewasher cabinet Fig 3 36 NOTE Takecarenotto letthetubdropfreein sidethecabinet Thiscould result indamage to components inthecabinet ordamage tothetub assembly Front Shock Absorbers Rear Shock Absorbers Fi...

Page 31: ...e tub assembly takenoteof thesespecialproce dures 1 Whenreassembling thetub be sure to install allthe metalclipsallaround thetub A hammermaybe necessary to do this 2 When reinstalling theheater element besureitisinserted properly inthe retainer inside thetub Fig 3 39 Heater Glip Fig 3 39 Whenreinstalling thetub besureto hookthesprings intotheholesto wardsthefrontofthetub Asmall piece ofducttapemay...

Page 32: ... 4 5 PressureSwitch TemperatureSensor DispenserSwitch Motor lnlet Valves DrainPump 6 Door Lock Solenoids 7 Motor Gontrol Unit Power 8 Door Lock Main Switches 9 Heating Element Relay 1O Line Filter l Serial Gomm Link l2 Touchpad LED Ribbon Gable l3 Door Switch 14 Flowmeter 4 1 ...

Page 33: ...dition disconnect thewiring harness connector fromtheCentral Control Unitbefore making anycontinuity tests Pressure Switch Thepressure switch canbechecked atvarious water levels Disconnect thepressure switch connector fromthecontrol box r ryt q l Hffi trre ffi 5 WaterLevel Empty SudsDetect L1 Overflow TestPoints 4 t o 6 1 l o 2 4 t o 5 3 t o 4 Reading 0 ohms 0 ohms 0 ohms 0 ohms Temperature Sensor...

Page 34: ...s oll4 em I lH Reading 15ohms TestPoints 3 t o 2 3 t o 1 TestPoints 5 t o 4 2 t o 1 Reading 60 ohms 60 ohms Reading 0 ohms 0 ohms Door Locl Unlock Solenoids Door Lock Main Switches Tocheck thedoorlockmainswitches thedoormustbelocked Begin byselecting a cycleand press START Youwillhearthedoorlocksolenoid engage Unplug thewasher fromthewall outlet andcheck forcontinuity atthefollowing points 4 3 ...

Page 35: ...b Y TestPoints 2lo 1 Door Closed Door Open Reading 15ohms DoorSwitch ConnectorLocation TestPoints 2 l o 1 2lo 1 Reading 0 ohms Infinity MOTOR CONTR a J OLUNIT I I q Power Supply Motor Connector _i ii 1 1 f 3 rachometer Serial Gomm Link ...

Page 36: ...TestPoints Connector Location Dispenser Switch LINEFILTER A t o B 0 o h m s C t o D 0 o h m s DISPENSER Dispenser Motor Continuity Check 1400 Cl DispenserMotor 4 5 ...

Page 37: ...s Made 21 lo 22 1 1t o 1 4 21 to 24 21 lo 26 HEATING ELEMENT ANd TEMPERATURE SENSOR Connector Location Heating Element TestPoints Reading Between Terminals 15ohms HEATING ELEMENT SOLENOID Heating Element Terminals Temperature SensorTerminals Temperature Sensor 32 F o C 122 F 50 203 F 95 C RELAY 4 6 15ohms ...

Page 38: ...will stopthedrive motor andthebasket willstopspinning Theelectronic control willcount thenumber ofspinrepetitions thatareattempted duetofoam suds There area maximum ofthree 3 attempts foreachSpin Extract Routine lf countis equalto 0 theKill Foam Routine isperformed lf countis greater than0 theCentral Control Unitwillwaituntil thepressure switch doesnot sense foaminthewashtubandrestart theSpin Extr...

Page 39: ...rol Unitisgreater than180seconds 2 Thetimesince theinlet valve wasCLOSED isgreater thanfive 5 seconds 3 lfthetemperature ofthewater isgreater than122 F 50 C thewater willbedrained before unlocking willoccur 4 lfthewater level ishigher thanthewashlevelintheDelicate Woolor Handwash cycles thewater willbedrained before unlocking willoccur TheUnlocking Routine is 1 TheDoorUnlock Relay isenergized for4...

Page 40: ...snotsense anunbalanced condition therampwillcontinue b lftheMotor Control Unitsenses anunbalanced condition thedrivemotor isstopped lfthe repetition counter forlowspeed spinisequal to0 theCentral Control Unitwilladvance to thenextspinroutine lftherepetition counter isgreater than0 theCentral Control Unitwill restart thecurrent spinroutine Check 2 Thischeck occurs attheendofthedistribution ramp whi...

Page 41: ... Pressure switch Verify there isnota siphon problem Verify wireharness connections to Inlet Valves Pressure Switch Drain Pump Flow Meter andCentralControl Unit CCU Check allhoses forpossible leaks Verify pressure switch operation Verify flowmeter operation Verify CCUoperation LongDrain lfthedrain timeexceeds 8 minutes thewater valves areturned offand F 02 is flashed PressPAUSE CANCEL twice to clea...

Page 42: ...switch isClosed formorethan60seconds anOvedlow condition willoccur InanOverflow condition theDoor willremain locked andtheDrain Pump willrunconstantly even if PAUSE CANCEL ispressed twice andtheDisplay iscleared Unplug theunit toservice PotentialCauses Check thedrain hose andmake sureitisnotplugged orkinked Check WireHarness connections totheDrain Pump Pressure Switch and Central Control Unit CCU ...

Page 43: ...M Error TheCentral Control Unit CCU receives it sdatafromanEEPROM onboard the CCU lfthere isanerror readino thisdataitwillcause thiserror PotentialCauses A power glitch maycause thiserror Tryunplugging theUnit fortwominutes to seeifthatfixes theerror Replace CCU MotorControlUnit MCU Error lftheMCUdetects multiple resets orerrors during a washcycleitwillgointothis error mode PotentialCauses Check W...

Page 44: ...vtolockit6 times before displaying theerror PotentialCauses Door LockMechanism broken orremoved from theDoor Check DoorLock Switch Assembly Check thewireharness connections totheDoor Lock Switch Assembly and Central Control Unit CCU DoorLocl Switch Assemblv Failure Door UnlockError A DoorUnlock Erroroccursifthedoorcannotbe unlocked lt willtryto unlock the door6 timesbefore displaying theerror Pote...

Page 45: ...imes Overview TestProgram C 00 Dooris Locked DoorLockSystem C 01 Filling by coldwaterinletvalve Flowmeter Coldwater inlet valve C O2 Distribution system issetto Prewash position Dispenser motor Dispenser contact C 03 Fillbyhotwater inlet valve Hotwaterinletvalve C 04 Drumrotates clockwise atwashspeed Motor CIMcontrol C 05 Heater isswitched ON Drumrotates clockwise withwashspeed lfthereisnotenough ...

Page 46: ...gs WaterTemperature Sensor Disconnect thewireharness fromthewater temperature sensor andmeasure theresistance ofthe sensor Pin1 to Pin2 Normal approximately 6 Q Abnormal infinitv Pin2 toPin3 Normal approximately 6 Q Abnormal infinity Pin1 to Pin3 Normal pproximately 6 Q Abnormal infinity 203 F 95 C 5 9 ...

Page 47: ...EL button onthetouch pad twice Check thetouch pad LED assembly Check thattheDrain hose andDrain Pump Filter isclear of foreign objects andnotplugged Check Drain Pump Check theCCU CONTROL WON TACCEPT SELECTIONS 1 Press PAUSE CANCEL button onthetouch pad twice 2 Drain theunit thencheck thattheDrain hose andDrain Pump Filter isclear offoreign objects 3 Chect Replace Touch pad LED assembly 4 Check har...

Page 48: ...r Check WireHarness conneclions Check Drive belt Check Motor Control Unit WON TDRAIN 1 z 3 4 Check WireHarness connections Check Drain pump Check Drain pumpmotor Check thattheDrain hose andDrain Pump Filter isclear of foreign objects Check theCCU MACHINE VIBRATES i I z 3 Remove Shipping system Check installation Check leveling feet INCORRECT WATER TEMPERATURE 1 2 e 4 Check thattheInlet Hoses areco...

Page 49: ...thewater level canvaryfromL1to L3 Thepressure switch willfilltotheL1level then theflowmeter willallow anadditional 50 forL2andanadditional 150 from L1 totheL3 level Dispenser Box Thislinedescribes which portion ofthedispenser boxwillbeusedduring thecycle Inthis example onlytheMainWash mw andFabric Softener soft areused Otherportions ofthe dispenser boxare Prewash pw andBleach bleach Temp Fill Thew...

Page 50: ...illturnonanddrain thetubtolowest filllevel Suds Detect andthenrun foranadditional 15seconds Options 2nd rinse lf thisoptionis selected bytheconsumer thislineindicates whenit willoccur duringthemaincycleandit sduration 5 1 3 ...

Page 51: ...E E o I o c I o e j o o c 5 tr o 8 s o t c c E E I o a i l o l q l nl l o o l c o l 6 a l i r l a l 9 b l J I o o E c E rl urel le al JalBff iuoltdo o e ol a ol I o o o sl sf r ol q o o o ol o N 6l a o d o l f N N a o o o ol 6l 9 ol q o lll r I z 6 N r r O l T E t o Y 9 I t d l u 6 E s o a d E 6 Z E u J o Y 5 1 4 ...

Page 52: ...o c J G l l i I I E E C d c E e E a E E o o o o i 6 h x E o c c E C l c c i E o o c t ulursls UAUilru leAs lal9i 3uoltdo o E o z a o U o o o ol o r 6l l ci o o ol rf c ol a o d o ol o ol 6l a o d o 6l f ol ol a o o o ol 6l c ol a o Lll r O x z 6 o l r l 6 1 T rn l Y f E c u J t r o a d E Z E u J o Y ...

Page 53: ...u t o o a c C l t I i c E o a I a a q a t c o I o 0 t o d E _c E E c c I 6 E E c a t l o c a i a i x a c d c e c c c a c F 6J c o E J E o 3 E o ueueAou le el Jelel uolldo urilp o G 9 o 1t o o 6l c 6l q o d o ol t r ot a o d o ol ot ol q o o o N r 6l 6l i d d o ol ol D 6l a C lll o z 6 o l r l N T tr N Y f t c u J E O i i E Z E u J o Y 5 1 6 ...

Page 54: ... i E E ro o i 6 a c a E q c U o c o c til i il 3 E lli kti tt ID o o o o 0 E A tl 6 o i x v t E J x o o c g o E o u E a o a c c N ueuo oul le el luiel E o G 3 t c G c o G x o o 3 o tl o o 3 o o l o v ot a o o o l f a ol a o o o l o N a o o o ol r ol 6 ol s o d o ol ol a ol ci lll O x z 6 o l r v O l r tr Ol Y r f I c i u J E o e 6 Z E u J o v 5 1 7 ...

Page 55: ...l D J E l st E c t c c I E s R r s 4t t it v 6 c c E 6 o rl o o o c Y iaj E I n iE o 6 G I c c c o o a tl o c o h x v q x J x o q o o I o E o o J E c o 3 0 x 0 o c c q q o x o uaure our lo ol JAIe A uolldo o o N o c o ol a o o o l ol o ol a o o o 6l t a CD ol q o d o ol l ol o ol a o d o 6l ol r o ol R o ltJ O P e l r ol E E E o O K i E c d 3 fLl fr E F s t o i d E E 6 3 Z E u J o Y 5 1 8 ...

Page 56: ... n c o E E I 3 o o c E o c c N f f I J o c c al n g t c 5 c i t i J E I o o c 6 o lt r D J I c s c E s o o s E s E q a G o o a J c E t u I c c q a o o c c E g e I l u e t d o u G fi E n J I I l I I I o C 6 o a c t o c 3 E o c c c t a c U o c o G i E f E E a o o o o o o n a 3 E E o o a a o 0 o o l o c o i i 6 i x y r 9 b u 5 3 3 4 E o o a o J E J o c a 3 E o o c c o D la al JAle v o 9 o o o ol o a ...

Page 57: ...ft extract o i o o E peedlrpml n 3 1 n 0 31 0 0 3 1 0 2 1 0 600 eversrng n Xsec off ySec 0 1 5 30 5 1 5 30 5 0 0 t 1 n n 1 5 31 5 U 0 1 5 31 5 prncycle LS3 o B 9 1 Jisoenser box mw mw IW soft o E o ill cold warm taDcold tao cold tao cold warm tme 90sec 6 9min 3 min J mrn 3 mrn ioor croseo ctoseo croseo closed closed rump Lf 15s off on off on ofi on ofi on on o Zndrinse z J m t n 5 2 0 ...

Page 58: ...SpinCycleLS2 5 2 1 ...

Page 59: ...SpinCycleLS3 SpinCycleLS4 SpinCycleES 5 2 2 ...

Page 60: ... too u I l oort I r r Y l rnrrrH PAn onaa 1leo nsssrualv I I Y i HE22 l HEATING n f i l I RELAY I SUTCH i 9 i awtrcH DOORTOCK SWITCHASSEMBLY oL3 2 I I I i cf I v j l r or INTERLOCK SWITCH I DETERGENT DISPENSER TH2 1 l rH2 2t t PRESSURE swrrcH I r l w b rsq i 6 I I z a 5 1 enog oi lo_ i_ 6 i H_ i FLOVVT ETER 6 1 ...

Page 61: ...wercordfromtheoutlet 2 Remove thelowertoepanel 3 Reachupalongtheinside ofthefrontpanelandlocate thebottomofthedoorlatchassembly 4 Locatedon the bottomof thedoorlatchassemblyis a tear drop shapedtab 5 Gentlypullthetabdownabout q or unlila clickis heard 6 Thedoormaynowbe opened 7 1 ...

Page 62: ...Er TMTNATE AcctDENTs Y uO C r 4 1cLt 444 o laW illWl ...

Reviews: