background image

8

9

OPERATING YOUR STAND MIXER

SPEED CONTROL GUIDE

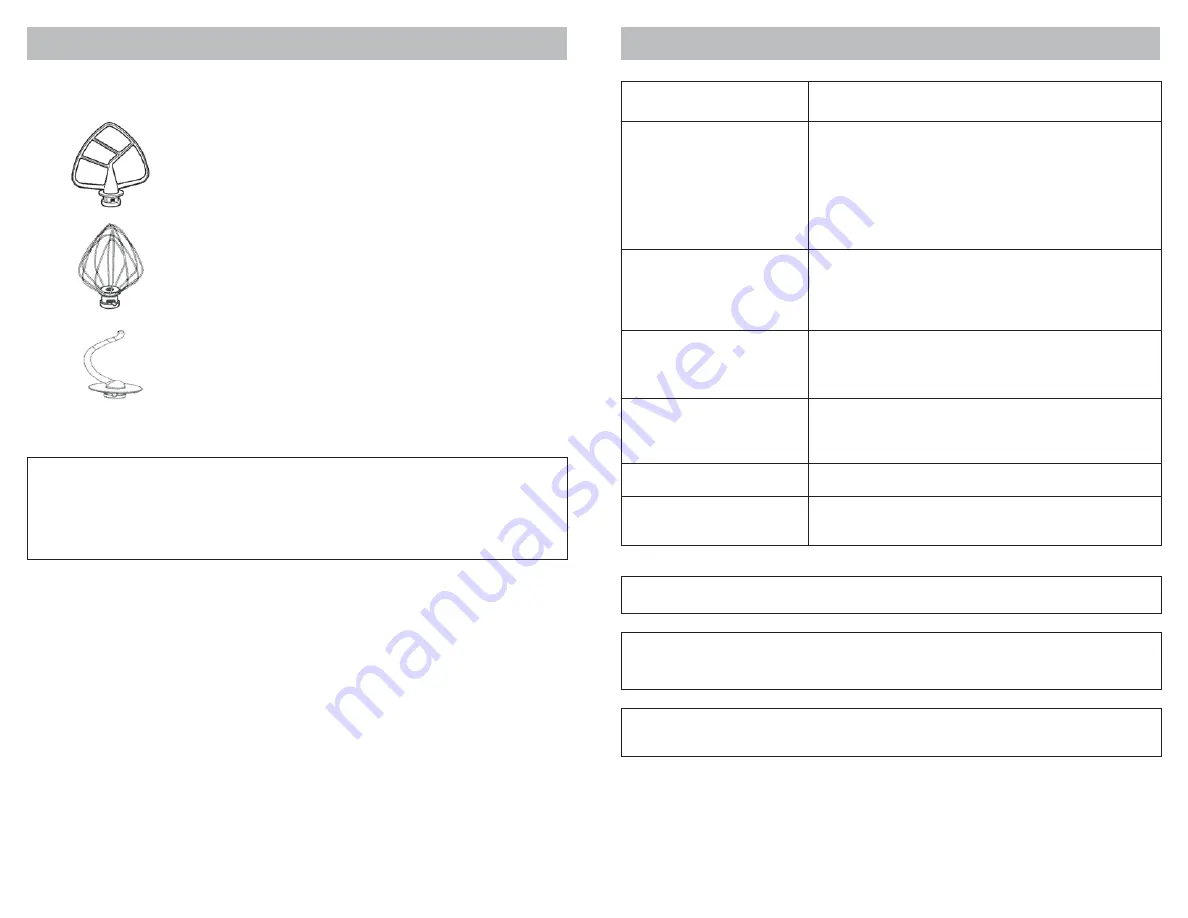
ATTACHMENTS AND THEIR USES

MIXING TIME

Your Bowl Lift Stand Mixer will mix faster and more thoroughly than most other electric Mixers. It 

is designed so that all the motion takes place in the Beaters / Attachments with the bowl staying 

stationary. Therefore, the mixing time in most traditional and non-packaged recipes should be 

adjusted to avoid overbeating. Cakes, for example, may need only half as much beating time as 

with other mixers.

MIXING HUB

Your Bowl Lift Stand Mixer comes with a built-in multipurpose Attachment Hub located in the 

front of the Motor Head. There are many attachments available for use with your Bowl Lift Stand 

Mixer. For more details, see ‘Attachments and Accessories’.

FLAT BEATER - For normal to heavy mixtures:

• cakes • cookies • quick breads

• creamed frostings  • pie pastry • meat loaf

• candies • biscuits • mashed potatoes

WIRE WHIP - For mixtures that need to have air incorporated:

• eggs • sponge cakes

• egg whites • angel food cakes

• heavy cream • mayonnaise

• boiled frostings • some candies

DOUGH HOOK - For mixing and kneading yeast doughs:

• breads 

• coffee cakes

• rolls 

• buns

NOTE

Do not scrape frequently the Bowl while the Stand Mixer is operating. The Bowl and Beater 

are designed to provide thorough mixing without frequent scraping. Scraping the Bowl 

once or twice during mixing is usually sufficient. Turn Off the Mixer before thoroughly 

scraping the bowl.

Number on Speed Knob

Pulse

2 Slow Mixing

4 Mixing, Beating

6 Beating, Creaming

8 Fast Beating, Whipping

10 Fast Whipping

For slow, short stirring, combining, mashing, starting all 
mixing procedures. The 1 speed on the knob is the only 
speed in which the Pulse Mode will work. While on setting 
1, press in on the center of the Speed Control Knob for 
Pulse mode. Use to add flour and dry ingredients to batter, 
add liquids to dry ingredients, and combine heavy 
mixtures.

For slow mixing, mashing, faster stirring. Use to mix heavy 
batters and candies, start mashing potatoes or other 
vegetables, cut shortening into flour, mix thin or splashy 
batters, and mix and knead yeast dough.

For mixing semi-heavy batter, such as cookies. Use to 
combine sugar and shortening and to add sugar to egg 
whites for meringues. Medium speed for cake mixes.

For medium fast beating (creaming) or whipping. Use to 
finish mixing cake, doughnut, and other batters. High 
speed for cake mixes.

For whipping cream, egg whites, and boiled frostings.

For whipping small amounts of cream or egg whites.

NOTE : Mixer may not maintain fast speeds under heavy load. This is normal.

NOTE : The Speed Control Knob can be set between the speeds listed in the above

chart to obtain speeds 3, 5, 7 and 9, if a finer adjustment is required.

NOTE : Do not exceed Speed 2 when preparing yeast dough.

This could damage the Mixer.

Summary of Contents for KKESM600M

Page 1: ...t d entretien conformément aux instructions fournies AVEC PREUVE DE VENTE ORIGINALE un appareil défectueux sera remplacé gratuitement Le nom de marque Kenmore est utilisé sous licence Adressez toutes les réclamations pour le service de garantie à Koolatron Corporation appeler 1 800 265 8456 ou envoyer un e mail à service koolatron com Cette garantie est nulle si cet appareil est utilisé à des fins...

Page 2: ...faces 10 Remove mixing bowl and flat beater wire whip or dough hook from Stand Mixer before washing them 11 DO NOT use this appliance for anything other than its intended use 12 To protect against electrical shock this appliance is equipped with a cord having a 3 prong grounding type plug for insertion into a proper grounding type receptacle DO NOT alter the plug for use in a 2 prong receptacle If...

Page 3: ...t on the Mixer Fig 4 5 Raise the Bowl Lift Handle up into the Locked position fig 5 TO ATTACH FLAT BEATER WIRE WHIP OR DOUGH HOOK 1 Turn Speed Control Knob to OFF 2 Unplug Stand Mixer or disconnect power 3 Place Bowl Lift Handle in down position 4 Align slot at the top of Beater Attachment with pin on Mixer Head s shaft Push Beater Attachment up onto shaft and turn counterclockwise until pin moves...

Page 4: ...n the Speed Control Knob to OFF and the message will clear WORK LIGHT AND POWER INDICATOR LIGHT When the Mixer is plugged in and turned ON a blue LED Light encircling the Speed Knob comes on A Work Light also comes on to illuminate the work area above the bowl When you turn the Mixer OFF the blue LED Light around the Speed Knob goes out The Work Light stays on for 3 minutes then shuts off NOTE LCD...

Page 5: ...ping Scraping the Bowl once or twice during mixing is usually sufficient Turn Off the Mixer before thoroughly scraping the bowl Number on Speed Knob Pulse 2 Slow Mixing 4 Mixing Beating 6 Beating Creaming 8 Fast Beating Whipping 10 Fast Whipping For slow short stirring combining mashing starting all mixing procedures The 1 speed on the knob is the only speed in which the Pulse Mode will work While...

Page 6: ...ase mixer speed only after the mixture has thickened Always unplug Stand Mixer before cleaning Do not immerse Mixer in water The exterior of the Mixer should only be cleaned with a soft damp cloth Beaters Attachments and Bowls should be washed as soon as possible after use to keep food from drying on them Any other servicing should be performed by an authorized service representative WARNING Injur...

Page 7: ...er les surfaces chaudes 10 Retirez le bol à mélanger et le batteur plat le fouet métallique ou le crochet pétrisseur du batteur sur socle avant de les laver 11 N UTILISEZ cet appareil qu aux fins pour lesquelles il est prévu 12 Cet appareil est équipé d un cordon muni d une fiche de mise à la terre à 3 broches pour l insertion dans une prise de mise à la terre appropriée à des fins de protection c...

Page 8: ...OCLE FIXATION DU BATTEUR PLAT DU FOUET MÉTALLIQUE OU DU CROCHET PÉTRISSEUR 1 Tournez le bouton de commande vers la position d arrêt 2 Débrancher le batteur sur socle ou déconnecter la source de courant électrique 3 Placez la manette lève bol en position basse 4 Alignez la fente en haut de l accessoire avec la broche sur l arbre de la tête du batteur Poussez l accessoire sur l arbre et tournez le d...

Page 9: ...sition d arrêt et le message disparaîtra LAMPE DE TRAVAIL ET VOYANT D ALIMENTATION Lorsque le batteur est branché et allumé un voyant DEL bleu entourant le bouton de commande de vitesse s allume Une lampe de travail est également allumée pour éclairer la zone de travail au dessus du bol Lorsque vous éteignez le batteur le voyant DEL bleu autour du bouton de vitesse s éteint La lampe de travail res...

Page 10: ...tesse Pulse impulsion 2 Mélanger lentement 4 Mélanger battre 6 Battre réduire en crème 8 Battre fouetter rapidement 10 Fouetter rapidement Pour remuer lentement et de courte durée combiner écraser les ingrédients et commencer toutes les procédures de mélange La vitesse 1 sur le bouton est la seule vitesse à laquelle le mode Impulsion fonctionnera Pendant le réglage 1 appuyez au centre du bouton de...

Page 11: ...ssi Débranchez toujours le batteur sur socle avant de le nettoyer N immergez pas le batteur sur socle dans l eau L extérieur du batteur sur socle peut être nettoyé avec un linge doux et humide Les batteurs les accessoires et les bols doivent être lavés dès que possible après utilisation pour éviter que les aliments ne sèchent dessus Toute intervention de dépannage doit être effectuée par un dépann...

Page 12: ...zón de fuente que se mezcla y batidor azote del alambre o gancho plano de la pasta de mezclador del soporte antes de lavarlas 11 No utilice esta aplicación para cualquier cosa con excepción de su uso previsto 12 Para proteger contra descarga eléctrica este aparato se equipa de una cuerda que tiene un enchufe tipo de poner a tierra de tres dientes para la inserción en un receptáculo tipo poner a ti...

Page 13: ...EL BATIDOR PLANO ALAMBRE DE BATIR O GANCHO DE PASTA 1 Gire la perilla de control de velocidad a APAGADO 2 Desenchufe el Mezclador del soporte o desconecte la energia 3 Coloque la manija de elevación del tazón en la posición de abajo 4 Alinee la ranura en la cima del batidor accesorio con el perme en el eje de la cabeza del mezclador Empuje el batidor accesorio arriba sobre el eje y gire a la izqui...

Page 14: ...y se enciende el mezclador una luz azul del LED que encircula la perilla de velocidad se enciende Una luz del trabajo también se enciende para iluminar el Área de trabajo sobre el tazón Cuando usted apaga el Mezclador la luz azul del LED alrededor de la perilla de velocidad se apaga La luz del trabajo permanece encendido por 3 minutos y después se apaga NOTA La pantalla LCD permanece encendida sie...

Page 15: ...el tazón una vez o durante mezclarse dos veces es generalmente suficiente Gire el mezclador a O antes de raspar a rondo el tazón Número en perilla de velocidad Pulso 2 Mezclar lento 4 Mezclar batiendo 6 Batir cremar 8 Batir rápido batir 10 Batir rápido Para el revolvimiento lento corto combinando triturando comenzando todos los procedimientos de mezclar La velocidad en la perilla es la Única veloc...

Page 16: ... el mezclador parado antes de limpiar No sumerja el mezclador en agua El exterior del mezclador se debe limpiar solamente con un paso húmedo suave Los batidores accesorios y las vasijas deben ser cuanto antes lavado después de uso para guardar el alimento secarse en ellos Cualquier otro servicio debe ser realizado por y representante de servicio autorizado ADVERTENCIA Peligro de Lesión Desenchufe ...

Reviews: