background image

English

Directions for use 

In the following, you will find all the important 
information for the use of your appliance. 
The instructions for use apply to several models, which 
is why details of the information  may differ according to 
the  type of the appliance. 

Installation (Choice of position for installation)  

Strictly avoid high ambient temperatures and direct 
sunlight. We advise you to place your appliance in a 
cool, well aired, dry room. Installation in the immediate 
vicinity of a heat source (heating, oven etc.) is highly 
inappropriate (increased compressor performance 
would be necessary and, as a result, power 
consumption would be considerably higher). 

If the installation near a heat source cannot be avoided, 
a suitable insulation plate must be fitted between the 
appliance and the heat source (do not use asbestos), or 
the following minimum distances must be observed: 

„

from gas or electric cooker 


3  cm

„

from radiator or oven          


5  cm

„

from a wall, piece of furniture or  


another appliance       


2  cm

Never obstruct the ventilation grille 

Larger chest freezers are equipped with a ventilation 
grille (F) located below on one side. These appliances 
can be placed directly against a wall or a piece of 
furniture but not with the side protected with the 
ventilation grille.  

Freezers without ventilation grille  

Leave sufficient space between the rear of the 
appliance and the wall to ensure that outward flow of 
warm air is able to escape.  

The appliance must be placed horizontally and on a 
levelled base. Only this way can an  impeded circuit of 
the refrigerant and optimum function be ensured.

IMPORTANT! 

Leave the appliance stand in  the final position for 
at least 2 hours before switching it on, so that the 
refrigerant circuit stabilises and no operating 
problems occur.  

The odour which is typical of all new appliances is easy 
to remove.  
Thoroughly clean the interior compartment with a 
mixture of 

lukewarm water and vinegar

.

Do not use washing liquids, sharp or granular 
cleaning implements, or any cleaning products 
containing soda. 

Before connecting the appliance, make sure that the 
inner area – especially the corners – is absolutely dry. 

Danger warning 

Depending on its composition, the refrigerant is easily 
inflammable. The refrigerant circuit is hermetically 
sealed and the 

density

 has been subject to repeated 

tests.
An improper intervention can cause acute fire hazard.  

Instruction for use 

Omit any mechanical influence on the  cooling system, 
especially on the following accessible parts in the 
compressor chamber 

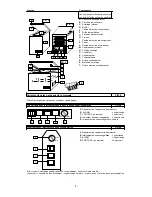
(L)

:

„

Rear wall condenser or skin condenser (R) 

„

Compressor (P) 

(motor)

„

Capillary tube (Q) 

„

Drying filter (N) 

Interventions on the cooling system must be carried out 
by professional and authorised personnel only. 

IMPORTANT! 

Escaping refrigerant can injure your eyes. 
In the event of eye contact with the refrigerant, wash 
your eyes instantly under plenty of running water and 
call/consult an eye specialist immediately.  

2 Rating 

plate 

The rating plate (with technical data) is located on the
housing (D) at the rear of the appliance. 

Take a note of the technical data 

Copy the technical data from the rating plate to here so
that it is at any time readily available, without having to
move the appliance

Model/Type …………….………………………… 

Net capacity

………………….……………litres

Operating voltage ………………….……...…...V-50Hz
Maximum absorbed power(W)..……………….Watt
Safety (A)  ……………….....………………......Amp
Power consumption………………………….....kWh/24h
Freezing capacity…………………………….....kg/24h

Connection to power supply 

Your appliance must be connected to a power socked 
with grounded connection, which is conform to the 
respective standards and has been installed by an 
authorised specialist. 
Before you connect the plug of the appliance with the 
power socket, make absolutely sure that 
the voltage (V) on the appliance’s data-plate 
corresponds with that of your mains. 
If the voltage differs, notify the after-sales-service or 
your dealer immediately, and do not on any account 
connect the appliance to the mains. 

4

temperature selection 

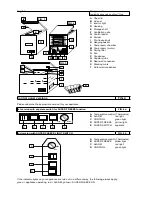
(Thermostat) (FIG.4) 

To prevent temperature being accidentally modified, the 
control is intentionally resistant to turning. To vary the 
setting, we recommend to use a coin or screwdriver. 

To switch on: 

Turn the control to the right 

adjust temperature to the level you require, between: 

-

Min.

(slight cooling) and 

-

max

. (lowest temperature) 

2

Summary of Contents for BD-103GAA KX

Page 1: ...B Bedienungsanleitung Gefriertruh D Instructions pour l emploi Gong lateur coffre F Istruzioni per l uso Congelatore orizzontale I Instrucciones de uso Congelador E Manual de instru es Arca congelador...

Page 2: ......

Page 3: ......

Page 4: ...1...

Page 5: ...2...

Page 6: ...3...

Page 7: ...4...

Page 8: ...5...

Page 9: ...6...

Page 10: ...7...

Page 11: ...8...

Page 12: ...9...

Page 13: ...1...

Page 14: ...containing soda Before connecting the appliance make sure that the inner area especially the corners is absolutely dry Danger warning Depending on its composition the refrigerant is easily inflammable...

Page 15: ...ixture of lukewarm water and vinegar and dry thoroughly with a cloth 5 Close the appliance 6 Insert the plug in the socket 7 Switch on the appliance by turning the temperature control FIG 4 to the rig...

Page 16: ...oduct and its packaging Therefore strictly observe the producer s instructions on the packaging For fresh food that you like to deep freeze consult the storage table at the back of this user manual Af...

Page 17: ...5...

Page 18: ...n the chest is closed lift the chest for a brief moment and then put it back down to its original position After 2 hours put the plug back in Do not open the chest during this period and a further 12...

Page 19: ...abbit Aluminium foil z Lamb Aluminium foil z Mushrooms Polyethylene freezer bag z Asparagus Polyethylene freezer bag z Vegetables cut Polyethylene freezer bag z Strawberries Polyethylene freezer bag z...

Page 20: ...sion for your appliance 1st version with separate switch for SUPER FREEZE function FIG 4a A Temperature control Thermostat B ALARM red light C CONTROL green light D SUPER FREEZE yellow light E SUPER S...

Page 21: ...1...

Page 22: ...ec notamment dans les coins Avertissements concernant la s curit Suivant sa composition le r frig rant s av re facilement inflammable Le circuit du r frig rant est tanche et sa densit a t v rifi e plu...

Page 23: ...teur de temp rature sur la droite FIG 4 tourner d abord le r gulateur l extr me droite en position maximale Les voyants vert et rouge s allument 8 S il y en a un enclencher l interrupteur de SUPER CON...

Page 24: ...10h Un quart plein ou moins Bas Sur 8h 10 Dur e de conservation La dur e de conservation des produits pr congel s diff re beaucoup selon le type d aliment et sa composition ce propos respecter les in...

Page 25: ...5...

Page 26: ...6...

Page 27: ...ier d aluminium z Agneau Papier d aluminium z Champignons Sachet de cong lation en poly thyl ne z Asperges Sachet de cong lation en poly thyl ne z L gumes coup s Sachet de cong lation en poly thyl ne...

Page 28: ...iantes concernant votre appareil 1 re variante avec interrupteur s par pour fonction super cong lation FIG 4a A R gulateur de temp rature thermostat B ALARM Voyant rouge C CONTROL en marche Voyant ver...

Page 29: ...1...

Page 30: ...bonato di sodio Prima del collegamento dell apparecchio il vano interno deve essere completamento secco soprattutto negli angoli Avvertenze di sicurezza A seconda della composizione del gas refrigeran...

Page 31: ...nel vano compressore se presenti 3 Rimuovere dal vano interno dell apparecchio tutta la documentazione e gli accessori eventualmente presenti 4 Pulire il vano interno con acqua tiepida addizionata di...

Page 32: ...zza massima di caricamento Per garantire una conservazione ottimale dei prodotti congelati si consiglia di non riempire mai il vano di congelamento E fino al margine superiore Tra il coperchio ed i pr...

Page 33: ...5...

Page 34: ...parecchio consente un tempo di conservazione di 10 12 ore dall insorgere dell anomalia Negli apparecchi dotati di isolamenti maggiori il tempo di conservazione risulta prolungato Richiedete al Vostro...

Page 35: ...Coniglio Foglio d alluminio z Carne d agnello Foglio d alluminio z Funghi Sacchetto in polietilene z Asparagi Sacchetto in polietilene z Verdure tagliate Sacchetto in polietilene z Fragole Sacchetto...

Page 36: ...i segnare le varianti pertinenti al Vostro apparecchio 1 variante con interruttore separato per funzione di supercongelamento FIG 4a A Regolatore della temperatura termostato B ALARME Spia rossa C CON...

Page 37: ...1...

Page 38: ...r totalmente seco Aviso de peligro Dada la composici n del l quido refrigerante ste puede resultar ligeramente inflamable La circulaci n del l quido refrigerante est herm ticamente cerrada y la densid...

Page 39: ...ja as se enfriar adecuadamente el compartimento interior 10 Entonces puede llenarlo con la cantidad que desee de alimentos de congelaci n r pida art culos comprados ya congelados V ase el siguiente ca...

Page 40: ...lo sumo dentro de un plazo de 24 horas 11 Medidas de seguridad e indicaciones Desconecte la clavija de conexi n cada vez que vaya a limpiar o descongelar Despu s de haber cerrado la puerta del arc n n...

Page 41: ...5...

Page 42: ...el arc n cerrado desenchufe vuelque a un lado el arc n por poco tiempo y vuelva a colocarlo en su posici n normal Despu s de 2 horas vuelva a conectar el enchufe No abra el arc n durante este tiempo...

Page 43: ...buey Papel de aluminio z Conejo Papel de aluminio z Cordero Papel de aluminio z Setas Bolsa polietileno congelaci n z Esp rragos Bolsa polietileno congelaci n z Verduras cortadas Bolsa polietileno co...

Page 44: ...para su aparato la variante correspondiente 1 Variante con interruptor separado para la funci n de SUPERCONGELACI N FIG 4a A Regulador de temperatura termostato B ALARMA luz roja C CONTROL en uso luz...

Page 45: ...1...

Page 46: ...ntes da loi a ou detergentes fortes abrasivos nem produtos que contenham bicarbonatos Antes de ligar o aparelho o interior dever estar seco principalmente nos cantos Manual de instru es Indica es de p...

Page 47: ...e desliga automaticamente quando ligar o BOT O DE REFRIGERA O R PIDA 7 Colocar em funcionamento 1 Desempacotar completamente o aparelho 2 Tirar os elementos em esferovite da c mara do compressor quand...

Page 48: ...abastecimento de alimentos frescos que poder reabastecer o seu aparelho com quantidades adequadas XX kg 24h capacidade de congela o do mesmo N o ultrapassar a altura m xima de empilhamento Manual de...

Page 49: ...5...

Page 50: ...esse motivo pedimos que compreenda que reservamos o direito de proceder a altera es na forma no equipamento e nos aspectos t cnicos 6 Manual de instru es 18 O que fazer quando a Nenhuma fun o aparelh...

Page 51: ...olha de alum nio z Carne de carneiro Folha de alum nio z Cogumelos Saco de congela o de polietileno z Asp ragos Saco de congela o de polietileno z Legumes cortados Saco de congela o de polietileno z M...

Page 52: ...e a variante correspondente ao seu aparelho 1 Variante com bot o para fun o de congela o r pida em separado FIG 4a A Regulador da temperatura Term stato B ALARME vermelha C CONTROLO a funcionar verde...

Page 53: ...1...

Page 54: ...oordat het apparaat wordt aangesloten moet de binnenzijde vooral in de hoeken volledig droog zijn Mogelijke gevaren Het koelmiddel is al naar gelang de samenstelling licht ontvlambaar Het koelmiddelci...

Page 55: ...nnenzijde reinigen met een lauwwarme oplossing van azijn in water en met een doek volledig droog vegen 5 Apparaat sluiten 6 Stekker in stopcontact steken 7 Apparaat inschakelen door de temperatuurrege...

Page 56: ...apparaat Bij normale omgevingstemperatuur 18 tot 22 C raden wij de volgende instellingen van de temperatuur aan voor een minimaal stroomverbruik vullingsgraad merkstreep instelling vol bovenste richti...

Page 57: ...5...

Page 58: ...m de storing op te heffen Breng zonodig de producten over in een andere vrieskist bijvoorbeeld bij de buren b Apparaat koelt niet voldoende Invriezen duurt te lang Compressor draait te vaak Mogelijke...

Page 59: ...miniumfolie z Haas Aluminiumfolie z Lamsvlees Aluminiumfolie z Paddestoelen Polyethyleen vrieszakje z Asperges Polyethyleen vrieszakje z Groente gesneden Polyethyleen vrieszakje z Aardbeien Polyethyle...

Page 60: ...t welk bedieningspaneel uw apparaat is uitgerust 1 Uitvoering met aparte schakelaar voor supervries stand FIG 4a A temperatuurregelaar thermostaat B ALARM rode lamp C CONTROL in bedrijf groene lamp D...

Page 61: ......
Reviews: