background image

4

 OPERATION

    WARNING: DO NOT USE THIS MACHINE ON A
FLOOR WITH DAMAGED OR LOOSE TILES, THIS
MAY RESULT IN ADDITIONAL DAMAGE TO THE
FLOOR OR BODILY INJURY.

Before starting, sweep the area to reduce the chance

of marking the floor.  Install the desired pad. See “PAD
INSTALLATION”.  For effective long burnishing use, be-
gin with fully charged batteries and a clean dust bag.

Begin by setting the speed of the machine to the slow-

est setting by turning the traverse speed knob fully clock-
wise.  Next, turn the pad pressure adjustment knob in
the “-” direction (clockwise) until it stops.  Now turn it in
the “+” direction (counterclockwise) for eight turns.  This
will set the pad pressure at its middle setting.  Toggle
the master switch to the “ON” position.  Now toggle the
vacuum switch to the “ON” position, then toggle the pad
lift switch to the “DOWN” or “ON” position.

To start the machine moving forward and turn on the

pad drive motor, push forward on the control handles.

NOTE: There is a switch on the pad head. It does not

allow the pad drive motor to turn on without the pad head
being one inch or less off the ground while the drive
control handles are engaged.

The pad pressure may need to be adjusted to the con-

dition of the floor. See “PAD PRESSURE ADJUSTMENT
KNOB”.

CAUTION: Too much pressure may damage floor

or overload the pad drive motor.

The desired forward speed can be adjusted by turning

the traverse speed knob. See “TRAVERSE SPEED”.

To stop forward motion and the pad from rotating, move

the control handles to the center (neutral) position.  Dy-
namic braking helps to stop the machine from coasting
forward when the drive control is disengaged.

To move the machine backwards, pull on the control

handles.

CAUTION: When moving backwards neither the

machine drive motor or dynamic braking assists in
moving or stopping the machine  .

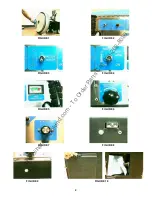
DUST BAG  (Figure 10)
The dust created by machine operation is collected in

a recovery bag located at the rear of the machine.  Flip
both latches and remove door to access the bag.

BATTERY CHARGING
Read and understand the charger manufacturer’s

instructions before using.

The machine’s master switch should be in the OFF

position before and during recharging.  Lift the hood to
allow ventilation to the battery compartment and do not
close during charging operation.

The machine’s charger plug is mounted on the rear of

the machine.  Firmly connect the charger’s mating plug
into the charger plug of the machine.

DANGER

HYDROGEN GAS IS FORMED WHEN THE BATTER-
IES APPROACH FULL CHARGE. THIS GAS IS
EXPLOSIVE; AVOID ANY OPEN FLAME OR ELEC-
TRIC SPARK NEAR BATTERIES. NEVER CONNECT
OR DISCONNECT CHARGER WHILE CHARGING.
AVOID ACCUMULATION OF GAS, BE SURE THE
BATTERIES RECEIVE GOOD AIR CIRCULATION
WHILE BEING CHARGED BY HAVING THE MA-
CHINE IN A WELL VENTILATED AREA.

CLEAN UP AND STORAGE

Store the machine in a cool dry place.
Avoid prolonged exposure of machine to freezing tem-

peratures during storage or transporting.

MAINTENANCE

DAILY
ˇ Check and replace pads as needed
ˇ Check and replace the dust bag as needed
ˇ Check and charge the batteries

BATTERY CARE
1. Keep water  level in cells above the plates. Check

daily - if cells need water, use only distilled or approved
water.

2. Keep batteries fully charged when not in use.
3. Keep batteries and terminals clean. When neces-

sary, clean the terminals with a baking soda solution,
then coat them with grease to retard corrosion.

CHANGE PAD MOTOR BRUSHES  (Figure 11)
This light illuminates when the pad drive motor’s

brushes need to be replaced.  Contact the dealer from
which the machine was purchased or an authorized ser-
vice station for service.

https://harrissupplyind.com - To Order Parts Call 608-268-8080

Summary of Contents for SelectGloss KF-2019B

Page 1: ... ENTREIEN DES SOLS MAQUINAS PARA EL SUELO OWNER S MANUAL FOR COMMERCIAL USE ONLY MANUEL D UTILISATION A USAGE INDUSTRIEL EXCLUSIVEMENT MANUAL DEL PROPIETARIO PARA USO COMERCIAL SOLAMENTE h t t p s h a r r i s s u p p l y i n d c o m T o O r d e r P a r t s C a l l 6 0 8 2 6 8 8 0 8 0 ...

Page 2: ... PRÉPARATION 6 MODE D EMPLOI 7 NETTOYAGE ET STOCKAGE 7 ENTRETIEN 7 IDENTIFICATION DU PRODUIT 8 SOLUTIONS AUX PROBLÈMES 8 ACCESSOIRES EN OPTION 8 ESPAÑOL INSTRUCCIONES DE SEGURIDAD 9 DESEMBALAJE Y PREPARACIÓN 9 PREPARACIÓN 9 OPERACIÓN 10 LIMPIEZA Y ALMACENAMIENTO 10 MANTENIMIENTO 10 IDENTIFICACIÓN DE PRODUCTO 11 GUÍA PARA ENCONTRAR AVERÍAS 11 ACCESORIOS OPCIONALES 11 h t t p s h a r r i s s u p p l...

Page 3: ...2 FIGURE 2 FIGURE 1 FIGURE 4 FIGURE 3 FIGURE 6 FIGURE 5 FIGURE 8 FIGURE 7 FIGURE 9 FIGURE 10 h t t p s h a r r i s s u p p l y i n d c o m T o O r d e r P a r t s C a l l 6 0 8 2 6 8 8 0 8 0 ...

Page 4: ...mic braking system from a po tential short circuit SAFETY INSTRUCTIONS READ ALL INSTRUCTIONS BEFORE USING When using an electrical appliance basic precautions should always be followed including the following WARNING Failure to follow these safety instructions could result in damage to the machine damage to prop erty or bodily injury fl Use machine only as described in this manual Do not use in wa...

Page 5: ...or or dynamic braking assists in moving or stopping the machine DUST BAG Figure 10 The dust created by machine operation is collected in a recovery bag located at the rear of the machine Flip both latches and remove door to access the bag BATTERY CHARGING Read and understand the charger manufacturer s instructions before using The machine s master switch should be in the OFF position before and du...

Page 6: ...ce if worn or damaged 2 Reinstall pad make sure it is centered on the padholder 1 Reset by pushing circuit breaker button 2 Reduce pad pressure using adjustment knob 3 Raise the pad head and clean the pad 4 Contact the dealer from which the machine was purchased or an autho rized service center 1 Contact the dealer from which the machine was purchased or an autho rized service center CAUSE 1 Batte...

Page 7: ...le CONSERVEZ CES INSTRUCTIONS DEBALLAGE ET ASSEMBLAGE Inspectez soigneusement tous les composants pour vous assurer qu ils n ont pas été endommagés pendant le transport S ils ont été endommagés faites immédiatement une déclaration que vous remettrez au transporteur Mettez les batteries et les câbles en place comme indiqué sur le SCHEMA DE CABLAGE DES BATTERIES qui se trouve à l intérieur de l appa...

Page 8: ... arrêt SAC A POUSSIERE Figure 10 La poussiére produite par le fonctionnement de l appareil est recueillie dans un sac à poussiére placé à l arriére de l appareil Basculez les deux verrous et retirez la porte pour accéder à ce sac RECHARGE DES BATTERIES Lisez et veillez à bien comprendre les instructions du fabricant du chargeur avant de vous servir de celui ci L interrupteur général de l appareil ...

Page 9: ...nce 4 Placez les poignées de commande en position de marche avant ou arriére 1 Relevez la tét de tampon et nettoyez celui ci 2 Remplacez le tampon 1 Rechargez les batteries à fond avant de com mencer 2 Nettoyage en profondeur 3 Remplacez la batterie défectueuse 1 Vérifiez le tampon et remplacez le s il est usé ou endommagé 2 Remettez le tampon en place en veillant à ce qu il soit centré sur son su...

Page 10: ...escubren daños envíe inmediatamente un Informe de daños a la compañía de transporte Instale las baterías y los cables según se indica en el DIAGRAMA DE CONEXIONES DE LA BATERÍA ubicado dentro de la máquina en la cubierta PREPARACIÓN ADVERTENCIA ANTES DE EFECTUAR CUALQUIER TAREA DE SERVICIO ASEGÚRESE DE QUE LA MÁQUINA ESTÉ APAGADA Y QUE EL CARGADOR DE BATERÍAS ESTÉ DESCONECTADO INSTALACIÓN DE LA AL...

Page 11: ...ico contribuye a mover o detener la máquina BOLSA PARA EL POLVO Figura 10 El polvo producido por la operación de la máquina se acumula en una bolsa ubicada en la parte trasera de la máquina Desconecte los enganches y quite la puerta para poder tener acceso a la bolsa CARGA DE LAS BATERÍAS Asegúrese de leer y entender las instrucciones del fabricante del cargador antes de utilizarlo El interruptor ...

Page 12: ...uebe la almohadilla y reemplácela si está desgastada o dañada 2 Vuelva a instalar la almohadilla asegúrese de que esté centrada en el portador 1 Reajuste pulsando el botón del disyuntor 2 Reduzca la presión de la almohadilla usando la perilla de ajuste 3 Suba la cabeza de la almohadilla y limpie la almohadilla 4 Póngase en contacto con el distribuidor al que compró la máquina o con un centro de se...

Reviews: