background image

6

C-BX3

About measures to prevent falling 
down and toppling over

Be sure to take measures to prevent falling down and toppling over 

• 

due to earthquakes (for both the system and the device placed on 
the system).
The effectiveness of measures to prevent falling down and toppling 

• 

over may be decreased depending on the strength of the wall. In such 
cases, reinforce the measures appropriately.
The measures to prevent falling down and toppling over are intended 

• 

for reducing the risk of injury, but may not be effective for all 
earthquakes.

To prevent the system from falling dawn 
and toppling over

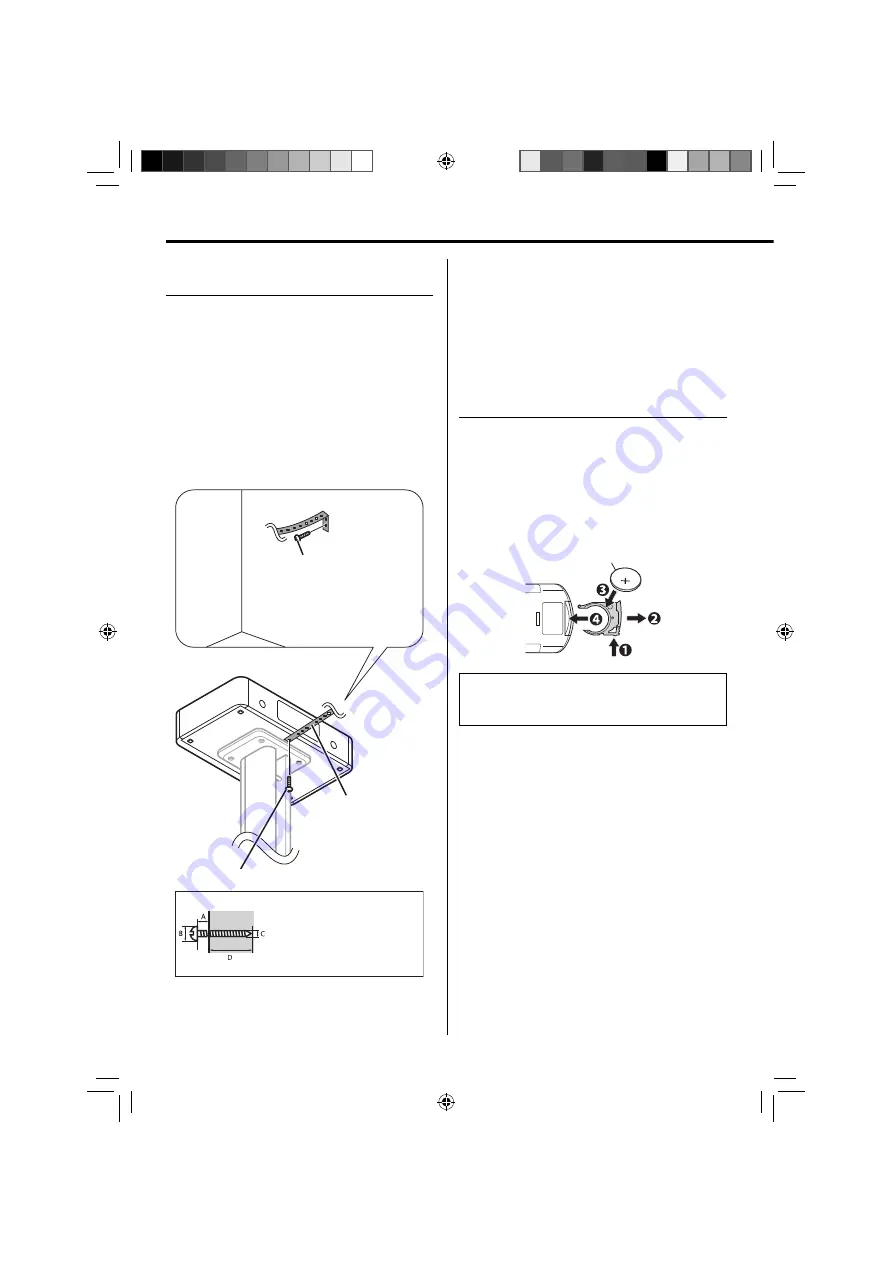
Use the supplied strap band to fix the system to the wall.

Screw (not supplied)
See the illustration below for the size 
of this screw.

A: 2-3 mm
B: Minimum 

φ

11 mm 

(screw head diameter)

C: 

φ

4 mm (screw diameter)

D: Minimum 20 mm

(Wall)

Screw (M5 × 10 mm) (supplied)

Rear side (Main unit)

Strap band (supplied)

To prevent the TV from falling down or 
toppling over

When you place a TV on the system, see the instructions supplied for 
your TV and fix the TV to the wall. Do not fix the TV to the system.

When you fix your TV to the wall, use appropriate screws, string or 

• 

chains separately purchased and suitable for the quality of the wall.
The wall should have sufficient strength to fix your TV. Consult the 

• 

contractor of the structure regarding the strength of the wall.

Preparing the remote control

When you use the remote control for the first time, pull out the 
insulation sheet.
If the range or effectiveness of the remote control decreases, replace 

the battery.

To replace the battery in the remote control

Insert the battery into the remote control by matching the polarities 
(+ and –) correctly.

¤ 

CAUTION

Danger of explosion if battery is incorrectly replaced.
Replace only with the same or equivalent type.

Store the battery in a place where children cannot reach. If a child 

• 

accidentally swallows the battery, consult a doctor immediately.
To prevent the battery from overheating, cracking, or starting a fire:

• 

Do not recharge, short, disassemble or heat the battery, or dispose 


of it in a fire.
Do not leave the battery with other metallic materials.


Wrap the battery with tape and insulate when throwing away or 


saving it.
Do not poke the battery with tweezers or similar tools.


Dispose of the battery in the proper manner, according to federal, state, 

• 

and local regulations.

Lithium coin battery
(product number: CR2025)

Getting started 

(continued)

EN_C-BX3[E]f.indd   6

EN_C-BX3[E]f.indd   6

7/4/12   9:44:42 AM

7/4/12   9:44:42 AM

Summary of Contents for C-BX3-B

Page 1: ...GVT0349 001A E 2012 JVC KENWOOD Corporation COMPACT HI FI COMPONENT SYSTEM C BX3 INSTRUCTION MANUAL Glass inside EN_C BX3 E f indd 1 EN_C BX3 E f indd 1 7 13 12 11 24 37 AM 7 13 12 11 24 37 AM ...

Page 2: ... edge of the apparatus otherwise the apparatus may topple over or break and injury may result Do not apply strong force or hit a hard material on the top glass The top glass is made of tempered glass However incorrect usage may result in the glass being broken and injury may result Do not scratch the glass with a sharp material If a scratch remains on the tempered glass for a long period the glass...

Page 3: ...at have adopted separate waste collection systems Products and batteries with the symbol crossed out wheeled bin cannot be disposed as household waste Old electrical and electronic equipment and batteries should be recycled at a facility capable of handling these items and their waste byproducts Contact your local authority for details in locating a recycle facility nearest to you Proper recycling...

Page 4: ...ight excessive dust or vibration Install the System in a location with adequate ventilation to prevent internal heat buildup Power cord Do not handle the power cord with wet hands A small amount of power is always consumed while the power cord is connected to the wall outlet Do not pull on the cord to unplug the power cord When unplugging the power cord always grasp and pull the plug so as not to ...

Page 5: ...r details refer to Connecting the DC power cord Getting started DO NOT connect the power cord until all other connections have been made Unpacking and assembling the system For details refer to How to assemble the system on a separate manual Placing the system Be careful of the following when placing the system Leave 10 cm or more space between the rear of the system and the wall Place the system ...

Page 6: ...chains separately purchased and suitable for the quality of the wall The wall should have sufficient strength to fix your TV Consult the contractor of the structure regarding the strength of the wall Preparing the remote control When you use the remote control for the first time pull out the insulation sheet If the range or effectiveness of the remote control decreases replace the battery To repla...

Page 7: ...ll Core filter small Setting the video output While the source is selected to IPOD and iPod is not connected to the unit Press and hold iPod 6 main unit Each time you press and hold the button VIDEO OFF and VIDEO ON scroll on the display VIDEO OFF The video picture from iPod is shown on iPod itself VIDEO ON The video picture from iPod is shown on the TV Connecting external components You can conne...

Page 8: ...ase To a wall outlet AC adaptor supplied Basic operation Turning on off the power Press A small amount of power is consumed even when the power is turned off standby mode During standby mode the STANDBY indicator lamp on the front panel lights up Unplug the power cord from the AC outlet to turn the power off completely You can also turn on the power by pressing one of the input buttons DIGITAL1 DI...

Page 9: ...d treble sound level within the range of 3 to 3 1 Press BASS TREBLE repeatedly to select the sound you want to adjust Each time you press the button BASS and TREBLE alternates on the display BASS Adjusts the bass sound level TREBLE Adjusts the treble sound level 2 Press UP or DOWN to adjust the level The change in the bass and treble sound level of the speakers differ depending on the incoming sig...

Page 10: ...is recommended to turn off the equalizer of iPod You can select the video signal format NTSC or PAL in the setting menu on iPod 1 power button 2 INPUT button Press the button repeatedly to select the input source DIGITAL 1 DGTL1 DIGITAL 2 DGTL2 ANALOG 3 iPod 6 button Press the button to play back iPod 4 SSHD button Press to turn on off StudioSound HD 5 VOLUME buttons Adjusts the volume within the ...

Page 11: ...Pod is not properly connected Remove iPod from the unit and then connect it again iPod cannot be charged iPod is not properly connected Remove iPod from the unit and then connect it again After connecting iPod turn on the power again Specifications Output Power 30 W 30 W RMS 1 kHz 10 T H D 4 Ω Audio section Input Terminals ANALOG IN 1 V 50 kΩ Digital Input Terminals DIGITAL IN 1 OPTICAL 21 dBm to ...

Page 12: ...iPod touch are trademarks of Apple Inc registered in the U S and other countries is a trademark of SRS Labs Inc StudioSound HD technology is incorporated under license from SRS Labs Inc SSHD StudioSound HD by SRS Labs Inc SRS StudioSound HD provides an immersive and engaging surround sound experience while maintaining steady volume and delivering rich bass and clear dialog TVOL TruVolume by SRS La...

Reviews: