background image

1

DOUBLE OVEN

CERAMIC COOKER

model


CK 408/1

Instructions for use - Installation advice

Before operating this cooker,

please read these instructions carefully

Summary of Contents for CK 408/1

Page 1: ...1 DOUBLE OVEN CERAMIC COOKER model CK 408 1 Instructions for use Installation advice Before operating this cooker please read these instructions carefully ...

Page 2: ...mmendations 4 7 Cooking Hob 8 Control Panel 9 Use of cooking hob 10 13 Fan main oven 14 18 Conventional oven 19 20 Cooking guide 21 120 minutes timer 22 Cleaning maintenance 23 27 Advice For The Installer 28 Installation 29 32 Electrical section 33 35 Guarantee 36 ...

Page 3: ...ORTANT INFORMATION FOR CORRECT DISPOSAL OF THE PRODUCT IN ACCORDANCE WITH EC DIRECTIVE 2002 96 EC At the end of its working life the product must not be disposed of as urban waste It must be taken to a special local authority differentiated waste collection centre or to a dealer providing this service Disposing of a household appliance separately avoids possible negative consequences for the envir...

Page 4: ...am nails pa cking straps etc should not be left around within easy reach of children as these may cause serious injuries Some appliances are supplied with a protective film on steel and aluminium parts This film must be removed before using the appliance IMPORTANT The use of suitable protective clothing gloves is recommended when handling or cleaning of this appliance Do not attempt to modify the ...

Page 5: ... After use ensure that the knobs are in the off position Children less than 8 years of age shall be kept away unless con tinuously supervised This appliance can be used by children aged from 8 years and above and persons with reduced physical sensory or mental ca pabilities or lack of experience and knowledge if they have been given supervision or instruction concerning use of the appliance in a s...

Page 6: ...m the electrical power supply to avoid the possibility of electric shock and call Customer Service WARNING When correctly installed your product meets all sa fety requirements laid down for this type of product category However special care should be taken around the rear or the underneath of the appliance as these areas are not designed or intended to be touched and may contain sharp or rough edg...

Page 7: ...ndle as this could be a fire hazard Clean the oven regularly and do not allow fat or oils to build up in the oven base or tray Remove spillages as soon as they occur Do not stand on the cooker or on the open oven door Always stand back from the appliance when opening the oven door to allow steam and hot air to escape before removing the food SAFE FOOD HANDLING Leave food in the oven for as short a...

Page 8: ... not be placed on the hob surface since they can get hot VITROCERAMIC COOKING HOB 1 Hi Light single zone Ø 180 mm 1800 W 2 Hi Light single zone Ø 145 mm 1200 W 3 Hi Light double zone oval Ø 145 x 250 mm 2000 1100 W 4 Hi Light double zone Ø 210 120 mm 2200 750 W 5 Hi Light single zone Ø 145 mm 1200 W 6 Cooking zones residual heat indicators OB 2 1 3 4 6 5 1 COOKING HOB Fig 1 1 ...

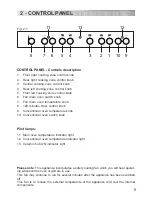
Page 9: ... temperature indicator light 12 Conventional oven temperature indicator light 13 Ceramic hob ON indicator light Please note This appliance incorporates a safety cooling fan which you will hear operat ing whenever the oven or grill are in use This fan may continue to run for several minutes after the appliance has been switched off This fan is to reduce the external temperature of the appliance and...

Page 10: ...from overheating The use of incorrect pans and or wrong pan positioning will cause the temperature limiter to operate more frequently resulting in a reduction of cooking performance The temperature limiter can be seen under the glass dissecting the element This is not a fault with the appliance Hi Light SINGLE ZoneS fig 3 2 The heating element is formed of a coil of resistant material which reache...

Page 11: ...urn on both zones of the double element turn the double element knob fully clockwise to the position To reduce the heat of the full double element turn its knob anticlockwise to setting 12 or lower Adjust the heat during cooking as necessary Note if you leave the knob at the position the full double element will remain at the highest heat setting To return to using only the inner zone of the doubl...

Page 12: ...bigger quantities to whip creams and sauces vegetables fruits soups 6 7 Slow boiling i e boiled me ats spaghetti soups conti nuations of steam cooking of roasts stews potatoes 7 8 For every kind of frying cutlets uncovered cooking i e risotto 8 9 10 Browning of meats roasted potatoes fried fish ome lettes and for boiling large quantities of water 11 12 Fast frying grilled steaks etc Switching on t...

Page 13: ...KING HINTS To reduce the cooking time you can turn the control knob to the max when you switch the plate on After a short time you can set the control knob to the position required for cooking You should only use pots and pans with flat bases pans with the test mark for glass ceramic hobs are available from specialist shops The diameter of the pan should match that of the cooking plate or be sligh...

Page 14: ...s re main hot for some time after they are switched off about 30 mm Follow the cleaning instructions carefully If you note a crack in the cooktop switch the appliance off immedia tely and call the After Sales Service Do not scratch the cooktop with cutting or sharp objects Do not use the glass ceramic sur face as a work surface CLEANING Before you begin cleaning make sure that the appliance is swi...

Page 15: ...using the fan only function without heat GENERAL FEATURES With your new Fan oven it is possible to cook a variety of food using the 2 different cooking functions The 2 positions thermostatically con trolled are obtained by 2 heating ele ments Grill element 2000 W Circular element 2200 W NOTE Upon first use it is advisable to operate the oven at the maximum temperature thermostat knob on position 2...

Page 16: ...N or OFF automatically according to the energy need which is determined by the thermostat OVEN LIGHT By setting the knob to this position 0 only the oven light comes on The light remains on whilst any of the cooking modes are selected DEFROSTING FROZEN FOODS Only the oven fan is on To be used with the thermostat knob on l because the other positions have no effect The defrosting is done by simple ...

Page 17: ... element is switched on The heat is diffused by radiation Use with the oven door closed the function knob set to and the temperature knob to position 225 C for max 15 minutes then to position 175 C For correct use see chapter USE OF THE GRILL Before using the grill preheat for about five minutes Always grill with the oven door closed and do not use the grill for longer than 30 minutes at any one t...

Page 18: ...he oven has reached the desired temperature Check the cooking time and turn off the oven 5 minutes before the theoretical time to recuperate the stored heat SIMULTANEOUS COOKING OF DIFFERENT FOODS The FAN consents a simultaneous he terogeneous cooking of different foods Different foods such as fish cake and meat can be cooked together without mixing the smells and flavours together This is possibl...

Page 19: ...lement 643 W Bottom element 735 W Grill element 1332 W NOTE Upon first use it is advisable to operate the oven at the maximum temperature thermostat knob on position 250 for 60 minutes in the position and for another 15 minutes in the position to eliminate possible traces of grease on the heating elements WARNING The door is hot use the handle ATTENTION MOST IMPORTANT Pay special attention not to ...

Page 20: ...re the theoretical time to recuperate the stored heat GRILLING The infrared grill element at the top of the oven comes on The heat is dispersed by radiation Use with the oven door closed the func tion knob set to and the temperature knob to position 225 C for max 15 min utes then to position 175 C For cooking hints see the chapter USE OF THE GRILL Recommended use Intense grilling browning cooking ...

Page 21: ...oria sandwich plain fruit cake baked fish moderate 4 180 350 Small cakes choux pastry fairly hot 5 190 375 Short pastry Swiss rolls soufflés fairly hot 6 200 400 High temperature roasting flaky pastry scones hot 7 220 425 Puff pastry bread very hot 8 230 450 Small puff pastries browning cooked foods very hot 9 240 475 These temperatures relate to the centre oven temperature Remember to use ovenpro...

Page 22: ... the end of the countdown The knob must be rotated clockwise as far as the 120 minutes position first and then set to the required time by rotating it anticlockwise IMPORTANT WARNING This is only a mechanical timer Remember to turn off the oven manu ally at the end of countdown Fig 7 1 7 120 MINUTES TIMER ...

Page 23: ...the oven door glass since they can scratch the surface which may result in shattering of the glass WARNING When correctly installed your product meets all safety requirements laid down for this type of product category However special care should be taken around the rear or the underneath of the appliance as these areas are not designed or intended to be touched and may contain sharp or rough edge...

Page 24: ...h and neutral soap CAUTION Do not use abrasive substances or non neutral detergents as these will irreparably damage the surface REPLACING THE OVEN LAMPS WARNING Ensure the appliance is switched off before replacing the lamp to avoid the possibility of electric shock Let the oven cavity and the heating elements to cool down Switch off the electrical supply Remove the protective cover Unscrew and r...

Page 25: ...accessible through the pivoting panel fig 8 2 Fig 8 1 OVEN DOOR The internal glass panel can be easily removed for cleaning by unscrewing the retaining screws Fig 8 1 Do not use harsh abrasive cleaners or sharp metal scrapers to clean the oven door glass since they can scratch the sur face which may result in shattering of the glass ...

Page 26: ...se when it has cooled down The cavity should be cleaned using a mild detergent solution and warm water Suitable proprietary chemical cleaners may be used after first consulting with the manufacturers recommendations and testing a small sample of the oven cavity Abrasive cleaning agents or scouring pads cloths should not be used on the cavity surface NOTE The manufacturers of this appliance will ac...

Page 27: ...ver A completely on the left and right hinges fig 8 5b Hold the door as shown in fig 8 5 Gently close the door fig 8 5c until left and right hinge levers A are hooked to part B of the door fig 8 5b Withdraw the hinge hooks from their location following arrow C fig 8 5d Rest the door on a soft surface To replace the door repeat the above steps in reverse order Fig 8 5 ...

Page 28: ...ance with the local safety standards Failure to observe this rule will invalidate the warranty The electrical mains outlet if located behind the cooker must not be higher than 18 cm above the floor level Some appliances are supplied with a protective film on steel and aluminium parts This film must be removed before using the cooker Advice for the installer ...

Page 29: ...e housed in heat resistant units The walls of the units must be capable of resisting temperatures of 75 C above room temperature Do not install the appliance near inflammable materials eg curtains If the cooker is located on a pedestal it is necessary to provide safety measures to prevent it falling out 50 mm 750 mm 450 mm 500 mm Fig 9 1 9 INSTALLATION ...

Page 30: ... the rear of the cooker on a piece of the polystyrene packag ing exposing the base for the fit ting of the feet Fit the 4 legs by screwing them tight into the support base as shown in picture 9 3 Fig 9 3 LEVELLING THE COOKER The cooker may be levelled by screwing the lower ends of the feet IN or OUT fig 9 4 Fig 9 4 ...

Page 31: ...ut this manoeuvre to prevent damage to the adjustable feet fig 9 5 WARNING Be carefull Do not lift the cooker by the door handle s when raising to the upright position fig 9 6 WARNING When moving cooker to its final posi tion DO NOT DRAG fig 9 7 Lift feet clear of floor fig 9 5 Fig 9 7 Fig 9 6 Fig 9 5 ...

Page 32: ... 8 2 Drill two 8 mm diameter holes in the wall and insert the plastic plugs supplied Important Before drilling the holes check that you will not damage any pipes or electrical wires 3 Loosely attach the anti tilt bracket with the two screws supplied 4 Move the cooker to the wall and adjust the height of the anti tilt bracket so that it can engage in the slot on the cooker s back as shown in fig 9 ...

Page 33: ...witch with minimum opening between the contacts of 3 mm between the ap pliance and the mains The power supply cable must not touch any hot parts and must be posi tioned so that it does not exceed 75 C at any point Once the cooker has been installed the switch must always be accessible N B For connection to the mains do not use adapters reducers or branching devices as they can cause overheating an...

Page 34: ...0 2 10 3 Feed the supply cable through the ca ble clamp D The supply cable must be of a suitable size for the current re quirements of the appliance see the section Feeder cable section Connect the phase neutral and earth wires to terminal B according to figu res 10 2 and 10 3 Pull the feeder cable and block it with the cable clamp D Re mount shield A NOTE Earth cable must be 3 cm longer than neut...

Page 35: ...35 PE 1 2 3 4 5 N L2 L1 PE 1 2 3 4 5 PE 1 2 3 4 5 N L1 L2 L3 N L1 L2 230 V 400 V 2N 400 V 3N Fig 10 2 2 3 4 5 1 230 V N L2 PE L1 2 3 4 5 1 L1 L2 N PE 400 V 2N 2 3 4 5 1 L1 L2 L3 N PE 400 V 3N Fig 10 3 ...

Page 36: ... the specified period to repair or replace free of charge any parts of the appliance found to be defective provided that We are promptly informed of the defect The appliance is installed and used in accordance with the written instructions en closed with the appliance The appliance is used only on an electrical supply as indicated on the rating label fixed to the appliance The appliance has not be...

Page 37: ...37 ...

Page 38: ...38 ...

Page 39: ...39 ...

Page 40: ...r transcription errors in the present booklet The manufacturer reserves the right to make all modifications to its products deemed necessary for manufacture or commercial reasons at any moment and without prior notice without jeopardising the essential functional and safety characteristics of the appliances ...

Reviews: