background image

10

5.6 

Instellen van tijd en datum

Bij de ontvangst van een DAB+ of FM-zender in voldoende kwaliteit wordt het uur automatisch 
ingesteld. Afhankelijk van de ontvangststerkte neemt dit proces enige tijd in beslag. Indien er geen 
passende zender ter beschikking staat, kunt u het uur ook handmatig instellen:

1.  Schakel de radio in en roep het menu met de toets 

<MENU/INFO>

 op.

2.  Met de toetsen 

<TUNE+/->

 of de volumeregelaar het menu 

„Time/Date“

 selecteren en vervolgens 

bevestigen.

3.  

„Set time and date“

 selecteren en bevestigen. Vervolgens dag, maand, jaar, uren en minuten 

selecteren, instellen en bevestigen.

Bijkomende instellingen in het menu „Time/Date“

Volgende functies kunnen in het menu 

„Time/Date“

 ingesteld worden:

„Set Hour system“

: Instelling van het tijdformaat.

Keuzemogelijkheden: 

„24 hours system” / “12 hours system“

„Set Date Format“

: Instelling van het datumformaat.

Keuzemogelijkheden: 

„dd-mm-yyyy“ / „mm-dd-yyyy / yyyy-mm-dd“

„Clock style“

: Instelling van het klokdesign in de stand-by modus.

Keuzemogelijkheden: 

„Analogue” / “Digital“

„Auto. Update“

: Instelling voor automatische tijdinstelling.

Keuzemogelijkheden: 

„No Update” / “Radio from Update“

5.7 Instellen van de displayverlichting

De displayverlichting kan in 3 helderheidstrappen geprogrammeerd worden. Volgende instellingen 
kunnen in het menu 

„Backlight“

 doorgevoerd worden:

„Timeout“

: Tijdspanne totdat de achtergrondverlichting van het display uitgeschakeld wordt.

Keuzemogelijkheden: 

„Always On / 10 sec. / 20 sec. / 30 sec. / 45 sec. / 60 sec. / 90 sec. / 120 sec. 

/ 180 sec.“

In de modus 

„Always On“ 

wordt de achtergrondverlichting niet uitgeschakeld. Daardoor wordt de 

inschakelduur van de accu korter. 

„Level“

: Helderheid van het display wanneer de radio ingeschakeld wordt.

Keuzemogelijkheden: 

„Low” / “Medium” / “High“


Gelieve voor de instelling als volgt te werk te gaan:

1. Schakel de radio in en roep het menu met de toets 

<MENU/INFO>

 op.

2.  Kies door middel van 

<TUNE+/->

 of de volumeregelaar het menu 

„Backlight“

 en druk dan op 

<ENTER/SCAN>

.

3.  Met de toetsen 

<TUNE+/->

 of de volumeregelaar het menu 

„Timeout“

 of 

„Level“

 selecteren en 

vervolgens met 

<ENTER/SCAN>

 bevestigen.

5.8 Instellen van de Sleeptimer

De sleeptimer wordt gebruikt om de radio na een vooraf ingestelde tijdspanne automatisch uit te 
schakelen. Gelieve voor de instelling als volgt te werk te gaan:

1. Schakel de radio in en roep het menu met de toets 

<MENU/INFO>

 op.

Summary of Contents for CR-M30DAB

Page 1: ...DAB Kompaktradio CR M30DAB BEDIENUNGSANLEITUNG DEUTSCH FRAN Ç AIS ITALIANO ENGLISH NEDERLANDS ...

Page 2: ... Akku 5 3 Konformitätserklärung 6 4 Inbetriebnahme 7 5 Bedienung des Radios 9 6 Verwendung des DAB Radios 12 7 Verwendung des UKW Radios 13 8 BLUETOOTH Audio 14 9 Verwendung eines Kopfhörers 15 10 Fehlerbehebung 15 11 Wartung und Pflege 15 12 Entsorgung 16 13 Technische Daten 17 14 Garantie 18 DEUTSCH ...

Page 3: ...chine in einem feuchten Kellerraum oder in der Nähe eines Schwimmbeckens usw auftreten Stellen Sie niemals mit Flüssigkeiten gefüllte Behälter wie z B Blumenvasen auf das Gerät oder direkt neben das Gerät Belüftung Schlitze und Öffnungen im Gehäuse dienen der Belüftung des Geräts um den zuverlässigen Betrieb des Geräts sicherzustellen und um das Gerät vor Überhitzung und einer möglichen Selbstentz...

Page 4: ...fizierten Kundendienstpersonal Beschädigungen die eine Reparatur erfordern Wartungs und Reparaturarbeiten nur von einem qualifizierten Kundendienst ausfüh en lassen Eine Wartung Reparatur ist erforderlich wenn das Gerät beschädigt wurde z B das Steckernetzteil wenn Flüssigkeit in das Gerät gelaufen ist wenn Gegenstände in das Gerät eingedrungen sind wenn das Gerät Regen oder Nässe ausgesetzt war w...

Page 5: ... Umgebungstemperatur soll 5 C nicht unter und 35 C nicht überschreiten In einem KFZ kann die Temperatur ggf deutlich über 35 C liegen Laden Sie den Akku ausschließlich über das mitgelieferte USB Steckernetzteil auf Wenn der Akku das Ende seiner Lebenszeit erreicht hat muss das Gerät mit dem integrierten Akku fachge recht entsorgt werden Versuchen Sie nicht den Akku auszubauen oder zu ersetzen Der ...

Page 6: ...er Richtlinie 2014 53 EU entspricht Der vollständige Text der EU Konformitätserklärung ist unter der folgen den Internetadresse verfügbar https www kenwood com euukdoc Hersteller 3 12 Moriya cho Kanagawa ku Yokohama shi Kanagawa 221 0022 JAPAN EU Kontaktadresse Amsterdamseweg 37 1422 AC Uithoorn THE NETHERLANDS ...

Page 7: ...nden sind USB C Steckernetzteil Bedienungsanleitung 4 2 Bedienelemente und Anschlüsse 1 Teleskopantenne 2 LCD Anzeige 3 FUNC Taste 4 MENU INFO Taste 5 PRESET Taste 6 ENTER SCAN Taste 7 Taste Tune 8 Taste Tune 9 P2 Taste 10 P1 Taste 11 Lautstärke Blättern 12 Kopfhörerbuchse 13 Ladekontrolle LED 14 USB C Eingang Netzteil ...

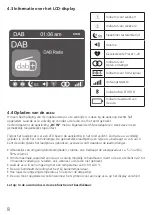
Page 8: ...erlängert sich dadurch die Ladezeit Je nach Umgebungsbedingungen Lautstärke usw beträgt die Wiedergabedauer ca 5 7 Stunden bei 50 Lautstärke Um die volle Kapazität des Akkus so lange wie möglich zu erhalten sollten Sie den Akku alle 2 bis 3 Monate vollständig aufladen auch wenn Sie das Radio nicht benutzen Laden Sie den Akku in einer Umgebung zwischen 0 und 40 C Der Akku hält seine Ladung am beste...

Page 9: ...te MENU INFO gedrückt um das quellenbezogene Menü aufzurufen Durch Drücken der Tasten Tune oder Tune können Sie in den Menüs navigieren Zum Blättern können Sie auch den Lautstärkeregler verwenden Bestätigt wird die Menüauswahl mit der Taste ENTER SCAN Wenn Sie die Taste MENU INFO in einem Menü kurz drücken springen wird auf die vorherige Menüebene zurückgesprungen 5 3 Lautstärke anpassen Durch Dre...

Page 10: ... Update Update von Radio 5 7 Einstellen der Display Beleuchtung Die Display Beleuchtung kann in 3 Helligkeitsstufen programmiert werden Folgende Einstellungen können im Menü Beleuchtung vorgenommen werden Autom Abschaltung Zeit bis die Hintergrundbeleuchtung des Displays abgeschaltet wird Auswahlmöglichkeiten Immer an 10 Sek 20 Sek 30 Sek 45 Sek 60 Sek 90 Sek 120 Sek 180 Sek Im Modus Immer an wird...

Page 11: ...r dem Lautstärkeregler weiter mit der Taste ENTER SCAN Einstellung von Stunden und Minuten Zahlen auswählen mit TUNE oder dem Lautstärkeregler weiter mit der Taste ENTER SCAN Einstellung der Quelle FM DAB oder Weckton mit TUNE oder dem Lautstärkeregler auswählen weiter mit der Taste ENTER SCAN Einstellung Intervall Einmal Täglich Wochenende Werktage auswählen mit TUNE oder dem Lautstärkeregler wei...

Page 12: ...ER SCAN bestätigen Sie die Auswahl Danach wird der Signalpegel im Display angezeigt ein weiterer Tastendruck lädt das gewählte Ensemble Anwählen eines DAB Senders Die in der Stationsliste alphabetisch gespeicherten Sender lassen sich wie folgt auswählen Drücken Sie die Tasten TUNE oder verwenden Sie den Lautstärkeregler um vorwärts oder rückwärts in der Senderliste zu blättern Wenn der gewünschte ...

Page 13: ...Senders Drücken Sie die Taste TUNE um die Empfangsfrequenz zu erhöhen Drücken Sie die Taste TUNE um die Empfangsfrequenz zu verringern Wenn Sie die Tasten TUNE oder TUNE gedrückt halten startet ein automatischer Sender suchlauf der bei der nächsten gefundenen Station stoppt Wenn Sie die ENTER SCAN Taste gedrückt halten beginnt die automatische Stationssuche Alle gefundenen Stationen werden im Send...

Page 14: ...dio Es können Smartphones Tablets oder ähnliche Geräte gekoppelt werden Drücken Sie die Taste FUNC am Radio bis im Display BLUETOOTH erscheint 8 1 Herstellen einer Verbindung Im Display steht Getrennt und das gelbe BLUETOOTH Symbol blinkt im Display Starten Sie einen Gerätescan auf Ihrem mobilen Gerät Wählen Sie CR M30DAB aus der Geräteliste aus und koppeln Sie beide Geräte wie gewohnt Auf dem Dis...

Page 15: ... erneut Probleme beim Radioempfang Richten Sie die Antenne neu aus Suchen Sie einen geeigneteren Standort Andere Elektrogeräte stören den Empfang Standort nicht für den Empfang von DAB Signalen geeignet 11 Wartung und Pflege Reinigung des Gehäuses Benutzen Sie ein mit einem milden Reinigungsmittel leicht angefeuchtetes Tuch Benutzen Sie keine Reinigungsmittel die Alkohol Ammoniak oder Scheuermitte...

Page 16: ...ht soweit Altgeräte einer Vorbereitung zur Wiederverwendung unter Beteiligung eines öffentlich rechtlichen Entsorgungsträgers zugeführt werden Durch Ihren Beitrag zur korrekten Entsorgung dieses Produktes schützen Sie die Umwelt und die Gesundheit Ihrer Mitmenschen Unsachgemässe oder falsche Entsorgung gefährden Umwelt und Gesundheit Weitere Informationen über das Recycling von Elektro altgeräten ...

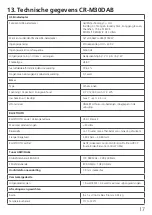
Page 17: ...azität Energieinhalt 3 7 V 2000 mAh 7 4 Wh Betriebszeit Ladezeit max 7 Std ca 4 Std UN Nummer UN3481 Lithium Ionen Batterien enthalten in der Ausrüstung BLUETOOTH BLUETOOTH Version Leistungsklasse V5 0 Klasse 2 Maximale Sendeleistung 20 dBm Reichweite ca 10 Meter kann je nach Umgebung abweichen Frequenzbereich 2 402 GHz 2 480 GHz BLUETOOTH Profil A2DP Advanced Audio Distribution Profile VRCP Audio...

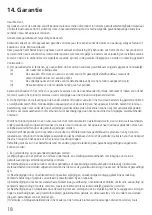
Page 18: ...lb des Bestimmungslandes fallen nicht unter die vorgenannten Garantiebestimmungen Außerdem übernehmen wir keinerlei Haftung für Arbeiten in diesem Zusammenhang oder für Beschädigungen des Produktes die durch solche Arbeiten entstehen Wird das Produkt in einem Land benutzt für das dieses nicht konzipiert und hergestellt worden ist dann werden Garantie arbeiten nur dann ausgeführt wenn die Kosten fü...

Page 19: ...eansprucht werden die das Produkt legal erworben haben In der Übereinstimmung mit den vorgenannten Garantiebedingungen wird das Produkt kostenlos instandgesetzt oder um getauscht Dieses Recht beeinträchtigt in keiner Weise sonstige Rechte des Benutzers im Rahmen der gültigen rechtlichen Bestimmungen Instandsetzung oder Austausch bewirken keine Verlängerung der Garantiezeit Weitergehende Ansprüche ...

Page 20: ... 2022 ...

Page 21: ...DAB compact radio CR M30DAB OPERATING MANUAL GERMAN FRAN Ç AIS ITALIANO ENGLISH NEDERLANDS ...

Page 22: ...the battery 5 3 Declaration of conformity 6 4 Start up 7 5 Operating the radio 9 6 Using the DAB radio 12 7 Using the FM radio 13 8 BLUETOOTH audio 14 9 Using headphones 15 10 Troubleshooting 15 11 Maintenance and care 15 12 Disposal 16 13 Technical specifications 17 14 Guarantee 18 ENGLISH ...

Page 23: ...htub wash basin kitchen sink washing machine wet basement or swimming pool Never place containers filled with liquids such as e g flower vases on the device or d ectly next to the device Ventilation Slots and openings in the housing are used to ventilate the device to ensure reliable operation of the device and to protect the device from overheating and possible autoignition Do not block the venti...

Page 24: ...Leave all mainte nance to qualified service personnel Damage requiring repair Maintenance and repair work should only be carried out by a qualified customer service Maintenance repair is required if the device has been damaged e g the mains adapter if liquid has en tered the device if objects have entered the device if the device has been exposed to rain or moisture when it stops working properly ...

Page 25: ...sunlight or heat The ambiance temperature must not fall bellow 5 C and must not exceed 35 C The temperature in motor vehicle can be significantly higher than 35 C Charge the battery exclusively using the supplied USB power adapter If the battery has reached the end of its service life the device with the integrated battery must be disposed of properly Do not attempt to remove or replace the batter...

Page 26: ...DAB complies with Directive 2014 53 EU The full text of the EU Declaration of Conformity is available at the following Internet address https www kenwood com euukdoc Manufacturer 3 12 Moriya cho Kanagawa ku Yokohama shi Kanagawa 221 0022 JAPAN EU Contact address Amsterdamseweg 37 1422 AC Uithoorn THE NETHERLANDS ...

Page 27: ... adapter Operating instructions 4 2 Control elements and connectors 1 Telescopic antenna 2 LCD display 3 FUNC button 4 MENU INFO button 5 PRESET button 6 ENTER SCAN button 7 Tune button 8 Tune button 9 P2 button 10 P1 button 11 Volume scroll 12 Headphone jack 13 Charge control LED 14 USB C input power adapter ...

Page 28: ...o would prolong the charging time Depending on environmental conditions volume etc the playback time is approx 5 7 hours with 50 volume To maintain the full capacity of the battery as long as possible you should fully charge the battery every 2 to 3 months even if you do not use the radio Charge the battery in ambient temperature of between 0 and 40 C The battery maintains it s charge best at room...

Page 29: ...eep the MENU INFO button pressed to call up the source related menu By pressing the Tune or Tune button you can navigate in the menu You can also use the vol ume control for browsing Confirm the menu selection with the ENTER SCAN button If you briefly press the MENU INFO button in a menu you will jump back to the previous menu level 5 3 Adjusting the volume You can adjust the volume by turning the...

Page 30: ...play illumination The display illumination can be programmed in 3 brightness levels The following settings can be made in the Backlight menu Timeout Time until the background light of the display is switched off Choices Always On 10 sec 20 sec 30 sec 45 sec 60 sec 90 sec 120 sec 180 sec In the Always On mode the background light is not switched off This shortens the battery life Level Brightness o...

Page 31: ... control continue with the ENTER SCAN button Setting of hours and minutes Select numbers with TUNE or the volume control continue with the ENTER SCAN button Select the setting for the Source FM DAB or Buzzer with TUNE or the volume control continue with ENTER SCAN button Setting the Interval Select Once Daily Weekends Workday with TUNE or the volume control continue with ENTER SCAN Select start up...

Page 32: ...her pressing stores the selected ensemble Selecting a DAB station The stations stored alphabetically in the station list can be selected as follows Press the TUNE button or use the volume control to browse forwards or backwards in the station list Once the desired station is selected press the ENTER SCAN button to start the playback If the reception level on the selected station is insufficient fo...

Page 33: ...t station found Pressing and holding the ENTER SCAN starts the automatic station search All found stations are stored in the station memory RDS functions The following information can be retrieved by repeatedly pressing the MENU INFO button PTY Program Type RDS Radio text Frequency Time Date In case of inadequate reception conditions the reception of this information may be interrupted or not poss...

Page 34: ...ion In the Display you see the Disconnected and the yellow BLUETOOTH symbol flashes in the Displa Start a device scan on your mobile device Select CR M30DAB from the device list and pair both devices as usual The Connected is displayed in the Display and a voice prompt sounds Now you can playback the desired content on your mobile device You can control basic playback functions on the radio as wel...

Page 35: ...ery is discharged Thereafter reconnect the power adapter Problems with radio reception Reorient the antenna Find a more suitable location Other electrical appliances interfere with the reception Location not suitable for receiving DAB signals 11 Maintenance and care Cleaning the housing Use a cloth lightly moistened with a mild detergent Do not use detergents containing alcohol ammonia or scouring...

Page 36: ... waste devices are prepared for recycling with the partici pation of a public waste management authority By helping to properly dispose of this product you are protecting the environment and the health of your fellow human beings Improper or incorrect disposal endangers the environment and health For more information on the recycling of these electrical devices and batteries please contact your lo...

Page 37: ... content 3 7 V 2000 mAh 7 4 Wh Operating time Charging time max 7 hrs approx 4 hrs UN Number UN3481 Lithium Ion batteries included in the equipment BLUETOOTH BLUETOOTH version performance class V5 0 Class 2 Maximum transmission power 20 dBm Reach About 10 meters may vary depending on the environment Frequency range 2 402 GHz 2 480 GHz BLUETOOTH profil A2DP Advanced Audio Distribution Profile VRCP ...

Page 38: ...s the costs for upgrading the device to nationally applicable standards and safety regulations In addition if the product differs from the products sold by the official importer and if spare parts are not available for the repair of this product the user must bear the costs of transporting the device to and from the country of purchase The same applies if no warranty services can be offered in the...

Page 39: ...articular those for conversion reduction or compensation Contact address JVCKENWOOD U K Limited First Floor Gleneagles the Belfry Colonial Way Watford Hertfordshire WD24 4WH Email Enquiries uk jvckenwood com www kenwood electronics co uk ...

Page 40: ... 2022 ...

Page 41: ...Radio compacte DAB CR M30DAB MANUEL D EMPLOI DEUTSCH FRAN Ç AIS ITALIANO ENGLISH NEDERLANDS ...

Page 42: ...ation de conformité 6 4 Mise en service 7 5 Commande de la radio 9 6 Utilisation de la radio DAB 12 7 Utilisation de la radio FM 13 8 Audio BLUETOOTH 14 9 Utilisation d un casque audio 15 10 Élimination des défaillances 15 11 Maintenance et entretien 15 12 Mise au rebut 16 13 Caractéristiques techniques 17 14 Garantie 18 FRANÇAIS ...

Page 43: ...té immédiate de l appareil par exemple un vase avec des fleurs Ventilation Les fentes et orifices du boîtier servent à la ventilation de l appareil afin d assurer le bon fonctionnement de l appareil et le protéger contre toute surchauffe qui pourrait occasionner une auto ignition N obturez pas les orifices de ventilation Installez l appareil conformément aux consignes du fabricant N obturez pas le...

Page 44: ...s qualifié La maintenance réparation est nécessaire lorsque l appareil a été endommagé par ex le bloc d alimentation à fiche qu un liquide a pénétré dans l appareil que des objets ont pénétré dans l appareil que l appareil a été exposé à la pluie ou l humidité lorsqu il ne fonctionne plus correctement ou est tombé Pièces détachées En cas de mise en place de pièces détachées assurez vous que le tec...

Page 45: ...eil au soleil ou à la chaleur La température ambiante doit se situer entre 5 C et 35 C Dans un véhicule la température peut être considérablement supérieure à 35 C Chargez l accu uniquement à l aide du bloc d alimentation à fiches USB fourni Lorsque l accu arrive en fin de vie l appareil avec l accu intégré doit être mis au rebut conformément aux réglementations en vigueur Ne tentez pas de démonte...

Page 46: ... satisfait aux exigences de la directive 2014 53 UE Le texte complet de la déclaration de conformité UE est disponible via l adresse Internet suivante https www kenwood com euukdoc Fabricant 3 12 Moriya cho Kanagawa ku Yokohama shi Kanagawa 221 0022 JAPAN Coordonnées en Union européenne Amsterdamseweg 37 1422 AC Uithoorn THE NETHERLANDS ...

Page 47: ... à fiches USB C Notice d emploi 4 2 Éléments de commande et connecteurs 1 Antenne télescopique 2 Afficheur à LCD 3 FUNC Touche 4 Touche MENU INFO 5 Touche PRESET 6 Touche ENTER SCAN 7 Touche Taste Tune 8 Touche Tune 9 Touche P2 10 Touche P1 11 Volume Feuilleter 12 Port de casque audio 13 Voyant de charge à LED 14 Port USB C du bloc d alimentation ...

Page 48: ...rge En fonction des conditions ambiantes du volume etc la durée d utilisation est d env 5 7 heures à 50 du volume max Pour conserver aussi longtemps que possible la capacité intégrale de l accu il convient de charger entièrement l accu tous les 2 à 3 mois même lorsque vous n utilisez pas la radio Chargez l accu à une température ambiante de 0 à 40 C L accu conserve sa charge au mieux à température...

Page 49: ...he MENU INFO pour afficher le menu spécifique à la source Utilisez les touches Tune ou Tune pour naviguer dans les menus Pour feuilleter vous pouvez utiliser aussi le régulateur de volume Confirmez le choix de menu à l aide de la touche ENTER SCAN Si vous appuyez brièvement sur la touche MENU INFO depuis un menu vous revenez au niveau de menu précédent 5 3 Réglage du volume Pour régler le volume i...

Page 50: ...que Réglage pour le réglage automatique de l heure Options disponibles Pas de MAJ MAJ depuis radio 5 7 Réglage de l éclairage de l écran L éclairage de l afficheur peut être ajusté selon 3 niveaux de luminosité Les fonctions suivantes peuvent être réglées dans le menu Rétroéclairage Temporisation Durée jusqu à ce que le rétroéclairage de l écran soit éteint Options disponibles Toujours allumé 15 s...

Page 51: ...aide des touches TUNE ou du régulateur de volume puis confirmez par ENTER SCAN Réglage des heures et des minutes sélectionnez à l aide des touches TUNE ou du régulateur de volume puis confirmez par ENTER SCAN Réglage de la source FM DAB ou Alarme à l aide des touches TUNE ou du régulateur de volume puis confirmez par ENTER SCAN Réglage Répéter Sélectionnez Une fois Tous les jours Week ends Jours d...

Page 52: ... touche ENTER SCAN Le niveau du signal s affiche alors à l écran Un nouvel actionnement de la touche charge l ensemble sélectionné Sélection d une station DAB Pour afficher les stations mémorisées par ordre alphabétique dans la liste des stations procédez comme suit Appuyez sur les touches TUNE ou utilisez le régulateur de volume pour feuilleter la liste des stations vers l avant ou l arrière Lors...

Page 53: ...uyez sur la touche FUNC jusqu à ce que l afficheur affiche FM 7 1 Réglage d une station FM Appuyez sur la touche TUNE pour augmenter la fréquence de réception Appuyez sur la touche TUNE pour diminuer la fréquence de réception Si vous maintenez les touches TUNE ou TUNE appuyées l appareil lance une station Recherche de stations de stations automatiques qui sera interrompu à la prochaine station tro...

Page 54: ...tre 4 8 Audio BLUETOOTH La fonction BLUETOOTH permet la transmission sans fil des fichiers de musique Streaming audio à la radio Des smartphones tablettes ou appareils similaires peuvent être appariés à la radio Appuyez sur la touche FUNC de la radio jusqu à ce que l écran affiche BLUETOOTH 8 1 Établir une connexion L écran affiche Déconnecté et le symbole BLUETOOTH jaune clignote Lancez la recher...

Page 55: ...suite le bloc d alimentation à fiches Problèmes lors de la réception radio Réorientez l antenne Trouvez un endroit adapté pour l installation D autres appareils électroniques perturbent la réception Le lieu d installation n est pas adapté à la réception de signaux DAB 11 Maintenance et entretien Nettoyage du boîtier Utilisez un chiffon légèrement humecté avec un détergent doux N utilisez pas de dé...

Page 56: ...t de déchets de droit public Par votre contribution à l élimination correcte de ce produit vous protégez l environnement et la santé de vos concitoyens Une mise au rebut non conforme ou erronée occasionne des risques pour l environnement et la santé Vous pouvez obtenir des informations plus détaillées au sujet du recyclage des appareils électriques et électroniques usagés ainsi que des piles usagé...

Page 57: ...m ions Tension Capacité Énergie disponible 3 7 V 2000 mAh 7 4 Wh Durée de service durée de charge max 7 heures env 4 heures N UN UN3481 Accu lithium ions intégré à l équipement BLUETOOTH Version BLUETOOTH Classe de performances V5 0 Classe 2 Puissance émettrice maximale 20 dBm Portée Env 10 m peut varier en fonction de l environnement Plage de fréquences 2 402 GHz 2 480 GHz Profil BLUETOOTH A2DP A...

Page 58: ...les interventions réalisées dans ce contexte ni pour les détériorations du produit occasionnées par de telles interven tions Si le produit est utilisé dans un pays pour lequel il n est ni conçu ni fabriqué nos interventions de garantie ne sont réalisées que si les coûts pour la transformation de l appareil en fonction des normes et dispositions de sécurité nationales applicables sont prises en cha...

Page 59: ...n toute légalité Conformément aux dispositions de garantie sus nommées le produit est réparé ou remplacé gratuitement Ce droit ne nuit en aucun cas aux autres droits de l utilisation dans le cadre des dispositions juridiques applicables La réparation ou le emplacement ne donnent pas lieu à une prolongation de la durée de garantie Les droits complémentaires sont exclus notamment ceux relatifs à la ...

Page 60: ... 2022 ...

Page 61: ...Radio compatta DAB CR M30DAB MANUALE DIISTRUZIONI DEUTSCH FRAN Ç AIS ITALIANO ENGLISH NEDERLANDS ...

Page 62: ...ulla batteria 5 3 Dichiarazione di conformità 6 4 Messa in servizio 7 5 Funzionamento della radio 9 6 Uso della radio DAB 12 7 Uso della radio FM 13 8 Audio BLUETOOTH 14 9 Uso di cuffie 15 10 Eliminazione errori 15 11 Cura e manutenzione 15 12 Smaltimento 16 13 Dati tecnici 17 14 Garanzia 18 ITALIANO ...

Page 63: ...direttamente accanto ad esso Ventilazione Le fessure e le aperture all interno dell involucro sono previste per la ventilazione dell apparecchio per garantire un funzionamento affidabile dell apparecchio per proteggerlo dal surriscaldamento e dall eventuale autoaccensione Non bloccare le aperture di ventilazione Installare l apparecchio secondo le istruzioni del produttore Non bloccare mai le aper...

Page 64: ...i esclusivamente da un centro di assistenza clienti qualificato L assistenza è necessaria quando l apparecchio è stato danneggiato ad esempio adattatore di alimentazione è stato versato del liquido sono caduti oggetti all interno dell apparecchio oppure l apparecchio è stato esposto a pioggia o umidità non funziona normalmente o è caduto Ricambi Se sono necessarie parti di ricambio assicurarsi che...

Page 65: ...e non deve scendere al di sotto di 5 C e non deve superare i 35 C In un automobile la temperatura può essere significati vamente superiore a 35 C Caricare la batteria solo con l alimentatore USB in dotazione Quando la batteria ha raggiunto la fine della sua vita utile il dispositivo con la batteria integrata deve essere smaltito correttamente Non tentare di rimuovere o sostituire la batteria Non r...

Page 66: ...conforme alla Direttiva 2014 53 UE Il testo integrale della dichiarazione di conformità UE è disponibile al seguente indirizzo Internet https www kenwood com euukdoc Produttore 3 12 Moriya cho Kanagawa ku Yokohama shi Kanagawa 221 0022 JAPAN Indirizzo di contatto UE Amsterdamseweg 37 1422 AC Uithoorn THE NETHERLANDS ...

Page 67: ...resenti Alimentatore USB C Manuale di istruzioni 4 2 Controlli e collegamenti 1 Antenna telescopica 2 Display LCD 3 FUNC Tasto 4 Tasto MENU INFO 5 Tasto PRESET 6 Tasto ENTER SCAN 7 Tasto Tune 8 Tasto Tune 9 Tasto P2 10 Tasto P1 11 Volume Scroll 12 Presa per cuffie 13 LED di controllo della carica 14 Alimentatore con ingresso USB C ...

Page 68: ...ni ambientali del volume ecc la durata della riproduzione è di circa 5 7 ore al 50 del volume Per mantenere la piena capacità della batteria il più a lungo possibile è necessario caricarla completamente ogni 2 o 3 mesi anche se non si utilizza la radio Caricare la batteria in un range di temperatura compreso tra 0 e 40 C La batteria mantiene la carica al meglio a temperatura ambiente Più bassa è l...

Page 69: ...U INFO per accedere al menu relativo alla sorgente Premendo i tasti Sintonia o Sintonia è possibile navigare fra i menu È anche possibile utilizzare il controllo del volume per scorrere fra le varie voci Confermare la selezione del menu con il tasto ENTER SCAN Premendo brevemente il tasto MENU INFO in un menu si torna al livello precedente 5 3 Regolare il volume Ruotando il controllo del volume è ...

Page 70: ...essun aggiorn Aggiornamento dalla radio 5 7 Impostazione dell illuminazione del display L illuminazione del display può essere programmata in 3 livelli di luminosità Nel menu è possibile effettuare le seguenti impostazioni di Retroilluminaz Timeout Tempo che intercorre fino allo spegnimento della retroilluminazione del display Possibilità di scelta Sempre acceso 10 sec 20 sec 30 sec 45 sec 60 sec ...

Page 71: ...l controllo del volume continuare con il tasto ENTER SCAN Impostazione di ore e minuti selezionare i numeri con TUNE o il controllo del volume continuare con il tasto ENTER SCAN Impostazione della sorgente FM DAB o Cicalino con TUNE o il controllo del volume continuare con il tasto ENTER SCAN Impostazione Ripetere Una volta Ogni giorno Fine settimana Giorni lavorativo selezionare con TUNE o il con...

Page 72: ...segnale viene visualizzato sul display un altra pressione del tasto carica l insieme selezionato Selezione di una stazione DAB Le stazioni memorizzate in ordine alfabetico nell elenco delle stazioni possono essere selezionate come segue Premere i tasti TUNE oppure utilizzare il controllo del volume per scorrere in avanti o indietro l elenco delle stazioni Una volta selezionato il canale desiderato...

Page 73: ...NE per aumentare la frequenza di ricezione Premere il tasto TUNE per ridurre la frequenza di ricezione Quando si preme il tasto TUNE o TUNE si avvia una stazione Avviare ricerca automatica delle stazioni che si ferma alla stazione successiva trovata Quando si preme il tasto ENTER SCAN inizia la ricerca automatica delle stazioni Tutte le stazioni trovate vengono memorizzate nella memoria delle staz...

Page 74: ...o Smartphone tablet o dispositivi simili possono essere accoppiati Premere il tasto FUNC sulla radio finché il display non visualizza BLUETOOTH 8 1 Stabilire una connessione Il display visualizza Scollegato e il simbolo giallo BLUETOOTH lampeggia sul display Avviare una SCAN del dispositivo sul dispositivo mobile Selezionare CR M30DAB dall elenco dei dispositivi e accoppiare entrambi i dispositivi...

Page 75: ...oblemi di ricezione radio Riorientare l antenna Trovare una posizione più adatta Altri apparecchi elettrici interferiscono con la ricezione Posizione non adatta alla ricezione di segnali DAB 11 Cura e manutenzione Pulizia dell alloggiamento Utilizzare un panno leggermente inumidito con un detergente delicato Non utilizzare detergenti contenenti alcool ammoniaca o abrasivi Precauzioni per evitare l...

Page 76: ...o con la partecipazione di un autorità pubblica di gestione dei rifiuti Contribuendo al corretto smaltimento di questo prodotto si protegge l ambiente e la salute degli altri esseri umani Uno smaltimento improprio o non corretto mette in pericolo l ambiente e la salute Per ulteriori informazioni sul riciclaggio dei vecchi apparecchi elettrici e delle batterie è possibile rivolgersi alle autorità l...

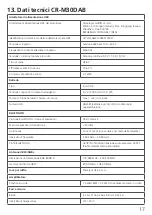
Page 77: ...ontenuto energetico 3 7 V 2000 mAh 7 4 Wh Tempo di funzionamento tempo di ricarica max 7 ore circa 4 ore Numero UN UN3481 Batterie agli ioni di litio contenute in apparecchiature BLUETOOTH Versione BLUETOOTH classe di prestazioni V5 0 Classe 2 Massima potenza di trasmissione 20 dBm Autonomia Circa 10 metri può variare a seconda dell ambiente Intervallo di frequenza 2 402 GHz 2 480 GHz Profili BLUE...

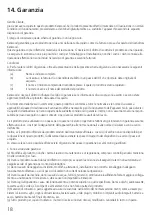
Page 78: ...sto o per danni al prodotto causati da tali lavori Se il prodotto viene utilizzato in un paese per il quale non è stato progettato e fabbricato gli interventi in garanzia saranno effettuati solo se i costi per l adeguamento dell apparecchio alle norme nazionali e alle norme di sicurezza sono a carico dell utente Inoltre se il prodotto differisce dai prodotti venduti dall importatore ufficiale e i ...

Page 79: ... non pregiudica in alcun modo gli altri diritti dell utente nell ambito delle disposizioni di legge applicabili La riparazione o la sostituzione non proroga il periodo di garanzia Sono escluse ulteriori rivendicazioni in particolare le richieste di conversione riduzione o risarcimento danni Indirizzo di contatto JVCKENWOOD ITALIA S p A Via G Sirtori 7 9 20129 Milano Tel 39 02 204821 www kenwood it...

Page 80: ... 2022 ...

Page 81: ...DAB compacte radio CR M30DAB GEBRUIKSAANWIJZING DEUTSCH FRAN Ç AIS ITALIANO ENGLISH NEDERLANDS ...

Page 82: ...nformiteitsverklaring 6 4 Ingebruikname 7 5 Bediening van de radio 9 6 Gebruik van de DAB radio 12 7 Gebruik van de FM radio 13 8 BLUETOOTH audio 14 9 Gebruik van een hoofdtelefoon 15 10 Oplossing van fouten 15 11 Onderhoud en zorg 15 12 Afvalverwerwijdering 16 13 Technische gegevens 17 14 Garantie 18 NEDERLANDS ...

Page 83: ...recht in de keuken een wasmachine in een vochtige kelderruimte of in de nabijheid van een zwembad enz Zet nooit met vloeistoffen gevulde houders zoals bv bloemenvazen op het apparaat of direct naast het apparaat Ventilatie Sleuven en openingen in de behuizing dienen voor de verluchting van het apparaat om de betrouwbare werking van het apparaat veilig te stellen en om het apparaat tegen oververhit...

Page 84: ...gekwalificeerd klantenservicepersoneel Beschadigingen die een reparatie vereisen Onderhouds en reparatiewerkzaamheden alleen door een gekwalificeerde klantenservice laten uitvoeren Een onderhoudsbeurt reparatie is noodzakelijk als het apparaat bv de stekkernetvoeding beschadigd werd als er vloeistof in het apparaat gelopen is wanneer er voorwerpen het apparaat binnengedrongen zijn als het apparaat...

Page 85: ...bloot aan direct zonlicht of aan hitte De omgevingstemperatuur moet minimaal 5 C en maximaal 35 C bedragen In een motorvoertuig kan de temperatuur eventueel duidelijk meer dan 35 C bedragen Laad de accu uitsluitend via de bijgeleverde USB stekkernetvoeding op Wanneer de accu het einde van haar levensduur bereikt heeft moet het apparaat met de geïntegreer de accu vakkundig afgevoerd worden Tracht n...

Page 86: ...e KENWOOD CR M20DAB aan de richtlijn 2014 53 EU voldoet De volledige tekst van de EU conformiteitsverklaring is op volgende website beschikbaar https www kenwood com euukdoc Fabrikant 3 12 Moriya cho Kanagawa ku Yokohama shi Kanagawa 221 0022 JAPAN EU contactadres Amsterdamseweg 37 1422 AC Uithoorn THE NETHERLANDS ...

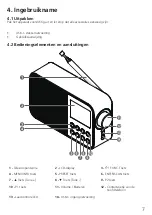
Page 87: ...kernetvoeding Gebruiksaanwijzing 4 2 Bedieningselementen en aansluitingen 1 Telescoopantenne 2 LCD display 3 FUNC Toets 4 MENU INFO toets 5 PRESET toets 6 ENTER SCAN toets 7 Toets Tune 8 Toets Tune 9 P2 toets 10 P1 toets 11 Volume Bladeren 12 Contactvoetje van de hoofdtelefoon 13 Laadcontrole LED 14 USB C ingang netvoeding ...

Page 88: ...jd langer Afhankelijk van omgevingsomstandigheden volume enz bedraagt de weergaveduur ca 5 7 uur bij 50 volume Om de maximale capaciteit van de accu zolang mogelijk te handhaven dient u de accu telkens na 2 tot 3 maanden volledig op te laden ook wanneer u de radio niet gebruikt Laad de accu in een omgeving met een temperatuur van 0 tot 40 C De accu handhaaft de lading het best bij kamertemperatuur...

Page 89: ...MENU INFO ingedrukt om het aan de bron gerelateerde menu op te roepen Door het indrukken van de toetsen Tune of Tune kunt in de menu s navigeren Om te bladeren kunt u ook de volumeregelaar gebruiken Bevestigd wordt de menuselectie met de toets ENTER SCAN Wanneer u de toets MENU INFO in een menu even indrukt wordt er terug naar het vorige menuniveau gesprongen 5 3 Volume aanpassen Door aan de volum...

Page 90: ... tijdinstelling Keuzemogelijkheden No Update Radio from Update 5 7 Instellen van de displayverlichting De displayverlichting kan in 3 helderheidstrappen geprogrammeerd worden Volgende instellingen kunnen in het menu Backlight doorgevoerd worden Timeout Tijdspanne totdat de achtergrondverlichting van het display uitgeschakeld wordt Keuzemogelijkheden Always On 10 sec 20 sec 30 sec 45 sec 60 sec 90 ...

Page 91: ...de stappen uit te voeren Instelling wekker On of Off Selecteren met TUNE of de volumeregelaar verder met de toets ENTER SCAN Instelling van uren en minuten cijfers selecteren met TUNE of de volumeregelaar verder met de toets ENTER SCAN Instelling van de bron FM DAB of Buzzer met TUNE of de volumeregelaar selecteren verder met de toets ENTER SCAN Instelling Interval Once Daily Weekends Workday sele...

Page 92: ...te selecteren Met de toets ENTER SCAN bevestigt u de selectie Daarna wordt het signaalniveau op het display aangegeven door nog een toets in te drukken wordt het gehele ensemble gekozen Selecteren van een DAB zender De in de zenderlijst alfabetisch opgeslagen zenders kunnen als volgt geselecteerd worden Druk op de toetsen TUNE of gebruik de volumeregelaar om voorwaarts of achterwaarts in de zender...

Page 93: ...m de ontvangstfrequentie te verhogen Druk de toets TUNE in om de ontvangstfrequentie te verlagen Wanneer u de toetsen TUNE of TUNE ingedrukt houdt start er een automatische zender Automatische afstemming van de zenders van de zenders die bij het volgende gevonden station stopt Wanneer u de ENTER SCAN toets ingedrukt houdt begint de automatische zoekfunctie voor zenders Alle gevonden stations worde...

Page 94: ...ones tablets of gelijkaardige apparaten gekoppeld worden Druk op de toets FUNC aan de radio totdat op het display BLUETOOTH verschijnt 8 1 Tot stand brengen van een verbinding Op het display staat Disconnected en het gele BLUETOOTH symbool knippert op het display Start een apparaatscan op uw mobiel toestel Selecteer CR M30DAB uit de apparatenlijst en koppel beide apparaten zoals gewoonlijk Op het ...

Page 95: ...e radio ontvangst Positioneer de antenne opnieuw Zoek een meer geschikte locatie Andere elektrische apparaten storen de ontvangst Locatie niet geschikt voor de ontvangst van DAB signalen 11 Onderhoud en zorg Reiniging van de behuizing Gebruik een met een mild reinigingsmiddel lichtjes bevochtigde doek Gebruik geen reinigingsmiddelen die alcohol ammoniak of schuurmiddel bevatten Waarschuwingsinstru...

Page 96: ...enwerking met een publiekrechtelijke voor de afvalverwijdering bevoegde instantie op de recyclage voorbereid worden Door uw bijdrage aan een correcte afvoer van dit product beschermt u het milieu en de gezondheid van uw medemens Een onvakkundige of verkeerde afvoer brengt milieu en gezondheid in gevaar Bijkomende informatie over de recycling van oude elektrische apparaten en batterijen krijgt u va...

Page 97: ...paciteit Energie inhoud 3 7 V 2000 mAh 7 4 Wh Inschakelduur laadtijd max 7 uur ca 4 uur UN nummer UN3481 Lithium ion batterijen inbegrepen in de uitrusting BLUETOOTH BLUETOOTH versie Vermogensklasse V5 0 Klasse 2 Maximaal zendvermogen 20 dBm Reikwijdte ca 10 meter kan afhankelijk van omgeving afwijken Frequentiegebied 2 402 GHz 2 480 GHz BLUETOOTH profiel A2DP Advanced Audio Distribution Profile A...

Page 98: ...steld worden voor werkzaamheden in dit verband of voor beschadigingen aan het product die door dergelijke werkzaamheden ontstaan Wordt het product gebruikt in een land waarvoor het niet ontwikkeld en gefabriceerd werd dan worden werkzaamheden onder garantie slechts uitgevoerd wanneer de kosten voor ombouw van het apparaat naar nationaal geldende normen en veiligheidsvoorschriften door de gebruiker...

Page 99: ... verworven heeft In overeenstemming met de bovenstaande garantievoorwaarden wordt het product kosteloos gerepareerd of omgeruild Dit recht doet op geen enkele manier afbreuk aan overige rechten van de gebruiker in het kader van de geldende wettelijke bepalingen Reparatie of omruiling brengen geen verlenging van de garantieperiode met zich mee Verder reikende rechten in het bijzonder die op koopver...

Page 100: ... 2022 ...
Reviews: