background image

46

Return to the Top page

Widget and Application Operation

E-mail (SNS Application)

Displays the screen for using E-mail.

Preparation

•  You must have a connection with the internet 

using Wi-Fi. See 

Wi-Fi Setup (P.28)

.

•  To use a Google or email service, the 

corresponding account is required.

•  You can use a user account when you have 

logged in the Owner or User.


Ñ

Register an account

Press the <HOME> button.

Flick the screen left or right to select 
the Network contents panel.

Touch [ 

 ].

Touch [ 

 SNS].

Touch [ 

 (mail)].

Touch [Sign in].

Touch [Gmail].

Enter the Email and Password.

Touch [Next].

NOTE

•  You can register Email (IMAP). Select [Other] in 

step 7, and enter necessary data according to the 
displayed messages.


Ñ

Operation

Press the <HOME> button.

Flick the screen left or right to select 
the Network contents panel.

Touch [ 

 ].

Touch [ 

 SNS].

Touch [ 

 (mail)].

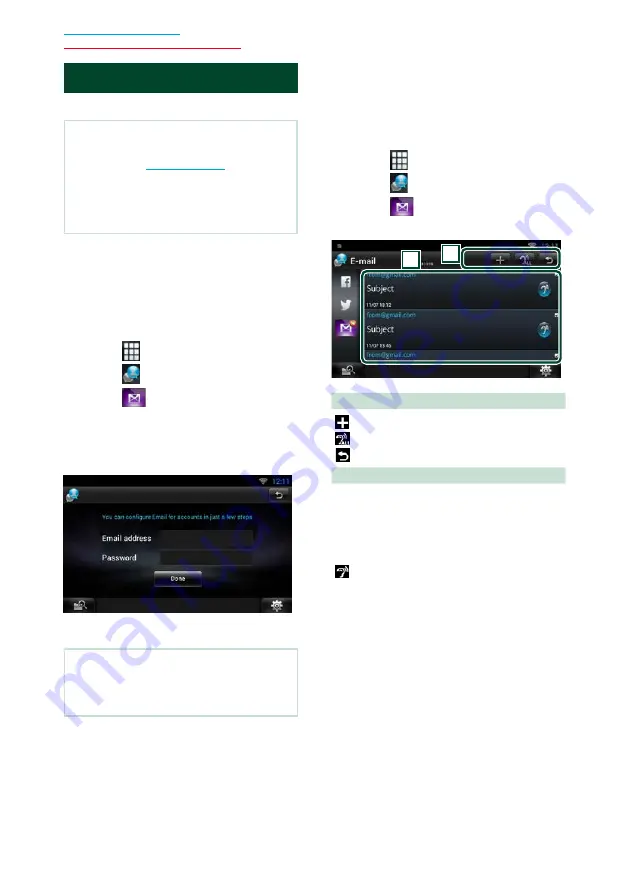
Perform desired operation as follows.

2

1

2

1

 :  Create a new article.

 :  Reads out all articles by voice. 
 :  Terminates the application.

2

 Inbox list

Displays an article or message.
Touching this displays details.
While the latest information is displayed at 
the top, sliding the list down updates the 
information.

 :  Reads out the article by voice.

Summary of Contents for DNN9350BTM

Page 1: ...IGATION SYSTEM DNN9350BT DNN9350BTM CONNECTED MONITOR WITH DVD RECEIVER DNR8035BT DNR8035BTM INSTRUCTION MANUAL Before reading this manual click the button below to check the latest edition and the modified pages http manual kenwood com edition im383 Check the latest edition ...

Page 2: ...NECTED NAVIGATION SYSTEM In this manual you will learn various convenient functions of the system Click the icon of the media you want to play With one click you can jump to the section of each media iPod USB VCD DVDVIDEO Music CD Disc Media BT Audio Pandora Apps Radio Storage WirelessLink ...

Page 3: ...nt_________________ 37 Widget and Application Operation 38 Today Widget_______________________ 38 SNS Widget_________________________ 38 RSS Widget_________________________ 39 Schedule Application_________________ 40 Facebook SNS Application ____________ 42 Twitter SNS Application ______________ 44 E mail SNS Application ______________ 46 RSS Application_____________________ 48 Now playing Widget_...

Page 4: ...View Camera____________ 108 Setting Up 110 Monitor Screen Setup________________ 110 System Setup_______________________ 111 Display Setup_______________________ 114 Navigation Setup DNN9350BT DNN9350BTM __________ 116 Camera Setup_______________________ 116 Software Information_________________ 118 AV Input Setup______________________ 119 AV Output Interface Setup_____________ 119 Controlling Audi...

Page 5: ... directly to the unit may affect its mechanical parts Wiping the faceplate with a hard cloth or using a volatile liquid such as thinner or alcohol may scratch the surface or erase screened print Ñ ÑLens fogging When you turn on the car heater in cold weather dew or condensation may form on the lens in the disc player of the unit Called lens fogging this condensation on the lens may not allow discs...

Page 6: ...ion mail search logs etc stored in this unit by yourself and confirm that the data has been deleted We shall not be liable for any damage caused by leakage of undeleted data 1 Press the HOME button HOME 6 2 Press the MENU button HOME 6 3 Touch Setting 4 Touch Backup Reset 5 Touch Factory data reset 6 Enter owner password Touch Rest 7 Touch ERASE ...

Page 7: ...current source 1 Touch in the control screen The search type screen appears 2 Touch desired search way ñ ñ How to Read this Manual NOTE The screens and panels shown in this manual are examples used to provide clear explanations of the operations For this reason they may be different from the actual screens or panels used or some display patterns may be different Link header You can refer each sect...

Page 8: ...7 Return to the Top page How To Read This Manual ...

Page 9: ...reaming without music files on this unit P 82 Speech to Text STT and Text to Speech TTS Notes You can use following feature for 2 years after registration of the owner account To use it continuously a usage fee is required For details see web site of Route Collector http www route collector com TTS by Nuance STT by Nuance To use the following services you need to register the corresponding free or...

Page 10: ...BT DNN9350BTM Wi Fi access point Connect to Internet using the tethering function of your smartphone or an Internet device P 28 HOME 6 Wi Fi 11n g b 4G 3G LTE or EDGE Wi Fi hotspot This unit becomes the Wi Fi access point and you can enjoy music and video in a smartphone Wi Fi connected by Kenwood Wireless Link P 30 ...

Page 11: ... this reason they may be different from the actual panels How to insert an SD Card DNN9350BT DNN9350BTM 1 Press 8 G button for 1 second The panel fully opens 2 Hold the SD card as the illustration in the right and insert it into the slot until it clicks V To eject the card Push the card until it clicks and then remove your finger from the card The card pops up so that you can pull it out with your...

Page 12: ...ressing for 1 second switches AV out sources 6 HOME Displays the Home screen P 18 Pressing for 1 second turns the power off When the power off turns the power on 7 6 Back Return to the previously viewed screen Pressing for 1 second displays the Hands Free screen P 102 8 G Eject Ejects the disc When the panel is opened pressing closes the panel and pressing for 1 second ejects the disc forcibly Whe...

Page 13: ... turning on the power varies between different models Press the HOME button HOME 6 The unit is turned on ö ö To turn off the unit Press the HOME button for 1 second If it is your first time turning the unit on after installation it will be necessary to perform Initial setup P 14 1 ...

Page 14: ...istered Enter the password When you selected Administrator or Guest you do not need to enter a password Auto Login Checking this checkbox allows you to log in to the system automatically from the next time Touch Login NOTE If you forgot your password create your new password on the Route Collector site http www route collector com 1 2 3 ...

Page 15: ...igure settings for connection to Wi Fi 1 Touch WiFi Setup 2 Slide Wi Fi to ON 3 Select the Wi Fi access point to register from the list 4 Enter the Password 5 Touch Connect 6 After setting press the 6 button For details on operation see Wi Fi Setup P 28 Date Setup Set the date and time 1 Touch Date Setup 2 Touch Select time zone 3 Select a time zone 4 After setting press the 6 button For details o...

Page 16: ...red country 3 Touch Enter Language Select the language used for the control screen and setting items Default is American English en 1 Touch SET 2 Touch C or D to select the desired language 3 Touch Enter For details on operation see Language setup P 112 Angle Adjust the position of the monitor Default is 0 1 Touch SET 2 Touch desired angle number and For details on operation see Monitor angle cont...

Page 17: ...n 3 If you want to change color touch SET of Panel Color Coordinate 4 Touch your desired color and For details on operation see Panel color coordinate P 115 Camera Set the parameters for the camera 1 Touch SET 2 Set each item and touch For details on operation see Camera Setup P 116 DEMO Set the demonstration mode Default is ON 1 Touch ON or OFF Touch Finish NOTE These settings can be set from the...

Page 18: ... the USB device with the USB cable The unit reads the device and playback starts ö ö To disconnect the device Touch G on the screen and disconnect the device from the cable iPod Connect the iPod NOTE For the details of the necessary cable and adapter to connect with iPod iPhone refer to Music Video Basic Operation P 62 The unit reads the iPod and playback starts ö ö To disconnect the iPod iPhone c...

Page 19: ...ion 1 Service panel Network widget Displays the schedule SNS or RSS 2 Media panel Now playing Displays the title of the song being played or the name of the station you are listening to and allows you to perform simple operations Media widget Displays the Summary board that shows the songs you marked with Like and the playback history and the Photo frame that shows photos 3 Source launcher panel A...

Page 20: ...ource list All apps list You can scroll the list screen by flicking the screen up down Home Returns to the Source launcher panel or the Network contents panel From All source list you can perform the following functions Function Icon Operation Switch the audio source etc Touch the icon of the desired source Switch the video source etc Touch the icon of the desired video source Display navigation s...

Page 21: ...panel or Network contents panel Touching the icon continuously to display the Source launcher panel or Network contents panel screen Drag the icon to an empty space Media panel 2 1 1 Now playing widget Displays the title of the song being played or the name of the station you are listening to and allows you to perform simple operations See Now playing Widget P 50 2 Media widget Touching allows you...

Page 22: ... and date 2 Network widget Touching allows you to switch between Schedule RSS and SNS See Today Widget P 38 SNS Widget P 38 RSS Widget P 39 Change the skin for home screen You can select a home screen skin from 3 types Press the MENU button Touch Theme Select a skin Touch OK 1 2 3 4 ...

Page 23: ... screen Displays the control screen of current source Icon feature differs depending on the source List screen There are some common function keys in the list screens of most sources Scroll Touch to scroll through texts on the display etc Touch keys with various functions are displayed here Displayed keys differ depending on the current audio source status etc For examples of functions of each key...

Page 24: ...23 Return to the Top page Basic Operations Flick scrolling You can scroll the list screen by flicking the screen up down or right left ...

Page 25: ...information while the source control screen is displayed Touch the information bar The navigation screen with audio information appears Touch or in the navigation screen Touching this area displays the audio screen Displays the navigation and control keys of the current source Displays the navigation and current video playback display NOTE The screen switches between playback screen and camera vie...

Page 26: ... responsibility the procedures set forth in the left column Press the MENU button in the navigation screen or source control screen Touch Triplog On Touch Yes When the Trip log is active appears in the status bar NOTE You must have a connection with the internet using Wi Fi You can use the Trip log function when you have logged in the system as Owner or User Where To function You can set the desti...

Page 27: ... panel Touch Touch SNS Touch mail Touch Touch The address for setting the meeting point is added in the text part Enter the address subject etc to complete the mail and send it Your family or friend will enter the meeting point Check the address in the mail register as the meeting point and press Send You will be notified by the icon on the status bar when they enter the meeting point Drag the sta...

Page 28: ... also be used for secondary purposes at your sole option and responsibility In any event we cannot accept any responsibility for any results of your use of the function for whatever purpose Should you select to use this option please activate the function through the procedures set forth in the left column Log in to Route Collector site by the owner account http www route collector com Set to ON t...

Page 29: ...Make preparations for using the Wi Fi access point for Internet connection through use of the tethering function of the smartphone Set to OFF the Wi Fi Hotspot in Wi Fi Hotspot Setup P 30 1 Press the HOME button to display the Home screen Note To display the Network contents panel Press the HOME button again 2 Press the MENU button 3 Touch Setting 4 Slide Wi Fi to ON 5 Touch Wi Fi 6 Select the Wi ...

Page 30: ...Setup Register the Wi Fi access point manually 1 Touch ADD NETWORK 2 Enter the SSID code 3 Select the security 4 Enter the security code 5 Touch Save Confirm the MAC address 1 Press the MENU button 2 Touch Advanced 3 Press the 6 button ...

Page 31: ...he Internet via Wi Fi Set to OFF the Wi Fi in Wi Fi Setup P 28 1 Press the HOME button to display the Home screen Note To display the Network contents panel Press the HOME button again 2 Press the MENU button 3 Touch Setting 4 Touch Portable hotspot 5 Touch Configure Wi Fi hotspot 6 Enter the SSID code Select the security Enter the password When you check Show password the password that you set is...

Page 32: ...31 Return to the Top page Network Setup ...

Page 33: ...te Setup 1 Press the HOME button to display the Home screen Note To display the Network contents panel Press the HOME button again 2 Press the MENU button 3 Touch Setting 4 Touch Date time 5 Set each item as follows 6 Press the 6 button ñ ñ Clock and Date Setup ...

Page 34: ...up Adjust the date and time manually 1 Touch Automatic date time to remove the check 2 Touch Select time zone 3 Select a time zone 4 Touch Set date 5 Adjust the date 6 Touch Set 7 Touch Set time 8 Adjust the time 9 Touch Set 10Press the 6 button ...

Page 35: ...the functions related to mail social media and Route Collector site You can register up to 4 user accounts Ñ ÑAccount registration procedure 1 Create an account in the Route Collector site Create an account refering to Create User Account P 34 or the Route Collector site http www route collector com 2 Register the account in this unit To register an Owner account refer to Set Owner Account P 35 To...

Page 36: ... can register an owner account for the person who manages this system Preparation You must have a connection with the internet using Wi Fi See Wi Fi Setup P 28 First create an account in the Route Collector site See Create User Account P 34 If you have not created an owner account log in to the system as Administrator If you have created an owner account log in to the system after account resettin...

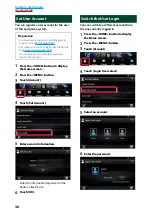
Page 37: ... a user account when you have logged in the Owner 1 Press the HOME button to display the Home screen 2 Press the MENU button 3 Touch Account 4 Touch Set Account 5 Enter account information Enter the information registered in the Route Collector site 6 Touch OK Switch the User Login You can switch to a different account from the one currently logged in 1 Press the HOME button to display the Home sc...

Page 38: ...count 5 Select an account 6 Touch OK Confirmation screen appears 7 Touch Yes Reset Owner Account You can delete previously registered owner and user accounts Preparation You can set a user account when you have logged in the Owner 1 Press the HOME button to display the Home screen 2 Press the MENU button 3 Touch Account 4 Touch Reset Account 5 Enter the owner account s password 6 Touch OK Confirma...

Page 39: ...itory fashion SNS Widget You can use Facebook Twitter Gmail and email IMAP Preparation To use each service the email Google Facebook Twitter or email account is required You can use a user account when you have logged in the Owner or User 1 Press the HOME button 2 Flick the screen left or right to select the Service panel 3 Touch 4 Select the SNS Widget 1 2 3 1 Starts the SNS application Reads out...

Page 40: ...S application Reads out all the contents in an auditory fashion Switches to the schedule or SNS 2 Category Select a service category 3 RSS article list Displays the contents selected in Category in a new order Touching this starts the RSS application and displays its contents When the latest information is displayed at the top sliding the list allows you to update the information Reads out the RSS...

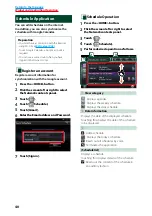
Page 41: ... Network contents panel 3 Touch 4 Touch Schedule 5 Touch Gmail 6 Enter the Email address and Password 7 Touch Sign in Ñ ÑSchedule Operation 1 Press the HOME button 2 Flick the screen left or right to select the Network contents panel 3 Touch 4 Touch Schedule 5 Perform desired operation as follows 3 2 1 1 View category Displays agendas Displays the weekly schedule Displays the daily schedule 2 Date...

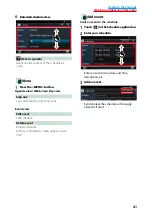
Page 42: ...eek view Day view Sign out Logs out from the current account Event view Edit event Edit schedule Delete event Deletes schedule When a confirmation screen appears touch Yes Ñ ÑAdd event Adds an event to the schedule 1 Touch in the Schedule application 2 Enter your schedule Enter an event name date and time description etc 3 Add an event Synchronizes the schedule with Google Calendar if used ...

Page 43: ...ication Displays the screen for using Facebook Preparation You must have a connection with the internet using Wi Fi See Wi Fi Setup P 28 To use a Facebook service the corresponding account is required You can use a user account when you have logged in the Owner or User Ñ ÑRegister an account 1 Press the HOME button 2 Flick the screen left or right to select the Network contents panel 3 Touch 4 Tou...

Page 44: ...tion Reads out the article by voice 7 Detailed article or message view 2 1 1 Votes as Like Posts a comment 2 Deletes an article When the confirmation screen appears touch Ok Reads the content of the comment by voice Returns to previous screen Ñ ÑMenu 1 Press the MENU button Article list view Setting Set an update interval Sign out Logs out from the current account Ñ ÑAdd to post Create an article ...

Page 45: ... Network contents panel 3 Touch 4 Touch SNS 5 Touch Twitter 6 Touch Sign in 7 Enter the Username email and Password 8 Touch Authorize app Ñ ÑOperation 1 Press the HOME button 2 Flick the screen left or right to select the Network contents panel 3 Touch 4 Touch SNS 5 Touch Twitter 6 Perform desired operation as follows 1 2 1 Create a new article Posting the current place Reads out all articles by v...

Page 46: ...on Article list view Setting Set an update interval Sign out Logs out from the current account Ñ ÑAdd to post Create an article to be posted to the SNS service of the selected category 1 Touch in the SNS application 2 Create an article to post 2 1 3 1 Enter an article to post Enter a comment using the voice recognition function When Speak now appears speak the comment Post Posts the article 2 Post...

Page 47: ...h SNS 5 Touch mail 6 Touch Sign in 7 Touch Gmail 8 Enter the Email and Password 9 Touch Next NOTE You can register Email IMAP Select Other in step 7 and enter necessary data according to the displayed messages Ñ ÑOperation 1 Press the HOME button 2 Flick the screen left or right to select the Network contents panel 3 Touch 4 Touch SNS 5 Touch mail 6 Perform desired operation as follows 2 1 2 1 Cre...

Page 48: ...t a label Add account Register a new account Delete account Delete a registered account Select the account to delete by putting a checkmark and then touch OK Ñ ÑAdd to post Create an article to be posted to the SNS service of the selected category 1 Touch in the SNS application 2 Create an article to post 2 1 3 1 Sends the mail Stores the mail temporarily Deletes the mail Enters the address of the...

Page 49: ...es by voice Terminates the application 2 Category Select the RSS feed to be displayed 3 Article list Display the article Touching this displays details While the latest information is displayed at the top sliding the list down updates the information Reads out the article by voice 6 Detailed article view 2 2 1 1 Registers the RSS feed in the bookmark of the Route Collector site You can read it lat...

Page 50: ...lectable RSS feed you need to edit it in the Route Collector site See www route collector com Ñ ÑDelete RSS feed Delete an RSS feed 1 Press the MENU button 2 Touch Delete 3 Touch Yes to confirm Ñ ÑRSS setup Performs setup when using RSS Application 1 Press the MENU button 2 Touch Setting in the Menu 3 Select an option as follows Update interval Set the information update interval ...

Page 51: ... are listening to P 51 2 Album art Touching Album art displays the Source control screen 3 Information display Displays the information title etc about the song being played 4 Allow you to stop playback temporarily and select songs Radio source such as Radio 4 3 2 1 1 I m listening You can post the information about the song you are listening to on twitter Fecebook See Posting the information abou...

Page 52: ...1 2 3 1 Enter the information you want to post Enter a comment using the voice recognition function When Speak now is displayed pronounce the comment Post Posts the information 2 Fixed phrase Select the information about the song you are listening to and a fixed phrase 3 Select the service on which you want to post the information Select the service and then touch OK Returns to previous screen Ñ Ñ...

Page 53: ...ect the Summary Board Widget 5 Touch desired item 1 2 YouTube app starts and plays the song 1 Update the history information Switches to Photo frame 2 Category Select the service category Displays the playback history of YouTube Displays the list of your favorite songs that you saved liked Count the contents which users marked Like and list up Like Recommend Show the search result by artist name a...

Page 54: ...he order Deletes the photo from the list 2 Touch 3 Select a picture 4 Touch Mixed Media Search You can search media like USB iPod for the song by artist or album name and play it 1 Touch 2 Select whether you search for the song by artist name or album name 3 Enter the Artist or Album Enter the keyword using the voice recognition function When Speak now is displayed pronounce the keyword You can us...

Page 55: ...hapter number display Track Scene VCD track or scene number display Scene is displayed only when PBC is on D B F I etc Current play mode display The meanings of each icon are as follows D play B fast forward A fast backward F search up E search down I stop IR resume stop H pause slow playback slow reverse playback Touch this area to display the disc lable name 2 Multi function key Touch to switch ...

Page 56: ...P play time display and R disc remaining time For confirmation of current playing position See the bar in center DVD only The bar does not appear while the remaining time is being displayed 6 Movie display area Touch to display Video screen 7 Searching area Touch to search the next previous content Scrolling from center of display to left or right performs fast backward or fast forward Each time y...

Page 57: ...he functions of each key are as follows E F Searches the previous next content DH Plays or pauses or DVD only Plays in slow motion forward or backward I Stops playback When touched twice the disc is played from the beginning when you play it the next time PBC VCD only Turn PBC on or off ...

Page 58: ...Displays the previous menu Touch Return Enters selected item Touch Enter Enables direct operation Touch Highlight to enter the highlight control mode See Highlight control P 57 Moves the cursor Touch R S C D These keys may not function depending on the disc Ñ ÑHighlight control Highlight control lets you control the DVD menu by touching the menu key directly on the screen 1 Touch Highlight in the ...

Page 59: ...e is switched Controls zoom ratio Touch Zoom For details see step2 in Zoom Control for DVD and VCD P 58 Switches the picture angle Touch Angle Each time you touch this key picture angle is switched Exits menu control Touch Exit Displays the Menu Control 1 screen Touch Previous Zoom Control for DVD and VCD You can enlarge Playback screen for DVD and VCD 1 For VCD touch illustrated area during playb...

Page 60: ...h Source Source SETUP Menu screen appears 4 Touch DVD SETUP in the list DVD SETUP screen appears 5 Set each item as follows Menu Subtitle Audio Language See Language setup P 60 Dynamic Range Control Set the dynamic range Wide The dynamic range is wide Normal The dynamic range is normal Dialog Default Makes the total sound volume larger than other modes This is effective only when you are using Dol...

Page 61: ...guage used in the menu subtitle and voice You cannot setup these items during DVD playback 1 Touch SET of the desired item Menu Language Subtitle Language Audio Language Language Set screen appears 2 Enter the desired language code and touch Enter For language code refer to DVD Language Codes P 144 Sets the entered language and returns to the DVD SETUP screen NOTE To cancel the setup and return to...

Page 62: ...loaded disc If a disc has no parental lock anybody can play it even though you have set the parental lock Ñ ÑDisc setup Performs setup when using disc media 1 Touch SET of DISC SETUP DISC SETUP screen appears 2 Select an option as follows CD Read Sets the motion of this unit when a music CD is played 1 Default Automatically recognizes and plays an audio file disc a DVD or a music CD 2 Forcibly pla...

Page 63: ...ning to USB Cable accessory of the iPod iPhone Bluetooth profile SPP iPod connection setup HDMI BT B To listen music with Lightning connector device Lightning to USB Cable accessory of the iPod iPhone iPod connection setup USB 1Wire C To listen music and watch video with 30 pin connector device analog KCA iP202 iPod connection setup USB AV IN D To listen music with 30 pin connector device KCA iP10...

Page 64: ...t etc D B F I etc Current play mode display The meanings of each icon are as follows D play B fast forward A fast backward F search up E search down I stop IR resume stop H pause 2 Movie display area Control switching area Touch to switch between the Simple Control and List Control screen Only for Music file Touch to display Video screen Only for Video file 3 Multi function key Touch to switch the...

Page 65: ... only 9 9 10 11 12 9 Searching file area disc media only Touch to search the next previous file Scrolling from center of display to left or right performs fast backward or fast forward Each time you touch each area the speed changes standard 2 times 3 times To stop fast backward forward touch center of the display 10Menu display area disc media only Touch to display the Control screen For details ...

Page 66: ...screen Only for Video file 3 Multi function key Touch to switch the multi function menu For details on the menu see Multi function menu P 66 4 Multi function menu Various functions can be performed by using keys in this area For details on the keys see Multi function menu P 66 5 Sub function key Touch to display Sub function menu 7 in this table 6 Content list Displays the list and content The con...

Page 67: ...a Touch to display the Movie control screen For details see Movie Control P 72 11Key display area Video file only Touch to display the last control screen 12Screen setup display area Touch and hold to display the screen control screen See Monitor Screen Setup P 110 Ñ ÑMulti function menu Music CD iPod Disc media USB device The following functions can be performed by using keys in this area Only fo...

Page 68: ...vice Searches track from the album artwork list For details on search operation see Search from album artwork P 70 A B Only for music CD and disc media Fast forward or fast backward Only for iPod and USB device Plays the previous or next album in Favorite list P 71 or For confirmation of play time During music CD playback you can also confirm disc remaining time by touching time display Each time ...

Page 69: ...le list and folder list by touching For disc media you cannot display the list during random play and stop Ñ ÑOther search There are other search methods in order to narrow search for a song This function is not available when music CD is the current source 1 Touch in the control screen The search type screen appears 2 Touch desired search method USB device iPod The list sorted in the way you sele...

Page 70: ...d link from the left part of the screen You can select from artist album genre and composer The link list corresponding to your selection appears NOTE The list is sorted by the way you selected Artist Displays the album list of the artist Album Displays all tunes of the current album Genre Displays the artists list in which artists belong to the same genre Composer Displays the album list of the c...

Page 71: ...ÑSearch from album artwork Only for iPod and USB device You can search music files by selecting the album artwork 1 Touch Sub function menu appears 2 Touch Favorite screen appears 3 Touch desired artwork in the upper line NOTE The key in the upper side of the screen functions differently depending on the status When Load Albums appears You have not yet loaded any artwork Touch the key to start loa...

Page 72: ...lbum already registered to the favorite list Up to 10 albums can be registered to the list 2 Touch the desired artwork in the favorite list The selected album is played and the control screen appears NOTE The favorite list is played to the right starting with the selected album To delete the album from the favorite list touch and drag it to the upper line You can change the playing order of the fa...

Page 73: ...t the movie playback 1 In the playback screen touch illustrated area Movie control screen appears 2 Touch Disc CTRL Disc media only Movie Control screen appears 3 Perform desired operation as follows Changes subtitle language Touch Subtitle Changes audio language Touch Audio Exits the menu Touch Exit ...

Page 74: ...er to Application link setup P 79 1 Press the HOME button 2 Flick the screen left or right to select the Source launcher panel 3 Touch 4 Touch Pandora 2 6 2 7 Simple Control screen List Control screen 1 7 3 3 4 4 5 8 1 Information display Displays text information of current content that is being played 2 Artwork Control switching area The artwork is displayed if available from current content Whe...

Page 75: ...e list of the Summary Board using YouTube See Summary Board Widget P 52 Bookmark Artist Bookmark an artist in the current content Bookmark Song Bookmark a song in the current content Ñ ÑSub function menu The following functions can be performed by using keys in this area Status bar in center Displays the elapsed time since when you select the station and status bar which shows current location Cre...

Page 76: ...e in the list Sort the list in alphabetical order You can select the desired letter from the list which corresponds to the station name to help narrow the search Display the genre list Displays the genre list Sort the list by date Touch ByDate The list is sorted to begin with the last registered station NOTE You can operate Pandora by using the remote controller However only playing pausing and sk...

Page 77: ...he screen left or right to select the Source launcher panel 3 Touch 4 Touch APPS NOTE When you turn on the power and select apps as the source the caution for the operation watching video and listening music appears With your acceptance you can control apps listen to music and watch video from apps when you are driving 1 2 1 2 3 3 1 D H iPod only L Plays or pauses 2 E F Searches the previous next ...

Page 78: ...Source SETUP Menu screen appears 4 Touch USB SETUP iPod SETUP APPS SETUP or DivX VOD in the list Each setup screen appears See the following section for each setting USB setup P 77 iPod setup P 78 Apps setup P 79 DivX VOD P 81 Ñ ÑUSB setup 1 Set each item as follows On Screen USB Set how information from a USB device is displayed Auto Default Information appears for 5 seconds when updated OFF Does...

Page 79: ...g is not available when an iPod is connected 2 This item can be set when in STANDBY source iPod iPhone connection setup 1 Press the HOME button twice to the Source launcher panel 2 Touch 3 Touch STANDBY 4 Touch 5 Touch SETUP 6 Touch Source 7 Touch iPod SETUP 8 Touch iPod Connection Setup in the iPod SETUP screen iPod connection setup screen appears 9 Touch CHANGE 10Set each item as follows USB AV ...

Page 80: ...ngs Makes the detailed setting of the device in which APPS are installed Screen Adjust Touch SET to display the screen control screen See Monitor Screen Setup P 110 APP interrupt volume DNR8025BT Sets the volume level of the information from APP when it cuts in the music you are listening to This item can be set when in STANDBY source Application link setup 1 Press the HOME button twice to the Sou...

Page 81: ...onnecting via Bluetooth only 13Touch Next Confirmation screen appears 14Touch Done NOTE For the details of the necessary cable and adapter to connect with iPod iPhone and Android device refer to Music Video Basic Operation P 62 When you select HDMI BT HDMI MHL BT or Bluetooth in step 12 Bluetooth device selection screen will appear Select the device to be connected If a connectable Bluetooth devic...

Page 82: ...unit which is already registered After you touch the key a confirmation message appears Follow the message and complete the operation NOTE DivX R Registration Code is disabled when a DVD is being played When downloading a DivX VOD file controlled by DRM register the code appeared on the screen Otherwise the file may not be able to play with this unit Remaining number of viewing is displayed when p...

Page 83: ...udio file MP3 mp3 AAC LC m4a aac WMA wma WAV wav FLAC flac Copyrighted content cannot be played Music Basic Operation The music files uploaded to Dropbox can be played Preparation To play the files uploaded to Dropbox setting is required See Starting procedure P 82 1 Press the HOME button 2 Flick the screen left or right to select the Source launcher panel 3 Touch 4 Touch Storage L Plays or pauses...

Page 84: ...e file random random off For confirmation of play time Status bar in center For confirmation of current playing position You can drag the circle left or right to change the playing position Category search You can search music files by the following operations 1 Touch in the control screen The search type screen appears 2 Touch the desired category from the left part of the screen 3 The list is so...

Page 85: ...i Hotspot Setup P 30 HOME 6 DNN HOME 6 DNN Wi Fi Wi Fi Wi Fi access point Wireless Link Media Server function Plays the content stored in the USB memory connected to this unit via another network media player client device We confirmed normal operation using the following network media players software Windows Media Player 12 Media Player function Plays the content stored in another media server d...

Page 86: ... the client device Operate the client device to connect to the server Server name DNN9350BT DNN9350BTM DNR8035BT or DNR8035BTM Media Player function Plays the content stored in another media server device via this unit 1 Press the HOME button 2 Flick the screen left or right to select the Source launcher panel 3 Touch 4 Touch Wireless Link 5 Connect to the media server A list of detected media ser...

Page 87: ...g position You can drag the circle left or right to change the playing position Touch to display Sub function menu Touch and hold to switch between the file list and the current file information Media Controller function Allows you to handle the content stored in another media server device via this unit and play them on another network media player client device 1 Press the HOME button 2 Flick th...

Page 88: ...through this unit 1 Press the HOME button 2 Flick the screen left or right to select the Source launcher panel 3 Touch 4 Touch Wireless Link 5 Touch DMR The Rendering function is turned on 6 Establish connection from the media controller Operate the media controller to connect to this unit This unit DNN9350BT DNN9350BTM DNR8035BT or DNR8035BTM ...

Page 89: ...nformation FM1 etc Band display MHz kHz Frequency display Preset Preset number Touch to switch between the Simple Control and List Control screen 3 Multi function key Touch to switch the multi function menu For details on the menu see Multi function menu P 89 4 Preset key Multi function menu Recalls the memorized station or channel When touched for 2 seconds stores the current receiving station or...

Page 90: ...ion menu The functions of each key are as follows P1 P6 Select the preset station Touch for 2 seconds to store the current station into the preset memory Displays the list of preset stations For details on search operation see Selecting Operation P 91 TI FM tuner only Sets the traffic information mode on For details see Traffic Information P 92 SEEK Switches the seek mode in the following sequence...

Page 91: ...within 10 seconds 1 Touch Sub function menu appears 2 Touch desired band key 3 Touch in the control screen The multi function menu appears 4 Touch AME in the multi function menu 5 Touch A or B in the sub function menu Auto memory starts Ñ ÑManual memory You can store the current receiving station or channel in memory 1 Select a station or channel you wish to store in memory 2 Touch P 1 6 in which ...

Page 92: ...n also select your desired channel from the list Ñ ÑList select You can select an ensemble from a list of memorized ensembles or select a service from a list of all services received 1 Touch in the control screen The multi function menu appears 2 Touch in the multi function menu List screen appears 3 Select the desired content from the list Ñ ÑSearch by program type FM tuner only You can tune to a...

Page 93: ...essary to have Traffic Information function set to on in order to have the Traffic Information screen appear automatically The volume setting during reception of traffic information is automatically stored The next time the traffic information is received this unit recalls the volume setting automatically Tuner Setup You can set tuner related parameters This function is available for models with r...

Page 94: ... Regional Sets whether to switch to the station only in the specific region using the AF control Default is OFF Auto TP Seek When traffic information station reception is poor automatically searches for a station that can be received better Default is ON Language Select Selects a display language for the PTY function Antenna Control Allows you to turn off the Radio Data System function to prevent ...

Page 95: ...ated by the keyword Category Serach Searches for videos by the category My YouTube When you log in to YouTube you can use the following Favorite Videos Playlists Recommeds Upload Lists Channel Feed Note The video playback which uses the internet browser is not guaranteed Ñ ÑKeyword Search 1 Touch Keyword Search 2 Perform desired operation as follows 1 2 1 Enter a Keyword for search Enter a keyword...

Page 96: ...firmation of current playing position You can drag the circle left or right to change the playing position Ñ ÑMy YouTube By logging into YouTube you can use My Favorites and My Videos 1 Press the MENU button 2 Touch Sign in 3 Enter the Email address and Password 4 Touch Sign in 5 Touch My YouTube 6 Select a category Ñ ÑMenu 1 Press the MENU button Sign in Log into the YouTube service Now you can u...

Page 97: ... You need to connect to Internet using Wi Fi See Wi Fi Setup P 28 1 Press the HOME button 2 Flick the screen left or right to select the Network contents panel 3 Touch 4 Touch Aupeo 5 Select a genre Ñ ÑLog in By registering an account you can listen to your favorite songs 1 Touch log in 2 Enter the User Name and Password 3 Touch log in ...

Page 98: ...ect a sub genre Mood Music matching your mood Select a new genre FEATURED Select a Featured Stations GENRE STATIONS Select a Genre Stations ARTIST STATIONS Create a station of your type by searching stations by the artist name Favorites Edit the titles registered in Loves and Bans You can use this button only when you have logged in to this service Ñ ÑEditing Favorites You can edit the titles regi...

Page 99: ...nes cell phones verified for compatibility access the following URL http www kenwood com cs ce bt The units supporting the Bluetooth function have been certified for conformity with the Bluetooth Standard following the procedure prescribed by Bluetooth SIG However it may be impossible for such units to communicate with your smartphone cell phone depending on its type Registering and Connecting Blu...

Page 100: ...tion on this unit or iOS smartphone registers the smartphone as a Bluetooth device 2 Select the Bluetooth unit to register from the list NOTE If the Bluetooth unit cannot be searched in step 1 you can search it again by touching Search in above screen Touch Cancel to cancel searching for the Bluetooth unit 3 Enter PIN code form the cell phone Ñ ÑConnecting the Bluetooth unit 1 Touch the name of de...

Page 101: ...code in your smartphone cell phone PIN code is set to 0000 as the default SSP Secure Simple Pairing of Bluetooth 2 1 or later 1 Search the unit DNN from your smartphone cell phone 2 Confirm the request both on the smartphone cell phone and the unit Ñ ÑChange the PIN code 1 Touch PIN Code Set PIN Code Set screen appears 2 Input the PIN code 3 Touch Enter ...

Page 102: ...revious next content D Plays H Pauses I Stops playback 3 Control switching area Touch to switch between the Simple Control and List Control screen 4 Content information Displays the information of the current content These items appear only when the audio player which supports AVRCP profile is connected NOTE If the operation keys do not appear operate from the player Depending on your smartphone c...

Page 103: ... of your cell phone the following restrictions are placed The phonebook data cannot be downloaded normally Characters in the phonebook are garbled To cancel downloading the phonebook data operate the cell phone 2 Select a dialing method See the following table for each method Call by entering a phone number 1Touch 2Enter a phone number with number keys 3Touch Call using call records 1 Touch Incomi...

Page 104: ...ns become ineffective if touched The status icons such as battery and antenna displayed may differ from those displayed on the cell phone Setting the cell phone in the private mode can disable the hands free function Ñ ÑVoice Recognition You can access the voice recognition function of the smartphone cell phone connected to this unit You can search a phone number in the smartphone cell phone phone...

Page 105: ...one and speaker Sending DTMF tone signal Touch DTMF to display the tone input screen You can send tones by touching desired keys on the screen Call waiting You can answer a second call while talking with the first caller by placing the first call on hold and switching to the second call You can switch back and forth between first and second caller as well To answer the second call Touch The first ...

Page 106: ... whether you search by Phonebook name or Phone number 3 Enter the Phonebook name or Phone number Enter the keyword using the voice recognition function When Speak now is displayed pronounce the keyword You can use a user account when you have logged in the Owner or User 4 Touch TEL When searched by Phonebook name 5 Touch Û When searched by Phonebook number The unit make a call ...

Page 107: ...stem automatically answers a call OFF Default Automatic response is not available 0 99 Set ringing time interval second Auto Pairing When set to ON the Apple Auto Pairing function is turned on to automatically register the iPod touch or iPhone connected to this unit ON Default Uses Apple Auto Pairing function OFF Not uses Apple Auto Pairing function Call Beep Select whether or not to beep upon rec...

Page 108: ...hone Level Adjust the sensitivity of the telephone microphone Default is 3 Noise Reduction Level Reduces the noises generated by surrounding environment without changing the microphone volume Use this setting when the voice of caller is not clear Default is 10 Restore Resets the settings to the default settings 1 Either the time interval for automatic answer set on this unit or the time interval s...

Page 109: ...tem as follows 1 2 3 1 Guideline Pressing each time turns on or off the guideline display alternately 2 Angle Pressing each time changes camera angles in the following order Super wide view Wide view Overhead view Wide view Top view Corner view 3 Clearing the Camera View display Switching the View Camera Switching between the front view camera and the rear view camera 1 Press the NAV APPS button f...

Page 110: ...109 Return to the Top page Camera Control ...

Page 111: ...nd buttons do not dim SYNC Default Turns the dimmer function on or off when the vehicle light control switch is turned on or off NAV SYNC Turns the dimmer function on or off according to the Navigation Day Night display setting DNN9350BT DNN9350BTM Mode Playback screen only Select screen mode Full Full picture mode Just Justify picture mode Zoom Zoom picture mode Normal Normal picture mode NOTE Ad...

Page 112: ...t from Auto Once OFF Auto Default Scrolls the text automatically Once Allows you to scroll the text only once automatically when updated OFF Does not scroll the text automatically NAV Key Longer than 1 Second APPS Key Longer than 1 Second You can set the operation performed when the NAV key is pressed for 1 second Select from V OFF CAM V OFF Default Turn the display off CAM Switches to the front o...

Page 113: ...emote Controller in the User Interface screen Steering Remote Controller Setting screen appears 2 Press the steering remote controller button you want to set the function NOTE You can have the unit learned all buttons at a time In that case press the all buttons one at a time and after pressing all of them touch Done in Steering Remote Controller Setting screen However new functions cannot be lear...

Page 114: ...ed due to replacement of the battery the settings can be restored 1 Touch SETUP Memory in the System Menu screen SETUP Memory screen appears 2 Follow the instruction on the screen Lock Unlock Locks or unlocks the AV IN SETUP and Audio SETUP settings Yes Memorizes or recalls the settings No Cancels the function or memorization The SETUP Menu screen appears again When Lock is selected you cannot cha...

Page 115: ... Control monitor angle P 114 Adjust panel color P 115 Ñ ÑMonitor angle control You can adjust the angle of the monitor 1 Touch Angle in the Display Menu screen Angle setup screen appears 2 Select a number below an angle that will best suit your monitor viewing Default is 0 NOTE You can store the current monitor angle as the angle during power off Touch Memory when the desired angle is selected ...

Page 116: ...Panel Color Scan is set to off Touch Initialize to reset the settings to the default settings 3 Touch the desired color Registering original color You can register your original color 1 Touch Adjust in the Panel Color Coordinate screen Panel Color RGB Coordinate screen appears 2 Use C and D to adjust each color value 3 Touch the desired preset key for 2 seconds Panel color scan You can set the pan...

Page 117: ... Uses the front left side speaker for voice guidance Front R Uses the front right side speaker for voice guidance Front All Default Uses both front speakers for voice guidance NAV Voice Volume Adjust the volume for voice guidance of the navigation system Default is 20 NAV Mute Mutes the volume of rear speakers during voice guidance of the navigation system Default is ON Camera Setup You can set ca...

Page 118: ... the CMOS 3xx series with ID 1 set For details see the instruction manual of your camera Front Camera 1 Select the type of front camera to use CMOS 310 When the CMOS 3xx series with ID 2 set is connected Other When the other camera is connected OFF Default When the front camera is not used F CAM Settings 3 Adjust the CMOS 3xx series with ID 2 set For details see the instruction manual of your came...

Page 119: ...oftware see the relevant update procedure manual which comes with the software Notify the update When the program is updated you will be notified by the icon on the status bar Preparation You need to connect to Internet Minor update If it is the minor update you can update the program via the Internet 1 Drag the status bar downward 2 Touch Download to start download Touch Detail to display details...

Page 120: ...hen you select a system that is connected via the AV INPUT port Default is VIDEO AV Output Interface Setup You can select an AV source to be output at the AV OUTPUT port Default is VIDEO1 1 Touch on any screen 2 Touch SETUP SETUP Menu screen appears 3 Touch AV OUT AV OUT Interface screen appears 4 Touch C or D to set AV OUT to VIDEO DISC iPod or OFF NOTE You can select iPod only when iPod is conne...

Page 121: ...ars See the following section for each setting Setting audio P 120 Controlling audio P 124 Controlling equalizer P 125 Controlling sound effect P 126 Performing zone control P 128 Set listening position P 128 Setting Audio 1 Touch on any screen 2 Touch Audio Audio screen appears 3 Touch Audio SETUP Audio SETUP screen appears See the following section for each setting Set up speakers P 121 Set up y...

Page 122: ...tails see Crossover network setup P 122 3 Select a speaker size using C and D The speaker size is different depending on the speaker type and the unit Front OEM 8 cm 10 cm 12 cm 13 cm 16 cm 17 cm 18 cm 4x6 5x7 6x8 6x9 7x10 Rear None OEM 8 cm 10 cm 12 cm 13 cm 16 cm 17 cm 18 cm 4x6 5x7 6x8 6x9 7x10 Subwoofer None 16 cm 20 cm 25 cm 30 cm 38 cm over NOTE Select None if you have no speakers When Speak...

Page 123: ...r Setup 2 Only when Subwoofer is set to a mode other than None in Speaker Setup 3 Only when LPF FREQ HPF FREQ is set to a mode other than Through in X over When Speaker network is set to 3 way Region code 3 area Range switching area graph Selects the band for setting gain frequency filter and slope Touch the left arc to set the LPF the center arc to set the BPF and the right arc to set the HPF Pha...

Page 124: ...ly for timing adjustment of sound output for each channel to have the highest surround effects Speaker location setup 1 In the Car Type screen touch Location Speaker Location screen appears 2 Select the speaker locations using D Front Speaker Select the location from Door On Dash Under Dash Rear Speaker Select the location from Door Rear Deck 2nd Row 3rd Row Minivan Minivan Long When Speaker netwo...

Page 125: ...screen appears 3 Touch Audio Control 4 Set each item as follows Fader Balance Adjust the volume balance around the touched area C and D adjust the right and left volume balance R and S adjust the front and rear volume balance Volume Offset Finely adjust the volume of the current source to minimize the difference in volume between different sources Subwoofer Level Adjust the subwoofer volume This s...

Page 126: ...zer cannot be set when you select iPod in the Equalizer screen 1 Touch EQ in the Equalizer screen 2 Touch the screen and set the Graphic Equalizer as desired Gain level light green boxed area Adjust the gain level by touching the each frequency bar Touching C D R and S can also adjust the level Use C and D to select a frequency and R and S to set the level EQ INIT Returns to the previous level whi...

Page 127: ...lowing section for each setting Set space enhancer P 126 Set Drive Equalizer Drive Equalizer P 127 Set up elevation P 127 Set up realizer or supreme P 127 Ñ ÑSpace Enhancer 1 Touch Space Enhancer in the Sound Effect screen Space Enhancer screen appears 2 Touch Small Large or OFF Each setting value indicates the soundscape level NOTE This setting is not available during Radio and Digital Radio sour...

Page 128: ...rs virtually 1 Touch Elevation in the Sound Effect screen Elevation screen appears 2 Select Elevation level from High Low and OFF Ñ ÑRealizer and Supreme You can restore the sound lost due to audio compression to a realistic sound 1 Touch the screen in the Sound Effect screen Realizer Realizer is sound enhancement and boosting low frequencies bass boost Select the level from OFF Level1 Level2 Leve...

Page 129: ...n off the dual zone function NOTE When the rear speaker sound is switched the audio source that is output at the AV OUTPUT terminal is also switched to the same source When the dual zone function is set to on the following functions are not available Output from the subwoofer Subwoofer Level Bass Boost P 124 Equalizer Control Sound Effect Listening Position P 125 126 128 DSP Bypass Control Speaker...

Page 130: ...r output specified here to have a more suitable environment for your vehicle If you specify the distance from the center of the currently set listening position to every speaker the delay time will be automatically computed and set 1 Determine the center of the currently set listening position as the reference point 2 Measure the distances from the reference point to the speakers 3 Calculate the d...

Page 131: ...p or heat the battery or place it in an open fire Such actions may cause the battery to leak fluid If spilled fluid comes in contact with your eyes or on clothing immediately rinse with water and consult a physician Place the battery out of reach of children In the unlikely event that a child swallows the battery immediately consult a physician Battery Installation If the remote control operates o...

Page 132: ...Ñ ÑDirect search mode Using the remote control you can jump directly to the desired file track chapter etc with entering the number corresponding to the content NOTE This operation cannot be performed for USB device and iPod 1 Press the BS button several times until the desired content appears The available contents are different depending on the source DVD Title number Chapter number Play time It...

Page 133: ...gation and the source screens 3 MENU I DVD Stops playing and memorizes the last point where the disc stopped The last point is deleted by pressing twice NAV Displays Main menu 4 OUT IN NAV Zooms in or out the navigation map 5 POSITION L AUD DVD Pauses the track or file and resumes playing by pressing twice During radio source in AUD mode switches the seek mode NAV Displays the current position 6 C...

Page 134: ...he direct search mode see Direct search mode P 131 DVD Press 1 2 to fast forward backward Switches the fast forward backward speed each time you press this key Press 4 5 to slow forward backward Switches the slow playback speed each time you press this key DVD only 15 CLEAR DVD Clears the number 16 BS DIRECT AUD DVD Switches to the direct search mode For details on the direct search mode see Direc...

Page 135: ...bled Set the dual zone function to on See Zone Control P 128 Cannot set up the equalizer Cannot set up the crossover network The dual zone function is enabled Set the dual zone function to off See Zone Control P 128 DSP Select is set to Bypass Set DSP Select to Through See DSP select P 124 Ñ ÑAbout audio operations Problem Reason Solution Radio reception is poor The car antenna is not extended Pul...

Page 136: ...speaker cord has shorted or it has come in contact with the car chassis Wire or insulate the speaker cord as appropriate and then press the Reset button P 137 Hot Error When the internal temperature of this unit rises to 60 C or more the protection circuit is activated and you may not be able to operate the unit Use the unit again after reducing the temperature of the unit Mecha Error The disc pla...

Page 137: ...nd Files P 138 and try another USB device USB Device Error The connected USB device is rated a current capacity higher than the allowable limit Check the USB device Some trouble may have occurred to the connected USB device Change the source to any source other than USB Remove the USB device Authorization Error Connection to the iPod has failed Remove the iPod and then reconnect it The unit does n...

Page 138: ... unit returns to factory settings HOME 6 NOTE Disconnect the USB device before pressing the Reset button Pressing the Reset button with the USB device connected can damage the data stored in the USB device For how to disconnect the USB device see How to Play Media P 17 When the unit is turned on after resetting the Initial SETUP screen appears See Initial setup P 14 ...

Page 139: ...CD Music CD 1 v CD TEXT CD ROM v MP3 WMA AAC MPEG1 MPEG2 DivX playback Multisession is supported Packet write is not supported CD R v CD RW v DTS CD Video CD VCD v Super video CD Photo CD CD EXTRA r Only music CD session can be played HDCD v CCCD Others Dualdisc Super audio CD r Only CD layer can be played 1 Incompatible with 8 cm 3 inch discs v Playback is possible r Playback is partly possible P...

Page 140: ...d at the first setout is played WMA and AAC of which is covered with DRM cannot be played Although the audio files are complied with the standards listed above the play may be impossible depending on the types or conditions of media or device An online manual about audio files is posted on the site www kenwood com cs ce audiofile On this online manual detailed information and notes which are not w...

Page 141: ...ithout displaying a folder name etc Changing the browse item will display a correct title etc When the iPod is connected to this unit KENWOOD or ä is displayed on the iPod to indicate that you cannot operate the iPod Ñ ÑUsable USB device You can use a mass storage class USB device on this unit The word USB device appearing in this manual indicates a flash memory device and digital audio players ca...

Page 142: ...e title repeat function is on ö öVCD 1chLL 2chLL Identifies the left audio output of channel 1 or 2 1chLR 2chLR Identifies the monaural audio output of channel 1 or 2 1chRR 2chRR Identifies the right audio output of channel 1 or 2 1chST 2chST Identifies the stereo audio output of channel 1 or 2 LL Identifies the left audio output LR Identifies the monaural audio output RR Identifies the right audi...

Page 143: ...AUTO1 Seek mode is set to AUTO1 AUTO2 Seek mode is set to AUTO2 MANUAL Seek mode is set to MANUAL MONO The forced monaural function is on EON The Radio Data System station is sending EON AF The AF search function is on LO S The Local Seek function is on NEWS News bulletin interruption is in progress RDS Indicates the state of the Radio Data System station when the AF function is on White Radio Dat...

Page 144: ... 9 is displayed on a standard TV set screen 4 3 with a black band at both the top and bottom of the screen letter box ö öOperation regulatory marks With this DVD some functions of this unit such as the play function may be restricted depending on the location where the DVD is playing In this case the following marks will appear on the screen For more information refer to the disc manual Prohibitio...

Page 145: ...Cambodian kn Kannada ko Korean ks Kashmiri ku Kurdish ky Kirghiz la Latin lb Luxembourgish ln Lingala lo Laotian lt Lithuanian lv Latvian Lettish mg Malagasy mi Maori mk Macedonian ml Malayalam mn Mongolian mo Moldavian mr Marathi ms Malay mt Maltese my Burmese na Nauru ne Nepali nl Dutch no Norwegian oc Occitan om Afan Oromo or Oriya pa Punjabi pl Polish ps Pashto Pushto pt Portuguese qu Quechua ...

Page 146: ...deo VIDEO CD CD DA Sampling Frequency 44 1 48 96 kHz Quantifying Bit Number 16 20 24 bit ö öUSB interface section USB Standard USB 2 0 Full High speed File System FAT 16 32 Maximum Power Supply Current DNN9350BT DNN9350BTM iPod iPhone DC 5 V 1 A USB DC 5 V 500 mA DNR8035BT DNR8035BTM DC 5 V 1 A D A Converter 24 Bit Video Decoder MPEG1 MPEG2 MPEG4 WMV H 264 Audio Decoder MP3 WMA AAC WAV FLAC ö öNet...

Page 147: ...section Graphics equalizer Band 13 Band Frequency BAND1 13 62 5 100 160 250 400 630 1k 1 6k 2 5k 4k 6 3k 10k 16k Hz Gain 9 8 7 6 5 4 3 2 1 0 1 2 3 4 5 6 7 8 9 dB 2Way X Over High pass filter Frequency Through 30 40 50 60 70 80 90 100 120 150 180 220 250 Hz Slope 6 12 18 24 dB Oct Low pass filter Frequency 30 40 50 60 70 80 90 100 120 150 180 220 250 Hz Through Slope 6 12 18 24 dB Oct 3Way X Over R...

Page 148: ... 1611 kHz 9 kHz Region code 4 model 531 kHz 1611 kHz 9 kHz Usable Sensitivity MW 25μV LW 45μV Region code 4 model 28 dBμV ö öVideo section Color System of External Video Input NTSC PAL External Video Input Level RCA jacks 1 Vp p 75 Ω External Audio Max Input Level RCA jacks 2 V 25 kΩ Video Input Level RCA jacks 1 Vp p 75 Ω Video Output Level RCA jacks 1 Vp p 75 Ω Audio Output Level Mini jack 1 2 V...

Page 149: ...marks and trade names are those of their respective owners The AAC logo is a trademark of Dolby Laboratories Microsoft and Windows Media are either registered trademarks or trademarks of Microsoft Corporation in the United States and or other countries Made for iPod and Made for iPhone mean that an electronic accessory has been designed to connect specifically to iPod or iPhone respectively and ha...

Page 150: ...d associated logos are trademarks of Rovi Corporation or its subsidiaries and are used under license PANDORA the PANDORA logo and the Pandora trade dress are trademarks or registered trademarks of Pandora Media Inc used with permission QR Code is registered trademarks of DENSO WAVE INCORPORATED in JAPAN and other countries The aptX software is copyright CSR plc or its group companies All rights re...

Page 151: ...OFITS OR BUSINESS INTERRUPTION HOWEVER CAUSED AND ON ANY THEORY OF LIABILITY WHETHER IN CONTRACT STRICT LIABILITY OR TORT INCLUDING NEGLIGENCE OR OTHERWISE ARISING IN ANY WAY OUT OF THE USE OF THIS SOFTWARE EVEN IF ADVISED OF THE POSSIBILITY OF SUCH DAMAGE Requirements Pandora Requirements for listening to the Pandora are as follows A smartphone with the latest Pandora application installed A Pand...

Page 152: ...other relevant provisions of Directive 1999 5 EC Türkçe Bu vesileyle JVC KENWOOD DNN9350BTM DNR8035BTM ünitesinin 1999 5 EC Direktifinin başlıca gereksinimleri ve diğer ilgili hükümleri ile uyumlu olduğunu beyan eder ö öFor Turkey Bu ürün 28300 sayılı Resmi Gazete de yayımlanan Atik Elektrikli ve Elektronik Eşyalarin Kontrolü Yönetmeliğe uygun olarak üretilmiştir ö öEski Elektrik ve Elektronik Eki...

Page 153: ......

Reviews: