background image

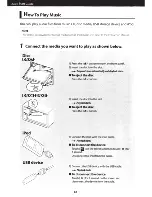
Summary of Contents for DNX5060EX

Page 1: ...ance from your new GPS Navigation System For your records Record the serial number found on the back of the unit in the spaces designated on the warranty card and in the space provided below Refer to the model and serial numbers whenever you call upon your Kenwood dealer for information or service on the product Model DNX7190HD DNX7490BT DNX6990HD DNX6190HD DNX6490BT DNX5190 DNX5060EX Serial numbe...

Page 2: ...fferent from the actual panels In this manual each model name is abbreviated as follows DNX7190HD and DNX7490BT 1 1 f t DNX6990HD DNX6190HD and DNX6490BT 1 1 f At DNX5190 and DNX5060EX l l f ca t If above icons are showed read the article applicable to the unit you use In operation procedures bracket shape indicates the key or button you should control indicates the name of panel buttons indicates...

Page 3: ...y is incorrectly replaced Replace only with the same or equivalent type Protecting the monitor To protect the monitor from damage do not operate the monitor using a ballpoint pen or similar tool with the sharp tip 3 Lens fogging When you turn on the car heater in cold weather dew or condensation may form on the lens in the disc player of the unit Called lens fogging this condensation on the lens m...

Page 4: ...Fig 1 Fig 2 Cleaning The Unit If the faceplate of this unit is stained wipe it with a dry soft cloth such as a silicon cloth If the faceplate is stained badly wipe the stain off with a cloth moistened with neutral cleaner then wipe it again with a clean soft dry cloth Applying spray cleaner directly to the unit may affect its mechanical parts Wiping the faceplate with a hard cloth or using a volat...

Page 5: ...reful of the ambient temperature Using the navigation system at extreme temperatures can lead to malfunction or damage Also note that the unit can be damaged by strong vibration by metal objects or by water getting inside the unit 5 A CAUTIONS Failure to avoid the following potentially hazardous situations may result in injury or property damage The navigation system is designed to provide you wit...

Page 6: ...when you reset the unit 6 1 Touch the corresponding key and set the value Select the language used for the control screen and setting items Default is American English en touch Enter Adjust the position of the monitor Default is 0 Set the terminal which your iPod is connected to Default is iPod Set the screen and button illumination color You can select whether to perform color scan and adjust sca...

Page 7: ...DNX7190HD DNX7490BT DNX6990HD DNX6190HD DNX6490BT DNX5190 DNX5060EX 2 Touch Finish NOTE For details on operations of each setting refer to the Instruction Manual 7 ...

Page 8: ...l How To Insert An SD Card 1 Press button for 1 second The panel fully opens 2 Hold the SO card as the diagram in the right and insert it into the slot until it clicks e To eject the card Push the card until it clicks and then remove your finger from the card The card pops up so that you can pull it out with your fingers 8 0 1 l Labelled side ...

Page 9: ...Graphic Equalizer screen Instruction Manual P 95 Pressing for 1 second switches camera view display on off Displays the navigation screen Pressing for 1 second switches AV out sources Displays the Top Menu screen Instruction Manual P 14 Pressing for 1 second turns the power off When the power off turns the power on Displays the Hands Free screen Instruction Manual P 64 Pressing for 1 second displa...

Page 10: ... slot cover as the diagram in the right 2 Hold the microSD card with the label facing left and the notched section up and insert it into the slot until it clicks e To eject the card Push the card until it clicks and then remove your finger from the card The card pops up so that you can pull it out with your fingers 10 ...

Page 11: ...the current music from HD Radio tuner or SiriusXM Instruction Manual P 56 Central and South America sales area Pressing for 1 second turns off the display Volume Knob Pressing switches attenuation of the volume on off Turning adjusts volume up or down Pressing for 1 second displays Tone Control screen Instruction Manual P 95 SCRN Displays the Screen Control screen Pressing for 1 second displays re...

Page 12: ...s of the menu are as follows l l J o Displays the EXT SW Control screen Displays the SETUP Menu screen Displays the Audio Control Menu screen Displays the control screen of current source Icon feature differs depending on the source Closes the menu ll scroll Scrolls the displayed text IJietc Touch keys with various functions are displayed here Displayed keys differ depending on the current audio s...

Page 13: ...avigation system from Help To display Help touch Tools and then touch Help Where Am I Routes My Data World Clock Calculator For more information about your navigation system download the latest version of the Owner s Manual from manual kenwood com edition im345 3 Enter your destination and start the guidance e Finding points of interest 1 Touch Where To 2 Touch Points of Interest 3 Select a catego...

Page 14: ...rows on the map and directions at the top of the map If you depart from the original route your navigation system recalculates the route 1 2 Views the Next Turn page or the junction view page when available mViews the Turn List page Views the Where Am I page 0 Zooms in and out Returns to the Main Menu Displays a different data field I Views the Trip Computer NOTE Touch and drag the map to view a d...

Page 15: ...nt on the map and change your route to avoid the incident The FM TMC subscription activates automatically after your navigation system acquires satellite signals while receiving traffic signals from the service provider Go to www garmin com fmtraffic for more information e Updating the software To update the navigation system software you must have a USB mass storage device and an internet connect...

Page 16: ...d For details on playable file format media format iPod model etc refer to the Instruction Manual 7 Connect the media you want to play as shown below h v 1 1 Connectthe USBdevice withthe USB caole Pioyback1ttltts i eTo disconnect the device Touch for l second on the screen and disconnectthe device from the cable 16 ...

Page 17: ...enter bar Repeats current content l Plays all contents in random order NOTE For other operations refer to the Instruction Manual If desired key is not displayed in the multi function bar touch the B to switch the menu 3 Search the track file you want to listen to e List search 1 Touch center of the screen The content list of the media being played is displayed If the information of the current tra...

Page 18: ... disc menu 3 Displays the Source Searches the next previous content or Control screen file Scrolling from center of display to left or right performs fast backward or fast forward To stop fast backward forward touch center of the display 4 1 See DVD Disc Menu Operation P 23 in the Instruction Manual 2 See Zoom Control For DVD And VCD P 24 in the Instruction Manual 3 See Movie Control P 39 in the I...

Page 19: ...function menu appears 2 Touch AM or FM to select the band Radio HD Radio tuner only 3 Touch or to tune in the desired station e Auto memory Radio HD Radio tuner only 1 Touch Ill Sub function menu appears 2 Touch AM or FM to select the band 3 Touch a 4 Touch AME 5 Touch or in the sub function menu Auto memory starts e Recalling the preset station 1 Touch P You can also display the preset list by to...

Page 20: ...n the Searched Device List screen Registering is completed 2 Connect your cell phone to the unit 1 Touch SET of Paired Device List in the Bluetooth SETUP screen 2 Touch the desired device from the list and touch TEL HFP The selected device is connected to the unit NOTE Touch Audio A2DP if you want to connect the device as an audio player This key appears only for l illEU Touch Pandora SPP if you w...

Page 21: ...umber with number keys Touch IJ c t us lil itl t i r CDTouch Incoming Calls Outgoing Calls or Missed Calls g Select the phone number from the list Touch I CDTouch Redial to display the previously called number g Touch I Jt usj gg lfJP K CDTouch Phonebook g Select the name from the list Select the number from the list Touch IJ CDTouch Preset to start calling the corresponding phone number 1 1 1 t f...

Page 22: ...ey If you connect the ignition wire to a power source with a constant voltage supply such as with battery wires the battery may be drained 22 If the console has a lid make sure to install the unit so that the faceplate will not hit the lid when closing and opening If the fuse blows first make sure the wires aren t touching to cause a short circuit then replace the old fuse with one with the same r...

Page 23: ... Make the proper input and output wire connections for each unit 3 Connect the speaker wires of the wiring harness 4 Connect the wiring harness wires in the following order ground battery ignition 5 Connect the wiring harness connector to the unit 6 Install the unit in your car 7 Reconnect the 8 terminal of the battery 8 Press the Reset button P 4 9 Perform the Initial Setup See First Step P 6 e N...

Page 24: ...Attach accessory to the unit e General Motors cars l l t O 1 Cut out accessory to meet the shape of the opening of the center console 2 Attach accessory to the unit 24 e Toyota Scion cars I t D 1 Cut out accessory as illustrated 2 Fold double sided adhesive accessory along the slit and attach it to accessory cut out against the center rib as illustrated Use 2 pieces of accessory for 1 accessory cu...

Page 25: ... reception of the GPS satellite signals might not be possible with an inside installation The GPS antenna should be installed at a position that is spaced at least 12 inch 30 em from cellular phone or other transmitting antennas Signals from the GPS satellite may be interfered with by these types of communication Painting the GPS antenna with metallic paint may cause a drop in performance 25 Micro...

Page 26: ...op side in the same manner 2 When the lower level is removed remove the upper two locations 26 Removing the unit 1 Remove the hard rubber frame by referring to step 1in Removing the hard rubber frame 2 Insert the two removal tools accessory deeply into the slots on each side as shown 3 Lower the removal tool toward the bottom and pull out the unit halfway while pressing towards the inside NOTE Be ...

Page 27: ...ty be sure to connect the parking Purple White Reverse sensor wire Accessory 11 Cooling fan Speaker impedance 4 8 0 Fuse 1SA 8 u r1 lb ___j l lj To front left speaker 8 u r1 1 ___j l lj To front right speaker Gray Green Black 8 u r1 lb ___j l lj To rear left speaker Connect to vehicle s reverse Green lamp harness when using the optional rear view camera 1 r FM AM antenna input 27 8 u f1 lb ___j l ...

Page 28: ...ersation To use the Mute feature you need to hook up this wire to your telephone by using a commercial telephone accessory Depending on what antenna you are using connect either to the control terminal of the motor antenna or to the power terminal for the booster amplifier of the film type antenna Max 300mA 12V When using the optional power amplifier connect Light Blue Yellow Steering remote contr...

Page 29: ... _ White Audio Left Output Red Audio Right Output Rear Preout Red Audio Right Output J c r White Audio Left Output Y Front Preout Red Audio Right Output White Audio Left Output _______ J 1 Subwoofer Preout 1 Red Audio Right Output White Left 29 Refer to the box1 below I I I Refer to the box2 below AV input CA C3AV Optional accessory Red White White Use an RCA cable as shown in above diagram ...

Page 30: ...cially available KCA iP202 Optional Accessory D USB device commercially available 1 m USB terminal O Sm USB terminal USB maximum power supply USB terminal current DC SV 1 A DNX7190HD DNX6990HD DNX6190HD DNX5190 DNX5060EX only SIRIUS XM Satellite Radio tuner 30 ...

Page 31: ...and Reader are either registered trademarks or trademarks of Adobe Systems Incorporated in the United States and or other countries Android is a trademark of Google Inc 31 BlackBerry RIM Research In Motion and related trademarks names and logos are the property of Research In Motion Limited and are registered and or used in the U S and countries around the world Used under license from Research In...

Page 32: ...67 3 ISHIKAWA MACHI HACHIOJI SHI TOKYO JAPAN THIS PRODUCT COMPLIES WITH DHHS RULES 21 CFR SUBCHAPTER J IN EFFECT AT DATE OF MANUFACTURE Location Top plate 32 DNX7190HD DNX6990HD DNX6190HD DNX5190 DNX5060EX 1c Industry Canada Notice Operation is subject to the following two conditions 1 This device may not cause interference and 2 this device must accept any interference including interference that...

Page 33: ...at are of a weaker class There is no danger of hazardous radiation outside the unit CALIFORNIA USA This product contains a CR Coin Cell Lithium Battery which contains Perchlorate Material special handling may apply See www dtsc ca gov hazardouswaste perchlorate t Sir IAs vr m 0Bluetooth ore VIDEO Made for iPod DiPhone 1 ffl Designed for Windows 1111 f TM MediaTM 33 This HD Radio receiver enables H...

Page 34: ...time to read through this instruction manual Familiarity with installation and operation procedures will help you obtain the best performance from your new GPS Navigation System For your records Record the serial number found on the back of the unit in the spaces designated on the warranty card and in the space provided below Refer to the model and serial numbers whenever you call upon your Kenwoo...

Page 35: ...etooth Control 64 Registering And Connecting Bluetooth Unit_____________________ 64 Playing Bluetooth Audio Device________ 67 Using Hands Free Unit________________ 68 Bluetooth Setup_____________________ 71 Hands Free Control__________________ 72 Setting Up 78 Monitor Screen Setup________________ 78 System Setup_______________________ 79 Display Setup_______________________ 82 Navigation Setup____...

Page 36: ...e disc and move outward When removing discs from this unit pull them out horizontally If the disc center hole or outside rim has burrs use the disc only after removing the burrs with a ballpoint pen etc Discs that are not round cannot be used 8 cm 3 inch discs cannot be used Discs with coloring on the recording surface or discs that are dirty cannot be used This unit can only play the CDs with Thi...

Page 37: ... attenuation of the volume on off North America Sales area Pressing for 1 second stores the tag data of the current music from HD Radio broadcast or SIRIUS XM P 56 Central and South America sales area Pressing for 1 second turns the screen off 3 5 Vol Adjusts volume 4 AUD Displays Graphic Equalizer screen P 95 Pressing for 1 second switches camera view display on off 5 NAV Displays the navigation ...

Page 38: ...button is pressed P 107 If the SI function is turned on this indicator flashes when the vehicle ignition is off P 80 2 MENU Displays the Top Menu screen P 14 Pressing for 1 second turns the power off When the power off turns the power on 3 NAV Displays the navigation screen Pressing for 1 second switches AV out sources 4 TEL Displays the Hands Free screen P 64 North America Sales area Pressing for...

Page 39: ... language 3Touch Enter For detailed operation see Language setup P 80 Angle Adjust the position of the monitor Default is 0 1Touch SET 2Touch desired angle number and For detailed operation see Monitor angle control P 82 iPod AV Interface Use Set the terminal which your iPod is connected to Default is iPod 1Touch iPod or AV IN2 Color Set the screen and button illumination color You can select whet...

Page 40: ...ts To eject the disc Press the 0 button Insert the disc into the slot The unit loads the disc and playback starts To eject the disc Press the 0 button USB device Connect the USB device with the USB cable The unit reads the device and playback starts To disconnect the device Touch 0 for 1 second on the screen and disconnect the device from the cable iPod Connect the iPod with the iPod cable The uni...

Page 41: ...appears NOTE You can select the hiding icon by scrolling the screen left or right From this screen you can perform the following functions Function Icon Operation Switch the audio source etc Touch the icon of the desired source Enter setup mode etc Touch the icon of the desired setup function Display navigation screen or Touch NAV or navigation information Turn off all audio function Touch STANDBY...

Page 42: ...screen Displays the control screen of current source Icon feature differs depending on the source Closes the menu List screen There are some common function keys in the list screens of most sources Scroll Scrolls the displayed text etc Touch keys with various functions are displayed here Displayed keys differ depending on the current audio source status etc For examples of functions of each key re...

Page 43: ...e the source control screen is displayed Touch the information bar The navigation screen with audio information appears 1 1 Touch or in the navigation screen Touching this area displays the audio screen Displays the navigation and control keys of the current source Displays the navigation and current video picture playback display NOTE The screen switches between playback screen and camera view ea...

Page 44: ...eat chapter repeat function off VCD PBC On Does not repeat VCD PBC Off track repeat function off Hides all keys Touch Fast forward or fast backward Touch 1 or Each time you touch the key the speed changes standard 2 times 3 times Confirms play time See DVD You can switch the time display between title play time chapter play time and title remaining time Each time you touch the display switches bet...

Page 45: ...eration You can set up some items in the DVD VIDEO disc menu 1 Touch illustrated area during playback Menu Control screen appears 2 Perform desired operation as follows Displays the top menu Touch Top Displays the menu Touch Menu Displays the previous menu Touch Return Enters selected item Touch Enter Enables direct operation Touch Highlight to enter the highlight control mode P 23 Moves the curso...

Page 46: ... disc NOTE You cannot touch the menu keys directly on the screen when zooming DVD Setup You can set up the DVD playback functions NOTE Each operation in this section can be started from the Top Menu screen For details see Operating With The Top Menu Screen P 14 1 Touch in the control screen Multi function menu appears 2 Touch SETUP SETUP Menu screen appears 3 Touch Source Source SETUP Menu screen ...

Page 47: ...l To clear the entered code touch Clear Current parental level appears as Level 3 Touch 2 or 3 to select a parental level NOTE If a disc has higher parental lock level you need to enter the code number The parental lock level varies depending on a loaded disc If a disc has no parental lock anybody can play it back even when you have set the parental lock Disc setup Performs setup when using disc m...

Page 48: ...etween the Simple Control and List Control screen 3 Multi function key Touch to switch the multi function menu For details on the menu see Multi function menu P 32 CD Audio And Visual Files iPod Operation 4 Multi function menu Various functions can be performed by using keys in this area For details on the menu see Multi function menu P 32 5 Sub function key Touch to display Sub function menu 7 in...

Page 49: ...see Multi function menu P 32 4 Multi function menu Various functions can be performed by using keys in this area For details on the keys see Multi function menu P 32 5 Sub function key Touch to display Sub function menu 7 in this table 6 Contents list Displays the list and contents The contents of the list differ depending on the playback status and source 7 Sub function menu Various functions can...

Page 50: ...nal device power supply For details see External Device Control P 88 REAR Touch to mute the rear speaker Sub function menu Music CD iPod Disc media USB device The following functions can be performed by using keys in this area Repeats the current track folder Each time you touch the key repeat mode switches in the following sequence CD iPod track repeat repeat off Disc media USB device file repeat...

Page 51: ...a file of same artist album genre composer as the current track P 35 Folder List You can search a file according to hierarchy P 36 Thumbnail Viewer You can search a picture file P 36 NOTE For disc media you can display the folder list directly by touching Categorysearch USBdeviceandiPodonly 1 Touch the desired category from the left part of the screen 2 The list is sorted by selected category 3 To...

Page 52: ...k 1 Touch Sub function menu appears 2 Touch Favorite screen appears 3 Touch desired artwork in the lower line NOTE The key in the upper side of the screen functions differently depending on the status When Load Albums appears You have not yet loaded any artworks Touch the key to start loading When Load More Albums appears Some artworks are not loaded Touch the key to load all artworks If you touch...

Page 53: ...ete the album from the favorite list touch and drag it to the lower line You can change the playing order of the favorite list by dragging the artwork in the list The favorite list mode is canceled in the following situations Playing another album from other list folder list category list etc Playing another album by touching the artwork in the lower line in the artwork list screen The favorite li...

Page 54: ...ation Displays the information of the current content being played 7 Play time Displays the elapsed time since when you select the station and status bar which shows current location 8 List switching key Touch to switch between the content list and the current content information Multi function menu The following functions can be performed by using keys in this area Searches the station For detail...

Page 55: ...tails see Operating With The Top Menu Screen P 14 1 Touch in the control screen Multi function menu appears 2 Touch SETUP SETUP Menu screen appears 3 Touch Source Source SETUP Menu screen appears 4 Touch USB iPod or DivX in the list Each setup screen appears See the following section for each setting USB setup P 43 iPod setup P 43 DivX setup P 44 USB setup 1 Set each item as follows Picture Displa...

Page 56: ...tivation Deregisters the unit which is already registered After you touch the key a confirmation message appears Follow the message and complete the operation NOTE DivX R Registration Code is disabled when a DVD is being played When downloading a DivX VOD file controlled by DRM register the code appeared on the screen Otherwise the file may not be able to play with this unit Remaining number of vi...

Page 57: ...he list of preset stations or channels and the information 7 Sub function menu The following functions can be performed by using keys in this area Switches the band Touch AM or FM Tunes in a station Touch 1 The method of frequency switching can be changed See Multi function menu P 47 Selects a channel HD Radio tuner only Touch CH or CH5 Tunes in by entering direct number HD Radio tuner only Touch ...

Page 58: ...ration requires the connection of the optional SiriusXM Connect Vehicle Tuner sold separately and service To activate the SiriusXM Vehicle Connect tuner you will need the Radio ID Make a note of your Radio ID For each SiriusXM Vehicle Connect tuner peculiar Radio ID is assigned To confirm your Radio ID tune to channel 0 The letters I O S and F are not used in any Radio ID How to activate your Siri...

Page 59: ...u The functions of each key are as follows P1 P6 Selects the preset channel Touch for 2 seconds to store the current station into the preset memory Selects the method of searching from preset channel selecting or category channel searching For details on search operation see Selecting Operation P 52 SEEK Switches the seek mode in the following sequence SEEK1 SEEK2 SEEK1 Tunes channels one after th...

Page 60: ... P6 The unit will tune to the selected station or channel Selecting from the preset list 1 Touch illustrated area List Control screen appears 2 Select a station or channel from the list NOTE For SIRIUS XM and HD Radio tuner touching and then Preset List displays the preset channel list You can also select your desired channel from the list Search by program type FM tuner and HD Radio tuner only Yo...

Page 61: ...isten and watch the traffic information automatically when a traffic bulletin starts However this feature requires a Radio Broadcast Data System that includes the TI information 1 Touch in the control screen The multi function menu appears 2 Touch TI in the multi function menu Traffic information mode is set When the traffic bulletin starts The Traffic Information screen appears automatically NOTE...

Page 62: ...t alert list as follows Aritst alert Song alert Team alert For how to register artists and songs and turn on off the City alert function see Multi function menu P 50 For how to set up the Content alert function see SIRIUS XM Setup P 59 iTunes Tagging SIRIUS XM and HD Radio tuner only You can tag your music using an iTunes Tagging enabled HD Radio tuner and SIRIUS XM receiver When you hear a song y...

Page 63: ...pears NOTE The code number is set to 0000 as default 2 Enter the current code number Parental Pass 1st entering screen appears 3 Enter the new code number and touch Enter Parental Pass 2nd entering screen appears 4 Enter the same code number as you input in step 3 and touch Enter The code number is confirmed and SIRIUS XM parental code is now set Instant Replay SIRIUS XM only You can replay last 3...

Page 64: ...ch list screen are same as Parental lock P 60 Parental lock You can select the channels to enable SIRIUS XM Parental Lock function 1 Touch SET of Parental Lock Channel Select in the SIRIUS XM SETUP screen Parental Pass Check screen appears NOTE You need to complete Parental code P 59 beforehand To delete the parental lock channel setting touch and hold Clear for 2 seconds enter the Parental code n...

Page 65: ...list screen appears 2 Touch Type to select the screen of the content you want to set up Touching this allows you to switch among the Artist list Song list and Team list cyclically 3 Touch each content list and set ON or OFF NOTE Touch Delete to delete the currently selected content from the Artist list and Song list Available teams were pre registered in the Team list Team s cannot be registered o...

Page 66: ...tton Hands Free screen appears 2 Touch BT SETUP Bluetooth SETUP screen appears See the following section for each setting Registering the Bluetooth Unit P 65 Connecting the Bluetooth unit P 66 Bluetooth Control Registering the Bluetooth Unit 1 Touch SET of Regist New Device Searched Device List screen appears NOTE A new device cannot be registered if there are 5 registered Bluetooth units Delete u...

Page 67: ...ist screen appears 2 Select the device name you want to register from the list Special Device Select Confirm screen appears 3 Confirm the device name and touch Yes NOTE If you touch No operation is cancelled The devices not listed cannot be registered Playing Bluetooth Audio Device Bluetooth basic operation 2 2 3 3 5 Simple Control screen List Control screen 1 4 1 Information display Displays the ...

Page 68: ...e following table for each method Call by entering a phone number 1Touch Direct Number 2Enter a phone number with number keys 3Touch Call using call records 1 Touch Incoming Calls Outgoing Calls or Missed Calls 2Select the phone number from the list 3Touch Redial 1 Touch Redial to display the previously called number 2Touch Call using the phonebook 1Touch Phonebook 2Select the name from the list 1...

Page 69: ...reen appears and system is paused The system resumes playing automatically when the call ends and hang up the phone NOTE To use the Mute feature you need to hook up the mute wire to your telephone using a commercial telephone accessory See Connection P 27 in Quick Start Guide Call waiting If you receive a call during another call you can answer it with the current call suspended or switch between ...

Page 70: ...Hands Free phone 1 Touch TEL SETUP in the Hands Free screen Hands Free SETUP screen appears 2 Set each item as follows Auto Response 1 Sets an automatic response time to pick up an incoming call OFF Default Automatic response is not available 0 99 Set calling ring time second Call Beep Select whether to beep at an incoming call ON Default Beeps OFF Not beeps SMS Receive Beep Select whether to beep...

Page 71: ...eating a new message 1 Touch Create Message in the SMS Select screen SMS Create Menu screen appears 2 Touch or Direct Number Select from the phonebook Touch Enter the phone number Touch Direct Number 3 Touch SET of Message in the SMS Create Menu screen Create SMS Message screen appears 4 Enter a message using keys and touch SET Moves the cursor Use 2 3 Switches the keyboard layout Use 5 The layout...

Page 72: ...e Hands Free screen NOTE When there is no preset number touching the key momentarily moves to the step 2 2 Touch desired key and enter the number you want to register See the table below for explanations for each key Register from received SMS messages Touch Register from sent SMS messages Touch Register from phonebook Touch Register from outgoing calls list Touch Register from incoming call list ...

Page 73: ... System Setup NOTE Each operation in this section can be started from the multi function menu 1 Touch Menu on any screen TOP Menu screen appears 2 Touch SETUP 3 Touch System System Menu screen appears See the following section for each setting Set up the user interface P 79 Adjust touch panel P 80 Set up security P 80 Set up external switch P 81 Set up memory P 81 User interface You can setup user...

Page 74: ...m Menu screen Security screen appears 2 Touch ON or OFF of SI EXT SW setup Set up the external switch power mode 1 Touch EXT SW in the System Menu screen EXT SW screen appears 2 Set each item as follows SW Name Sets the name of the external device Output Pattern Sets the power signal output mode among Pulse Level Default is Pulse You can set to turn output on off each time the button on the EXT SW...

Page 75: ... can store the current monitor angle as the angle during power off Touch Memory when the desired angle is selected Panel color coordinate You can set the screen and button illumination color The selectable items differ depending on the unit 1 Touch Color in the Display Menu screen Color screen appears 2 Touch SET of Panel Color Coordinate Panel Color Coordinate screen appears NOTE You can touch SE...

Page 76: ...kground and touch Enter NOTE SeePlayableMediaAndFiles P 108 forreadable image specifications Touching Delete in the Background screen deletes the background image After you touch Delete a confirmation message appears Follow the message and complete the operation Navigation Setup You can set navigation parameters 1 Touch Menu on any screen 2 Touch SETUP SETUP Menu screen appears 3 Touch Navigation ...

Page 77: ...our camera 1 These settings become settable only when the parking brake is on 2 This setting becomes settable only when the parking brake is on and the CMOS 300 series is selected 3 This setting becomes settable only when the parking brake is on and Front Camera is set to ON Software Information Check the software version of this unit 1 Touch Menu on any screen 2 Touch SETUP SETUP Menu screen appe...

Page 78: ... to VIDEO DISC TV iPod or OFF External Device Control Control the external device power supply 1 Touch EXT SW in the Source Control screen EXT SW Control screen appears NOTE If EXT SW is not displayed touch 2 Touch the desired switch key You can turn on or off the external device power supply NOTE You must connect a commercially available relay unit in order to use this function Connect the extern...

Page 79: ...ing a tweeter together with the front speakers set the tweeter to ON X over Displays the speaker crossover setup screen You can adjust the crossover setup that was set automatically when you selected the speaker type Fordetails seeCrossovernetworksetup P 91 3 Select a speaker size using 2 and 3 The speaker size is different depending on the speaker type and the unit Front OEM 4 inch 5 inch 6 1 2 i...

Page 80: ...n Speaker Location screen appears 2 Select the speaker locations using 3 Front Speaker Select the location from Door On Dash Under Dash Rear Speaker Select the location from Door Rear Deck 2nd Row 3rd Row Minivan Minivan Long DSP select You can select whether using DSP Digital Signal Processor System 1 Touch Bypass or Through of DSP Select in the Audio SETUP screen Bypass There is no effect by DSP...

Page 81: ...t equalizer by selecting the optimized setting for each category If you use you can also adjust equalizer manually 1 Touch Equalizer Equalizer screen appears operation Controlling EQ curves 1 Select EQ curve from Natural Rock Pops Easy Top40 Jazz Powerful iPod and User NOTE iPod is available only during iPod source Controlling equalizer manually This setting cannot be performed when you select iPo...

Page 82: ...lows Bass 1 1 25 1 5 2 Default is 1 Middle 1 2 Default is 1 Bass DC EXT Turns Bass DC EXT on or off Default is OFF If you select ON the bass center frequency is extended to the low register by approximately 20 Flat Tone level becomes 0 flat Subwoofer Level Adjusts the subwoofer volume This setting is not available when subwoofer is set to OFF See Speaker setup P 90 Zone Control You can select diff...

Page 83: ...ther speakers 4 Input the differences calculated in step 3 for individual speakers 5 Adjust gain for individual speakers A sound image will be shifted to the speaker with increased gain Example When Front All is selected as the listening position 1 6feet 2 5feet 5feet 2 5feet 0feet 3 4feet Listening Position You can adjust the sound effects according to your listening position 1 Touch Position Pos...

Page 84: ...th the and poles aligned properly following the illustration inside the case Switching the operation mode The functions operated from the remote controller differ depending on the position of the mode switch DVD T V NAV AUD AUD mode Switch to this mode when controlling a selected source or tuner source etc DVD mode Switch to this mode when playing a disc media including DVD VCD and CD NAV mode Swi...

Page 85: ...and 3D map displays 11 MAP DIR AUD DVD Switches the display angle each time it is pressed NAV Switches between the heading up navigation and north up navigation map displays 12 5 AUD DVD Selects the folder to be played During radio HD Radio and SIRIUS XM source in AUD mode switches the bands to be received 13 2 3 AUD DVD Selects the track or file to be played During radio HD Radio and SIRIUS XM so...

Page 86: ...m Reason Solution The Touch Sensor Tone doesn t sound The preout jack is being used The Touch Sensor Tone cannot be output from the preout jack Error Messages When you fail to operate the unit correctly the cause of the failure appears as the message on the screen Error Message Cause Solution Protect Protective circuit has been activated because a speaker cord has shorted or it has come in contact...

Page 87: ...ur car interior SIRIUS XM Check Tuner A SiriusXM tuner is not connected to this unit Check that the connected SiriusXM tuner is connected Subscription Updated Press Return To Continue The SiriusXM subscription has been renewed Pressing the Control knob will clear the error message Channel Not Available The currently selected channel is unavailable Ch Unsubscribed The currently selected channel is ...

Page 88: ... the CD standard playback may be impossible A DualDisc is a disc with one surface containing DVD standard signals and the other surface containing music CD signals About disc format The disc format should be the one of the following ISO 9660 Level 1 2 Joliet Romeo Long file name About files The following audio video and picture files are supported Audio files AAC LC m4a MP3 mp3 WMA wma Linear PCM ...

Page 89: ...harged through the USB cable Install the USB device in the place where it will not affect safe driving You cannot connect a USB device via a USB hub and Multi Card Reader Take backups of the audio files used with this unit The files can be erased depending on the operating conditions of the USB device We shall have no compensation for any damage arising from any erased data No USB device comes wit...

Page 90: ... SEEK1 Seek mode is set to SEEK1 SEEK2 Seek mode is set to SEEK2 TAG Tagging is enabled DVD disc marks ALL Indicates a region number The discs with this mark can be played with any DVD player 8 Indicates the number of audio languages recorded Up to 8 languages can be recorded in a movie You can select a favorite language 32 Indicates the number of subtitled languages recorded Up to 32 languages ca...

Page 91: ...ho su Sundanese sv Swedish sw Swahili ta Tamil te Telugu tg Tajik th Thai ti Tigrinya tk Turkmen tl Tagalog tn Setswana to Tongan tr Turkish ts Tsonga tt Tatar tw Twi uk Ukrainian ur Urdu uz Uzbek vi Vietnamese vo Volapuk wo Wolof xh Xhosa yo Yoruba zh Chinese zu Zulu DVD Language Codes Specifications Monitor section Picture Size DNX7190HD DNX7490BT 6 95 inches diagonal wide 156 6 mm W x 81 6 mm H...

Page 92: ...e Sensitivity 28 dBμ Digital AM tuner section DNX7190HD DNX6990HD DNX6190HD Frequency Range 10 kHz 530 kHz 1700 kHz Frequency Response 3 0 dB 40 Hz 15 kHz S N Ratio dB 70 dB STEREO Video section Color System of External Video Input NTSC PAL External Video Input Level RCA mini jack 1 Vp p 75 Ω External Audio Max Input Level RCA mini jack 2 V 25 kΩ Video Output Level RCA jacks 1 Vp p 75 Ω Audio Outp...

Page 93: ...Pandora If you are not already a registered user an account can also be created at www pandora com Internet connection by 3G EDGE or WiFi Pandora is available only in the U S Because Pandora is a third party service the specifications are subject to change without prior notice Accordingly compatibility may be impaired or some or all of the services may become unavailable Some functions of Pandora ...

Page 94: ...se and says that the component uses laser beams that have been classified as Class 1 It means that the unit is utilizing laser beams that are of a weaker class There is no danger of hazardous radiation outside the unit CALIFORNIA USA This product contains a CR Coin Cell Lithium Battery which contains Perchlorate Material special handling may apply See www dtsc ca gov hazardouswaste perchlorate ...

Page 95: ...This HD Radio receiver enables ...

Page 96: ...TEME DE NAVIGATION GPS SISTEMA DE NAVEGACIÓN GPS DNX7190HD DNX6990HD DNX6190HD DNX5190 DNX5060EX GPS NAVIGATION INSTRUCTION MANUAL MANUEL D INSTRUCTIONS DE NAVIGATION DU GPS MANUAL DE INSTRUCCIONES DE NAVEGACIÓN GPS B64 4944 08 ...

Page 97: ... 19 Saving and Modifying the Active Route 19 Navigating a Saved Route 19 Deleting All Saved Routes 19 Stopping Your Route 19 Adding a Detour to a Route 20 Taking a Detour Around Specified Areas 20 Adding a Custom Avoidance 20 Using Multiple Route Preview 20 Using trafficTrends 20 Where To 13 Searching Near Another Location 13 Go Page Options 13 Finding an Address 13 Finding a Place by Spelling the...

Page 98: ...Security 25 Icons Used in This Manual Important precautions are described to prevent injuries and potentially dangerous situations Special instructions supplementary explanations limitations and reference pages are described Traffic Information 23 Understanding FM TMC Traffic 23 Traffic in Your Area 23 Traffic on Your Route 23 Viewing the Traffic Map 23 Viewing Traffic Delays 23 Manual Conventions...

Page 99: ...ncluding their licensors and suppliers and affiliated companies on the other hand IMPORTANT READ THIS LICENCE CAREFULLY BEFORE USING THIS PRODUCT INSTALLING COPYING OR OTHERWISE USING THIS PRODUCT INDICATES YOUR ACKNOWLEDGEMENT THAT YOU HAVE READ THIS LICENCE AND AGREE TO ITS TERMS IF YOU DO NOT AGREE RETURN THE COMPLETE PRODUCT WITHIN 7 DAYS OF THE DATE YOU ACQUIRED IT IF PURCHASED NEW FOR A FULL...

Page 100: ...d Countries do not allow certain warranty exclusions so to that extent the above exclusion may not apply to you Disclaimer of liability GARMIN AND ITS LICENSORS INCLUDING THEIR LICENSORS AND SUPPLIERS SHALL NOT BE LIABLE TO YOU IN RESPECT OF ANY CLAIM DEMAND OR ACTION IRRESPECTIVE OF THE NATURE OF THE CAUSE OF THE CLAIM DEMAND OR ACTION ALLEGING ANY LOSS INJURY OR DAMAGES DIRECT OR INDIRECT WHICH ...

Page 101: ... All rights reserved Australian Map Data Map Data for Australia is based on data NAVTEQ has licensed from PSMA Australia Limited www psma com au In addition the Product incorporates data which is 2010 Telstra Corporation Limited GM Holden Limited Intelematics Australia Pty Ltd Sentinel Content Pty Limited and Continental Pty Ltd If your Product uses RDS TMC Codes contained in the Map Data the traf...

Page 102: ...E TO THE TERMS OF THIS AGREEMENT PROMPTLY within 7 days of purchase RETURN THE PRODUCTS AND ANY ACCOMPANYING ITEMS including written materials TO Garmin INTERNATIONAL INC CUSTOMER SERVICE 1200 EAST 151ST STREET OLATHE KANSAS 66062 FOR A REFUND DMTI Spatial hereby grants to you a non exclusive non transferable license to use the data contained on the media in this package the Licensed Product solel...

Page 103: ...r of Industry Statistics Canada 1996 Digital Topographic Data produced under license from Her Majesty the Queen in Right of Canada with permission of Natural Resources Canada NAVTEQ Traffic End User License Agreement Your Garmin product may be equipped to receive traffic data If it is so equipped the following terms and conditions apply to your use of your Garmin product NAVTEQ North America LLC a...

Page 104: ...n product Governing Law The above terms and conditions shall be governed by the laws of the State of Illinois without giving effect to i its conflict of laws provisions or ii the United Nations Convention for Contracts for the International Sale of Goods which is explicitly excluded You agree to submit to the jurisdiction of the State of Illinois for any and all disputes claims and actions arising...

Page 105: ...igating this displays Kenwood audio When using audio this displays navigation information The hands free phone feature is only available if your mobile phone has Bluetooth wireless technology and has been paired to the navigation system See the other Kenwood manuals and your phone manual for setup and pairing instructions Help When You Need It Touch Tools Help to get more information about using y...

Page 106: ...ies and other locations The detailed map loaded in your navigation system contains millions of points of interest such as restaurants hotels and auto services Finding a Restaurant 1 Touch Where To 2 Select a category 3 Select a subcategory 4 Select a type 5 Select a place 6 Select Press for More to see the Review page 7 Touch Go ...

Page 107: ...our route The navigation system gives you directions to the stop and to your final destination 1 With a route active touch back icon Where To 2 Search for the extra stop 3 Touch Go 4 Touch Add As a Via Point to add this stop before your destination If you want to add more than one stop to the route edit the current route See page 19 Taking a Detour If a road on your route is closed you can take a ...

Page 108: ...Favorites Touch to create a turn by turn route to this location Touch to return to the previous page Touch to view more information about the location Touch to switch between a 3D three dimensional map and a 2D two dimensional map Touch to rotate the viewing angle in 3D view Finding an Address The steps to find an address can vary depending on the maps that are loaded on your navigation system Not...

Page 109: ... touch a letter or a number to enter it Touch to add a space Touch and to move the cursor Touch to delete the character or touch and hold to delete the entire entry Touch to change the keyboard language mode Touch to enter special characters Finding Places in a Different Area You can search for locations in a different area such as a different city or near your destination 1 From the subcategories...

Page 110: ...or the place you return to most often 1 Touch Where To Go Home 2 Select an option Enter My Address enter an address for the location using the on screen keyboard Use My current location set your current location as your Home Location Choose from Recently Found select a location from your recently found locations After you set your Home Location touch Tools My Data Set Home Location Favorites You c...

Page 111: ...for More 4 Touch Edit 5 Touch the item you want to edit Change Name enter a new name for the location using the on screen keyboard Change Map Symbol touch a new symbol Change Phone Number enter a phone number Change Categories create or change the category in which this location is saved Deleting a Favorite 1 Touch Tools My Data 2 Touch Delete Favorite s 3 Select the Favorite to delete 4 Touch Del...

Page 112: ... are driving to a common destination and displays the destination and estimated time of travel in the navigation bar on the map 1 From the Main page touch Settings Navigation myTrends Enabled 2 Save a common destination like your home or workplace as a Favorite page 15 3 Drive to the Favorite several times 4 When myTrends information appears in the navigation bar touch it to view route information...

Page 113: ... page or touch any turn on the Turn List page About Junction View When available the Lane Assist page may display a view of the upcoming junction and in which lane you should be driving You must be navigating a route before you can view the junction You can also view junctions from the Turn List page When available junctions appear on a split screen The Lane Assist page with Junction View is not a...

Page 114: ...om the route Manually Reorder Points change the order of points along your route Optimally Reorder Points automatically order the points Recalculate recalculate the route Delete remove this route Your changes are saved automatically when you exit any of the route edit pages Saving and Modifying the Active Route 1 Touch Where To or Tools Routes 2 Touch Active Route 3 Touch Add or Remove Points 4 Ad...

Page 115: ...elect an option Select Next 1 2 mile 0 5 km on Route Select Next 2 miles 2 km on Route Select Next 5 miles 5 km on Route Select Detour by Roads on Route and select a road Adding a Custom Avoidance Custom avoidances allow you to avoid specific areas and sections of road You can enable and disable custom avoidances as needed 1 Select Settings Navigation Custom Avoidances 2 If necessary select Add Ne...

Page 116: ...The ecoChallenge helps you maximize your fuel economy by scoring your driving habits The higher your ecoChallenge scores the more fuel you save The ecoChallenge collects data and calculates a score whenever you are moving The ecoChallenge icon displays your current score on the map Touch Tools ecoRoute ecoChallenge To view detailed ecoChallenge scores touch the icon The leaf color on the driving c...

Page 117: ...e average fuel economy and the fuel cost of navigating to a destination A mileage report is created for every route that you drive If you stop a route on the device a mileage report is created for the distance you traveled Mileage reports are created automatically when you stop or complete routes Viewing a Mileage Report You can view the 20 most recent mileage reports 1 Touch Tools ecoRoute Mileag...

Page 118: ...sted or stopped Gray No data Traffic data has not updated Traffic on Your Route When calculating your route the navigation system examines the current traffic and automatically optimizes the route for the shortest time If a severe traffic delay occurs on your route while you are navigating the navigation system automatically recalculates the route You might still be routed through traffic if no be...

Page 119: ...ngs Changing the Navigation Settings Touch Settings Navigation Route Preference select a preference for calculating your route Avoidances select the road types you want to avoid or you would prefer to use on your routes Restore restore the original navigation settings Voice Prompts turn voice prompts on or off Custom Avoidance select a specific area on a specific road to avoid Advanced Detours sel...

Page 120: ...anguages Touch Settings Language Voice Language select a voice Keyboard select the keyboard for your language You can also change the keyboard language mode from any keyboard by touching the Mode button Restore restore the original languages Adding Security Touch Settings Security Safe Mode turn safe mode on or off When your vehicle is moving safe mode disables all functions that require significa...

Page 121: ...nwood service center for details 1 Go to www garmin com Kenwood 2 Select Order Map Updates for your Kenwood unit 3 Follow the Web site instructions to update your map Safety Cameras WARNING Garmin and Kenwood are not responsible for the accuracy of or the consequences of using a safety camera database Safety camera information is available in some locations Go to http my garmin com for availabilit...

Page 122: ...se the USB mass storage device to load the POIs The POI Loader is available at www garmin com products poiloader Refer to the POI Loader Help file for more information click Help to open the Help file Each time you load custom POIs to the navigation system any other custom POIs already saved in the system will be overwritten Finding Custom POIs To view a list of the custom POIs loaded in your navi...

Page 123: ...90 Rev A Garmin and the Garmin logo are trademarks of Garmin Ltd or its subsidiaries registered in the USA and other countries ecoRoute myTrends and trafficTrends are trademarks of Garmin Ltd or its subsidiaries These trademarks may not be used without the express permission of Garmin NAVTEQ is a trademark of NAVTEQ Inc or its affiliates and is registered in one or more countries including the U S...

Page 124: ...KENWOOD Ver 1 0 WOl 2029 05 ...

Page 125: ...update the firmware from it Update cannot be performed if it is copied inside a folder If the updater file name is changed update cannot be performed Checking the Firmware Version 1 Press the Setup icon to display the Setup Menu screen 2 Press the Software to display the Software Information screen 3 Check the version Updating the Program 1 Connect the USB memory 2 When an audio file is played or ...

Page 126: ...wood Service Center Dear Customer LIMITATION OF IMPLIED WARRANTIES Any and all implied warranties including warranties of merchantability and fitness tor aparticular purpose shatt be limited in duration to the length of this warranty EXCLUSION OF CERTAIN DAMAGES KENWOOD s liability tor any defective product1s lim1ted to the repair or replacement of said product at our potion and shall not include ...

Page 127: ...est exempt delous d8fauts Sil un d8tautseproduitpendantlap8riodedegarantie KENWOODs engageaassumerlecoO tdespibeesd8fectueuses etdeIamain d oeuvrenecessairespoureffectuer lesreparations pourvu que de leis d8fauts son attribuables ades piflces defettL muses employees Iars de Ia fabrication du produil Kenwood auaIamain d oeuvrelelqu 8tabli parKENWOOD ou parl undesescentresdeserviceautorises AppelezK...

Reviews: