background image

21

ADAPTING THE APPLIANCE TO FUNC-
TION WITH DIFFERENT TYPES OF
GAS

If a different gas from that one indicated on
the label is used, adapt the cooktop to this
new function.

Injectors for LPG gas can be obtained
from the After-Sales Service.

Select the injectors to be replaced
according to the TABLE FOR THE
CHOICE OF THE INJECTORS.
The nozzle diameters, expressed in hun-
dredths of a millimetre, are marked on
the body of each injector.

OPERATIONS TO BE PERFORMED
WHEN SUBSTITUTING THE INJECTORS

To replace the injectors: 

Remove the gratings, the burner cov-
ers and the knobs;

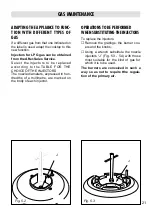
Using a wrench substitute the nozzle
injectors “J” (Fig. 5.3 - 5.4) with those
most suitable for the kind of gas for
which it is to be used.

The burners are conceived in such a
way so as not to require tthe regula-
tion of the primary air.

Fig. 5.3

J

J

Fig. 5.2

GAS MAINTENANCE

Summary of Contents for HCG700

Page 1: ...Before operating this hob please read these instructions carefully BUILT IN COOKING HOB model HCG700 GB Instructions for use Installation advice ...

Page 2: ...ee 27 DECLARATION OF CE CONFORMITY This cooking hob has been designed to be used only for cooking Any other use such as heating a room is improper and dangerous This cooking hob has been designed constructed and marketed in compliance with Safety requirements of the Gas Directive 90 396 EEC Safety requirements of EEC Directive Low voltage 73 23 gas or gas electric appliances Safety requirements of...

Page 3: ...erous The manufacturer declines all responsibility in the event of damage caused by improper or incorrect use of the appliance IMPORTANT INFORMATION FOR CORRECT DISPOSAL OF THE PRODUCT IN ACCORDANCE WITH EC DIRECTIVE 2002 96 EC At the end of its working life the product must not be disposed of as urban waste It must be taken to a special local authority differentiated waste collection centre or to...

Page 4: ...uirements laid down for this type of product category However special care should be taken around the underneath of the appliance as this area is not designed or intended to be touched and may contain sharp or rough edges that may cause injury Fire Risk Do not leave inflammable materials on the Hob top Make sure that electrical cords connecting other appliances in the proximity can not come in to ...

Page 5: ...ner R 3 00 kW 4 Triple ring burner TC 3 50 kW CONTROL PANEL DESCRIPTION 5 Front right semirapid burner control knob 2 6 Rapid burner control knob 3 7 Triple ring burner control knob 4 8 Rear left semirapid burner control knob 2 9 Auxiliary burner control knob 1 The gas lighter is incorporated into the knobs Fig 1 1 8 7 6 5 9 ...

Page 6: ...s flow to minimum rotate the knob anti clockwise to point the indicator towards the small flame symbol The maximum position permits rapid boiling of liquids whereas the mini mum position allows slower warming of food or maintaining boiling condi tions of liquids Other intermediate operating can be achieved by positioning the indicator between the maximum and minimum positions but not between the m...

Page 7: ... Rapid 24 cm 26 cm 2 Triple ring 26 cm 28 cm Maximum diameter for woks 36 cm do not use pans with concave or convex bases 1 front right burner maximum diameter 22 cm 2 with glass lid optional rear right burner maximum diameter 24 cm Fig 2 3 Caution the cooking hob becomes very hot during operation Keep children well out of reach LIGHTING GAS BURNERS The electric ignition is incorporated in the kno...

Page 8: ...he triple ring burner Warning Using a wok without the stand may cause the burner to operate incorrectly Do not use the stand for ordinary flat bottomed saucepans IMPORTANT The wok stand MUST BE PLACED ONLY over the pan rest for the triple ring burner Fig 2 4a WRONG Fig 2 4b CORRECT ...

Page 9: ...mel for a long time they will damage the surface STAINLESS STEEL ELEMENTS Stainless steel parts should be rinsed with water and dried with a soft and clean cloth or with a chamois leather For persistent dirt use specific non abrasive products available commercially or a little hot vinegar Note regular use could cause discolouring around the burners because of the high flame temperature WARNING Whe...

Page 10: ...e products After cleaning check that the burners and their flame spreaders are dry before replac ing correctly It is very important to check that the burner flame spreader and the cap have been cor rectly positioned Failure to do so can cause serious problems In appliances with electric ignition keep the electrode clean so that the sparks always strike Note To avoid damage to the electric ignition...

Page 11: ...er F and the cap C have been correctly positioned see figs 3 1 and 3 2 Failure to do so can cause serious problems In appliances with electric ignition check that the electrode S fig 3 1 is always clean to ensure trouble free sparking The probe must be very carefully cleaned Fig 3 2 Fig 3 1 F C S ...

Page 12: ...ing burner must be correctly positioned see fig 3 3 the burner rib must be fitted in their housing as shown by the arrow The burner correctly positioned must not rotate fig 3 4 Then position the cap A and the ring B fig 3 4 3 5 Fig 3 5 Fig 3 4 A B Fig 3 3 ...

Page 13: ...urrent laws in force concerning ventilation and the evacuation of exhaust gases Always unplug the appliance before carrying out any maintenance operations or repairs The appliance must be housed in heat resistant units These tops are designed to be embedded into kitchen fixtures measuring 600 mm in depth The walls of the units must not be higher than work top and must be capable of resisting tempe...

Page 14: ...ast 30 mm It is absolutely essential that you place a separator between the base of the cooktop and the built in unit or the oven the cooker top must be kept no less than 200 mm away from any side wall fig 4 1 the hob must be installed at least 60 mm from the wall there must be a distance of at least 650 mm between the hob and any wall cupboard or extractor hood positioned immediately above see fi...

Page 15: ... mm clear ance be left between the cooker top and the fixture surface fig 4 3 À À À À À À À À À À À À À À À À À À À À À À À À À À À À À À À À À À À À À À À À À À À À À À À À À À À À À À À À À À À À À À À À À À À À À 30 mm Fig 4 3 Space for connections Clearance Door 650 mm Fig 4 2 ...

Page 16: ...it for next use figure 4 4b Spread the seal B around the left front and right edges of the cooker top as shown in figure 4 4c Spread the seal C along the rear edge of the cooker top as shown in fig ure 4 4d Making sure that the begin ning and the end overlap at the seal B see figure 4 4e Fig 4 4a Fig 4 4b Fig 4 4c Fig 4 4d Fig 4 4e Front side Rear side seal A seal C seal A seal C seal B seal C sea...

Page 17: ...moment Make sure that the brackets are fas tened as shown in figures 4 5a 4 5b and 4 5c FASTENING THE COOKER TOP Insert the cooker top into the hole and position it correctly Adjust the position of the brackets F and R and tighten screws B to block the cooker top firmly in position With a sharp cutter or trimmer knife trim the excess sealing material around the edge of the cooker top Rear side Fro...

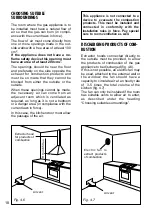
Page 18: ...ance with the current laws in force In this case the kitchen door must allow the passage of the air DISCHARGING PRODUCTS OF COM BUSTION Extractor hoods connected directly to the outside must be provided to allow the products of combustion of the gas appliance to be discharged fig 4 6 If this is not possible an electric fan may be used attached to the external wall or the window the fan should have...

Page 19: ...ains Cat II 2H3 GASES The gases used for the operation of cooking appliances may be grouped by their characteristics into two types Butane Propane gas in cylinders G30 G31 Natural gas G20 GB The cooktop connection fig 5 1 is made up as follows nut A gasket F 1 conical elbow C Connection to the gas main must be performed by a qualified technician in compliance with the current laws in force The gas...

Page 20: ...come into contact with moving parts Any connection to fixed metal pipes must be done in such a way so as not to place undue stress on the hob chassis Any flexible pipes must be so installed as to be easily inspected along their whole length They must be changed before the expiry date printed on the pipe itself and not exceed 2 metres in length After connecting to the gas mains check that the coupl...

Page 21: ...HE INJECTORS The nozzle diameters expressed in hun dredths of a millimetre are marked on the body of each injector OPERATIONS TO BE PERFORMED WHEN SUBSTITUTING THE INJECTORS To replace the injectors Remove the gratings the burner cov ers and the knobs Using a wrench substitute the nozzle injectors J Fig 5 3 5 4 with those most suitable for the kind of gas for which it is to be used The burners are...

Page 22: ...ntre of the shaft fig 5 5 Using a screwdriver with max diame ter 3 mm turn the screw inside the tap until the correct setting is obtained On gas valves provided with adjust ment screw on the valve body fig 5 6 Turn the screw A to the correct set ting with a screwdriver In models with a gas lighter incorporat ed into the knob turn screw A via the hole in the microswitch For G 30 G 31 gas tighten th...

Page 23: ...0 75 85 115 Y Triple ring TC 3 50 1 50 95 135 T Nominal power kW Reduced power kW Ø injector 1 100 mm Ø injector 1 100 mm AIR VENT NECESSARY FOR GAS COMBUSTION 2 m3 hxkW BURNERS Air vent necessary m3 hr Auxiliary A 2 00 Semirapid SR 3 50 Rapid R 6 00 Triple ring TC 7 00 TABLE FOR THE CHOICE OF THE INJECTORS Cat II 2H3 GB ...

Page 24: ...olutely essential The manufacturer accepts no responsibility for any inconvenience caused by failure to comply with this rule DETAILS Connection to the electric power supply must be carried out by a qualified technician and following the appropriate safety regulations Before carrying out the connection to the power supply the voltage rating of the appli ance stamped on the appliance identification...

Page 25: ...k There is a danger of electric shock if the cut off plug is inserted into any 13 amp socket outlet CONNECTION USING FIXED WIRING Fig 6 2 It is possible to connect the appliance directly to the mains supply by means of a heavy duty switch with 3 mm minimum distance between the contacts A double pole switch must be provided no further than 2 metres from the appliance to the electrical supply All su...

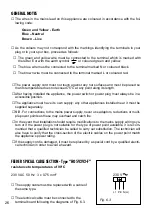
Page 26: ...e power point match the appliance s power rating If the supply cord is damaged it must be replaced by a special cord by a qualified electri cal technician in order to avoid a hazard GENERAL NOTES The wires in the mains lead on this appliance are coloured in accordance with the fol lowing code Green and Yellow Earth Blue Neutral Brown Live As the colours may not correspond with the markings identif...

Page 27: ...t The appliance has been installed as per the instructions contained within this booklet This guarantee does not affect your statutory rights GUARANTEE AFTER SALES SERVICE If you require After Sales Service contact the MASTERCARE Domestic Appliance Helpline Telephone 08701 565550 Descriptions and illustrations in this booklet are given as simply indicative The manufacturer reserves the right consi...

Page 28: ...code 1102424 ß3 Part Number 56321 1 ...

Reviews: