HM-331 (En/T)
43
Knowledge section
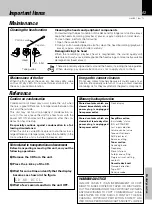
Cleaning the head section
Cleaning the heads and peripheral components
For maintaining the best condition of the deck and for longer service life, always
keep the heads (recording / playback / erase), capstan and pinch roller clean.
To clean them, perform the following:
1.Open the cassette holder.
2.Using a cotton swab dipped in alcohol, clean the head (recording / playback /
erase), capstan and pinch roller carefully.
Demagnetizing the head
When the recording / playback head is magnetized, the sound quality will
deteriorate. In such a case, demagnetize the head using a commercially available
demagnetizer (head eraser).
Maintenance
There are precisely aligned parts around the heads, including the tape guides.
When cleaning, pay special attention so as not to apply shock to them.
Note
Note
Cotton swab
Head
Capstan
Pinch roller
Tape guides
Caution on condensation
Condensation (of dew) may occur inside the unit when
there is a great difference in temperature between this
unit and the outside.
This unit may not function properly if condensation oc-
curs. In this case, leave the unit for a few hours with the
power left ON, and restart the operation after the con-
densation has dried up.
Be specially cautious against condensation in a fol-
lowing circumstance:
When this unit is carried from a place to another across a
large difference in temperature, when the humidity in the
room where this unit is installed increases, etc.
Reference
Maintenance of the Set
When the front panel, the case, etc. becomes dirty, wipe
with a soft, dry cloth. Do not use thinner, alcohol, etc., as
these can cause discoloration.
In regard to contact cleaners
Do not use contact cleaners because it could cause a mal-
function. Be specially careful not to use contact cleaners
containing oil, for they may deform the plastic component.
Stored contents which are
cleared immediately when
power plug is unplugged
from power outlet
Stored contents which are
cleared in at least a day after
power plug is unplugged
from power outlet
Clock display
Amplifier section
"on/standby" status
(ON or STANDBY)
Last input selection
Volume control value
Tone control levels
AUX input level
Balance setting
Tuner section
Receiving band
Frequency
Preset stations
Auto/mono setting
Program timer setting
contents
Cassette deck unit
Transport direction
"tape EQ."
Reverse mode
Memory backup function
WARNING NOTICE:
IN MOST CASES IT IS AN INFRINGEMENT OF COPY-
RIGHT TO MAKE COPIES OF TAPES OR DISCS WITH-
OUT THE PERMISSION OF THE COPYRIGHT OWNERS.
ANYONE WISHING TO COPY COMMERCIALLY AVAIL-
ABLE TAPES OR DISC SHOULD CONTACT THE ME-
CHANICAL COPYRIGHT PROTECTION SOCIETY LIM-
ITED OR THE PERFORMING RIGHTS SOCIETY LIMITED.
Note related to transportation and movement
Before transporting or moving this unit, carry out the
following operations.
1
Remove the CD from the unit.
2
Press the
6
key of the CD.
3
Wait for some time and verify that the display
becomes as shown in the figure.
4
Wait a few seconds and turn the unit OFF.
Important Items
C D
J
N O
T
D I S C
•
PM
MHz
BEST HITS O.T
8 0 8 2 0 0


