4
Before plugging in
O
Make sure your electricity supply is the same as the one shown
on the rear of your handmixer.
O
This appliance conforms to EC Regulation 1935/2004 on
materials and articles intended to come into contact with food.
Before using your handmixer
for the first time
O
Wash the parts (see
‘Cleaning’).
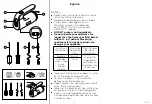
Key
1
Speed & Pulse selector
2
Tool SureEject™
3
Mixer
4
Beaters
5
Kneader
6
Kneader with collar
7
Cord wrap
To Use Your
Handmixer
1 Insert the beaters
or kneaders
– turn and push until a positive
click is felt.
Important:
check that the
kneader with the metal collar
is correctly fitted into the
socket (refer to illustration).
2 Plug in.
3 With the ingredients in a bowl
of an appropriate size, place
the beaters/kneaders into the
bowl.
4 Plug in and select a speed
(Refer to the recommended
usage chart).
O
As the mixture thickens,
increase the speed.
O
If the machine starts to slow
or labour, increase the speed.
O
Slide the speed selector to the
(P) position to use in short
bursts at maximum speed.
Note: the motor will only
operate for as long as the
control is held in position.
5 When the mixture has reached
the desired consistency, return
the speed selector to the off
‘O’ position and then lift the
beaters/kneaders out of the
bowl.
6 To remove the tools, make
sure the speed selector is in
the off ‘O’ position and unplug
the handmixer.Slide the tool
SureEject™ down to release
the tools
2
.
Note: When ejecting the tools
hold the hand mixer over the
bowl.
Important:
O
kneaders only - when making
bread dough we recommend
that the dough load does not
exceed 450g flour.
Cord Wrap
7
Wrap the cord round the heel of
the handmixer, using the cleat to
secure in place.


