background image

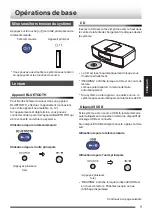
Dispositif externe

1

Sélectionnez “AUDIO IN”.

Télécommande

Appareil principal

.

.

(Appuyez plusieurs fois)

2

Démarrez la lecture d’un dispositif externe.

0

Ne pas déconnecter le lecteur audio

numérique pendant la lecture. Cela pourrait

provoquer un dysfonctionnement.

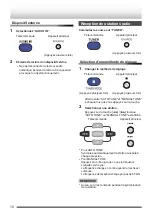
Réception des stations radio

Commutez la source sur “TUNER”.

Télécommande

Appareil principal

.

.

(Appuyez plusieurs fois)

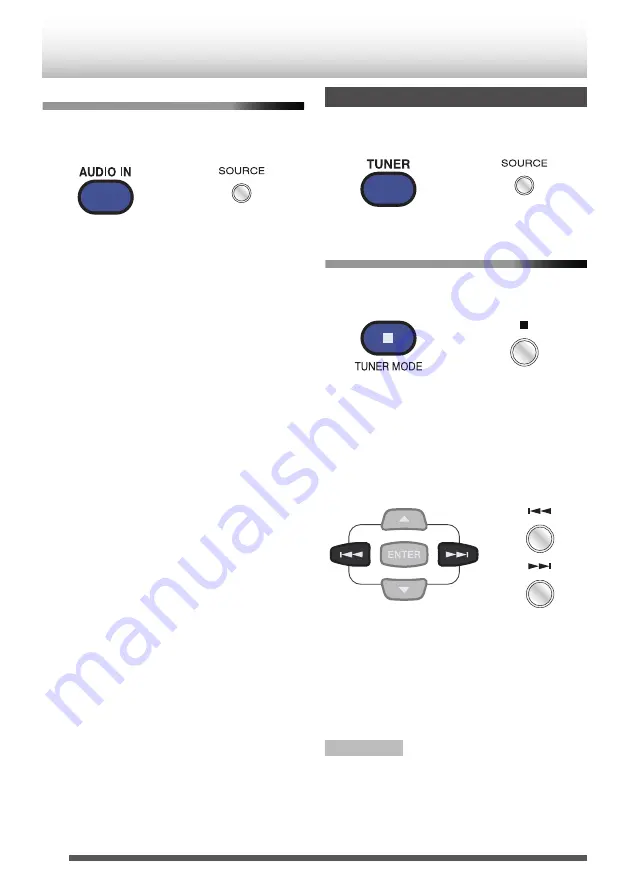
Sélection d’une méthode de réglage

1

Changer la méthode de réglage

Télécommande

Appareil principal

.

.

(Appuyez plusieurs fois)

(Appuyez plusieurs fois)

Alterne entre “AUTO TUNE” et “MANUAL TUNE”

à chaque fois que vous appuyez sur la touche.

2

Sélectionner une station.

Appuyez sur la touche [

S

]


/


[

T

] lorsque

“AUTO TUNE” ou “MANUAL TUNE” est affiché.

Télécommande

Appareil principal

.

.

.

0

Pour AUTO TUNE :

Syntonise automatiquement la station suivante à

chaque pression.

0

Pour MANUAL TUNE :

Appuyez en continu jusqu’à ce que la fréquence

souhaitée soit reçue.

La fréquence change en continu quand la touche est

enfoncée.

La fréquence de réception change par pas de 50 kHz.

REMARQUE

0

Aucun son n’est entendu pendant la syntonisation

de la station.

10

Summary of Contents for K-575BT

Page 1: ...ls please refer to the following Smart User Guide 0 See 3 for the table of contents ENGLISH DEUTSCH FRANÇAIS NEDERLANDS ITALIANO B5A 0211 00 E BASIC INSTRUCTION MANUAL Information on Smart User Guide You can get detailed procedures on operating the System from devices such as a smartphone Compatible with standard browsers on Android and iPhone http manual2 jvckenwood com audio mobile global ...

Page 2: ...ith regard to the EMC Directive 2004 108 EC Declaration of Conformity with regard to the R TTE Directive 1999 5 EC Manufacturer JVC KENWOOD Corporation 3 12 Moriya cho Kanagawa ku Yokohama shi Kanagawa 221 0022 Japan EU Representative s Kenwood Electronics Europe BV Amsterdamseweg 37 1422 AC UITHOORN The Netherlands Hereby Kenwood declares that this unit K 575BT B K 575BT S is in compliance with t...

Page 3: ...TOOTH devices 14 Specifications 15 Trademarks 0 2013 CSR plc and its group companies The aptX mark and the aptX logo are trade marks of CSR plc or one of its group companies and may be registered in one or more jurisdictions 0 AirPlay iPad iPhone iPod iPod classic iPod nano iPod touch and Retina are trademarks of Apple Inc registered in the U S and other countries iPad Air iPad mini and Lightning ...

Page 4: ...lows 1 Front No obstructions and open spacing 2 Sides Top Back No obstructions should be placed in the areas indicated by the dimensions in the illustration 3 Bottom Place on a level surface Front view 15 cm 15 cm 15 cm Side view Rear of the System 15 cm Notes on installation Select a place which is level dry and neither too hot nor too cold between 5 C and 35 C 4 ...

Page 5: ...sion if the battery is incorrectly replaced 0 Replace only with the same or equivalent type 0 Store the battery in a place where children cannot reach If a child accidentally swallows the battery consult a doctor immediately 0 To prevent the battery from overheating cracking or starting a fire Do not recharge short disassemble or heat the battery or dispose of it in a fire Do not leave the battery...

Page 6: ...he System 0 PLAY MODE button Switches the playback mode 0 DIMMER button For setting the display brightness F Sound setting buttons 0 D BASS button Increases the bass sound 0 SOUND button Adjusts the sound quality Sets the Front Surround 0 FLAT button Returns the adjusted sound to the original setting G Number buttons For selecting track and broadcast station H A Power button Switches the power ON ...

Page 7: ...ume and VOLUME s lowers the volume E S T buttons For skipping tracks Press and hold to fast forward and fast reverse Selects the broadcast station when listening to radio For selecting various settings F A Power button Switches the power ON OFF standby G o Stop button Stops playback on the CD USB device Switches the radio tuning when listening to FM radio H I W Playback Pause button Plays or pause...

Page 8: ...ction with the best reception tack or tape it securely FM indoor antenna supplied After you untied the bundled string extend the FM aerial when connecting so that you can obtain the best reception Connecting the power cord After connecting the supplied power cord to AC IN on the System plug the power cord into the AC outlet To power outlet Power cord supplied 0 Insert securely all the way into the...

Page 9: ...sert the CD with the label side facing up into the center of the disc loading slot in front of the System 0 The CD will be inserted automatically when you insert it in partially 0 READING is displayed when the CD is being read When it disappears playback starts automatically 0 If the System has been set to another source the System switches to CD playback automatically USB Device If the System is ...

Page 10: ...thod Remote control Main unit Press repeatedly Press repeatedly Alternates between AUTO TUNE and MANUAL TUNE each time you press the button 2 Select a station Pressthe S T buttonwhile AUTOTUNE or MANUAL TUNE is displayed Remote control Main unit 0 For AUTO TUNE Tunes to the next station automatically at each press 0 For MANUAL TUNE Press continuously until the desired frequency is received The fre...

Page 11: ...ayback temporarily Pressthe I W buttononthemainunitortheremotecontrol Remote control Main unit Selecting a track Skips and selects each track in sequence Press the S T button on the main unit or the remote control Remote control Main unit Fast forwarding reversing Press and hold the S T button on the main unit or the remote control Remote control Main unit Press and hold down Press and hold down S...

Page 12: ...or a possible BLUETOOTH connection is 10 m The distance may be shorter depending on the usage environment 0 When the iPhone or smartphone is connected to the System via BLUETOOTH ring alert of phone calls and mails can also be heard from the speakers of the System 0 This System is not equipped with a microphone feature To make a call cancel the connection with the System or use the microphone on t...

Page 13: ...omatically even if the System is in standby mode or set to other source Connecting a BLUETOOTH device manually When connecting the System and the BLUETOOTH device hereinafter referred to as target device for the first time perform pairing using the following method 1 Set the source to BLUETOOTH Press the button repeatedly to switch the source Press repeatedly until BLUETOOTH is displayed Remote co...

Page 14: ...airingstandbystate NOTE 0 If you touch the N mark of the System using another target device the device currently connected will be disconnected and the newly touched device is connected To cancel manually Press and hold the o button of the System until DISCONNECT appears on the display After DISCONNECT is displayed the n icon changes from solid light to blinking light pairing standby state Remote ...

Page 15: ...er 3 0 EDR Output power Class 2 Maximum service area About 10 m Communication range may vary depending on the environmental conditions Frequency band 2 4 GHz range Compatible BLUETOOTH profile A2DP Advanced Audio Distribution Profile AVRCP Audio Video Remote Control Profile Supporting codec SBC AAC aptX Speakers Enclosure Bass Reflex type Speakers 80 mm cone speaker Impedance 8 Ω Maximum input 30 ...

Page 16: ...found on the back of the unit in the spaces designated on the warranty card and in the space provided below Refer to the model and serial numbers whenever you call upon your dealer for information or service on this product Model Serial Number ...

Page 17: ...NLEITUNG Weitere Details finden Sie im folgenden Smart User Guide 0 Siehe 3 für das Inhaltsverzeichnis DEUTSCH B5A 0211 00 E ALLGEMEINE BEDIENUNGSANLEITUNG Informationen zum Smart User Guide Sie können detaillierte Informationen über den Betrieb des Systems von Geräten wie etwa einem Smartphone erhalten Kompatibel mit Standardbrowsern auf Android und iPhone http manual2 jvckenwood com audio mobile...

Page 18: ...Conformity with regard to the EMC Directive 2004 108 EC Declaration of Conformity with regard to the R TTE Directive 1999 5 EC Manufacturer JVC KENWOOD Corporation 3 12 Moriya cho Kanagawa ku Yokohama shi Kanagawa 221 0022 Japan EU Representative s Kenwood Electronics Europe BV Amsterdamseweg 37 1422 AC UITHOORN The Netherlands Hiermit erklärt Kenwood dass sich dieses Gerät K 575BT B K 575BT S in ...

Page 19: ...H Geräte 14 Technische Daten 15 Warenzeichen 0 2013 CSR plc and its group companies The aptX mark and the aptX logo are trade marks of CSR plc or one of its group companies and may be registered in one or more jurisdictions 0 AirPlay iPad iPhone iPod iPod classic iPod nano iPod touch and Retina are trademarks of Apple Inc registered in the U S and other countries iPad Air iPad mini and Lightning a...

Page 20: ...Keine Hindernisse und freier Platz 2 Seiten Oben Rückseite In den Bereichen die von den Abmessungen in der Abbildung dargestellt werden sollten keine Hindernisse aufgestellt werden 3 Unterseite Auf eine ebene Oberfläche stellen Vorderansicht 15 cm 15 cm 15 cm Seitenansicht Rückseite des Geräts 15 cm Hinweise zur Installation Wählen Sie einen Ort der eben trocken und nicht zu heiß oder zu kalt ist ...

Page 21: ... 0 Nur durch den gleichen oder einen gleichwertigen Typ ersetzen 0 Bewahren Sie die Batterie außerhalb der Reichweite von Kindern auf Wenn ein Kind die Batterie versehentlich verschluckt suchen Sie sofort einen Arzt auf 0 Um zu vermeiden dass die Batterie überhitzt birst oder einen Brand auslöst Die Batterie nicht wiederaufladen kurzschließen zerlegen oder erhitzen oder in einem Feuer entsorgen La...

Page 22: ...ystems 0 PLAY MODE Taste Schaltet den Wiedergabemodus um 0 DIMMER Taste Für die Einstellung der Display Helligkeit F Toneinstellungstasten 0 D BASS Taste Verstärkt den Basssound 0 SOUND Taste Stellt die Klangqualität ein Stellt Front Surround ein 0 FLAT Taste Setzt die angepasste Lautstärke auf die ursprüngliche Einstellung zurück G Zifferntasten Zur Auswahl von Titel und Sender H A Ein Ausschalte...

Page 23: ...t die Lautstärke E S T Tasten Zum Überspringen von Titeln Gedrückt halten für schnellen Vorlauf und schnellen Rücklauf Wählt den Sender beim Radiohören Zur Auswahl verschiedener Einstellungen F A Ein Ausschalten Taste Schaltet die Stromversorgung ON OFF Standby G o Stopp Taste Stoppt die Wiedergabe auf der CD dem USB Gerät Schaltet die Radio Sendersuche bei der Wiedergabe von FM Radio um H I W Wie...

Page 24: ...n Sie ihn sicher durch Anheften oder Festkleben FM Innenantenne im Lieferumfang enthalten Ziehen Sie die FM Hauptantenne heraus nachdem Sie die gebündelte Schnur gelöst haben sodass Sie besten Empfang erhalten Anschließen des Netzkabels Stecken Sie das Netzkabel in die AC Steckdose nachdem Sie das mitgelieferte Netzkabel mit AC IN am System verbunden haben Zur Netzsteckdose Netzkabel im Lieferumfa...

Page 25: ...gen Sie die CD mit der bedruckten Seite nach oben in die Mitte des Disc Fachs auf der Vorderseite des Systems ein 0 Die CD wird automatisch eingesetzt wenn Sie sie teilweise einsetzen 0 READING wird angezeigt wenn die CD gelesen wird Wenn sie verschwindet wird die Wiedergabe automatisch gestartet 0 Wenn das System auf eine andere Quelle eingestellt wurde schaltet das System automatisch auf CD Wied...

Page 26: ...m Fernbedienung Hauptgerät Drücken Sie wiederholt Drücken Sie wiederholt Schaltet zwischen AUTO TUNE und MANUAL TUNE bei jedem Drücken der Taste um 2 Wählen Sie einen Sender Drücken Sie die Taste S T während AUTO TUNE oder MANUAL TUNE angezeigt wird Fernbedienung Hauptgerät 0 Für AUTO TUNE Schaltet bei jedem Druck automatisch auf den nächsten Sender um 0 Für MANUAL TUNE Drücken Sie so lange bis di...

Page 27: ...Stoppen der Wiedergabe Drücken Sie die I W auf dem Hauptgerät oder auf der Fernbedienung Fernbedienung Hauptgerät Auswählen eines Titels Überspringt und wählt jeden Titel in Folge an Drücken Sie die S T auf dem Hauptgerät oder auf der Fernbedienung Fernbedienung Hauptgerät Schneller Vorlauf Rücklauf Halten Sie die Taste S T auf dem Hauptgerät oder auf der Fernbedienung gedrückt Fernbedienung Haupt...

Page 28: ...rägt 10 m Die Entfernung kann in Abhängigkeit von den Umgebungsbedingungen kürzer sein 0 Wenn das iPhone oder Smartphone per BLUETOOTH mit dem System verbunden ist können die Klingelsignale für Anrufe oder E Mails auch über die Lautsprecher des Systems gehört werden 0 Dieses System ist nicht mit einer Mikrofonfunktion ausgestattet Um einen Anruf zu tätigen brechen Sie den Anschluss mit dem System ...

Page 29: ...efindet oder auf eine andere Quelle eingestellt ist Manueller Anschluss eines BLUETOOTH Geräts Führen Sie bei der erstmaligen Verbindung des Systems mit dem BLUETOOTH Gerät im Folgenden Zielgerät genannt das Pairing unter Verwendung des folgenden Verfahrens durch 1 Stellen Sie die Quelle auf BLUETOOTH ein Drücken Sie die Taste mehrmals um die Quelle zu wechseln Drücken Sie wiederholt bis BLUETOOTH...

Page 30: ...chtet auf und blinkt dann Pairing Bereitschaftsmodus HINWEIS 0 Wenn Sie N Mark auf dem System mit einem anderen Zielgerät berühren wird das aktuell angeschlossene Gerät getrennt und das neu berührte Gerät wird verbunden Zum manuellen Abbrechen Halten Sie die o Taste des Systems gedrückt bis DISCONNECT auf dem Display erscheint Nachdem DISCONNECT angezeigt wird ändert sich das Symbol n von Dauerlic...

Page 31: ...lasse 2 Maximaler Betriebsbereich Ungefähr 10 m Die Kommunikationsreichweite kann je nach Umgebungsbedingungen abweichen Frequenzband 2 4 GHz Bereich Kompatibles BLUETOOTH Profil A2DP Erweitertes Audioverteilungsprofil AVRCP Audio Video Fernbedienungsprofil Unterstützte Codecs SBC AAC aptX Lautsprecher Gehäuse Bassreflex Typ Lautsprecher 80 mm Kegellautsprecher Impedanz 8 Ω Maximaler Eingang 30 W ...

Page 32: ...es Geräts befindet in den dafür vorgesehenen Stellen im Garantieschein sowie im nachfolgenden Feld ein Geben Sie das Modell und die Seriennummer an wenn Sie Ihren Händler für weitere Informationen über dieses Produkt bzw für Kundendienstanfragen kontaktieren Modell Seriennummer ...

Page 33: ...ails veuillez consulter le Guide de l utilisateur suivant 0 Voir 3 pour la table des matières FRANÇAIS B5A 0211 00 E MANUEL D INSTRUCTIONS DE BASE Informations sur le Guide de l utilisateur Il est possible d obtenir plus d informations sur le fonctionnement du système depuis un appareil tel qu un smartphone Compatible avec les navigateurs standard sur Android et iPhone http manual2 jvckenwood com ...

Page 34: ...eclaration of Conformity with regard to the R TTE Directive 1999 5 EC Manufacturer JVC KENWOOD Corporation 3 12 Moriya cho Kanagawa ku Yokohama shi Kanagawa 221 0022 Japan EU Representative s Kenwood Electronics Europe BV Amsterdamseweg 37 1422 AC UITHOORN The Netherlands Par la présente Kenwood déclare que l appareil K 575BT B K 575BT S est conforme aux exigences essentielles et aux autres dispos...

Page 35: ...Dispositifs BLUETOOTH reproductibles 14 Spécifications 15 Marques déposées 0 2013 CSR plc and its group companies The aptX mark and the aptX logo are trade marks of CSR plc or one of its group companies and may be registered in one or more jurisdictions 0 AirPlay iPad iPhone iPod iPod classic iPod nano iPod touch and Retina are trademarks of Apple Inc registered in the U S and other countries iPad...

Page 36: ...t pas d obstructions et d espace libre 2 Côtés haut arrière aucun élément créant une obstruction ne doit être placé dans les zones indiquées par les dimensions dans l illustration 3 Dessous Poser l appareil sur une surface plate Vue avant 15 cm 15 cm 15 cm Vue latérale Arrière de l appareil 15 cm Remarques concernant l installation Choisissez un endroit plat sec et ni trop chaud ni trop froid entr...

Page 37: ...e d explosion si la pile est remplacée de façon incorrecte 0 Remplacez uniquement par le même modèle ou un modèle équivalent 0 Rangez la pile hors de portée des enfants Si un enfant avale une pile par accident consultez immédiatement un médecin 0 Pour éviter que la pile surchauffe se fissure ou prenne feu Ne pas recharger court circuiter démonter ou chauffer la pile ni la jeter dans un feu Ne lais...

Page 38: ...ctuer divers réglages du système 0 Touche PLAY MODE Commute le mode de lecture 0 Touche DIMMER Pour régler la luminosité de l affichage F Touches de réglage du son 0 Touche D BASS Augmente les graves 0 Touche SOUND Règle la qualité du son Définit le Front Surround 0 Touche FLAT Ramène le son réglé au paramètre initial G Touches numériques Pour sélectionner la piste et la station d émission H Touch...

Page 39: ... baisse le volume E Touches S T Pour sauter des pistes Appuyez et maintenez enfoncé pour faire une avance rapide et un retour rapide Sélectionne la station radio lors de l écoute de la radio Pour sélectionner divers réglages F Touche A alimentation Met sous hors tension veille G Touche o arrêt Arrête la lecture du CD dispositif USB Change la fréquence radio lors de l écoute de la radio FM H Touche...

Page 40: ...le scotchez le solidement Antenne intérieure FM fournie Après avoir délié la corde fournie étendez l antenne FM lors de la connexion afin que vous puissiez obtenir la meilleure réception Connexion du cordon d alimentation Après avoir branché le cordon d alimentation AC IN sur le système branchez le cordon d alimentation secteur dans la prise À la prise d alimentation Cordon d alimentation fourni 0...

Page 41: ...le CD avec la face imprimée vers le haut dans le centre de la fente de chargement de disques devant le système 0 Le CD est inséré automatiquement lorsque vous l insérer partiellement 0 READING s affiche lorsque le CD est en cours de lecture Lorsque cela disparaît la lecture démarre automatiquement 0 Si le système a été réglé sur une autre source le systèmepasseautomatiquementàlalecturedeCD Disposi...

Page 42: ...ommande Appareil principal Appuyez plusieurs fois Appuyez plusieurs fois Alterne entre AUTO TUNE et MANUAL TUNE à chaque fois que vous appuyez sur la touche 2 Sélectionner une station Appuyez sur la touche S T lorsque AUTO TUNE ou MANUAL TUNE est affiché Télécommande Appareil principal 0 Pour AUTO TUNE Syntonise automatiquement la station suivante à chaque pression 0 Pour MANUAL TUNE Appuyez en co...

Page 43: ... la touche I W de l unité principale ou de la télécommande Télécommande Appareil principal Sélection d une piste Ignore et sélectionne chaque piste en séquence Appuyez sur la touche S T de l unité principale ou de la télécommande Télécommande Appareil principal Avance retour rapide Appuyez longuement sur la touche S T de l unité principale ou de la télécommande Télécommande Appareil principal Main...

Page 44: ...nnexion BLUETOOTH est de 10 m Il se peut que la distance soit réduite en fonction de l environnement d utilisation 0 Lorsque le iPhone ou un smartphone est connecté au système via BLUETOOTH une alerte de sonnerie de téléphone ou de mail peut également être émise par les enceintes du système 0 Ce système n est pas équipé d une fonction microphone Pour émettre un appel annulez la connexion avec le s...

Page 45: ... est en mode veille ou configuré sur une autre source Connexion d un appareil BLUETOOTH manuellement Lors de la connexion du système et du dispositif BLUETOOTH mentionné ci après comme dispositif cible pour la première fois effectuez l appariement avec la méthode suivante 1 Réglez la source sur BLUETOOTH Appuyer plusieurs fois sur la touche pour changer la source Appuyez à plusieurs reprises jusqu...

Page 46: ... 0 Si vous touchez le repère N du système à l aide d un autre dispositif cible le périphérique actuellement connecté est déconnecté et le dispositif qui vient d être mis en contact est connecté Pour annuler manuellement Appuyez et maintenez enfoncé le bouton o du système jusqu à ce que DISCONNECT apparaisse à l écran Une fois que DISCONNECT s affiche l icône n passe d une lumière continue à un cli...

Page 47: ...R Puissance de sortie Classe 2 Zone de service maximale Environ 10 m La portée de communication peut varier en fonction des conditions environnementales Bande de fréquence Plage de 2 4 GHz Profil BLUETOOTH compatible A2DP Advanced Audio Distribution Profile AVRCP Profil de télécommande audio vidéo Prenant en charge codec SBC AAC aptX Enceintes Boîtier Type Bass Reflex Enceintes Enceinte cône 80 mm...

Page 48: ...ère de l appareil dans les espaces prévus à cet effet dans la carte de garantie et dans les espaces ci dessous Indiquer le modèle et les numéros de série chaque fois que vous prenez contact avec votre revendeur pour lui solliciter des informations ou services sur ce produit Modèle Numéro de série ...

Page 49: ...or meer informatie verwijzen wij u naar de volgende Smart User Guide 0 Zie 3 voor de inhoudsopgave NEDERLANDS B5A 0211 00 E BASIS INSTRUCTIEHANDLEIDING Informatie over Smart User Guide U kunt gedetailleerde procedures krijgen over het gebruik van het systeem van apparaten zoals een smartphone Compatibel met standaard browsers op Android en iPhone http manual2 jvckenwood com audio mobile global ...

Page 50: ...regard to the EMC Directive 2004 108 EC Declaration of Conformity with regard to the R TTE Directive 1999 5 EC Manufacturer JVC KENWOOD Corporation 3 12 Moriya cho Kanagawa ku Yokohama shi Kanagawa 221 0022 Japan EU Representative s Kenwood Electronics Europe BV Amsterdamseweg 37 1422 AC UITHOORN The Netherlands Hierbij verklaart Kenwood dat dit toestel K 575BT B K 575BT S in overeenstemming is me...

Page 51: ...ng annuleren 14 Afspeelbare BLUETOOTH apparaten 14 Specificaties 15 Handelsmerken 0 2013 CSR plc and its group companies The aptX mark and the aptX logo are trade marks of CSR plc or one of its group companies and may be registered in one or more jurisdictions 0 AirPlay iPad iPhone iPod iPod classic iPod nano iPod touch and Retina are trademarks of Apple Inc registered in the U S and other countri...

Page 52: ...kant Geen belemmeringen en voldoende ruimte 2 Zijkanten Bovenkant Achterkant Geen belemmeringen moeten worden geplaatst op de gebieden aangegeven door de afmetingen in de afbeelding 3 Onderkant Plaats op een horizontaal oppervlak Vooraanzicht 15 cm 15 cm 15 cm Zij aanzicht Achterkant van het systeem 15 cm Opmerkingen over de installatie Kies een vlakke en droge plaats waar de temperatuur niet onde...

Page 53: ... de batterij onjuist wordt vervangen 0 Vervang alleen door hetzelfde of een gelijkwaardig type 0 Bewaar de batterij op een plaats buiten het bereik van kinderen Als een kind per ongeluk de batterij inslikt raadpleeg onmiddellijk een arts 0 Om te voorkomen dat de batterij oververhit raakt barst of in brand vliegt Niet opladen kortsluiten demonteren of de batterij verhitten of in het vuur gooien Bew...

Page 54: ... systeem 0 PLAY MODE knop Schakelt de afspeelmodus 0 DIMMER knop Voor het instellen van de helderheid van het display F Geluid instellingsknoppen 0 D BASS knop Verhoogt het basgeluid 0 SOUND knop Regelt de geluidskwaliteit Stelt de Front Surround 0 FLAT knop Verandert het aangepaste geluid naar de oorspronkelijke instelling G Cijfertoetsen Voor het selecteren van track en zender H A Power knop Sch...

Page 55: ...agt het volume E S T knoppen Voor het overslaan van tracks Ingedrukt houden om vooruit en snel achteruit te spoelen Selecteert de zender tijdens het luisteren naar radio Voor het selecteren van diverse instellingen F A Power knop Schakelt de stroom AAN UIT standby G o Stop knop Stopt het afspelen van de CD USB apparaat Schakelt de radio afstemming tijdens het luisteren naar FM radio H I W Afspelen...

Page 56: ...n positie en in de richting met de beste ontvangst tack of tape deze veilig FM binnenantenne meegeleverd Nadat u het meegeleverde touwtje hebt losmaakt trek de FM antenne bij het aansluiten zodat u de beste ontvangst krijgt Aansluiten van het netsnoer Na het aansluiten van de meegeleverde stekker op de AC IN op het systeem steek de stekker in het stopcontact Naar stopcontact Netsnoer meegeleverd 0...

Page 57: ...ts de CD met het etiket naar boven in het midden van de disc laden sleuf in de voorkant van het Systeem 0 De CD zal automatisch worden geplaatst wanneer u deze er gedeeltelijk in steekt 0 READING wordt weergegeven wanneer de CD wordt gelezen Wanneer het verdwijnt start het afspelen automatisch 0 Als het systeem is ingesteld op een andere bron schakelt het Systeem automatisch over naar CD weergave ...

Page 58: ...standsbediening Hoofdtoestel Herhaaldelijk drukken Herhaaldelijk drukken Wisselt tussen AUTO TUNE en MANUAL TUNE telkens wanneer u de toets indrukt 2 Selecteer een zender Druk op de S T knop terwijl AUTO TUNE of MANUAL TUNE wordt weergegeven Afstandsbediening Hoofdtoestel 0 Voor AUTO TUNE Stemt automatisch af naar het volgende station bij elke druk 0 Voor MANUAL TUNE Druk continu totdat de gewenst...

Page 59: ...I W knop op het hoofdapparaat of op de afstandsbediening Afstandsbediening Hoofdtoestel Een track selecteren Slaat over en selecteert elke track in de juiste volgorde Druk op de S T knop op het hoofdapparaat of op de afstandsbediening Afstandsbediening Hoofdtoestel Snel vooruitspoelen terugspoelen Druk en houd de S T knop vast op het hoofdapparaat of op de afstandsbediening Afstandsbediening Hoofd...

Page 60: ...UETOOTH aansluiting is 10 m De afstand kan mogelijk korter zijn afhankelijk van uw gebruiksomgeving 0 Wanneer de iPhone of smartphone op het systeem is aangesloten via BLUETOOTH kunnen meldingen zoals ringalarmen of telefoonoproepen en emails ook worden gehoord via de luidsprekers van het systeem 0 Dit Systeem is niet uitgerust met een microfoonfunctie Om te bellen annuleer de verbinding met het S...

Page 61: ... de stand by modus staat of ingesteld is op een andere bron Handmatig aansluiten van een BLUETOOTH apparaat Bij het aansluiten van het Systeem en het BLUETOOTH apparaat hierna bedoeld als doelapparaat voor de eerste keer voer koppeling uit met gebruik van de volgende methode 1 Stel de bron in naar BLUETOOTH Druk herhaaldelijk op de knop om de bron te schakelen Druk herhaaldelijk totdat BLUETOOTH w...

Page 62: ...ns koppeling stand by stand OPMERKING 0 Als het N merk van het Systeem met een ander doelapparaat in aanraking komt zal de huidige verbinding verbreken en wordt het nieuw aangeraakte apparaat verbonden Om handmatig te annuleren Druk en houd de o knop ingedrukt op het Systeem totdat DISCONNECT op het display verschijnt Nadat DISCONNECT wordt weergegeven zal het n pictogram veranderen van massief li...

Page 63: ...Maximale servicegebied Ongeveer 10 m Communicatiebereik kan variëren afhankelijk van de omgevingsomstandigheden Frequentieband Bereik van 2 4 GHz Compatibel BLUETOOTH profiel A2DP Advanced Audio Distribution Profile AVRCP Audio Video Remote Control Profile Ondersteunende codec SBC AAC aptX Luidsprekers Behuizing Bass Reflex type Luidsprekers 80 mm conus luidspreker Impedantie 8 Ω Maximum ingangsve...

Page 64: ...erkant van het toestel in de voorziene ruimtes op de garantiekaart en in de hieronder voorziene ruimte Vermeld het model en de serienummers telkens als u contact opneemt met uw dealer voor informatie over of service aan dit product Model Serienummer ...

Page 65: ...ettagli fare riferimento alla seguente Guida intelligente per l uso 0 Vedere 3 per il sommario ITALIANO B5A 0211 00 E BASIC INSTRUCTION MANUAL Informazioni sulla Guida rapida per l uso È possibile ottenere procedure dettagliate sul funzionamento del sistema da dispositivi come uno smartphone Compatibile con browser standard su Android e iPhone http manual2 jvckenwood com audio mobile global ...

Page 66: ...ormity with regard to the EMC Directive 2004 108 EC Declaration of Conformity with regard to the R TTE Directive 1999 5 EC Manufacturer JVC KENWOOD Corporation 3 12 Moriya cho Kanagawa ku Yokohama shi Kanagawa 221 0022 Japan EU Representative s Kenwood Electronics Europe BV Amsterdamseweg 37 1422 AC UITHOORN The Netherlands Conlapresente Kenwooddichiarachequestaunità K 575BT B K 575BT S è conforme...

Page 67: ...one 14 Cancellazione del collegamento 14 Dispositivi BLUETOOTH riproducibili 14 Specifiche 15 Marchi di fabbrica 0 2013 CSR plc and its group companies The aptX mark and the aptX logo are trade marks of CSR plc or one of its group companies and may be registered in one or more jurisdictions 0 AirPlay iPad iPhone iPod iPod classic iPod nano iPod touch and Retina are trademarks of Apple Inc register...

Page 68: ...e spazio aperto 2 Lati Parte superiore Parte posteriore Nessun ostacolo dovrebbe essere posto nelle aree indicate dalle dimensioni nell illustrazione 3 Fondo Collocare su una superficie ben orizzontale Vista anteriore 15 cm 15 cm 15 cm Vista laterale Lato posteriore del sistema 15 cm Note sull installazione Scegliere un luogo piano asciutto e né troppo caldo né freddo ad esempio a una temperatura ...

Page 69: ...eria viene sostituita in modo errato 0 Sostituire solo con una batteria uguale o di tipo equivalente 0 Conservare la batteria in un posto al di fuori della portata dei bambini Se un bambino ingoia accidentalmente la batteria consultare immediatamente un medico 0 Per evitare che la batteria si surriscaldi si spacchi o dia origine a un incendio Non ricaricare accorciare smontare o riscaldare la batt...

Page 70: ...duzione 0 Pulsante DIMMER Per impostare la luminosità del display F Pulsanti di impostazione suono 0 Pulsante D BASS Consente di aumentare il suono dei bassi 0 Pulsante SOUND Consente di regolare la qualità del suono Consente di impostare il Front Surround 0 Pulsante FLAT Consente di tornare al suono regolato alla impostazione originale G Pulsanti numerici Per selezionare brano e stazione di trasm...

Page 71: ...ni Premere e tenere premuto per l avanzamento rapido e il riavvolgimento rapido Consente di selezionare la stazione radio durante l ascolto della radio Per selezionare le varie impostazioni F Pulsante A Alimentazione Consente di commutare l alimentazione su ON OFF standby G Pulsante o Arresto Consente di arrestare la riproduzione sul CD dispositivo USB Consente di commutare la sintonizzazione dell...

Page 72: ...o fissarlo saldamente con nastro adesivo Antenna FM interna in dotazione Dopo aver sciolto la stringa attorcigliata allungare l antenna FM quando si esegue il collegamento in modo da ottenere la migliore ricezione Collegamento del cavo di alimentazione Dopo aver collegato il cavo di alimentazione in dotazione al CA IN sul sistema inserire il cavo di alimentazione nella presa CA Alla presa elettric...

Page 73: ...to dell etichetta rivolto verso l alto al centro dello spazio di caricamento del disco nella parte anteriore del sistema 0 Il CD si inserirà automaticamente quando viene inserito parzialmente 0 READING viene visualizzato quando il CD è in fase di lettura Quando scompare la riproduzione si avvia automaticamente 0 Se il sistema è stato impostato su un altra sorgente il sistema passa automaticamente ...

Page 74: ...Telecomando Unità principale Premere ripetutamente Premere ripetutamente Alterna tra AUTO TUNE e MANUAL TUNE ogni volta che si preme il pulsante 2 Selezionare una stazione Premere il pulsante S T mentre AUTO TUNE o MANUAL TUNE viene visualizzato Telecomando Unità principale 0 Per AUTO TUNE Consente di sintonizzarsi sulla stazione successiva automaticamente a ogni pressione 0 Per MANUAL TUNE Premer...

Page 75: ...ere il pulsante I W sull unità principale o sul telecomando Telecomando Unità principale Selezione di un brano Consente di saltare e selezionare ciascun brano in sequenza Premere il pulsante S T sull unità principale o sul telecomando Telecomando Unità principale Avanzamento riavvolgimento rapido Premere e tenere premuto il pulsante S T sull unità principale o sul telecomando Telecomando Unità pri...

Page 76: ...istanza massima per una possibile connessione BLUETOOTH è di 10 m La distanza può essere inferiore a seconda dell ambiente di utilizzo 0 Mentre iPhone o lo smartphone sono collegati al sistema via BLUETOOTH il tono di avviso per le chiamate telefoniche e per le e mail può essere ascoltato anche dai diffusori del sistema 0 Questo sistema non è dotato di una funzione microfono Per fare una telefonat...

Page 77: ...ticamente anche se il sistema è in modalità standby o impostato su un altra sorgente Collegamento manuale di un dispositivo BLUETOOTH Quando si collega il sistema e il dispositivo BLUETOOTH d ora in poi denominato dispositivo di destinazione per la prima volta eseguire l accoppiamento utilizzando il metodo seguente 1 Impostare la sorgente su BLUETOOTH Premere il pulsante ripetutamente per commutar...

Page 78: ... dell accoppiamento NOTA 0 SesitoccailsegnoNdelsistemautilizzandounaltro dispositivo di destinazione il dispositivo attualmente collegato verrà disconnesso e il dispositivo toccato più di recente viene collegato Per cancellare manualmente Premere e tenere premuto il pulsante o del sistema fino a che non appare DISCONNECT sul display Dopo che DISCONNECT viene visualizzato l icona n cambia da luce f...

Page 79: ...rsione BLUETOOTH Ver 3 0 EDR Potenza di uscita Classe 2 Massima area di servizio Circa 10 m La gamma di comunicazione può variare a seconda delle condizioni ambientali Banda di frequenza Gamma 2 4 GHz Profilo BLUETOOTH compatibile A2DP Advanced Audio Distribution Profile AVRCP Audio Video Remote Control Profile Supporto codec SBC AAC aptX Diffusori Enclosure Tipo Bass Reflex Diffusori Altoparlante...

Page 80: ...sul retro dell unità negli spazi appositi sulla scheda di garanzia e nello spazio fornito qui di seguito Indicare il modello e il numero di serie ogni volta che ci si rivolge al proprio rivenditore per informazioni o assistenza sul presente prodotto Modello Numero di serie ...

Reviews: