background image

English

59

Setting the System Clock ……………………………………60

Setting the Timer

• Setting the Sleep Timer (SLEEP)  ………………………………… 61

• Setting the Program Timer (Timer Set)  ………………………… 62

Display Settings

• Setting the Display Brightness (DIMMER)  ……………………… 67

• Turning the Display Saver ON/OFF ……………………………… 67

Auto Power Save (A.P.S.)  ……………………………………68

Component Settings

This chapter explains basic timekeeping settings, as well as 
settings for the timer, display, and other functions which provide 
more extensive usage of this product.

R-K731̲E.indb   59

R-K731̲E.indb   59

2011/10/07   14:08:50

2011/10/07   14:08:50

Summary of Contents for K-731-S

Page 1: ... with regard to the EMC Directive 2004 108 EC Manufacturer JVC Kenwood Corporation 3 12 Moriya cho Kanagawa ku Yokohama shi Kanagawa 221 0022 Japan EU Representative s Kenwood Electronics Europe BV Amsterdamseweg 37 1422 AC UITHOORN The Netherlands R K731 E indb 1 R K731 E indb 1 2011 10 07 14 08 34 2011 10 07 14 08 34 ...

Page 2: ...tion Back panel CLASS 1 LASER PRODUCT THE LIGHTNING FLASH WITH ARROWHEAD SYMBOL WITHIN AN EQUILATERAL TRIANGLE IS INTENDED TO ALERT THE USER TO THE PRESENCE OF UNINSULATED DANGEROUS VOLTAGE WITHIN THE PRODUCT S ENCLOSURE THAT MAY BE OF SUFFICIENT MAGNITUDE TO CONSTITUTE A RISK OF ELECTRIC SHOCK TO PERSONS THE EXCLAMATION POINT WITHIN AN EQUILATERAL TRIANGLE IS INTENDED TO ALERT THE USER TO THE PRE...

Page 3: ...n or pinched particularly at plugs convenience receptacles and the point where they exit from the apparatus IMPORTANT SAFETY INSTRUCTIONS Caution Read this page carefully to ensure safe operation Read These Instructions All the safety and operating instructions should be read before the product is operated Keep These Instructions The safety and operating instructions should be retained for future ...

Page 4: ... dropped 14 Replacement Parts When replacement parts are required be sure the service technician has used replacement parts specified by the manufacturer or have the same characteristics as the original part Unauthorized substitutions may result in fire electric shock or other hazards 15 Safety Check Upon completion of any service or repairs to this product ask the service technician to perform sa...

Page 5: ...posed as household waste Old electrical and electronic equipment and batteries should be recycled at a facility capable of handling these items and their waste byproducts Contact your local authority for details in locating a recycle facility nearest to you Proper recycling and waste disposal will help conserve resources whilst preventing detrimental effects on our health and the environment Notic...

Page 6: ...digital input External Input The system supports the playback of a USB flash memory and USB mass storage class compliant digital audio player In addition as well as analog input terminals for cassette decks and PC input terminal for playing its contents the R K731 also features a sampling rate converter compliant digital input terminal for digital tuners etc Choose your favorite audio quality Digi...

Page 7: ... External Components D AUDIO Audio Settings P 51 This chapter explains how to tailor the system to your audio preferences This chapter explains how to store and main tain your system so that it continues to give pleasure for many years to come This chapter explains how to select the settings for the system Component Settings P 59 To ensure safety read the items by this mark carefully Digital Signa...

Page 8: ...are missing or if the unit is damaged or fails to operate notify your dealer immediately If the unit was shipped to you directly notify your shipper immediately Kenwood recommends that you retain the original carton and packing materials in case you need to move or ship the unit in the future Keep this manual handy for future reference R K731 E indb 8 R K731 E indb 8 2011 10 07 14 08 36 2011 10 07...

Page 9: ...coustic effect Left speaker Right speaker Main unit Observe the following cautions when installing the system Insufficient heat radiation may build up internal heat and cause a malfunction or fire hazard z Do not place any object on the system that may hinder heat radiation z Do not place the system upside down or lay it on its side z Do not cover the system with a cloth or place it on a carpet or...

Page 10: ...experience always consult your dealer before installation The antenna should be located away from power lines If the antenna falls over contact with a power line creates the risk of electric shock To AC wall outlet Push into the slot AM loop antenna 1Connect to FM75Ω 2Find the location that gives the best reception 3Fix the antenna in place FM indoor antenna AC power cord Right speaker Left speake...

Page 11: ...esult in unnatural sound and unclear sound Connecting the speakers Microcomputer malfunctions If the system is connected correctly and still does not operate normally or shows display errors reset the microcomputer P 73 The antenna supplied with the system is for indoor use Place it as far as possible away from the main unit your TV set the speaker cords and the power cord and point it in the dire...

Page 12: ...d on z For more information on which models of iPod iPhone can be connected see P 32 z Depending on the device being connected it may take some time for the system to recognize it z Some USB devices may not be recognized or cannot play certain files z With some models a USB connection mode selection screen will appear Select Storage MSC mode Digital audio player iPod iPhone USB flash memory PC IN ...

Page 13: ...yer PHONES Plug headphones equipped with a 3 5 mm stereo mini plug into the PHONES jack on the front panel of the main unit z When headphones are connected no sound will be output from the speakers Powered subwoofer DIGITAL IN PCM signals Connect the optical digital output terminals on components such as digital tuners to the DIGITAL IN terminal on the rear panel of the main unit z Set the digital...

Page 14: ...lowing keys will turn on system power TUNER BAND CDE USBE D AUDIOE PC IN D IN1 2 or AUX of the remote control Component Names and Functions STANDBY TIMER indicator Red Lights in normal Standby mode Orange Lights in Timer Standby mode Power P 21 Turns the system on or off Standby Display P 15 Remote sensor P 17 L P 26 Volume knob P 20 CD slot P 21 26 E P 21 33 35 49 INPUT SELECTOR P 21 F P 35 39 49...

Page 15: ...le being played WAV WMA MP3 AAC Lights during all tracks repeat playback of CD USB or iPod iPhone P 29 33 35 The message 1 is also displayed during single track repeat playback P 29 33 35 Lights in random playback mode P 29 35 Lights in program playback mode P 29 30 35 36 Lights when Supreme EX is on P 56 Lights during USB connection P 34 Lights during PC connection P 44 Lights during iPod iPhone ...

Page 16: ... lit Selects the playback mode P 29 33 35 Adjusts volume P 20 Stops the playback Selects the radio station selection mode P 27 29 30 35 36 39 49 Skips back or forward through the tracks and selects the radio station P 27 35 39 Sets the sound quality P 52 55 Selects input source Starts playback P 21 26 32 34 38 44 46 48 ENTER Fixes a setting Selects a setting Uses for several settings Switches the ...

Page 17: ...ess the power K key on the remote control to turn the system on After the system powers up press the key for the function you want to use Point the remote control at the remote sensor when using it z The remote control may not operate correctly if direct sunlight or light from a high frequency fluorescent lamp such as an inverter type is shining on the remote sensor If this happens move the system...

Page 18: ...rted Elapsed time of current track Track numbers may not be displayed correctly when the following types of discs are played Discs recorded in multiple sessions To eject the CD Stop playback and press the CD EJECT key on the remote control or the L key on the main unit 18 R K731 W h i l e t h i s s y s t e m c a n b e controlled from either the remote control or the main unit the explanations in t...

Page 19: ...nce Return to the start of the track Skipping a folder is not possible if the playback is from a selec tion of tracks on the digital audio player Some functions may not work depending on the connected component 19 English Explains the procedure for CDs Operation icons How to Use This Manual Explains the procedure for the radio Related functions that may also be helpful Explanations of remote contr...

Page 20: ...wers the volume Increases the volume Mute z Press this key again to unmute the sound This section describes some basic procedures for using the system such as tuning the radio and playing audio from a CD iPod iPhone PC IN USB and a D AUDIO Adjusting the volume level 1 3 2 3 R K731 E indb 20 R K731 E indb 20 2011 10 07 14 08 40 2011 10 07 14 08 40 ...

Page 21: ...ck proceed to step 3 Insert a CD with the label side upwards 3 3 Start playback z You can select the sound quality you want See Audio Settings P 51 58 for details z If you connect the external components to the PC IN D IN1 or D IN2 terminal playback operation should be started on each component Press the Play Pause key for the input source See Procedures by Input Source P 25 50 for details Turn th...

Page 22: ...hen writing data to a disc always close the session or finalize the disc The disc may not play properly if you do not close the session or finalize the disc z Depending on the specifications of the writing software used the recorded folder names and file names may not be dis played correctly z Playback for multi session discs or discs that contain large numbers of folders may take longer to begin ...

Page 23: ...2 k 320 kbps z Files created using functions in Windows Media Player 9 or later cannot be played WMA Professional WMA Lossless WMA Voice CD file system WAV files USB only ISO 9660 Level 1 ISO 9660 Level 2 Joliet Romeo Extension wav Sampling frequency 8 16 22 05 24 32 44 1 48 kHz Quantization bit rate 8 16 bit Number of file limits Max files folders 999 in total Max folders 255 Maximum number of di...

Page 24: ...r iPod and Made for iPhone mean that an electronic accessory has been designed to connect specifically to iPod or iPhone respectively and has been certified by the developer to meet Apple performance standards Apple is not responsible for the operation of this device or its compliance with safety and regulatory standards Please note that the use of this accessory with iPod or iPhone may affect wir...

Page 25: ...lume Using a PC 45 External Components Playback from External Components 46 Adjusting the External Component Input Level 47 D AUDIO Playing from a Digital Audio Player 48 Adjusting the Digital Audio Player Input Level 50 Procedures by Input Source This chapter explains the operation procedures for each input source This manual explains the operations assuming that you will use the remote control S...

Page 26: ... This section explains how to play a CD As well as normal playback you can use folder playback random playback repeat playback and program playback CD Press the CDE key Track number during playback A CD is inserted Elapsed time of current track z Track numbers may not be displayed correctly when the following types of discs are played Discs recorded in multiple sessions To eject the CD Stop playba...

Page 27: ...lecting the folder MP3 WMA AAC z When you stop playback by pressing the F key the track being played is stored and pressing the CDE key restarts playback from the beginning of that track Resume function z The Resume function is cancelled if you switch to another input source during playback Press the DISPLAY key The mode changes as shown below each time you press the key CD R CD RWdiscsrecordedint...

Page 28: ...3 F6_3 mp3 Folder 7 Sample folder configuration Playback sequence for folders and track files MP3 WMA AAC When you play a disc containing recorded audio files the track files on the disc are played sequentially beginning with the files in the ROOT folder as shown in the figure z A folder that does not contain any tracks cannot be selected z Audio files are played back in accordance with the sequen...

Page 29: ...t Program playback mode PGM lit Folder playback mode N lit This mode plays the tracks on a CD repeatedly CD Repeat Playback Mode Press the CDE key to play the tracks you want to repeat 1 1 Press the REPEAT key to begin repeat playback The mode changes as shown below each time you press the key 2 2 z If you press the REPEAT key during program playback and PGM light up on the display and re peat pla...

Page 30: ...mber 3 press the 3 key and then press the ENTER key For folder number 17 press the 1 7 keys and then press the ENTER key For folder number 123 press the 1 2 and then the 3 key Press the P MODE key to select program playback mode The mode changes as shown below each time you press the key 1 1 1 Press the P MODE key to select program playback mode The mode changes as shown below each time you press ...

Page 31: ...t up to 30 tracks If you attempt to select more tracks the Program Full message is displayed 4 4 z You can also use number keys to select the file z If you enter the wrong information press the CLEAR key before you proceed to step 3 Then enter the information again z Proceed to step 3 within 20 seconds after selecting a track or file Press the ENTER key 3 3 To cancel program mode Stop playback and...

Page 32: ... z Also refer to the instruction manual that comes with the iPod iPhone z Update the software for iPod iPhone to the latest version Press the USBE key to begin playback z Simply pressing the USBE key turns on the system and begins playback 2 2 Supported models of iPod iPhone As of October 2011 ziPhone 4S ziPhone 4 ziPhone 3GS ziPhone 3G ziPhone ziPod touch 4th Generation ziPod touch 3rd Generation...

Page 33: ...n also perform these operations on the iPod iPhone Related Information Pausing and resuming playback Press the USBE key Press the E key Skipping forward back Hold down the G or H key Hold down the G or H key Skippingtracks skippingback skippingtothestart Skip a track Press the H key Press the G key 2 or more times in succession Press the G key once Skip back to the previous track Press the H key P...

Page 34: ...etails P 23 24 Press the USBE key to begin playback z Simply pressing the USBE key turns on the system and begins playback z After folders or files are searched playback begins with the smallest file number See P 28 for information on the playback sequence when there are multiple fold ers or files on the connected device 2 2 z If no playable files are found playback does not start z When playback ...

Page 35: ... Skip back to the previous track Press the H key Press the G key 2 or more times in succession Press the G key once Return to the start of the track Repeat playback mode Press the REPEAT key to shift the selection Single track repeat playback All tracks folders repeat playback Repeat playback off lit lit unlit Press the DISPLAY key to shift the selection Switching display contents Day Clock File n...

Page 36: ...number keys to select the folder To select folder number 3 press the 3 key and then press ENTER key For folder number 17 press the 1 7 keys and then press ENTER key For folder number 123 press the 1 2 and then the 3 key 1 1 Program playback mode Cancel program playback mode Folder playback mode PGM unlit PGM lit N lit z You can also use number keys to select the file z If you enter the wrong infor...

Page 37: ...u attempt to select more tracks the Program Full message is displayed 4 4 To cancel program mode Stop playback and press the P MODE key so that PGM is no lon ger displayed To remove a track from a program Stop playback and then press the CLEAR key Each time you press the key the last programmed track is cleared To add a track to the end of the program If you are already playing an audio file stop ...

Page 38: ... TUNER BAND key to select FM or AM Each time you press the key the band switches between FM and AM 1 1 Selecting with the number keys Select a preset station z See P 40 and P 41 for more information on presets Selecting with the P CALL keys To display the next stored station Press the G or H key To run through the sequence of stored stations at intervals of roughly 0 5 seconds Press and hold the G...

Page 39: ... you are tuned in to your preferred station Using Manual tuning Press the key until the desired station is tuned or until you reach the desired frequency Auto tuning Select this mode when reception is good Manual tuning Select this mode when reception is poor AUTO lit AUTO unlit The mode changes as shown below each time you press the key Choosing from stations that are not preset Auto ManualTuning...

Page 40: ...ystem stations are given priority during auto presetting If there is memory left after presetting this unit continues presetting regular FM and AM stations z A broadcast station that cannot be preset with Auto Memory should be set with Manual preset P 41 Press the C or D key z Auto Memory flashes on the display and the receivable radio stations are preset automatically z A preset frequency can be ...

Page 41: ...ber flashes The currently selected preset number flashes z If the selected preset number is already assigned a station the existing station is overwritten by the new station Use Auto Tuning or Manual Tuning to tune in the desired station See P 39 Tune in the station you want to preset and then press the ENTER key 1 1 Select the desired preset number P01 to P40 2 2 Selecting with the number keys Pr...

Page 42: ...dio Data System reception It can extract the information from the broadcast signal for use with various functions such as automatic display of the station name z Select the FM band z Preset Radio Data System stations with the Auto Memory function P 40 To switch the displays Press the DISPLAY key z The mode changes as shown below each time you press the key Clock Frequency PS Program Service Name R...

Page 43: ...s News Current Affairs Affairs Information Info Sport Sport Education Educate Drama Drama Culture Culture Science Science Varied Varied Program Type Name Display Weather Weather Finance Finance Children s programs Children Social Affairs Social Religion Religion Phone In Phone In Travel Travel Leisure Leisure Jazz Music Jazz Country Music Country National Music Nation M Oldies Music Oldies Folk Mu...

Page 44: ...s not recognize this system in a few seconds try to Disconnect the USB cable and connect it again Reboot the PC 3 3 Control the PC software and open an audio file z The audio file should be selected on the PC For the operations of the PC refer to the manuals for your PC and the software z The volume can be controlled on this system z is displayed while the PC is connected z This system is compatib...

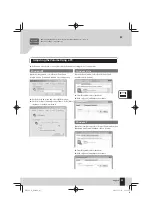
Page 45: ...tab and select USB Speakers z Click on Volume and adjust the volume If the Mute checkbox is checked uncheck it Windows Vista Open the Start menu select Control Panel and double click on Sound z From Playback select Speakers z Click on Levels and adjust the volume Windows 7 Open the Start menu select Control Panel and click on Hardware and Sound and then click on Sound z From Playback select Speake...

Page 46: ...omes with the external component being connected 1 1 3 3 Adjust the volume level Press the D IN1 2 key to perform playback from a device connected to the DIGITAL IN terminal while you press the AUX key to perform playback from a device connected to the AUX PLAY IN terminal 2 2 Begin playback on the connected external component Perform the required operation on the connected external component to s...

Page 47: ...e vol ume setting Press the AUX key 1 1 Select Input Level Press the C or D key 3 3 Adjust the Input Level Press the A or B key 4 4 z You can adjust the input level in a range from 3 to 5 Press the ENTER key z Connecting Other Accessories Commercially Available Units R P 12 13 z Audio Settings R P 51 onwards z Signals input via the AUX PLAY IN terminal will not be output from the AUX REC OUT termi...

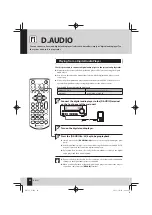
Page 48: ... main unit or the remote control Compatible Kenwood digital audio players HDD audio player Memory audio player recorder HD20GA7 M1GC7 MGR A7 MGR E8 Turn on the digital audio player 2 2 Press the D AUDIOE key to begin playback z Simply pressing the D AUDIOE key turns on the system and begins play back z If the digital audio player is not connected using the dedicated cable PNC 150 use the controls ...

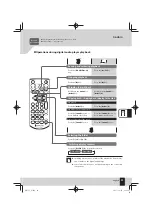
Page 49: ...hift the selection Switching display contents D AUDIO Day Clock Related Information Skipping tracks skipping back skipping to the start Skip a track Press the H key Press the G key two or more times in succession Press the G key once Skip back to the previous track Press the H key Press the G key two or more times in succession Press the G key once Return to the start of the track z Skipping a fol...

Page 50: ... to the D AUDIO terminal Use this adjustment when the volume from an external component is notice ably higher or lower than other input sources at the same volume setting z You can adjust the input level in a range from 3 to 5 Press the ENTER key D AUDIO z If you adjust the input level for D AUDIO the output level from the AUX REC OUT terminal will also change Press the MODE key 2 2 Press the ENTE...

Page 51: ... function to customize the sound to your own preferences Digital Signal Processor Adjusting Super Bass Tones D BASS 52 Adjusting the Range Levels TONE 53 Supreme EX Setting Supreme EX 56 Balance Adjusting the Speaker Volume Balance 57 Rec Out Level Adjusting the Recording Output Level 58 R K731 E indb 51 R K731 E indb 51 2011 10 07 14 08 48 2011 10 07 14 08 48 ...

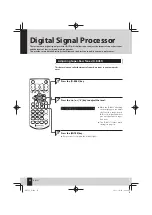
Page 52: ...r own preferences Adjusting Super Bass Tones D BASS This feature lets you tailor the impact of super bass tones to your own prefer ences z While the D BASS is flashing on the display you can adjust the level in a range from 0 Off to 10 Higher numbers give more pronounced super bass tones z The D BASS flashes while setting is in progress 1 1 Press the D BASS key Press the ENTER key z If you set lev...

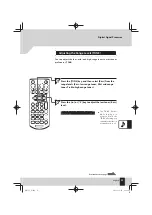
Page 53: ...atch your preferences TONE 1 1 Press the TONE key and then select Bass from the range levels Bass low range tones Mid mid range tones Treble high range tones Digital Signal Processor z The TONE flashes while setting is in progress While the TONE is flashing you can adjust the level in a range from 8 to 8 R K731 E indb 53 R K731 E indb 53 2011 10 07 14 08 48 2011 10 07 14 08 48 ...

Page 54: ...hen select Mid 4 4 Press the A or B key to adjust the mid tones Mid level z The TONE flashes while set ting is in progress While the TONE is flashing you can ad just the level in a range from 8 to 8 R K731 E indb 54 R K731 E indb 54 2011 10 07 14 08 48 2011 10 07 14 08 48 ...

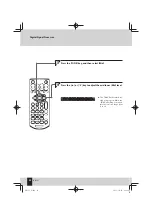
Page 55: ... to adjust the high tones Treble level z The TONE flashes while setting is in progress While the TONE is flashing you can adjust the level in a range from 8 to 8 z If you do not need to adjust all the range levels press the ENTER key to end the settings after you have finished the range level adjustments you want to make R K731 E indb 55 R K731 E indb 55 2011 10 07 14 08 48 2011 10 07 14 08 48 ...

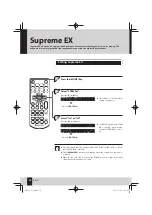
Page 56: ...t flashes while setting is in progress z The Supreme EX function operates when CD D IN1 D IN2 USB or PC IN 44 1 kHz 48 kHz is selected z The SUPREME EX indicator will light up while the Supreme EX function is activated z When D IN1 or D IN2 is selected the SPRM EX does not light if the input signal frequency is 96 kHz or 88 2 kHz Press the MODE key 1 1 Press the ENTER key z SPRM EX lights when SPR...

Page 57: ...for the left and right speakers Adjusting the Speaker Volume Balance Select Balance Press the C or D key 2 2 Press the ENTER key Adjust the balance Press the A or B key 3 3 Press the MODE key 1 1 Press the ENTER key R K731 E indb 57 R K731 E indb 57 2011 10 07 14 08 49 2011 10 07 14 08 49 ...

Page 58: ...evel Press the C or D key 3 3 Press the ENTER key Adjust the recording output level Press the A or B key 4 4 Press the MODE key Select the input source to be output at the recording output 2 2 1 1 Press the ENTER key Adjusting the Recording Output Level z You can adjust the level in a range from 5 to 3 R K731 E indb 58 R K731 E indb 58 2011 10 07 14 08 49 2011 10 07 14 08 49 ...

Page 59: ...ing the Display Brightness DIMMER 67 Turning the Display Saver ON OFF 67 Auto Power Save A P S 68 Component Settings This chapter explains basic timekeeping settings as well as settings for the timer display and other functions which provide more extensive usage of this product R K731 E indb 59 R K731 E indb 59 2011 10 07 14 08 50 2011 10 07 14 08 50 ...

Page 60: ...ress the C key z If there is a power failure or the system is unplugged from the wall outlet for some time set the time again z Pressing the F key on the remote control or on the main unit while the system is in the Standby mode will display the time for 5 seconds z If the system clock time setting is not correct the Program Timer will not start playback at the correct time z As a certain margin o...

Page 61: ...120 minutes is timer off 1 1 Sleep Timer on z While the Sleep Timer is running you can check the remaining time by pressing the SLEEP key To cancel the Sleep Timer Press the power K key to turn the system off Standby or press the SLEEP to turn off Q A Sleep Timer automatically turns the system off after a set interval while a Program Timer starts playback at a specified time Setting the Timer 10 2...

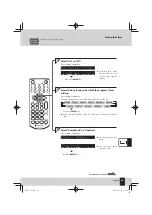
Page 62: ... system clock to the correct time before performing this procedure See P 60 z Make sure the times for Program 1 and Program 2 are different by at least 1 minute to ensure that their operations do not overlap z When you want to return to the previous step during the setting procedure press the C key Press the MODE key 1 1 Select Timer Set Press the C or D key 2 2 Press the ENTER key Select Program ...

Page 63: ...eryday Mon Fri Tue Sat or Sat Sun proceed to step 7 z The timer runs every week Select Every Week or Onetime Press the A or B key 6 6 Press the ENTER key z The specified timer runs once only Select On or Off Press the A or B key 4 4 z Selecting Off ends the procedure and restores the original display Press the ENTER key z Setting the System Clock R P 60 Everyday Sunday Monday Tuesday Wednesday Thu...

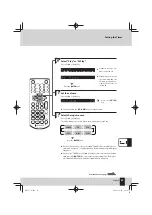
Page 64: ...e z The hour flashes z The minute flashes Specify the Off end time setting 8 8 Press the ENTER key Press the ENTER key Press the ENTER key Press the ENTER key z The hour flashes z The minute flashes Use the A or B key to set the hour Use the A or B key to set the minute R K731 E indb 64 R K731 E indb 64 2011 10 07 14 08 51 2011 10 07 14 08 51 ...

Page 65: ... you select TUNER use the A or B to select a preset number and then press the ENTER key This completes the settings and Complete is displayed briefly after which the original display reappears Press the ENTER key z Playback begins at the specified time and the volume gradually in creases to the level set in step 10 Select Play or AI Play Press the A or B key 9 9 Press the ENTER key z Playback is a...

Page 66: ...rogram 2 on Program 1 and 2 on Timer off 1 lit 2 lit 1 2 unlit 1 2 lit z The STANDBY TIMER indicator will flash orange if there was a power failure or the system was unplugged from the wall outlet for some time If this happens set the system clock to the correct time again See P 60 z To modify the program settings reconfigure the timer settings from the begin ning z When the system is in Standby m...

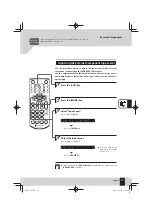
Page 67: ...crolls the display to prevent burn in of the text on the display and uneven dis play brightness Select On or Off Press the A or B key Select Display Saver Press the C or D key 2 2 Press the ENTER key 3 3 Press the ENTER key z The display saver is active z When you are playing from a CD or USB the display saver is activated if the system is not used at all for 10 minutes after the playback stops If...

Page 68: ... 2 3 3 z A P S lights up on the display z A P S turns off z If the input source is TUNER D AUDIO D IN1 D IN2 AUX iPod or PC IN Auto Power Save operates when the volume is set to 0 VOLUME 0 or MUTE is set to on When recording on external components turn A P S off or adjust volume to above 1 z A P S flashes on the display Press the MODE key 1 1 Press the ENTER key Press the ENTER key R K731 E 10 ind...

Page 69: ... or when problems arise It also describes how to store and maintain the system so it continues to give pleasure for many years to come Messages 70 Glossary of Terms 70 Troubleshooting 71 Care and Storage 74 Specifications 75 R K731 E indb 69 R K731 E indb 69 2011 10 07 14 08 52 2011 10 07 14 08 52 ...

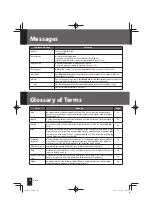
Page 70: ...the bit rate the better the sound quality 23 CD DA Refers to music CDs Almost all discs normally referred to as CDs are actually CD DA discs 22 MP3 An audio compression method developed by Germany s Fraunhofer IIS which achieves high rates of data compression by discarding data not readily audible to humans MP3 can compress data down to rates of approximately 1 11 128 kbps while retaining sound qu...

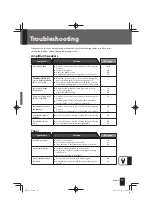
Page 71: ...IN1 or D IN2 z Check all connections as described in Connecting the System z Check whether PCM is selected for the digital audio output setting on the connected component 13 No sound from one of the speakers z Check all connections as described in Connecting the System z Check the volume balance for the left and right speakers 10 57 The clock display is flashing z Set the clock as described in Set...

Page 72: ...s system 23 24 Symptoms Solution Ref page Components connected to the D AUDIO terminal Themainunitandremote controlcannotcontrola Kenwooddigitalaudioplayer z Connect the player using the dedicated cable PNC 150 z Check whether the connected model is compatible 13 48 Symptoms Solution Ref page Remote control Theremotecontroldoes notwork z Load new batteries z Use the remote control within its effec...

Page 73: ... playback Audioisnoisy z Noise may be noticeable if the system is installed near a source of strong magnetic waves TV etc Install the system away from a source of strong magnetic waves 9 Microcomputer mal function the system does not work the display is faulty etc z Malfunctions may occur due to an external cause or because a connec tion cord was unplugged while the system was turned on Use the pr...

Page 74: ...When the front panel or case gets dirty wipe it with a soft dry cloth Never use lacquer thinner benzine alcohol or contact revitalizer which will cause discoloration or deformation Care and storage of CDs Storing a CD If you do not plan to use a CD for a long time re move it from the main unit and store it in its case Cleaning a CD z When a disc is contaminated with fingerprints or other stains wi...

Page 75: ... kΩ LINE AUX 2 V 1 kΩ Digital unit Sampling frequencies 32 kHz 44 1 kHz 48 kHz 88 2 kHz 96 kHz Supreme EX CD D IN USB PC IN Playable frequencies 1 Hz 48 kHz Digital input terminals Sensitivity Wave length Optical 15dBm 24dBm 660nm 30nm USB Usable USB device USB Mass storage class Interface USB2 0 Full speed USB1 1 compatible File system FAT 16 32 Supply current Max 1 A Tuner FM tuner Reception fre...

Page 76: ...ignated on the warranty card and in the space provided below Refer to the model and serial numbers whenever you call upon your dealer for information or service on this product Model Serial Number 1111KMYMODCDT R K731 E 11 indd 76 R K731 E 11 indd 76 2011 10 26 10 01 14 2011 10 26 10 01 14 ...

Reviews: