background image

Data Size:  B6L (182 mm x 128 mm)
Book Size:  B6L (182 mm x 128 mm)

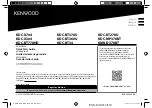
KDC-BT378U
KDC-BT360U
KDC-BT34

B5K-0649-20 [KN]

KDC-X704
KDC-X304
KDC-BT778HD

CD-RECEIVER

Quick Start Guide

AUTORADIO CD

Guide de démarrage rapide

RECEPTOR CD

Guía de inicio rápido

For your records
Record the serial number, found on the back of the unit, in the spaces designated on the warranty card, and in the space provided  
below. Refer to the model and serial numbers whenever you call upon your Kenwood dealer for information or service on the product.
Model KDC-X704/KDC-X304/KDC-BT778HD/KDC-BT378U/KDC-BT360U/KDC-BT34/KDC-BT278U/KDC-MP378BT/KMR-D378BT  
Serial number                                      

US Residents Only

Register Online

Register your Kenwood product at 

http://www.kenwood.com/usa/

© 2019 JVCKENWOOD Corporation

KDC-BT278U
KDC-MP378BT
KMR-D378BT

For detailed operations and information, refer to the 
INSTRUCTION MANUAL on the following website:
Pour les opérations et les informations détaillées, 
reportez-vous au MODE D’EMPLOI sur le site web suivant:
Para obtener más información y detalles sobre las 
operaciones, consulte el MANUAL DE INSTRUCCIONES en el 
siguiente sitio web:

<www.kenwood.com/cs/ce/>

ENGLISH

FRANÇAIS

ESPAÑOL

JS_KWD_QSG_KDC_X704_KN_C20.indd   1

JS_KWD_QSG_KDC_X704_KN_C20.indd   1

10/9/2019   11:37:57 AM

10/9/2019   11:37:57 AM

Summary of Contents for KDC-BT278U

Page 1: ...304 KDC BT778HD KDC BT378U KDC BT360U KDC BT34 KDC BT278U KDC MP378BT KMR D378BT Serial number US Residents Only Register Online Register your Kenwood product at http www kenwood com usa 2019 JVCKENWOOD Corporation KDC BT278U KDC MP378BT KMR D378BT For detailed operations and information refer to the INSTRUCTION MANUAL on the following website Pour les opérations et les informations détaillées rep...

Page 2: ...eiver is connected Consult the dealer or an experienced radio TV technician for help Información acerca de la eliminación de equipos eléctricos y electrónicos al final de la vida útil aplicable a los países que hayan adoptado sistemas independientes de recogida de residuos Los productos con el símbolo de un contenedor con ruedas tachado no podrán ser desechados como residuos domésticos Los equipos...

Page 3: ...idelines and RSS 102 of the IC radio frequency RF Exposure rules This equipment has very low levels of RF energy that it deemed to comply without maximum permissive exposure evaluation MPE But it is desirable that it should be installed and operated keeping the radiator at least 20cm or more away from person s body ATTENTION Cet équipement est conforme aux limites d exposition aux rayonnements éno...

Page 4: ... that no original copies or related materials continue in the possession of the User and that the User shall cause the transferee to comply with this Software License Agreement 2 The User shall not carry out reverse engineering disassembling decompiling or any other code analysis works in connection with the Licensed Software Article 4 Right pertaining to the Licensed Software Any and all copyrigh...

Page 5: ...isdiction of the Tokyo District Court for its first instance Important Notice concerning the Software jansson Copyright c 2009 2012 Petri Lehtinen petri digip org Permission is hereby granted free of charge to any person obtaining a copy of this software and associated documentation files the Software to deal in the Software without restriction including without limitation the rights to use copy m...

Page 6: ...ww aarongifford com Copyright c 2000 2001 Aaron D Gifford All rights reserved You may obtain a copy of the license at https opensource org licenses BSD 3 Clause THE SOFTWARE IS PROVIDED AS IS WITHOUT WARRANTY OF ANY KIND EXPRESS OR IMPLIED INCLUDING BUT NOT LIMITED TO THE WARRANTIES OF MERCHANTABILITY FITNESS FOR A PARTICULAR PURPOSE AND NONINFRINGEMENT IN NO EVENT SHALL THE AUTHORS OR COPYRIGHT H...

Page 7: ...tion and or software T Kernel 2 0 This product uses the source code of T Kernel 2 0 under T License 2 0 granted by T Engine Forum www tron org BSD 3 Clause Copyright c 2000 2001 Aaron D Gifford All rights reserved You may obtain a copy of the license at https opensource org licenses BSD 3 Clause THE SOFTWARE IS PROVIDED AS IS WITHOUT WARRANTY OF ANY KIND EXPRESS OR IMPLIED INCLUDING BUT NOT LIMITE...

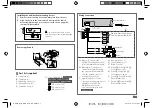
Page 8: ...uit To prevent short circuit Insulate unconnected wires with vinyl tape Be sure to ground this unit to the car s chassis again after installation Secure the wires with cable clamps and wrap vinyl tape around the wires that comes into contact with metal parts to protect the wires CAUTION Install this unit in the console of your vehicle Do not touch the metal parts of this unit during and shortly af...

Page 9: ...n ª Green black Rear speaker left j Purple ª Purple black Rear speaker right Removing the unit Installing the unit without mounting sleeve 1 Remove the mounting sleeve and trim plate from the unit 2 Align the holes in the unit on both sides with the vehicle mounting bracket and secure the unit with screws supplied commercially available Part list supplied A Faceplate 1 B Trimplate 1 C Mounting sle...

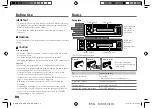
Page 10: ...our attention away from safe driving CAUTION Volume setting Adjust the volume so that you can hear sounds outside the car to prevent accidents Lower the volume before playing digital sources to avoid damaging the speakers by the sudden increase of the output level General Avoid using the external device if it might hinder safe driving Make sure all important data has been backed up We shall bear n...

Page 11: ... the date 7 Turn the volume knob to select DATE FORMAT then press the knob 8 Turn the volume knob to select DD MM YY or MM DD YY then press the knob 9 Turn the volume knob to select DATE SET then press the knob 10 Turn the volume knob to make the settings then press the knob Set the date in the order of Day Month Year or Month Day Year 11 Press and hold to exit To return to the previous setting it...

Page 12: ... a station or channel While listening to a station channel Press and hold one of the number buttons 1 to 6 Select a stored station or channel Press one of the number buttons 1 to 6 CD USB iPod Start playback The source changes automatically and playback starts when you load a disc or attach a device USB device iPod iPhone to the USB input terminal To On the faceplate Play back pause Press 6 IW Rev...

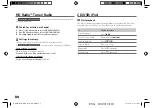
Page 13: ... MANUAL on the following website for the detailed explanation of each item www kenwood com cs ce The availability of each item vary depending on the model FUNCTION menu items AUDIO CONTROL Sets your preferred audio settings DISPLAY Sets your preferred control for the display window TUNER SETTING Settings for HD radio or radio source SIRIUS XM Settings for Sirius XM tuner USB Settings for using a U...

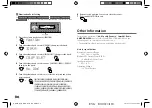
Page 14: ...battery Illumination Color Setting For you can set your preferred illumination color for each zone 1 Press the volume knob to enter FUNCTION 2 Turn the volume knob to select DISPLAY then press the knob 3 Turn the volume knob to select COLOR SELECT then press the knob 4 Turn the volume knob to select a zone ALL ZONE ZONE 1 ZONE 2 then press the knob 5 Turn the volume knob to select a color for the ...

Page 15: ...to enter the Personal Identification Number PIN code immediately after searching 3 Press the volume knob to start pairing PAIRING OK appears when pairing is completed Once pairing is completed Bluetooth connection is established automatically BT1 and or BT2 indicator on the faceplate lights up indicator lights up to show the strength of the battery and signal of the connected device BT1 and or BT2...

Page 16: ... courts circuits Isolez les fils non connectés avec du ruban adhésif Assurez vous de raccorder de nouveau la mise à la masse de cet appareil au châssis de la voiture après l installation Fixez les câbles avec des serre câbles et enrouler un ruban de vinyle autour des câbles qui entrent en contact avec des pièces métalliques pour protéger les câbles AVERTISSEMENT Installez cet appareil dans la cons...

Page 17: ...et Noir Enceinte arrière droite Retrait de l appareil Installation de l appareil sans le manchon de montage 1 Retirez le manchon de montage et la plaque de garniture de l appareil 2 Alignez les entailles de l appareil des deux côtés avec le support de montage du véhicule et fixez l appareil avec les vis fourni en vente dans le commerce Liste de pièces fourni A Façade 1 B Plaque de garniture 1 C Ma...

Page 18: ... véhicule AVERTISSEMENT Réglage du volume Ajustez le volume de façon à pouvoir entendre les sons extérieurs à la voiture afin d éviter tout risque d accident Réduisez le volume avant de reproduire des sources numériques afin d éviter d endommager les enceintes par la soudaine augmentation du niveau de sortie Généralités Éviter d utiliser le périphérique extérieur s il peut gêner une conduite en to...

Page 19: ...ATE FORMAT puis appuyez sur le bouton 8 Tournez le bouton de volume pour choisir DD MM YY ou MM DD YY puis appuyez sur le bouton 9 Tournez le bouton de volume pour choisir DATE SET puis appuyez sur le bouton 10 Tournez le bouton de volume pour faire les réglages puis appuyez sur le bouton Réglez la date dans l ordre Jour Mois Année ou Mois Jour Année 11 Maintenez enfoncée pour quitter Pour retourn...

Page 20: ...l Lors de l écoute d une station canal Maintenez enfoncée une des touches numériques 1 à 6 Sélection d une station ou d un canal mémorisé Appuyez sur l une des touches numériques 1 à 6 CD USB iPod Démarrez la lecture La source change automatiquement et la lecture démarre quand vous insérez un disque ou connectez un périphérique périphérique USB iPod iPhone à la prise d entrée USB Pour Sur la façad...

Page 21: ...puyez sur Reportez vous au MODE D EMPLOI sur les sites web suivant pour une explication détaillée de chaque élément www kenwood com cs ce La disponibilité de chaque élément varient en fonction du modèle Articles du menu FUNCTION AUDIO CONTROL Règle vos réglages audio préférés DISPLAY Règle votre commande préférée pour la fenêtre d affichage TUNER SETTING Réglages pour HD radio ou la source radio S...

Page 22: ...vant www kenwood com cs ce La disponibilité de chaque source varie en fonction du modèle Remarque pour les spécifications Plage de fréquences Bluetooth 2 402 GHz 2 480 GHz Puissance de sortie RF Bluetooth E I R P 4 dBm MAX Classe d alimentation 2 Impédance d enceinte 4 Ω 8 Ω Tension de fonctionnement Batterie de voiture 12 V CC Réglage de la couleur d éclairage Pour le vous pouvez régler votre cou...

Page 23: ... identification personnel immédiatement après la recherche 3 Appuyez sur le bouton de volume pour démarrer le pairage PAIRING OK apparait quand le pairage est terminé Une fois le pairage terminé la connexion Bluetooth est établie automatiquement L indicateur BT1 et ou BT2 sur la façade s allume L indicateur s allume pour montre la puissance de la batterie et du signal du périphérique connecté BT1 ...

Page 24: ...o Para evitar cortocircuitos Utilice una cinta de vinilo para aislar los cables no conectados Asegúrese de volver a conectar a masa esta unidad al chasis del automóvil después de la instalación Para proteger los cables asegúrelos con abrazaderas de cables y con una cinta de vinilo enrolle los cables que entran en contacto con partes metálicas PRECAUCIÓN Instale esta unidad en la consola de su vehí...

Page 25: ...pura ª Púrpura negro Altavoz trasero derecho Desmontaje de la unidad Instalación de la unidad sin manguito de montaje 1 Retire de la unidad el manguito de montaje y la placa embellecedora 2 Alinee los orificios de la unidad en ambos lados con la ménsula de montaje del vehículo y asegure la unidad con los tornillos suministrado disponibles en el mercado Lista de piezas suministradas A Placa frontal...

Page 26: ... conduciendo el vehículo PRECAUCIÓN Ajuste del volumen Ajuste el volumen a un nivel que le permita oír los ruidos del exterior para impedir accidentes Antes de reproducir fuentes digitales baje el volumen para evitar que el repentino aumento del nivel de salida cause daños a los altavoces General Evite el uso de dispositivos externos cuando puedan afectar la seguridad de conducción Asegúrese de te...

Page 27: ...ueda de volumen para seleccionar DATE FORMAT y a continuación pulse la rueda 8 Gire la rueda de volumen para seleccionar DD MM YY o MM DD YY y a continuación pulse la rueda 9 Gire la rueda de volumen para seleccionar DATE SET y a continuación pulse la rueda 10 Gire la rueda de volumen para realizar los ajustes y a continuación pulse la rueda Ajuste la fecha en el orden de Día Mes Año o Mes Día Año...

Page 28: ...anal Mientras escucha una emisora canal Pulse y mantenga pulsado uno de los botones numéricos 1 a 6 Seleccione una emisora o canal guardado Pulse uno de los botones numéricos 1 a 6 CD USB iPod Inicie la reproducción La fuente cambia automáticamente y la reproducción se inicia al cargar un disco o al conectar un dispositivo dispositivo USB iPod iPhone al terminal de entrada USB Para En la placa fro...

Page 29: ...r pulse Para obtener más detalles sobre cada una de las opciones consulte el MANUAL DE INSTRUCCIONES en el siguiente sitio web www kenwood com cs ce La disponibilidad de cada opción varía según el modelo Opciones del menú FUNCTION AUDIO CONTROL Establece sus ajustes de audio preferidos DISPLAY Establece su control preferido para la ventanilla de visualización TUNER SETTING Configuración de HD radi...

Page 30: ...iguiente sitio web www kenwood com cs ce La disponibilidad de cada fuente varía según el modelo Nota sobre las especificaciones Rango de frecuencia Bluetooth 2 402 GHz 2 480 GHz Potencia de salida de RF Bluetooth E I R P 4 dBm MAX potencia clase 2 Impedancia del altavoz 4 Ω 8 Ω Voltaje de trabajo Batería de 12 V CC para vehículos Ajuste del color de iluminación Para el color de iluminación preferi...

Page 31: ... de la búsqueda 3 Pulse la rueda de volumen para iniciar el emparejamiento El mensaje PAIRING OK aparece cuando ha finalizado el emparejamiento Cuando haya finalizado el emparejamiento la conexión Bluetooth se establece automáticamente Las indicaciones BT1 y o BT2 se iluminan en la placa frontal El indicador se enciende para mostrar la carga de la batería y la intensidad de la señal del dispositiv...

Page 32: ...e of this accessory with an Apple product may affect wireless performance Apple iPhone iPod iPod touch and Lightning are trademarks of Apple Inc registered in the U S and other countries Android is a trademark of Google LLC 2019 Pandora Media LLC All rights reserved PANDORA the PANDORA logo and the Pandora trade dress are trademarks or registered trademarks of Pandora Media LLC Used with permissio...

Reviews: