7
|
KDC-BT92SD
English
|
8
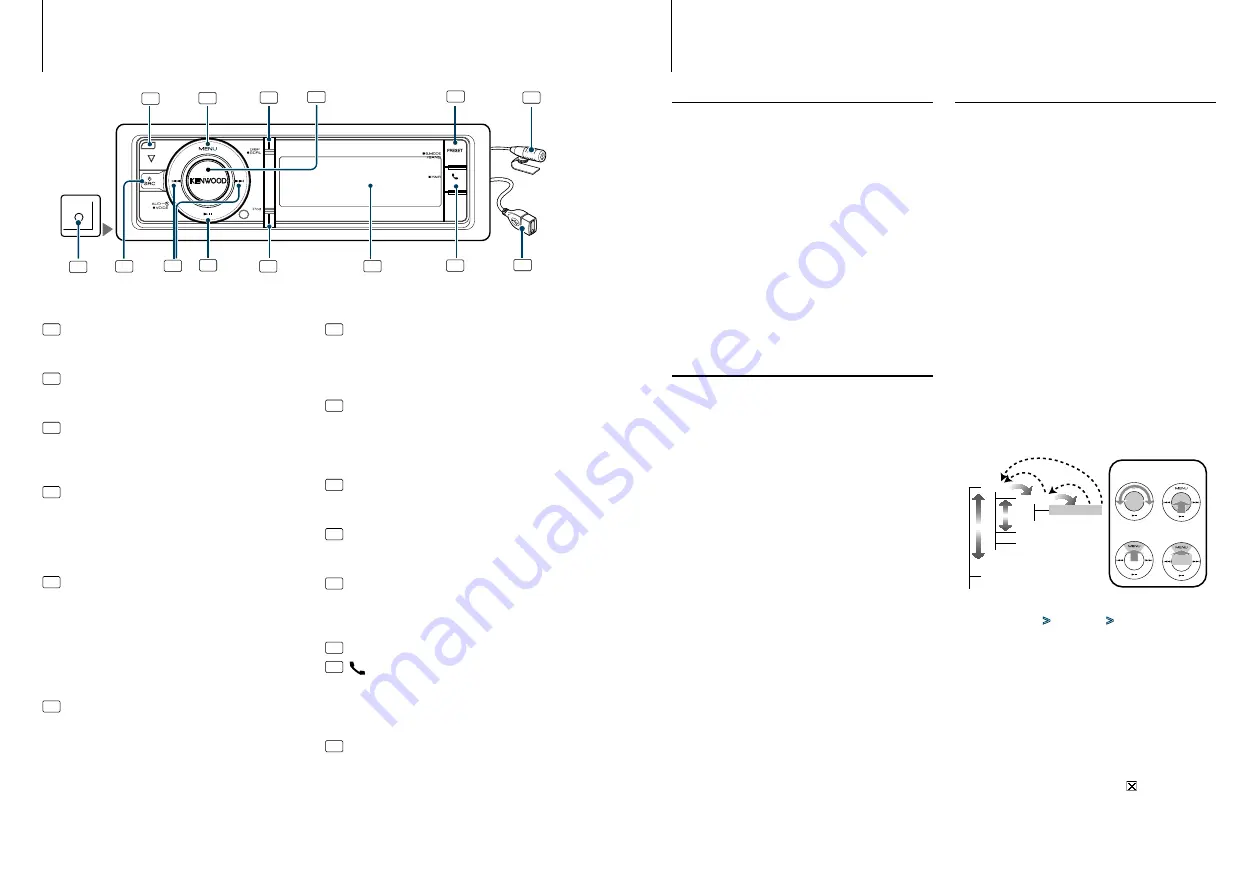
Component names and functions
1
Release button
To drop the faceplate down to open and CD can be
inserted or ejected (press the button).
2
[MENU] button
To select a song or set functions. See
3
[DISP] button
To change display item (press the button).
To scroll through texts on the display. (press the
button at least 1 second).
4
[VOL] knob
To adjust volume (turn the knob).
To select menu list item (turn and press the knob). See
<Menu List Operation> (page 8)
for details.
To make a voice dialing call (press the button at least
1 second).
5
[PRESET] button
To enter Station Preset Memory mode (press the
button).
To enter Search mode (iPod), move between folders
(Audio file), etc. (press the button at least 1 second).
For more details, see operations of each source
described in page 8 or later (press the button at least
1 second).
6
Microphon
The microphone for the hands free phone is supplied.
When your voice cannot be recognized due to the
low microphone volume or noises in the vehicle,
adjust the microphone settings by
7
Auxiliary Input Terminal
Portable audio device can be connected with the
mini-plug (3.5 mm ø).
• Use the mini-plug cable which is stereo type and does not
have any resistance.
8
[SRC] button
To turn on this unit and select the Source (press the
button).
To turn off this unit (press the button at least 1
second).
9
[
4
] / [
¢
] buttons
To select station, song and setting items. (press the
button).
10
[
38
] button
To start or interrupt playback for CD, audio file, and
iPod. (press the button).
11
[
iPod
] button
To select iPod source (press the button).
To set “APP & iPod Mode” to ON/OFF (press the
button at least 1 second).
12
Display window
13
[
] button
To enter Bluetooth mode (press the button).
To enter Bluetooth easy pairing mode (press the
button at least 1 second). See
14
USB Terminal
A USB device or an iPod can be connected.
AUX
2
3
4
5
6
7
8
9
10
11
12
13
14
1
Before Using
Exit of the Demonstration Mode
Turn off the demonstration mode when you use it
for the first time after installation.
1
Press the [VOL] knob to quit the demonstration
mode when the messages “To cancel Demo
press the volume knob” are displayed (approx. 15
seconds).
2
Turn the [VOL] knob to select “YES” and press the
[VOL] knob.
⁄
• Demonstration mode can also be cancelled in “DEMO
Mode” of Menu List mode. Refer to
Common Operation
Power and source select
Turns the power ON by pressing the [SRC]
button.
When the power is ON, select a source.
• SRC Select mode 1: Pressing the [SRC] button
each time switches between sources.
Tuner (“TUNER”)
➜
Bluetooth Audio (“BT
AUDIO”)
➜
USB (“USB”) or iPod (“iPod”)
➜
SD
(“SD”)
➜
CD (“CD”)
➜
Auxiliary input (“AUX”)
➜
Standby (“STANDBY”)
➜
Tuner...
• SRC Select mode 2: Press the [SRC] button and
then turn the [VOL] knob. To determine the
selected source, press the [VOL] knob.
Keeping pressing the [SRC] button for at least 1
second turns the power OFF.
⁄
• The SRC Select mode can be set in “SRC Select” of
• Auxiliary input source is initially set to “OFF”. Set “Built in
AUX” described in
to “ON”.
• When an optional accessory is connected, the source name
for each device appears.
• When connection of the iPod is recognized, the source
display changes from “USB” to “iPod”.
• This unit automatically turns full power OFF after 20
minutes lapses in Standby mode in order to save the
vehicle’s battery. The time until full power OFF can be set in
“Power OFF Wait” of
.
Volume
Turning the [VOL] knob adjusts the sound
volume.
Menu List Operation
The basic operating procedure for using this
function is described below. The individual function
items are covered in the operating procedures.
1
Select the source
Pressing the [SRC] button repeatedly switches
source.
Function items vary from source to source. For a list
of the function items. Refer to
.
✍
SRC Select mode 2: Press the [SRC] button and
then turn the [VOL] knob. To determine the
selected source, press the [VOL] knob.
2
Enter Menu List mode
Press the [MENU] button.
3
Select the setting item
Turn the [VOL] knob and press it when the
desired item is displayed.
Repeat the operation until your desired setup item
is selected.
✍
Press the [MENU] button to return to the
previous item.
Operation example:
Music
PlayLists
My
Best 25
…
Artists
Albums
…
Play Mode
…
[VOL]
[MENU]
[VOL]
[MENU]
1
1
2
2
3
4
3
1
4
2
3
1 sec.
In this manual, the above selection is indicated as
Select “Music”
>
“Playlists”
>
“My Best 25”.
4
Make a setting
Turn the [VOL] knob to select a setting value,
and then press the [VOL] knob.
5
Exit Menu List mode
Press the [MENU] button for at least 1 second to
return to the first hierarchy. Press the [MENU]
button in the first hierarchy to exit the Menu
List mode.
⁄
•
You cannot set the item with the “ ” icon displayed.
General operation
Rear view


