English
|
17
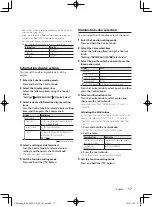
iPod, names will be displayed depending on the currently
selected browsing items.
•
If you select the APP & iPod Control mode while playing
music on the iPod, “APP & iPod Mode” is displayed.
•
If all characters cannot be displayed while music is played
on the iPod, the file number in the list is displayed.
Information
Display
Music title
“TITLE***”
Folder name
“FLD***”
File name
“FILE***”
Information display setting
You can set the side and graphic parts of the
display.
1
Enter the Function setting mode
Press and hold the Control knob.
2
Select the Display select item
Select the following items using the Control
knob.
“Settings” > “DISP&ILLUMI” > “Display Select”
3
Select a desired Information display setting
item
Turn the Control knob to select a display setting
item, and then press the Control knob.
Display
Description
“Display Select”
“Side Select”
Sets the side part display for Type A, B, and D.
1 / 2 / 3 (Type A, B only)
“Graphic Select”
Sets the Type C clock display.
1 / 2
“Status”
Sets the status display (ON/OFF indicator for
each function) for Type A and B.
“ON” / “OFF”
( : Factory setting)
4
Select a setting and determine it
Turn the Control knob to select a desired
setting, and then press the Control knob.
The previous item is displayed.
5
Exit the Function setting mode
Press and hold the [ ] button.
Illumination color selection
You can select the illumination color of the panel.
1
Enter the Function setting mode
Press and hold the Control knob.
2
Select the Color select item
Select the following items using the Control
knob.
“Settings” > “DISP&ILLUMI” > “Color Select”
3
Select the part for which you want to set the
illumination color
Display
Part
“Color Select”
“Color SEL All”
All
“Color SEL Display”
Display
“Color SEL Key”
Button
“Color SEL USB&AUX” USB terminal and Auxiliary input
Turn the Control knob to select a part, and then
press the Control knob.
4
Select an illumination color
Turn the Control knob to select a color, and
then press the Control knob.
Select the color from “Variable Scan”/ “Color1” —
“Color24”.
Adjusting the RGB values
In this step, you can also create your original color
during the selection from “Color1” — “Color24”.
The color you created can be called by selecting
“User”.
1. Press and hold the Control knob.
Enter the Detail color adjustment mode.
2. Set the color.
Operation type
Operation
To select the color to adjust
(Red, Green, or Blue)
Push the Control knob rightward or
leftward.
To adjust color.
(Range: 0 – 9)
Turn the Control knob.
3. Press the Control knob.
Exit the detail color adjustment mode.
5
Exit the Function setting mode
Press and hold the [ ] button.
12Stepup_B64-4922-00_02_M_en.indd 17
12/01/30 11:08


