background image

Do not set the remote on hot places such as above the
dashboard.

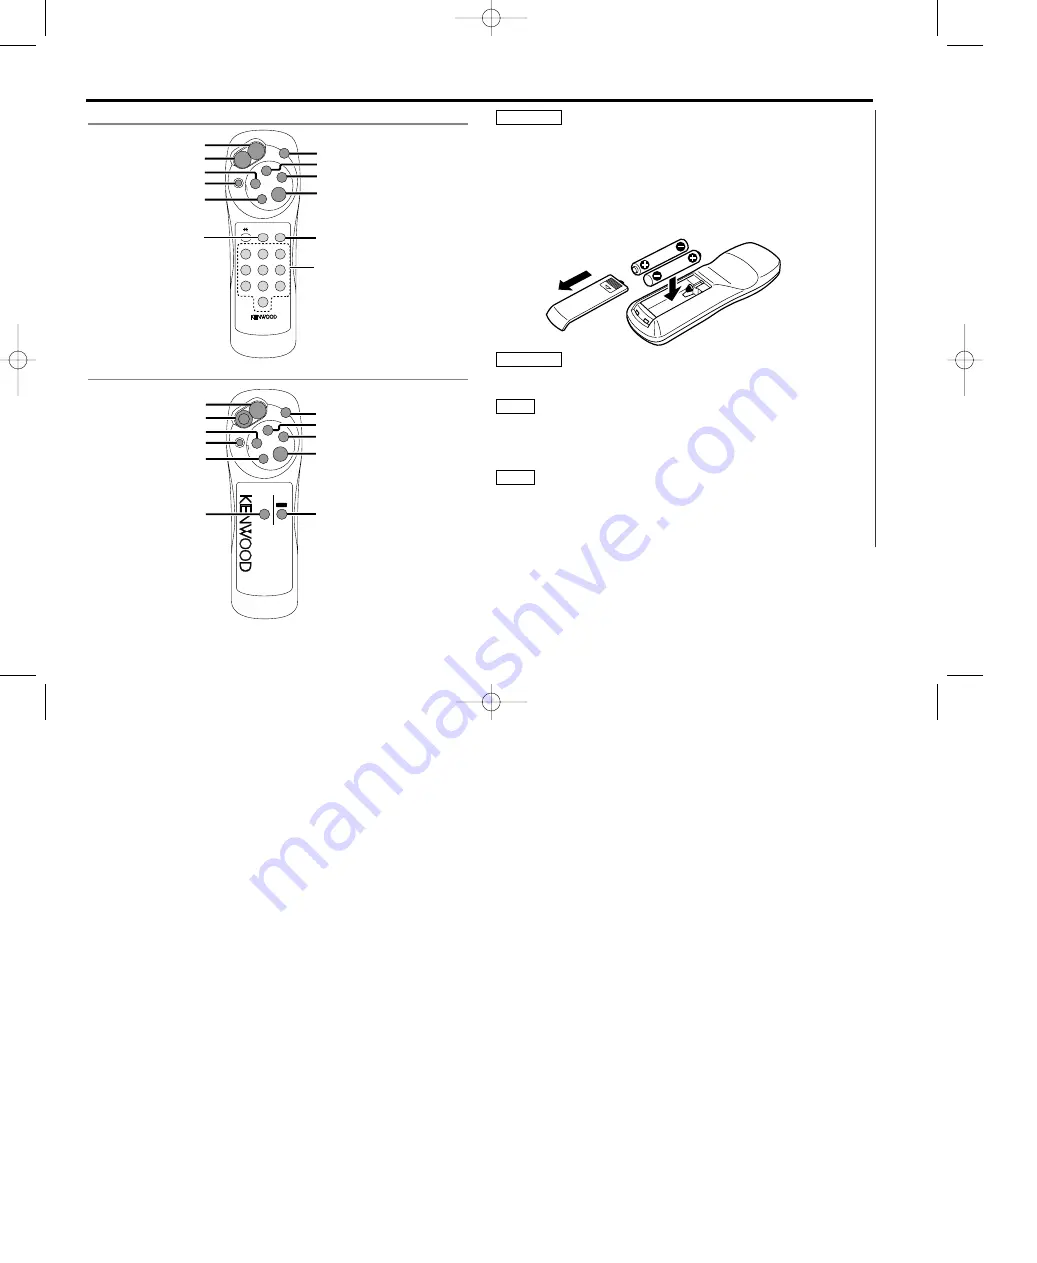
Loading and Replacing the Batteries:

Use two "AAA"-size batteries.
Slide the cover while pressing downwards to remove it as
illustrated.
Insert the batteries with the 

+

and 

poles aligned properly,

following the illustration inside the case.

Store unused batteries out of the reach of children. Contact a
doctor immediately if the battery is accidentally swallowed.

• The provided batteries are intended for use in operation

checking, and their service life may be short.

• When the remote controllable distance becomes short, replace

both of the batteries with new ones.

A portion of the operations may not be possible, depending on
the unit that is connected.

NOTE

NOTE

2

WARNING

2

CAUTION

Basic Operations of remote

— 37 —

A

TT

TUNE

TRACK

DSIC

#0~9/A~Z

AM

Ð

1

2

3

4

5

6

7

8

9

0

ABC

DEF

GHI

JKL

MNO

PRS

TUV

WXY

QZ

DNPP/

SBF

DIRECT

OK

REMOTE CONTROL UNIT

DNPP

FM/DISC 

+

ATT

AM/DISC 

+

OK

38

TUNE 

+

/

¢

/TRACK 

+

TUNE 

/

4

/TRACK 

SRC

SRC

4

¢

38

FM

+

+

Ð

OK

A

TT

TUNE

TRACK

DNPP/

SBF

DSIC

REMOTE CONTROL UNIT

DNPP/SBF

FM/DISC 

+

ATT

AM/DISC 

+

OK

38

TUNE 

+

/

¢

/TRACK 

+

TUNE 

/

4

/TRACK 

SRC

4

¢

38

FM

+

AM

Ð

SRC

Р+

KRC-X858

KRC-708

KRC-X858_U.S-4  00.12.27 0:13 PM  Page 37

Summary of Contents for KRC-708

Page 1: ...ation procedures will help you obtain the best performance from your new cassette receiver For your records Record the serial number found on the back of the unit in the spaces designated on the warranty card and in the space provided below Refer to the model and serial numbers whenever you call upon your KENWOOD dealer for information or service on the product Model KRC X858 708 Serial number KRC...

Page 2: ...Fast Forwarding and Reversing Disc Play 24 Track Search 24 Disc Search 24 Direct Track Search 25 Direct Disc Search 25 Presetting Disc Names DNPS 26 Track Disc Repeat 27 Track Scan 27 Disc Scan 27 Disc Name Preset Play DNPP 26 Random Play 28 Magazine Random Play 28 Text Title Scroll 29 Menu setting Menu System 30 Touch Sensor Tone 30 Manual Time Adjusting 30 Calendar Adjusting 30 Calendar Mode 31 ...

Page 3: ...cision equipment When replacing a fuse only use a new one with the prescribed rating Using a fuse with the wrong rating may cause your unit to malfunction To prevent a short circuit when replacing a fuse first disconnect the wiring harness Do not place any object between the faceplate and the unit Do not use your own screws Use only the screws provided If you use the wrong screws you could damage ...

Page 4: ...wipe them with a dry soft cloth Cleaning the Unit If the front panel gets dirty turn off the power and wipe the panel with a dry silicon cloth or soft cloth Do not wipe the panel with a hard cloth or a cloth dampened by volatile solvents such as paint thinner and alcohol They can scratch the surface of the panel and or cause the indicator letters to peel off 2CAUTION Cleaning the Tape Head After y...

Page 5: ...ing faceplate is hit by an object it will stop and return to its original state Remove the object and repeat the action The status of the security code Function P 34 is display whenever the power is switched on CODE ON Security code has been registered CODE OFF Security code has not been registered Using the Unit in Vehicles with Covered Consoles Make sure the console is uncovered while the facepl...

Page 6: ...edly and switch to ALL OFF When ALL OFF is displayed the standby mode is activated The standby mode turns all functions off while leaving the power to the unit on Use this mode when you want to have the display illuminated but don t want to listen to anything The mode switches to the next mode from any mode which cannot be used The external disc control mode will differ depending on the unit that ...

Page 7: ... mode is available only when the Sound coordinate system is on page36 You can call the following settings with this function bass center frequency bass level bass quality factor bass extension treble center frequency and treble level setting Their setting values are different depending on the setting of the mobile preset plan mode NOTE Adjust various parameters of sound quality Press the AUD butto...

Page 8: ...pass filter for front output Setting values Through 40Hz 60Hz 80Hz 100Hz 120Hz 150Hz 180Hz 220Hz You can separately set the high pass filter for front and rear output including preouts The high pass filter works except during non fading preout when switching to non fading The factory default settings for front output and rear output are Through NOTE Function of the KRC X858 NF Level Adjust the Non...

Page 9: ... the KRC X858 Recalling your sound settings Press a preset button 1 6 except during the bass center frequency bass level bass quality factor bass extension treble center frequency and treble level adjust mode NOTE Function of the KRC X858 Storing your sound settings Press a preset button 1 6 for at least two seconds This setting can be made only when the Sound coordinate system is on page36 The se...

Page 10: ...sed in order to open it You can prevent tampering of the unit when letting someone else drive your car by keeping it closed this way To cancel the forced closing of unit and open control panel Press the left part at the upper side of the faceplate for as many times as you have preset in the Manual Open Button Setting OPEN SW in the menu The faceplate will open and show the control panel When you s...

Page 11: ... 11 KRC X858_U S 4 00 12 27 0 12 PM Page 11 ...

Page 12: ...rst when reattaching the faceplate Doing so may cause the connector on the faceplate bracket to malfunction Press the right side of the faceplate until it locks If the faceplate bracket s angle was not set to the vertical when NOTE 2 2CAUTION 1 NOTE The faceplate can be detached from the unit helping to deter theft Removing the faceplate Choose the way from among the following and open the facepla...

Page 13: ... angle adjustment switch to 0 before removing the faceplate NOTE 0 1 2 0 1 2 0 2 1 Faceplate Angle Adjustment the faceplate was mounted check that the faceplate is securely attached to the faceplate bracket by holding its right side and pulling it gently towards you 13 1 6 FM AM SRC CLK AUD DISP NAME S AUTO AME MTL M RDM D SCN REP B S RDM SCAN B NR ATT LOUD NF DISC DISC DAB OFF EJECT MENU PROG PTY...

Page 14: ...f the FM1 FM2 FM3 and AM bands NOTE 2 1 Station Preset Memory received You can choose from three tuning modes auto seek preset station seek and manual The AUTO 1 indicator lights up when auto seek tuning is selected and the AUTO 2 indicator lights when preset station seek tuning is selected Selecting Tuning Mode Press the AUTO button Each time you press the AUTO button the mode switches as follows...

Page 15: ...ps 1 and 2 above then change the letter s that you want by following steps 3 and 4 NOTE 6 NOTE 5 Alphabet upper case A Z Alphabet lower case a z Numerals and symbols 0 9 Special characters á à é è í ì ó ò ú ù Ñ Ç ß fl â ä ê ë î ï ô ö û ü ñ ç Æ fi You can assign names to radio stations with the Station Preset Memory Up to 32 FM stations and 16 AM stations can be assigned names Adjust the frequency to...

Page 16: ...as been preset using Station Name Preset Press the DNPP button on the remote SNPP will be displayed once the station name preset play mode is entered The names of the stations stored in the band currently listened to are displayed in the following order for five seconds each Each time you press the button the station display switches in the forward direction Each time you press the 4 button the st...

Page 17: ...c is made the current function will be interrupted to allow the warning to be received under the following conditions during tuner reception or when the Traffic Information function is turned on Alarm RDS is a service used by radio stations to transmit data outside normal radio broadcast signals When an RDS station is received you can immediately find out what kind of data is being transmitted by ...

Page 18: ...o will be displayed for five seconds During that time E will blink in the display If you tune to frequencies for which no program type has been stored No Entry will be displayed NOTE NOTE 3 NOTE Conduct auto seek tuning only on those stations with selected kinds of programs Press the 38 PTY button PTY is displayed once the program type selection mode is entered You cannot use this function while t...

Page 19: ...gram type selection mode Press the NAME S button for at least two seconds The station will be registered as a program type allowing it to be the target of frequency seeks just as RDS stations are Press the PTY button to end the program type selection mode 5 4 3 2 1 Registration of a station as a PTY 19 FM AM SRC CLK AUD DISP NAME S AUTO AME MTL M RDM D SCN REP B S RDM SCAN B NR ATT LOUD NF DISC DI...

Page 20: ...exposed to the right insert in the slot The faceplate will close and the tape will start playing The IN indicator lights up when a cassette has been loaded Playing Cassettes Already Loaded Press the SRC source button repeatedly to select the tape mode TAPE is displayed when the tape mode has been selected The tape will start playing Listening to the other side Press the PROG button Tape play switc...

Page 21: ...ing Blank Skip Function On Off Blank Skip Skipping to Beginning of Current Track or to Previous Tracks Rewind DPSS Press the 4 button Press once to rewind to the beginning of the current track twice to rewind to the beginning of the previous track and so forth You can skip up to nine tracks Playback is continued after the tape is rewound by the indicated number of tracks Skipping to Later Tracks F...

Page 22: ... of the elapsed time NOTE Play side Tape counter Play side Play side Tape running Tape counter display Cassette player features 22 English SCAN RDM REP D SCN M RDM DISP NAME S FM AM SRC CLK AUD DISP NAME S AUTO AME MTL M RDM D SCN REP B S RDM SCAN B NR ATT LOUD NF DISC DISC DAB OFF EJECT MENU PROG PTY DISC DISC 4 SRC 38 Track number Mode display Disc number Track time KRC X858_U S 4 00 12 27 0 13 ...

Page 23: ...connected Mode Display Examples NOTE Playing Disc mode When a unit equipped with an O N switch is to be connected please also see the instruction manual of this unit Set the O N switch to N N operation will be set N operation The disc title and track title of the CD text can be displayed The disc name will be displayed when the name has been registered to any connected unit with the Presetting Dis...

Page 24: ... tracks depending on the model being connected Instead the reverse play function is canceled when it reaches the beginning of a track at which point normal play will automatically resume Fast Forwarding Disc Play Hold down on the button Release your finger to play the disc at that point Reversing Disc Play Hold down on the 4 button Release your finger to play the disc at the point NOTE Fast Forwar...

Page 25: ...umber buttons on the remote input the number of the track that you want to listen to The selected track number will blink in the display for 10 seconds If you make no further input in the 10 second period the number entry mode will automatically be canceled Press either the 4 or button while the track number is blinking The track starts playing Canceling Direct Track Search While It Is Operating P...

Page 26: ... names can be stored will differ depending on the disc changer that is NOTE 6 5 Button to press Times pressed Character 3 1 1 2 6 2 2 3 3 2 D A N C E NOTE NOTE Store the names of discs to be displayed when played Play the disc whose name you want to preset This function is not available for disc changers that do not feature the Disc Name Preset function This procedure is not to be used to store th...

Page 27: ... scan function is canceled when you eject the disc The track scan function only scans each track on a disc once NOTE Successively play the beginning of each track on a disc until you find the track that you want to listen to Track Scan Repeat playing the track or the disc currently being listened to Turning Repeat Play On Off Press the REP button to switch repeat track disc play on and off as foll...

Page 28: ...g it Press the DNPP button on the remote DNPP will appear in the display and the disc name preset play mode is entered The preset names disc titles of the disc in the disc changer to which you are currently listening are successively displayed for five seconds each In any of the units that are connected discs that have not been disc name preset will display NO NAME This function can only be used i...

Page 29: ... second results in one scrolling display of the titles Please see the menu settings page 33 about switching between manual scrolling and automatic scrolling NOTE 2 1 Text Title Scroll To change the track being heard press the button Another disc track will be selected and played Magazine random play is canceled when you eject the disc The time needed for random selection depends on the number of d...

Page 30: ...for additional functions in the menu mode Make a setting for each function referring to the following operations Enter the menu mode Press the MENU button for at least one second MENU is displayed when the menu mode is entered The function that you can adjust is indicated with the current settings displayed Selecting function to set Press the FM button to search through the functions until you see...

Page 31: ...ay can be adjusted Adjusting the date Press the FM or AM button The item of the date blinking in the display will change Press the MENU button to end the menu mode 5 4 3 2 1 You can set the date formats of the calendar function Display and setting Select the display Date Mode during the selecting function in the menu system Press the 4 and button to select the date format you want to show in the d...

Page 32: ... NOTE 8 Alphabet upper case A Z Alphabet lower case a z Numerals and symbols 0 9 Special characters á à é è í ì ó ò ú ù Ñ Ç ß fl â ä ê ë î ï ô ö û ü ñ ç Æ fi You can input the text to be displayed and set the date when that text will appear in the display with the calendar function Display and setting Select the display Memo Mode during the selecting function in the menu mode Press either the 4 or b...

Page 33: ...cs they will continue playing until a traffic bulletin is broadcast Display and setting TI ON The Traffic Information function is on When the function is on the TI indicator is turned on When a traffic bulletin begins to be broadcast TRAFFIC will be displayed If you are listening to a tape or disc when a traffic bulletin begins they will automatically be turned off When the bulletin ends or poor r...

Page 34: ...e unit s power switch you cannot turn on the unit again unless the preset security code is input This function helps prevent theft You must follow steps 1 to 9 to be able to use the Security Code function Turning off the power during the procedure will deactivate the security code setting Once the security code function has been activated Security disappears from the MENU system Note that it will ...

Page 35: ...rmation in the display Display and setting BLK MASK ON The display will turn on by using only the upper part of the display and the IN indicator BLK MASK OFF The display will turn on by using the whole part of the display Black Mask You can turn the movement of graphic display on and off The initial setting is ON Display and setting Graphic ON The graphic display works Graphic OFF The graphic disp...

Page 36: ...CX82 KDC CPS85 KDC CX85 device before you can use this function You can choose to send the AUX input through the rear channel and the unit s tuner or tape source through the front channel The Bass Treble and Loudness adjustments do not affect the rear channel When the Dual zone system is turned on the External disc control features cannot be used When you set the Dual zone system to on while the n...

Page 37: ...ecking and their service life may be short When the remote controllable distance becomes short replace both of the batteries with new ones A portion of the operations may not be possible depending on the unit that is connected NOTE NOTE 2WARNING 2CAUTION Basic Operations of remote 37 A T T TUNE TRACK DSIC 0 9 A Z AM Ð 1 2 3 4 5 6 7 8 9 0 ABC DEF GHI JKL MNO PRS TUV WXY QZ DNPP SBF DIRECT OK REMOTE...

Page 38: ... of entering the station name Number letter entry buttons KRC X858 only Press buttons 1 6 to recall preset stations Use to enter letters alphabetical during station name preset Tuner features VOLUME buttons Press the button to turn the volume up Press the button to turn the volume down SRC button Each time you press the SRC button the mode switches as follows The mode switches to the next mode fro...

Page 39: ...During disc name input stores the already input data in memory and ends the input mode Selects disc during the disc name preset play mode DNPP button Enters and cancels the Disc Name Preset Play mode Number letter entry buttons KRC X858 only Used to specify the track disc number used in direct track disc searches Use to enter letters during disc name preset External disc control features AM button...

Page 40: ...that the faceplate will not hit the lid when closing and opening If the fuse blows first make sure the wires aren t touching to cause a short circuit then replace the old fuse with one with the same rating Do not let unconnected wires or terminals touch metal on the car or anything else conducting electricity To prevent a short circuit do not remove the caps on the ends of the unconnected wires or...

Page 41: ...hite Gray Green Purple To front left speaker To front right speaker To rear right speaker To rear left speaker Ignition wire Red Battery wire Yellow Ground wire Black To car chassis Ignition key switch Car fuse box Main fuse ACC Car fuse box Battery If no connections are made do not let the wire come out from the tab Front left output White Front right output Red To connect the Disc changer or DAB...

Page 42: ... sections than the corners otherwise troubles such as the impossibility of opening or closing the panel may result 2CAUTION Refer to the section Removing the faceplate page 12 and then reattaching the faceplate Never insert the taptite screws ø2 6 mm in any other screw holes than the one specified If you insert it in another hole it will contract and may cause damage to the mechanical parts inside...

Page 43: ...all the way out with your hands being careful not to drop it 6 L Make the faceplate control panel appear Refer to the section Removing the hard rubber frame and then remove the hard rubber frame Remove the hex head machine screw with washer M4 8 on the back panel Insert the removal tool deeply as illustrated with the L on the left and the R on the right 4 3 2 1 If the unit is removed while the fac...

Page 44: ...TION Accessory6 for Toyota car Accessory5 for Nissan car Tab Hole Once you have affixed the factory installed radio bracket with the screws use a standard tipped screwdriver not Philips or similar utensil to pry the tabs of the J Car bracket to make them fit into the holes in the factory installed radio bracket depending on the car make Tab N Nissan car T Toyota car Factory trim bezel Accessory8 J...

Page 45: ...inal is connected to a different speaker One of the speaker wires is being pinched by a screw in the car Check the speaker wiring The antenna control wire is not connected Connect the wire correctly referring to the section on Connecting Wires to Terminals Radio reception is poor The car antenna is not extended Pull the antenna out all the way The power does not turn on The fuse has blown After ch...

Page 46: ...r dirty If skipping happens at the same place when the car is stopped something with the CD is wrong Clean the CD The display shows that the changer is being played but no sound can be heard The specified track will not play Random play or magazine random play has been selected Turn off random play or magazine random play SOLUTION POSSIBLE CAUSE PROBLEM If the following situations consult your nea...

Page 47: ...ervice center E 77 The protective circuit in the unit activates when the temperature inside the automatic disc changer exceeds 60 C 140 F stopping all operation Cool down the unit by opening the windows or turning on the air conditioner As the temperature falls below 60 C 140 F the disc will start playing again HOLD No disc has been loaded in the disc magazine Load a disc into the disc magazine NO...

Page 48: ...requency response 3 dB 30 Hz 18 kHz 70 µs Separation 43 dB 1 kHz Signal to Noise ratio Dolby NR OFF 57 dB Dolby B NR ON 65 dB Audio section Preout Level mV Load KRC X858 during CD changer mode 4500 mV 10 kΩ KRC 708 1800 mV 10 kΩ Preout Impedance KRC X858 80 Ω KRC 708 600 Ω Maximum output power 45 W x 4 Full Bandwidth Power at less than 1 THD 22 W x 4 Tone action Bass 100 Hz 10 dB Treble 10 kHz 10 ...

Page 49: ...KRC X858_U S 4 00 12 27 0 13 PM Page 49 ...

Reviews: