background image

English

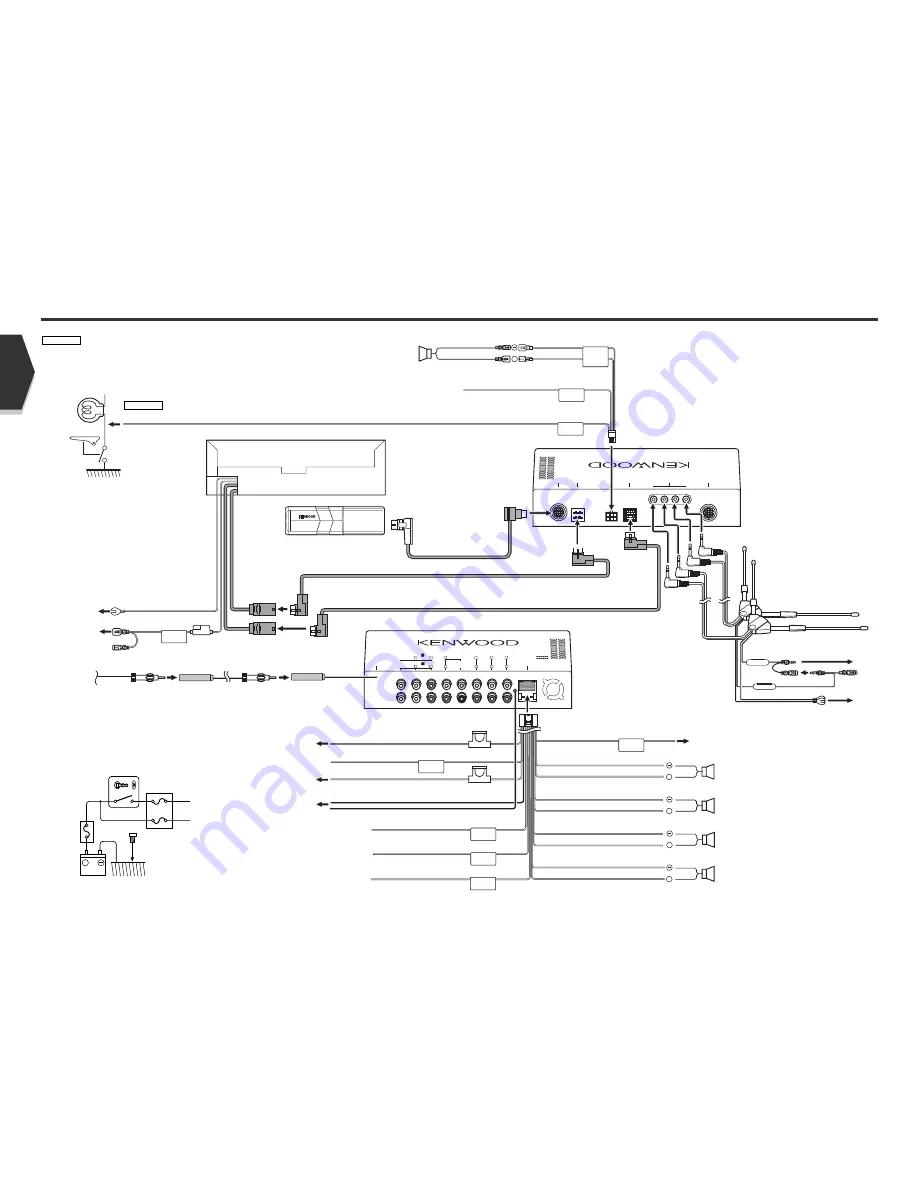
TO NA

VIGA TION I/F

TO TV ANTENNA

TO 5

L I/F

CENTER SP

SENSOR LINE

TO MONIT

OR

BLAC

K

TO MONIT

OR

WHITE

FM /AM ANTENNA

AV INPUT

AV INPUT

L

R

R

R

1

2

VIDEO

VIDEO

FRONT

REAR

PREOUT

SUB

(MONO)

AV OUTPUT

POWER

CENTER

L

L

R

L

R

L

R

L

VIDEO

A

B

C

B

C

+

CENTER

MUTE

ANT. CONT
  

P CONT

EXT CONT.

( 3A )

+

+

+

+

ILLUMI

PRK SW

REVERSE

( 10A )

( 5A )

BATT

A

C

( 1A )

( 1A )

(Pink)

Cable (included in
the disc changer)

Parking sensor wire (Green)

Receiver unit (rear side)

Receiver unit (front side)

Wiring harness
(Accessory 

1

)

White/Black

Gray/Black

Green/Black

Purple/Black

White

Gray

Purple

To front left speaker 

To front right speaker

To rear right speaker 

To rear left speaker 

Green

TEL mute wire (Brown) 

Connect to the terminal that is grounded when either the
telephone rings or during conversation.

Ignition wire (Red)

Ground wire (Black) 

-

(To car chassis)

Accessory 

!

Accessory 

4

(Black)

(Black/White)

Connection

Center Speaker

To vehicle’s reverse lamp harness

If you connect the ignition wire (red) and the battery wire (yellow) to the car chassis (ground),
you may cause a short circuit, that in turn may start a fire. Always connect those wires to the
power source running through the fuse box.

2

WARNING

Connect to the vehicle's parking brake detection switch
harness using the supplied relay connector.

For the sake of safety, be sure to connect the parking sensor. 

2

CAUTION

Battery wire (Yellow)

Ground wire (Black) 

-

(To car chassis)

FM/AM antenna input

Accessory 

5

Accessory 

2

Accessory 

3

Monitor unit

Disc Changer etc.

Ignition wire (Red)

Battery wire (Yellow)

Ground wire (Black) 

-

(To car chassis)

When using the optional power amplifier, connect

to its power control terminal.

To car light control switch

Depending on what antenna you are using,

connect either to the control terminal of the motor

antenna, or to the power terminal for the booster

amplifier of the film-type antenna.

To "EXT.AMP.CONT." terminal of the amplifier

having the external amp control function.

Power control wire 
(Blue) 

Motor antenna control
wire (Blue/White) 

Dimmer control wire (Orange/White) 

External amplifier control
wire (Pink/Black)

+

A

B

C

Ignition key
switch

Car fuse
box 
(Main fuse)

ACC

Car fuse box

Battery

88 English

English 89

Summary of Contents for KVT-935DVD

Page 1: ......

Page 2: ...etup Menu 45 Displaying the Control screen Displaying the Setup Menu screen Audio Set Up 46 Displaying the Car Type Set Up screen Displaying the Speaker Set Up screen Displaying the Channel Level screen Speaker Set Up Channel Level DTA Setup Crossover Network Setup Speaker Setup Memory DVD Setup 52 Displaying the DVD SETUP 1 screen Displaying the DVD SETUP 2 screen Displaying the DVD SETUP 3 scree...

Page 3: ...oth such as a commercially available silicon coated cloth When contaminated excessively clean them using a cloth dipped in a neutral detergent first then remove the detergent using a dry cloth Do not use a hard cloth and a volatile chemical such as an alcohol If used the panel surface may be scratched or printed letters may be erased Cleaning the disc slot As dust can accumulate in the disc slot c...

Page 4: ...r of folders 100 MP3 written in the formats other than the above may not be successfully played and their file names or folder names are not properly displayed Settings for your MP3 WMA encoder and CD writer Do the following setting when compressing audio data in MP3 data with the MP3 WMA encoder Transfer bit rate MP3 8 320 kbps WMA 48 192 kbps Sampling frequency MP3 32 44 1 48 kHz WMA 32 44 1 48 ...

Page 5: ...you can flash the burglar alarm lamp see page 57 Do not touch the moving components when you are opening or closing the monitor If done you will get hurt Do not try to open or close the monitor by hand You can automatically open or close the monitor when you turn on or off the ignition key see page 44 If the monitor movement is stopped by the shift lever or another obstacle when the monitor is ope...

Page 6: ...ey Attenuates the volume Press it again to cancel muting q Traffic Information TI key Turns the Traffic Information function On or Off see page 32 w Screen Setup SCREEN key Displays the Screen Setup or Angle Setup screen see page 44 e Function FNC key The video sources are switched each time you press the key Switches the source that is output at the AV OUTPUT terminal when it is pressed more than...

Page 7: ...older disc Press the AM key to switch to the AM band or the previous folder disc p Attenuator Att key Attenuates the volume Press it again to cancel muting q Select Seek Mode Auto key Selects the Seek mode see pages 26 30 for the Seek Mode w Screen Setup SCREEN key Displays the Screen Setup or Angle Setup screen see page 44 e Function FNC key The video sources are switched each time you press the ...

Page 8: ...alls the DVD Disc Menu VCD Turns the PBC Playback Control function On or Off Other than DVD VCD 1 TV AUD Switches the screen mode see page 17 p DVD VCD Enters your selection from the DVD VCD Disc Menu Other than DVD VCD 1 TV AUD The video sources are switched each time you press the key q DVD Selects an option from the DVD Disc Menu w TV TUNER 1 6 Call the stations from memory DVD 1 Fast Backward ...

Page 9: ... Display screen mode changes each time the Display key is pressed The Screen mode of the monitor changes each time the MODE key is pressed SCREEN MODE V SEL FNC AV OUT SEL V OFF S M V F SCREEN MODE V SEL FNC AV OUT SEL V OFF S M V F Full picture mode FULL Justify picture mode JUST Cinema picture mode CINEMA Zoom picture mode ZOOM Normal picture mode NORMAL KVT 935DVD PAL TV type KVT 935DVD NTSC TV...

Page 10: ...ter Search Area DVD V Selects the previous chapter Backward Track Search Area DVD A Selects the previous track 6 DVD Disc Menu Control Buttons Area 7 Information Display Button Area 8 Scene Track Number Display VCD 9 Forward Scene Track Search Area VCD Selects the next scene when PBC is On or track when PBC is Off p Backward Scene Track Search Area VCD Selects the previous scene when PBC is On or ...

Page 11: ...r Backwards DVD V DVD A l Turns the PBC function of VCD On or Off VCD Ver 2 0 Switches the Repeat Play operations in the following sequence DVD V Title Repeat Chapter Repeat Repeat Off DVD A Group Repeat Track Repeat Repeat Off VCD Track Repeat Repeat Off Available when the PBC is off z Scrolls the display text x Switches the play time display in the following sequence DVD V Title chapter remainin...

Page 12: ...ate within 10 seconds Search 3 Enter a number or time 2 DIRECT Selects the Direct Search mode 1 DVD Disc Menu Selects an option from the DVD Disc Menu DVD Disc Menu Control Buttons Area page 18 1 Calls the Menu Control 2 Switches the picture angle during program playback only 3 Switches the caption language during program playback only 4 Switches the voice language during program playback only 5 S...

Page 13: ...reen MENU t Adjusts the volume y Calls the TV Menu u Calls the Sound Effects Menu see page 68 i Switches the source Displays the Source Select screen when touched more than one second see page 42 o Calls the Setup Menu see page 45 Switches to VIDEO1 or VIDEO2 a Switches to TV1 or TV2 s Select a channel Use the Seek Mode see page 26 to change the channel tuning sequence d Switches between to button...

Page 14: ...ation If the station name is displayed if it has been set 2 Switches the band of the displayed station list 3 Band Display 4 Returns to the TV Menu Preset Select Call the Preset Select Menu 2 MENU Call the TV Menu 1 Next 6 1 6 1 Store in memory 2 TV Select a channel you wish to store in memory 1 Set Station Name Names a station For character entry details see Character Entry see page 43 You can st...

Page 15: ...Radio Text mode for text display Function of KVT 935DVD PAL TV type o Scrolls the display text Function of KVT 935DVD PAL TV type Turns the Local seek function On or Off Function of KVT 935DVD PAL TV type a When to buttons appear you can call up the stations from memory For memory of broadcasting stations see Auto Memory see page 30 or Manual Memory see page 30 s Seek Mode Indicator d Clock Level ...

Page 16: ...D 2 Switches the band of the displayed station list 3 Band Display 4 Returns to the Tuner Menu Preset Select Call the Preset Select Menu 2 MENU Call the Tuner Menu 1 Function of KVT 935DVD NTSC TV type 945DVD 965DVD Set Station Name Names a station For character entry details see Character Entry see page 43 You can store up to 30 stations in memory When you are receiving the traffic information yo...

Page 17: ...t of traffic information volume Continue to touch the key until the volume is displayed The preset volume is used automatically when the traffic bulletin starts in the next time Preset the volume 3 Adjust the volume 2 Tune in a station 1 Function of KVT 935DVD PAL TV type Radio Text You can display the radio text 1 Displays the Radio Text 2 Scrolls the Radio Text It is displayed when information c...

Page 18: ... pressed twice the disc is played back from its beginning in the next time k Clock Level meter Display When touched the display of Clock 1 Level meter 1 Clock 2 and Level meter 2 are switched one after the other l Function Indicator Displaying the CD MP3 WMA Disc Changer Control screen You can play the CD MP3 WMA disc changer using various functions CD Control screen English 35 1 Adjusts the volum...

Page 19: ...sh 37 CD MP3 WMA Disc Changer Play Control MP3 WMA Control screen During MP3 WMA play Ejects a disc z Fast Forwards x Stops to play When pressed twice the disc is played back from its beginning in the next time c Selects a song v Plays or pauses b Selects a folder n Starts or stops Scan Play that plays the beginning of each song one after the other m Repeats to play the present song Starts or stop...

Page 20: ...y 3 Displays a folder if the subdirectory has a folder without files When you touch the folder it opens 4 Displays a folder if the subdirectory has files without a folder When you touch the folder it opens 5 Displays a folder if the subdirectory has both files and folders When you touch the folder it opens 6 Displays the folder which has no files and folders in lower layers 7 Displays the MP3 WMA ...

Page 21: ...er 2 DIRECT Select the Direct Search mode 1 CD MP3 WMA Disc Changer Play Control ID3 WMA TAG Display during MP3 WMA play The ID3 WMA TAG information of MP3 WMA file is listed 1 Scrolls the list Infomation Display the ID3 WMA TAG 2 MENU Call the MP3 WMA Menu 1 Disc Select during play by disc changer The discs loaded on the disc changer are listed for quick disc selection 1 Plays the displayed disc ...

Page 22: ... Shifts the cursor 2 Enters a space If you erase a character locate the cursor on it and touch this button 3 Enters characters 4 Displays respective character entry screens 5 Exits the Character Entry mode and returns to the previous screen You can enter characters only after you have applied the parking brake Source Select Mute Telephone Mute Telephone When the telephone is called the system is p...

Page 23: ...rol screen You can adjust the picture quality using the following keys Screen Control screen Displaying the Angle Control screen You can set the monitor position and open close speed Angle Control screen Angle Adjusting the Monitor Display Position and Quality Setup Menu You can set up various receiver parameters You can call the same Setup Menu for the Control screen of each source 1 Adjusts the ...

Page 24: ...see Channel Level page 49 u Sets the speaker volume see Channel Level page 49 i Starts or stops test signal tone output for setup check o Displays to the Speaker Set Up screen Your setup on the Sound Effects Menu is adjusted automatically to get the best sound effects according to the car type and speaker you have set on the Audio Set Up see page 46 We recommend you to complete the Audio Set Up fi...

Page 25: ... is adjusted to its best position Select a speaker you wish to adjust 1 You can select any of the following speaker types Center speaker None 40 mm x 70 mm 5 cm 10 cm 13 cm 16 cm over Front speakers OEM 10 cm 13 cm 16 cm 17 cm 18 cm 4x6 inches 5x7 inches 6x8 inches 6x9 inches 7x10 inches Rear speakers None OEM 10 cm 13 cm 16 cm 17 cm 18 cm 4x6 inches 5x7 inches 6x8 inches 6x9 inches 7x10 inches Su...

Page 26: ...touching 7 on the Car Type Set Up screen Preset Preset Preset Store or call your setup into from memory Set a delay time 3 Crossover Network Setup You can manually set a crossover frequency of speakers P47 w 1 Sets a crossover frequency 2 Sets a crossover slope 3 Returns to the Speaker Set Up screen 4 Sets the phase of subwoofer output it is displayed when the subwoofer crossover frequency is set ...

Page 27: ...e to Normal and from Normal to Midnight You can easy to listen a small sound when the dynamic range is narrow This is effective only when you are using a Dolby Digital software 9 Displays the DVD SETUP 2 screen If is not shown touch or to display it p Turns the Speaker Protect filter On or Off On Turn the Speaker Protect Filter On to protect speakers by cutting off the 70 kHz and higher frequency ...

Page 28: ...sh English Abbreviation aa ab af am ar as ay az ba be bg bh bi bn bo br ca co cs cy da de dz el en eo es et eu fa fi fj fo fr fy ga gd gl gn gu ha hi hr hu hy ia ie ik in is it iw ja ji jw ka kk kl km kn ko ks ku ky la ln lo lt Language Afar Abkhazian Afrikaans Amharic Arabic Assamese Aymara Azerbaijani Bashkir Byelorussian Bulgarian Bihari Bislama Bengali Bangla Tibetan Breton Catalan Corsican Cz...

Page 29: ...Set Up 9 Selects an illumination color of receiver keys Red Green Green Red Red p Selects an illumination color of the Small Display Blue Blue A blue color display Key Sync The same color as the this unit button illumination color q Flashes the burglar alarm lamp if the protection panel is removed On w Sets a music CD playback 1 1 Automatically recognizes and plays back an MP3 WMA disc a DVD or a ...

Page 30: ...is entered via the AV INPUT2 port this image is displayed R ViewCAM An image entered via the AV INPUT2 port is displayed when the shift lever of the car is placed in the Reverse position 8 Sets a name to be displayed when you select an image of the system that is connected via the AV INPUT2 port VIDEO2 If you have selected the R ViewCAM display for the AV INPUT2 port the R ViewCAM is always select...

Page 31: ...creen If is not shown touch or to display it p Sets an on screen display of the navigation screen Auto If you set to Auto an information is displayed for 5 seconds when updated q Sets an on screen display of the TV screen Auto If you set to Auto an information is displayed for 5 seconds when updated w Sets an on screen display of the video playback screen Auto If you set to Auto an information is ...

Page 32: ...activated the code can t be changed and the function can t be released Note the Security Code can be set as the 4 digit number of your choice If is not shown touch or to display it 1 Adjusts the volume 2 Returns to the Control screen of the previous source 3 Calls the Sound Effects Menu see page 68 4 Calls the Setup Menu 5 Allows you to start security code registration If you have already complete...

Page 33: ...n On or Off On 8 Turns the Auto TP Seek function On or Off On 9 Displays the RDS Set Up2 screen If is not shown touch or to display it p Selects a display language for the PTY function q Displays the RDS Set Up1 screen Next Prev RDS Set Up Displaying the TV1 Area Set Up screen TV1 Area Set Up screen Displaying the TV2 Area Set Up screen TV2 Area Set Up screen TV Set Up 1 Adjusts the volume 2 Retur...

Page 34: ...p option 7 Selects a set value 8 Enters the set value If is not shown touch or to display it For the model name of amp you can control from the system see the amp s catalog For the options and values you can change and for the amp s operation when changed see the amp s instruction manual Next Prev Displaying the AMP Control screen AMP Control screen AMP Control Sets the power amp connected via the...

Page 35: ...ou to complete the Audio Set Up first then set up the Sound Effects Menu Displaying the Audio Control screen Audio Control screen Audio Control 1 Adjusts the volume 2 Returns to the Control screen of the previous source 3 Calls the Setup Menu see page 45 4 Calls the Sound Effects Menu 5 Adjusts the right and left volume balance 6 Adjusts the front and rear volume balance 7 Adjusts the volume of th...

Page 36: ...evious source 3 Calls the Setup Menu see page 45 4 Calls the Sound Effects Menu 5 Sets a sound field You can select any of the following sound fields Bypass Stadium Concert Hall Live House Theater Disco Club Disco Jazz Club Studio Listening Room Church Bypass Center Dolby PL II Music Dolby PL II Movie Dolby PL II Matrix 6 Displays the present source information The stream Dolby Digital dts Linear ...

Page 37: ...ype is shown as USER Return Close the Parametric Equalizer screen 6 P3 P1 P3 P1 P3 P1 P3 P1 Store or call the equalizer curve into from memory Q Q Set a Q value 5 English 73 Sound Effects Menu Equalizer You can set up the equalizer 1 Adjusts the volume 2 Returns to the Control screen of the previous source 3 Calls the Setup Menu see page 45 4 Calls the Sound Effects Menu 5 Adjusts the bass boost o...

Page 38: ...ee page 74 Only the adjusted distance of position setup Position and Position Fine Control values is stored in memory Therefore the final adjustment distance changes if you change the Car Type Set Up value see page 46 Return Close the Position Fine Control Screen 4 P3 P1 P3 P1 P3 P1 P3 P1 P3 P1 Store or call your adjustment into from memory Set a delay time 3 English 75 Sound Effects Menu Position...

Page 39: ... Zone function is On When the Zone function is turned On this button appears on the all Source Control screen 7 Sets the front and rear audio source separately This button appears when the Zone function is On When the rear speaker sound is switched the audio source that is output at the AV OUTPUT terminal is also switched to the same source However if you have set the Area to Reverse the audio sou...

Page 40: ...up screen See the Hands Free Setup page 83 6 Enter three phone numbers for quick dialing See the Quick Dialing page 83 7 Enters a phone number See the When dialing page 79 8 Clears the entered phone number All numbers you have entered are cleared if the button is pressed more than 1 second 9 Starts the hands free phone call p Displays the previously called phone number q Ends the hands free phone ...

Page 41: ...a 3 Hands Free Unit Control Calling by Phone Book You can call a person using his her phone number that you have registered in the Phone Book The Initial Input screen appears Initial Input screen 1 Switches the character type 2 Scrolls the character array display 3 Displays the Phone Book beginning with the name whose first character you have touched etc The Phone Book List screen appears A Select...

Page 42: ...u wish to edit on the Phone Book List screen The Edit Phone Number screen appears Edit Phone Number TEL Number Edit screen 1 Enters a phone number 2 Clears the input phone number All entry number are cleared if this key is touched more than 1 second 3 Returns to the Phone Book List screen 4 Enters the phone number 9 0 Enter a phone number 3 EDIT Start editing 2 Kenwood Select an item you wish to e...

Page 43: ...nit Control Reading the SMS Short Message Service messages You can display messages received by the SMS BOX Message List screen 1 Displays messages 2 Scrolls the message list 3 Returns to the GSM Control screen The message is displayed on the Box Message screen BOX Message screen 1 Scrolls for a single message 2 Clears the message if this button is touched more than 2 seconds 3 Returns to the BOX ...

Page 44: ...e unit so that the faceplate will not hit the lid when closing and opening If the fuse blows first make sure the wires aren t touching to cause a short circuit then replace the old fuse with one with the same rating Insulate unconnected wires with vinyl tape or other similar material To prevent a short circuit do not remove the caps on the ends of the unconnected wires or the terminals Connect the...

Page 45: ... yellow to the car chassis ground you may cause a short circuit that in turn may start a fire Always connect those wires to the power source running through the fuse box 2WARNING Connect to the vehicle s parking brake detection switch harness using the supplied relay connector For the sake of safety be sure to connect the parking sensor 2CAUTION Battery wire Yellow Ground wire Black To car chassis...

Page 46: ...sing the sems bolts 8 2 Use the tapping screw 9 to secure the hideaway unit to the audio board Installation for Monitor Player Unit Installation for Receiver unit Connection FM AM ANTENNA AV INPUT AV INPUT L R R R 1 2 VIDEO VIDEO FRONT REAR PREOUT SUB MONO AV OUTPUT POWER CENTER L L R L R L R L VIDEO Audio Visual input 1 Visual input Yellow Audio left input White Audio right input Red Audio Visual...

Page 47: ...ory Screws included in audio unit package Screws included in audio unit package Audio unit or others Accessory Bracket or 3 Bend each end of accessory to fix the bracket Use a flat blade screwdriver or pliers and bend each accessory tab into the hole of installation bracket to fix the bracket Installation Installation on Toyota Nissan or Mitsubishi Car using Brackets at Holes shown by Accessory or...

Page 48: ...old window glass surface will weaken the adhesive strength of the double sided tape Also if installation inside the cabin is performed on a day with high humidity or when it is raining the high humidity level will weaken the adhesive strength of the double sided tape Do not install the antenna in a location where it may obstruct the field of view during driving such as on the windshield 1 Check th...

Page 49: ...er number DVD The chapter is a section of video and audio recorded in a DVD A title is composed of several chapters The numbers assigned to individual chapters are referred to as the chapter numbers Subtitles DVD Some DVD discs contains the recording of more than one subtitle language This player allow you to select one of the recorded subtitle languages during playback Track number CD VCD A track...

Page 50: ...le Turn off the main unit Switch the remote control mode selector according to the source you select see page 14 English 99 No sound can be heard or the volume is low Attenuator is turned on The fader or balance settings are set all the way to one side The input output wires or wiring harness are connected incorrectly The sound quality is poor or distorted One of the speaker wires is being pinched...

Page 51: ...hanger exceeds 60 C 140 F stopping all operation Cool down the unit by opening the windows or turning on the air conditioner As the temperature falls below 60 C 140 F the disc will start playing again Mecha Error The disc player is malfunctioning Eject the disc and try inserting it again Contact the Kenwood dealer if this indicator continues blinking or the disc cannot be ejected Disc Error The un...

Page 52: ...nnels VHF 2 13ch Receivable channels UHF 14 69ch Channel selection system PLL frequency synthesizer system IF signal detection system Split carrier system Antenna input 4ch diversity 75 Ω 3 5Ø miniplug TV section KVT 935DVD PAL TV type 945DVD 965DVD Color TV Broadcasting system PAL B G PAL I PAL D Receivable channels PAL B G 2 12ch 21 69ch 1A 11ch 21 69ch 0 12ch 28 69ch Receivable channels PAL I 2...

Reviews: