background image

English - 

11

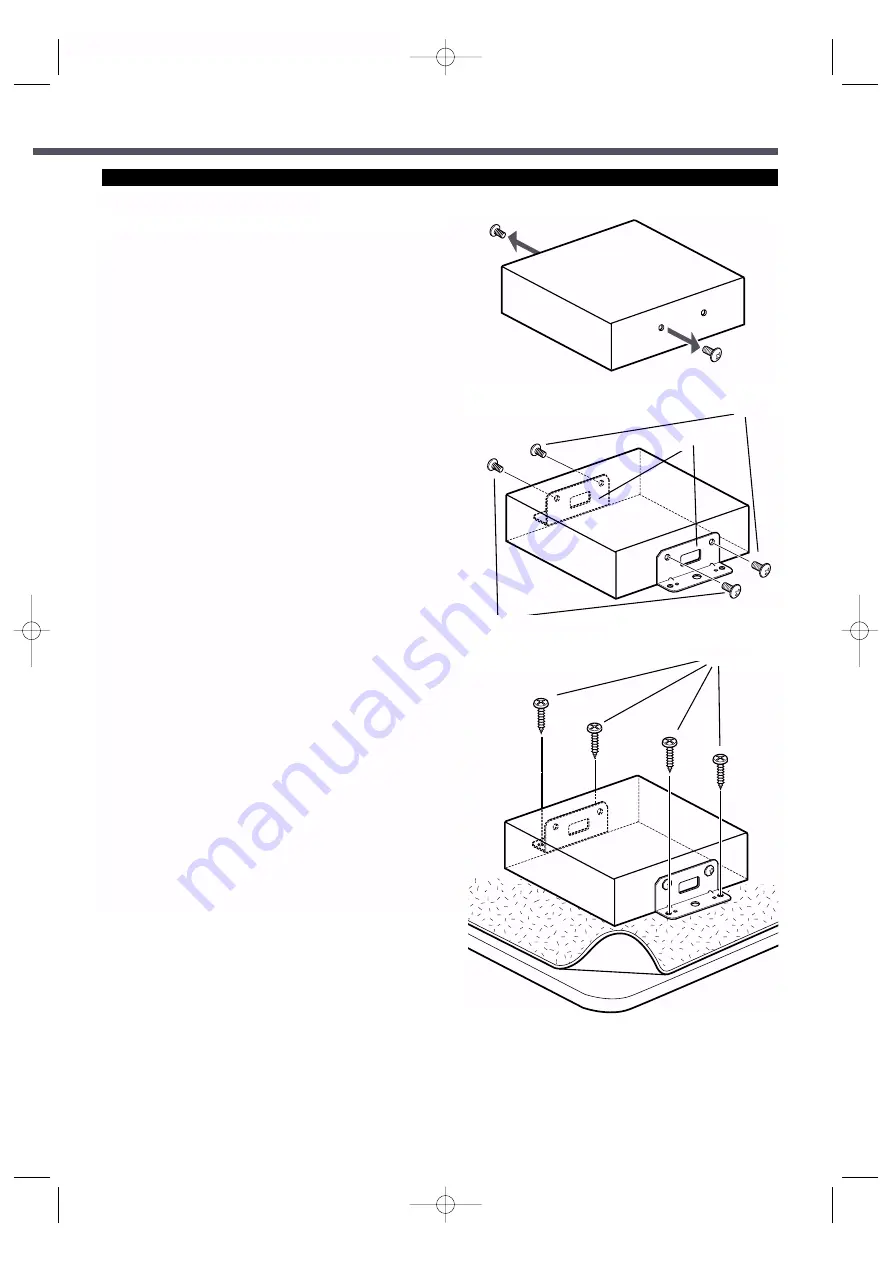
Installation for Video Box Unit

Securing to audio board

Accessory 

G

Accessory 

D

Removed the screw

Accessory 

F

Remove the screws on both sides that are already
attached to Video Box Unit.

Use the screws removed in step 1 and attached screws
(Accessory 

G

) to fix the bracket (Accessory 

D

) onto both

sides of Video Box Unit.

Use screws (Accessory 

F

) to fix Video Box Unit onto an

audio board or another. 

3

2

1

LZ-7500(W)_EFG_01  02.2.15  10:14 AM  Page 11

Summary of Contents for LZ-7500

Page 1: ... PRINTED IN JAPAN B64 2325 00 01 W DT LZ 7500 TOUCH SCREEN MONITOR INSTRUCTION MANUAL MONITEUR GRAND ECRAN MODE D EMPLOI BREITBILD MONITOR BEDIENUNGSANLEITUNG LZ 7500 W _EFG_01 02 2 15 10 13 AM Page 1 ...

Page 2: ...y out of place during collisions and other jolts When extending the ignition or ground cables make sure to use automotive grade cables or other cables with an area of 0 75mm2 AWG18 or more to prevent wire deterioration and damage to the wire coating To prevent short circuits never put or leave any metallic objects e g coins or metal tools inside the unit If the unit starts to emit smoke or strange...

Page 3: ... up button Decreasing Volume Press the down button Switching the Video Screen Mode WD Press the WIDE MODE button Each time the button is pressed the screen mode switches as follows Display Setting FULL Full screen mode ZOOM Zoom screen mode JUST Just screen mode NORMAL Normal screen mode You cannot operate when the navigation picture is displayed Switching the Speaker Mode SP Press the WIDE MODE b...

Page 4: ...stalled facing the front of monitor unit for light detection 3 Exit the Screen Control Screen Touch the OK button If you make no operation for 10 seconds the screen control screen is automatically canceled SCREEN T I N C O L O K B L K C O N T D I M S C R E E N SCREEN RTN S E T U P S Y S T E M T O U C H Screen Control Screen Setup Menu Screen Select the Setup Menu Screen Press the SCREEN button for...

Page 5: ... IN2 It becomes the video mode setting Operate the V SEL button when the image from the device connected to AV IN 2 terminal is shown on the monitor 7OFF It becomes the off mode setting Use this setting when there s nothing connected to the AV IN 2 terminal English 5 Setting the Camera Mode CAMERA VIDEO Touch Setting 7AUTO It becomes the Rear view camera mode setting When the reverse sensor cable ...

Page 6: ... t o n i n L e f t B o t t o m C o r n e r n t t h e Touch Panel Adjustment The touch panel can be adjusted if the position touched and the operation performed do not match Accurately touch the mark at the lower left Accurately touch the mark at the upper right When the mark at the upper right is touched the adjustment is completed and the system setup menu screen reappears If the CANCEL button is...

Page 7: ...lish 7 Switching the Speaker Mode SP Touch the B part Each time the B part is touched the built in speaker mode switches as follows Display Setting NORMAL Sound with monitor picture NAV Sound with navigation picture VIDEO1 Sound with video1 picture VIDEO2 Sound with video2 picture OFF Switch off the built in speakers Setting the AV Output Mode AV Touch the E part Each time the E part is touched th...

Page 8: ...upplied may destroy parts inside the unit causing it to smoke Using screws shorter than those supplied may cause the unit to come looks from the installation bracket If you are not going to install the unit using the supplied monitor stand be sure to use a commercially available monitor stand Mounting holes for such a stand are located on the bottom of the monitor unit If your car s ignition does ...

Page 9: ...e ACC Ground cable Black To car chassis Battery Monitor Unit Fuse 3A Reverse sensor cable Pink When the Rear view camera is connected Audio Visual input 1 Visual input Yellow Audio left input White Audio right input Red Audio Visual input 2 Visual input Yellow Audio left input White Audio right input Red Audio Visual Output Visual output Yellow Audio left output White Audio right output Red Rear v...

Page 10: ...nce or touch the adhesive with your fingers as this will weaken its adhesive strength If the temperature of the surface of the installation location is low warm it up using a heater or other means before attaching the stand Low temperature may weaken the adhesive strength of the tape The supplied stand is specially intended for this product Do not use it with another monitor Secure the stand using...

Page 11: ...ve the screws on both sides that are already attached to Video Box Unit Use the screws removed in step 1 and attached screws Accessory G to fix the bracket Accessory D onto both sides of Video Box Unit Use screws Accessory F to fix Video Box Unit onto an audio board or another 3 2 1 LZ 7500 W _EFG_01 02 2 15 10 14 AM Page 11 ...

Page 12: ...e temperature to rise Normal brightness will return Specifications Specifications subject to change without notice Monitor Unit Screen size 6 95 inches wide 154 1 W x 86 6 H x 176 7 Diagonal mm 6 1 16 W x 3 7 16 H inches Display system Transparent TN LCD panel Drive system TFT active matrix system Number of pixels 336 960 pixels 480 H x 234 V x RGB Effective pixels 99 99 Pixel arrangement RGB stri...

Page 13: ...LZ 7500 W _EFG_01 02 2 15 10 14 AM Page 13 ...

Page 14: ... vous prolongez un câble d alimentation de batterie ou de masse assurez vous d utiliser un câble pour automobile ou un câble avec une section de 0 75mm2 AWG18 afin d éviter tout risque de détérioration ou d endommagement de l isolation des câbles Pour éviter les court circuits ne jamais mettre ou laisser d objets métalliques comme une pièce de monnaie ou un outil à l intérieur de l appareil Si l a...

Page 15: ... Augmenter le volume Appuyez sur la touche up Baisser le volume Appuyez sur la touche down Sélection du mode d écran Vidéo WD Appuyez sur la touche WIDE MODE Chaque fois que l on appuie sur la touche le mode de l écran change de la manière suivante Affichage Réglage FULL Mode Grand écran ZOOM Mode de Zoom JUST Uniquement mode écran NORMAL Mode d écran normal Cette commande ne fonctionne pas lorsqu...

Page 16: ...détecter la lumière 3 Sortez de l écran de commande par l écran Effleurez la touche OK Si vous n effectuez aucune opération pendant 10 secondes l écran de contrôle est annulé automatiquement SCREEN T I N C O L O K B L K C O N T D I M S C R E E N SCREEN RTN S E T U P S Y S T E M T O U C H Ecran de commande par l écran Ecran de menu de configuration Sélection de l écran du menu de configuration Appu...

Page 17: ...e AV IN 2 VD2 Effleurer Réglage 7AV IN2 Ceci devient le réglage de mode vidéo utilisez la touche V SEL lorsque l image de l appareil connecté à la borne AV IN 2 est affichée sur le moniteur 7OFF Ceci devient le réglage de mode OFF Utiliser ce réglage lorsqu il n y a rien connecté à la borne AV IN 2 Réglage du mode Camera CAMERA VIDEO Effleurer Réglage 7AUTO Apparaît le mode d installation la rétro...

Page 18: ... f t h e B u t o n i n L e f t B o t t o m C o r n e r n t t h e Ajustement des touches Le panneau à touchement peut être adapté si l endroit touché et l opération effectuée ne correspondent pas Toucher précisément la marque située en bas à gauche Toucher précisément la marque située en haut à droite Lorsque la marque en haut à droite est touchée l ajustement est accompli et l écran d installation...

Page 19: ...ue l image de navigation est affichée Commuter le mode haut parleur SP Toucher la partie B Chaque fois que la partie B est touchée le micro intégré se modifie comme suit Affichage Réglage NORMAL Son avec image du moniteur NAV Son avec image de navigation VIDEO1 Son avec image de la vidéo 1 VIDEO2 Son avec image de la vidéo 2 OFF Micro intégré éteint Réglage du mode de sortie AV AV Toucher la parti...

Page 20: ...de provoquer une émission de fumée Le fait d utiliser des vis plus courtes que celles fournies risque de détacher l appareil du support d installation Si vous n allez pas installer l appareil avec le support pour moniteur fourni assurez vous d utiliser un support de moniteur disponible dans le commerce Des trous de montage du support sont situés au fond du moniteur Si l allumage de votre voiture n...

Page 21: ...umage Câble de masse Noir Au châssis de la voiture Batterie L unité moniteur Fusible 3A Inverser le câble du capteur Rose Lorsque la rétro caméra est connectée Entrée Audio Vidéo 1 Entrée Vidéo Jaune Entrée Audio gauche Blanc Entrée Audio droite Rouge Entrée Audio Vidéo 2 Entrée Vidéo Jaune Entrée Audio gauche Blanc Entrée Audio droite Rouge Sorties Audio Vidéo Sortie Vidéo Jaune Sortie Audio gauc...

Page 22: ...ois et ne pas toucher le ruban adhésif avec les doigts car cela affaiblit la force adhésive Si la température à la surface de l emplacement d installation est trop basse la réchauffer à l aide d un radiateur ou un autre appareil avant de fixer le socle Une basse température risque d affaiblir la force adhésive de la bande Le montant fourni est spécialement destiné à ce produit Ne pas l utiliser av...

Page 23: ...evez les vis des deux côtés déjà attachés à la boite vidéo Utilisez les vis enlevées au point 1 et des vis fixes Accessoire G pour fixer les agrafes Accessoire D des deux côtés de la boite vidéo Utilisez des vis Accessoire F pour fixer la boite vidéo dans une tableau audio ou autre 3 2 1 LZ 7500 W _EFG_01 02 2 15 10 14 AM Page 23 ...

Page 24: ...n moment après la mise sous tension pour que la température monte La luminosité normale va revenir Spécifications Les spécifications sont sujettes à changements sans notification Unité moniteur Taille d écran Large 6 95 pouces 154 1 L x 86 6 H x 176 7 Diagonal mm Système d affichage Panneau LCD TN transparent Système d entraînement Système de matrice active TFT Nombre de pixels 336 960 pixels 480 ...

Page 25: ...LZ 7500 W _EFG_01 02 2 15 10 14 AM Page 25 ...

Page 26: ...leudert wird Verwenden Sie bei Verlegung des Betriebsstrom Speicherschutz und Massekabels besonders strapazierfähige und speziell für die Installation im Auto angebotene Kabel mit einem Leitungsquerschnitt von mindestens 0 75 mm2 AWG 18 Stellen Sie sicher daß keine Metallgegenstände Münzen Nadeln Werkzeuge etc ins Innere des Geräts gelangen und Kurzschlüsse verursachen Schalten Sie das Gerät bei G...

Page 27: ...ke Drücken Sie die up Taste Senken der Lautstärke Drücken Sie die down Taste Den Video Bildschirmbetrieb auswählen WD Drücken Sie die WIDE MODE Taste Bei jeder Betätigung der Taste schaltet sich der Bildschirmbetrieb wie nachfolgend gezeigt um Display Einstellung FULL Vollbildschirm Modus ZOOM Zoombildschirm Modus JUST Nur Bildschirm Modus NORMAL Normalbildschirm Modus Sie können das Gerät nicht b...

Page 28: ...Lichterkennung an der Vorderseite des Monitors montiert 3 Verlassen des Bildschirms Steuerbildschirm Tippen Sie die OK Taste Wenn Sie 10 Sekunden lang keine Bedienung ausführen wird der Bildschirm Bildschirmsteuerung automatisch verlassen SCREEN T I N C O L O K B L K C O N T D I M S C R E E N SCREEN RTN S E T U P S Y S T E M T O U C H Bildschirm Steuerbildschirm Setup Menübildschirm Den Setup Menü...

Page 29: ...ng 7AV IN2 Diese Einstellung wird zur Videomodus Einstellung Betätigen Sie die Taste V SEL wenn das Bild von dem an den AV IN2 Anschluss angeschlossenen Gerät auf dem Monitor angezeigt wird 7OFF Diese Einstellung wird zur Ausschaltmodus Einstellung Verwenden Sie diese Einstellung wenn keinerlei Geräte an den Anschluss AV IN2 angeschlossen sind Einstellen des Kameramodus CAMERA VIDEO Tippen Einstel...

Page 30: ... r n t t h e Einstellen des Touch Screens Genau die Markierungen unten links und oben rechts den Meldungsanleitungen folgend berühren Tippen Sie genau auf die Markierung unten links Tippen Sie genau auf die Markierung oben rechts Wenn Sie auf die Markierung oben rechts tippen ist die Einstellung beendet und der Bildschirm System Setup Menü erscheint wieder Wenn die CANCEL Taste getippt wird ohne d...

Page 31: ...wenn das Navigationsbild angezeigt wird Umschalten des Lautsprechermodus SP Tippen auf Teil B Jedes Mal wenn Sie auf Teil B tippen wird der integrierte Lautsprechermodus wie folgt umgeschaltet Display Einstellung NORMAL Ton mit Monitorbild NAV Ton mit Navigationsbild VIDEO1 Ton mit Bild des 1 Videos VIDEO2 Ton mit Bild des 2 Videos OFF Integrierter Lautsprecher ist ausgeschaltet Den AV Ausgangs Be...

Page 32: ... mitgelieferten kann die inneren Bauteile des Gerätes beschädigen was zu einem Qualmaustritt vom Gerät führen kann Bei der Verwendung von kürzeren als den mitgelieferten Schrauben könnte sich das Gerät aus dem Montagerahmen lösen Wenn Sie das Gerät nicht mit dem mitgelieferten Monitorständer installieren möchten benutzen Sie bitte einen handelsüblichen Monitorständer Montagelöcher für einen derart...

Page 33: ...erie Monitor Gerätes Kasten 3A Rückwärtiges Sensorkabel Pink Wenn die Rückspiegelkamera angeschlossen ist Audio Eingang Visueller Eingang 1 Visueller Eingang Gelb Linker Audio Eingang Weiß Rechter Audio Eingang Rot Audio Eingang Visueller Eingang 2 Visueller Eingang Gelb Linker Audio Eingang Weiß Rechter Audio Eingang Rot Audio Ausgang Visueller Ausgang Visueller Ausgang Gelb Linker Audio Ausgang ...

Page 34: ...icht mit den Fingern da sich dies negativ auf die Klebkraft auswirken würde Wenn die Oberflächentemperatur des Aufstellungsortes niedrig ist müssen Sie den Aufstellungsort vor der Befestigung des Fußes mit einem Heizgerät oder auf andere Weise erwärmen Eine niedrige Temperatur könnte sich negativ auf die Klebkraft des Klebebandes auswirken Der mitgelieferte Fuß ist speziell für die Benutzung mit d...

Page 35: ...n die sich bereits an der Videobox befinden Verwenden Sie die in Schritt 1 entfernten Schrauben und schrauben Sie damit Zubehörteil G die Befestigungsschellen Zubehörteil D an beiden Seiten der Videobox fest Verwenden Sie die Schrauben Zubehörteil F um die Videobox auf einem Audioboard oder ähnlichem zu befestigen 3 2 1 LZ 7500 W _EFG_01 02 2 15 10 14 AM Page 35 ...

Page 36: ...s dunkler erscheint wenn er eingeschaltet wird Nach dem Einschalten warten damit die Temperatur steigt Normale Helligkeit kehrt zurück Technische Daten Die technischen Daten können sich ohne besonderen Hinweis ändern Monitor Einheit Bildformat 6 95 Zoll breit 154 1 B x 86 6 H x 176 7 Diagonal mm Displaysystem Transparent TN LCD panel Antriebssystem TFT Aktivmatrix System Pixel Anzahl 336 960 pixel...

Reviews: