background image

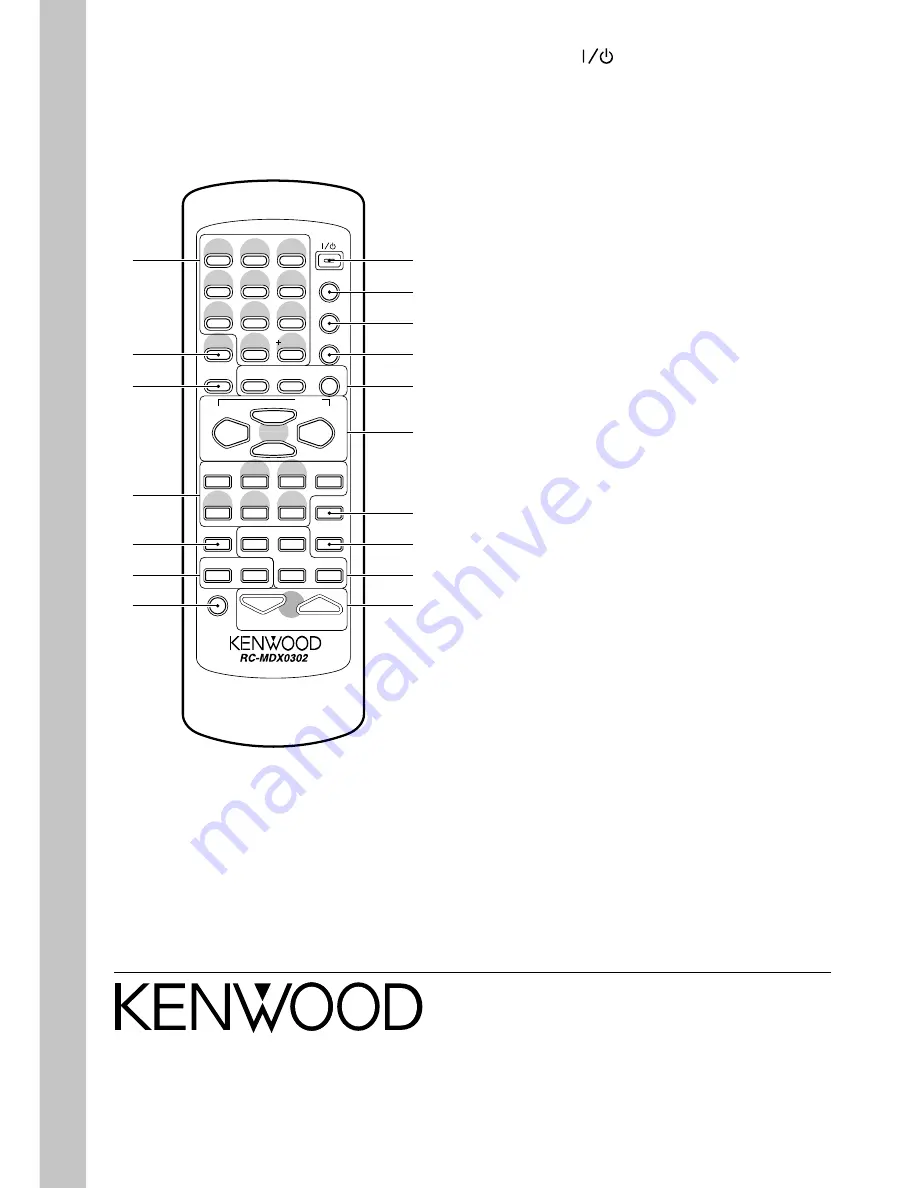
For your records

Record the serial number, found on the back of the
unit, in the spaces designated on the warranty card,
and in the space provided below. Refer to the model
and serial numbers whenever you call upon your dealer
for information or service on this product.

Model _____________ Serial Number ____________

¢

TRACK EDIT


REPEAT

1

4

1

6

TAPE

TAPE EQ.

VOLUME

ENTER

TITLE INPUT

POWER

PGM

CLEAR/DELETE

MUTE


CHARAC.


SPACE

MD

STOP

MD O.T.E.

AUTO/MANU

TUNING

DOWN

TUNING

UP

TAPE O.T.E.

DISPLAY TIME DISPLAY

P.CALL

SET

SOUND

TONE

TIMER

2 3

5

 JKL

2

 ABC

8

 TUV

0

ワオン

 QZ

6

MNO

3

 DEF

9

 WXY

10

記号

4

 GHI

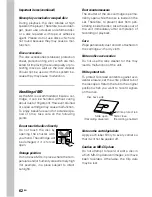
1


7

 PRS

RANDOM

SLEEP

7

6

FM/AM

CD

1
2
3
4
5

6

&

7
8
9
0

!

@
#

%

$

^

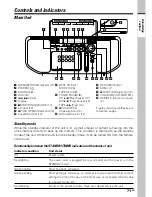
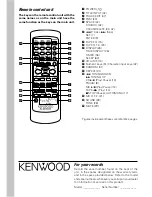
Remote control unit

The keys on the remote control unit with the
same names as on the main unit have the
same function as the keys on the main unit.

1

POWER 

2

TITLE INPUT (42)

3

TRACK EDIT (47)

4

PGM (30)

5

SPACE (42)
CHARAC. (42)
CLEAR/DELETE (30, 42)

6

4

 P. CALL 

¢

 (Skip)

SET (7)
ENTER (9)

7

TAPE EQ. (15)

8

TAPE O.T.E. (23)

9

DISPLAY (26)
TIME DISPLAY (26)
TIMER (55)
SLEEP (60)

0

VOLUME (10)

!

Numeric keys (9) / Character input keys (42)

@

RANDOM (31)

#

REPEAT (31)

$

TUNING DOWN

¡

 TUNING UP

CD 

6

 (Play/ Pause) (10)

FM/AM (8)
MD 

6

 (Play/ Pause) (12)

TAPE 

23

 (Play) (14)

7

 STOP (Pause), AUTO/MANU (17)

%

MD O.T.E. (21)

^

SOUND (28)
TONE (28)

&

MUTE (29)

Figures inside parentheses are reference pages.

Summary of Contents for MDX-G3

Page 1: ...MINIDISC PERSONAL STEREO SYSTEM B60 4854 00 01 MA M 0009 MDX G3 INSTRUCTION MANUAL ...

Page 2: ...ams do not open the cover CLASS 1 LASER PRODUCT CAUTION INVISIBLE LASER RADIATION WHEN OPEN AVOID EXPOSURE TO BEAM Safety precautions WARNING TO PREVENT FIRE OR ELECTRIC SHOCK DO NOT EXPOSE THIS APPLIANCE TO RAIN OR MOISTURE CAUTION RISK OF ELECTRIC SHOCK DO NOT OPEN Factory fitted moulded mains plug 1 The mains plug contains a fuse For replacement use only a 13 Amp ASTA approved BS1362 fuse 2 The...

Page 3: ...o temporarily MUTE 29 Playing CD or MD tracks in the desired sequence PGM 30 Repeating a CD or MD REPEAT 31 Playing a CD or MD in a random RANDOM 31 Stereo LP modes 32 Types of recording modes 32 Setting the recording mode 33 High speed recording of all CD tracks onto an MD 34 Recording onto MD 36 Recording onto TAPE 38 Recording CD tracks onto MD or TAPE in desired sequence 39 Recording MD tracks...

Page 4: ...s each key securely by leaving an interval of 1 second or more between keys The standard remote control range is within about 6 meters from the main unit front panel Be sure to point the remote to remote sensor on the front panel 3 Attach the battery com partment cover 2 Insert two R6 AA size batter ies following the polarity indi cations 1 Remove the battery com partment cover of the re mote Unpa...

Page 5: ... TV screen Be sure to put the unit to the STANDBY mode page 71 before plugging or unplugging the power cord Continued on next page Extend the FM antenna and ori ent it to obtain the best receiv ing condition possible When removing the power cord con nection unplug the power plug of the wall outlet first The provided antenna has been designed for indoor use Place it in a position as apart as possib...

Page 6: ...is displayed To enter demonstration mode Keep on pressing the SET DEMO key for more than 2 sec onds while the unit is ON AUX auxiliary component An additional MD player cassette tape or analog turntable with built in equalizer such as the P 110 which are available separately can optionally be connected to the system using an audio cable with stereo mini plugs option The AUX IN terminals are input ...

Page 7: ...P key while the unit is in the STANDBY mode page 71 After a power failure when the power cord is unplugged and plugged again or when the STANDBY TIMER indicator blinks in green the present time should be adjusted again In step 6 accurate time adjustment is pos sible by pressing the SET key at the same time as a time announcement indicating the 00 second of the minute APE T 7 STOP 1 3 5 2 4 6 A D J...

Page 8: ...e pre set When AUTO PRESET is performed the sta tions previously preset will be replaced by the newly preset stations In certain regions the automatically tuned and preset stations may not be receivable in a favorable condition 1 1 23 5ナ JKL 2カ ABC 8ヤ TUV 0ワオン QZ 6ハ MNO 3サ DEF 9ラ WXY 10記号 4タ GHI 1ア 7マ PRS 7 TRACK EDIT REPEAT TAPE TAPE EQ VOLUME ENTER TITLE INPUT POWER PGM CLEAR DELETE MUTE CHARAC ...

Page 9: ...tations only the de sired stations can be received and preset in dividually AUTO lit EX BASS T U N ER 4 Press the ENTER key during re ception 5 While is blinking press the 4P CALL or P CALL key re peatedly to select the desired preset number Press and hold the 4 P CALL or P CALL key to skip preset numbers The preset number can also be se lected by pressing numeric keys Examples To select preset No...

Page 10: ...sing the VOLUME keys on the remote Playback of CD To play a CD APE T CD MD HIGH SPEED DUBBING SYSTEM 1 B I T D U A L D A C O N V E R T E R 1 1 23 5ナ JKL 2カ ABC 8ヤ TUV 0ワオン QZ 6ハ MNO 3サ DEF 9ラ WXY 10記号 4タ GHI 1ア 7マ PRS 7 TRACK EDIT REPEAT TAPE TAPE EQ VOLUME ENTER TITLE INPUT POWER PGM CLEAR DELETE MUTE CHARAC SPACE MD STOP MD O T E AUTO MANU TUNING DOWN TUNING UP TAPE O T E DISPLAY TIMEDISPLAY P C...

Page 11: ...s played For the types of CDs that can be played on this unit see Discs which can be played with this unit page 61 Purpose Operation To stop playback Press the 7STOP key To let playback pause Press the CD 6 key Press it again to resume playback To skip a track Press the key to skip to the next track Press the 4 key quickly twice to skip to the previous track To fast forward audio Press and hold th...

Page 12: ...0ワオン QZ 6ハ MNO 3サ DEF 9ラ WXY 10記号 4タ GHI 1ア 7マ PRS 7 TRACK EDIT REPEAT TAPE TAPE EQ VOLUME ENTER TITLE INPUT POWER PGM CLEAR DELETE MUTE CHARAC SPACE MD STOP MD O T E AUTO MANU TUNING DOWN TUNING UP TAPE O T E DISPLAY TIMEDISPLAY P CALL SET SOUND TONE TIMER RANDOM SLEEP FM AM CD 7 STOP 7 STOP 1 1 4 4 4 1 3 PGM 3 EJECT 0 2 4 Numeric keys Playback of MD To play an MD Elapsed play time of track being...

Page 13: ...his will lead to malfunction When an MD has been inserted while the power is OFF simply pressing the MD 6 key in the STANDBY mode turns the power ON and starts playback One touch operation When the MD contains recording of title information the titles of the disc or tracks recorded in the MD are displayed Purpose Operation To stop playback Press the 7STOP key To let playback pause Press the MD 6 k...

Page 14: ...tion APE T 1 1 23 5ナ JKL 2カ ABC 8ヤ TUV 0ワオン QZ 6ハ MNO 3サ DEF 9ラ WXY 10記号 4タ GHI 1ア 7マ PRS 7 TRACK EDIT REPEAT TAPE TAPE EQ VOLUME ENTER TITLE INPUT POWER PGM CLEAR DELETE MUTE CHARAC SPACE MD STOP MD O T E AUTO MANU TUNING DOWN TUNING UP TAPE O T E DISPLAY TIMEDISPLAY P CALL SET SOUND TONE TIMER RANDOM SLEEP FM AM CD 7 STOP 7 STOP 1 1 4 4 4 TAPE EQ TIME DISPLAY 3 MENU SET 2 3 4 Playback of TAPE To...

Page 15: ...off by pressing the TAPE EQ key on the remote Setting the reverse mode of tape TAPE RVS 1 Press the MENU key 2 Rotate the VOLUME MULTI CONTROL knob so that TAPE RVS is displayed then press the SET key 3 Rotate the VOLUME MULTI CONTROL knob so that the desired reverse mode is dis played then press the SET key ONE WAY Tape will stop after a single side has been played REVERSE Tape will stop after bo...

Page 16: ...EREO EX BASS T U N ER Receiving broadcast stations Frequency Band APE T 1 1 23 5ナ JKL 2カ ABC 8ヤ TUV 0ワオン QZ 6ハ MNO 3サ DEF 9ラ WXY 10記号 4タ GHI 1ア 7マ PRS 7 TRACK EDIT REPEAT TAPE TAPE EQ VOLUME ENTER TITLE INPUT POWER PGM CLEAR DELETE MUTE CHARAC SPACE MD STOP MD O T E AUTO MANU TUNING DOWN TUNING UP TAPE O T E DISPLAY TIMEDISPLAY P CALL SET SOUND TONE TIMER RANDOM SLEEP FM AM CD 7 STOP TUNING MODE 4...

Page 17: ...ing mode stereo reception 2 While AUTO or MANUAL indicator is lit press the 4 or key on the main unit or the 1 TUNING DOWN or TUNING UP key on the remote to receive the desired station Auto tuning Each press of the key tunes the next station automatically Manual tuning Press and hold the key until the next station is tuned When the unit is in the STANDBY mode page 71 simply pressing the TUNER FM A...

Page 18: ...NTROL knob to adjust the listening volume The volume can also be adjusted using the VOLUME keys on the remote APE T 1 1 23 5ナ JKL 2カ ABC 8ヤ TUV 0ワオン QZ 6ハ MNO 3サ DEF 9ラ WXY 10記号 4タ GHI 1ア 7マ PRS 7 TRACK EDIT REPEAT TAPE TAPE EQ VOLUME ENTER TITLE INPUT POWER PGM CLEAR DELETE MUTE CHARAC SPACE MD STOP MD O T E AUTO MANU TUNING DOWN TUNING UP TAPE O T E DISPLAY TIMEDISPLAY P CALL SET SOUND TONE TIME...

Page 19: ...19EN Basic section ...

Page 20: ...on top The MD O T E One Touch Edit function makes it possible to record all tracks in a CD on an MD with a one touch operation All track recording It is also capable of recording the cur rently played CD track on an MD with a one touch operation Single track recording Recording CD onto MD MD O T E APE T CD MD HIGH SPEED DUBBING SYSTEM 1 B I T D U A L D A C O N V E R T E R 1 1 23 5ナ JKL 2カ ABC 8ヤ T...

Page 21: ...ts after returning to the beginning of the current track To stop recording in the middle Press the 7STOP key Be careful not to turn power off or apply shock or vibrations to the system while MD WRITING is displayed For the types of MDs that can be recorded on this unit see Handling of MD page 62 It is also possible to record a CD onto an MD at a double speed page 34 to 35 The CD audio is recorded ...

Page 22: ... OPEN to close the cassette holder Recording CD onto TAPE TAPE O T E The label side must be on top Insert with the side to be recorded facing the front The TAPE O T E One Touch Edit function makes it possible to record all tracks in a CD on a tape with a one touch operation All track recording It is also capable of recording the cur rently played CD track on a tape with a one touch operation Singl...

Page 23: ... gle side has been re corded REVERSE Tape will stop after both sides have been re corded ENDLESS Tape will stop after both sides have been re corded 6 Press the TAPE O T E key on the remote If you are operating the main unit 1 Press the MENU key 2 Rotate the VOLUME MULTI CONTROL knob so that REC OPTIONS is displayed then press the SET key 3 Rotate the VOLUME MULTI CONTROL knob so that CD TAPE is d...

Page 24: ...ding in the middle Press the 7STOP key The cassette deck of the system is capable of recording only the normal TYPE I tapes High TYPE II and metal TYPE IV position tapes cannot be used For the recordable tape types see Notes on cassette tape page 63 Do not open the cassette holder during recording Otherwise malfunction may occur Be sure to stop tape before taking it out The TAPE O T E recording is...

Page 25: ...25EN Basic section ...

Page 26: ...ta CD TEXT When a CD compatible with CD TEXT is played the system automatically shows the text data in the CD TEXT data disc title or track titles If a text data item contains too many char acters to be shown at once in the display press the DISPLAY key on the remote to scroll the display and see the characters which are not displayed in the beginning 1 1 23 5ナ JKL 2カ ABC 8ヤ TUV 0ワオン QZ 6ハ MNO 3サ ...

Page 27: ... CD DISPLAY TIME DISPLAY Viewing the MD information Display in recording The displayed information switches each time the DISPLAY key on the remote is pressed 1 Remaining recordable time of the disc 2 Music source being recorded With display 2 if the recorded music source is a CD TEXT CD the title data contained in it will be displayed To view the disc title or track titles When the MD contains th...

Page 28: ... 2 Adjust the VOLUME keys to the desired level The high or low frequency level can be adjusted in the range between 8 and 8 3 Press the SET key If the remote is left without pressing the SET key for about 8 seconds after adjustment the adjusted setting is entered in memory and the display re turns to the previous information The EX BASS or LOUDNESS mode is canceled if the bass or treble level is a...

Page 29: ...o the AUX IN jacks MD player ana log turntable VCR etc can be adjusted It is recommended to adjust it so that the AUX input sounds at a similar volume to the built in CD and MD Remote control unit only Press the MUTE key to switch muting on or off The display blinks The MUTE function is canceled when the volume is controlled while MUTE is ON 1 1 23 5ナ JKL 2カ ABC 8ヤ TUV 0ワオン QZ 6ハ MNO 3サ DEF 9ラ WXY...

Page 30: ...D 7 STOP SET PGM CLEAR DELETE CD MD 6 6 Numeric keys Playing CD or MD tracks in the desired sequence PGM Use the following procedure to program up to 32 desired tracks in a desired order 5 Press the SET key To select other tracks repeat steps 4 and 5 for each If you commit a mistake press the CLEAR DELETE key to clear the track number and restart selection 6 CD Press the CD 6 key MD Press the MD 6...

Page 31: ... that RANDOM is lit To cancel random playback Press the RANDOM key so that RANDOM turns off Random playback stops after having all of the tracks on the disc Repeating a CD or MD REPEAT Use the following procedure to play the de sired track s repeatedly Repeat playback can be combined with program playback or random playback Display when both ONE and REPEAT are lit Playing a CD or MD in a random RA...

Page 32: ...ridge Monaural LP MONO The recording time available only in mon aural becomes about twice the figure indi cated on each MD cartridge Stamping STAMP This system has the stamping function which attaches stamp LP at the beginning of each track title to facilitate identification of tracks recorded in the LP2 or LP4 mode LP is displayed as a part of title only when a track recorded in stereo LP mode is...

Page 33: ...it Main unit only 1 Press the MENU key 2 Rotate the VOLUME MULTI CON TROL knob so that MD REC MODE is displayed then press the SET key The currently set recording mode is indicated 3 Rotate the VOLUME MULTI CON TROL knob so that the desired re cording mode is displayed STEREO Stereo recording mode no indicator lit LP2 Stereo LP2 mode LP2 lit LP4 Stereo LP4 mode LP4 lit MONO Monaural LP mode MONO l...

Page 34: ...omatically when all of the CD tracks have been recorded onto the MD 1 1 23 5ナ JKL 2カ ABC 8ヤ TUV 0ワオン QZ 6ハ MNO 3サ DEF 9ラ WXY 10記号 4タ GHI 1ア 7マ PRS 7 TRACK EDIT REPEAT TAPE TAPE EQ VOLUME ENTER TITLE INPUT POWER PGM CLEAR DELETE MUTE CHARAC SPACE MD STOP MD O T E AUTO MANU TUNING DOWN TUNING UP TAPE O T E DISPLAY TIMEDISPLAY P CALL SET SOUND TONE TIMER RANDOM SLEEP FM AM CD MD O T E 7 STOP APE T ME...

Page 35: ...ff or apply shock or vibrations to the system while MD WRITING is displayed Once high speed recording of CD MD HIGH is started it is not permitted to record the same CD by high speed recording within 74 minutes after the start of previous high speed recording In case this restriction is applied the display shows the time until the next high speed recording becomes possi ble It is also prohibited t...

Page 36: ... the pause In case a message is displayed and record ing will not start See Display message list pages 68 69 Tips for recording CD onto MD When the MD recorder in record pause mode the recording can be started automati cally at the same time as the playback of CD is started Sync recording 1 Put the CD player in play pause mode 2 Select the track to be recorded first by pressing the 4 or key The CD...

Page 37: ...ay not be incremented in case the music source recorded contain noise etc When pianissimo or low level sections have continued during recording of classic music etc When the MD 6 or MD REC key is pressed in record pause mode to resume recording When the TRACK EDIT key on the re mote is pressed during recording When recording the digital output from CD track numbers are assigned auto matically in a...

Page 38: ... of 4 seconds To resume recording from record pause mode press the TAPE REC key again Tip for recording CD or MD onto tape When the cassette deck is put to record pause mode the start of tape recording can be started in synchronism with the start of playback of the CD or MD source Sync re cording 1 Put the CD player or MD recorder of the system to pause play pause mode 2 Select the track to be rec...

Page 39: ...his function is not available when the recording speed is CD MD HIGH 1 1 23 5ナ JKL 2カ ABC 8ヤ TUV 0ワオン QZ 6ハ MNO 3サ DEF 9ラ WXY 10記号 4タ GHI 1ア 7マ PRS 7 TRACK EDIT REPEAT TAPE TAPE EQ VOLUME ENTER TITLE INPUT POWER PGM CLEAR DELETE MUTE CHARAC SPACE MD STOP MD O T E AUTO MANU TUNING DOWN TUNING UP TAPE O T E DISPLAY TIMEDISPLAY P CALL SET SOUND TONE TIMER RANDOM SLEEP FM AM CD 7STOP MD O T E TAPE O T...

Page 40: ... REC key succes sively twice to put the tape deck in record pause mode The tape deck enters record pause mode after leaving a no sound section of 4 seconds Recording MD tracks onto TAPE in desired sequence A tape containing only the favorite tracks in an MD can be created by reordering them in the desired sequence 5 Press the MD 6 key When recording of MD tracks com pletes the tape deck stops auto...

Page 41: ... 6 key 3 Press the 7STOP key If PGM is lit turn it off by pressing the PGM key on the remote 4 Press the BEST HITS key When the first track of the CD has been recorded both the CD and MD stop automatically 5 Replace the CD and press the BEST HITS key Record the first tracks of other CDs by repeating this step APE T 7 STOP BEST HITS 6 CD BEST HITS EX BASS 0 0 3 R 72 0 1 To stop recording in the mid...

Page 42: ...ain unit to eject the MD MD WRITING is displayed Remote control unit only 1 Select the MD input and load a prerecorded MD 2 Press the TITLE INPUT key 3 Press the 4 or key repeat edly until dISC or the track number to be titled 001 etc is displayed 4 Press the SET key 5 Press the CHARAC key repeat edly to select the desired charac ter group Editing the MD titles Assigningatitletoadiscortrack When t...

Page 43: ...g a title to a disc or track page 42 The number of characters that can be input is 1792 characters per disc or 80 characters per track title including LP To cancel title input in the middle Press the TITLE INPUT key any time be fore the end of step 7 Editing can also be canceled provided that it is attempted be fore MD WRITING is displayed For the procedure see Canceling editing page 53 Character ...

Page 44: ... After composing the title press the ENTER key The title is registered in the MD and scrolled on the display To assign other track titles repeat steps 3 to 5 for each 6 Press the TITLE INPUT key To cancel title input in the middle Press the TITLE INPUT key any time be fore the end of step 4 4 EX BASS 1 1 23 5ナ JKL 2カ ABC 8ヤ TUV 0ワオン QZ 6ハ MNO 3サ DEF 9ラ WXY 10記号 4タ GHI 1ア 7マ PRS 7 TRACK EDIT REPEAT...

Page 45: ...T E DISPLAY TIMEDISPLAY P CALL SET SOUND TONE TIMER RANDOM SLEEP FM AM CD ENTER SET 4 MD6 TITLE INPUT CHARAC 4 EX BASS G P J W L Continued on next page 123 One of titles stored in title memo 1 2 and 3 page 44 can be copied dISC Disc title can be copied 001 Track title can be copied 5 Press the SET key The title is copied Additional characters can be input af ter the copied title 6 Press the ENTER ...

Page 46: ...diting character list The following characters including uppercase and lowercase alphabets numerals and sym bols Available characters in title input using the character input keys on the remote Editing the MD titles continued Uppercase alphabet group Lowercase alphabet group Numeral and symbol group Title memo title copy group ABCDEFGHIJKLMNOPQRSTUVWXYZ space abcdefghijklmnopqrstuvwxyz space 01234...

Page 47: ...ess the SET key Display when a track has been moved af ter track No 6 5 Press the ENTER key 6 Press the 0EJECT key on the main unit to eject the MD MD WRITING is displayed To cancel the MOVE operation in the mid dle Press the TRACK EDIT key any time before the end of step 4 Editing can be canceled provided that it is attempted before MD WRITING is dis played For the procedure see Canceling editing...

Page 48: ... you want to move in the desired sequence and move them together The track numbers are adjusted automatically Image of moving several tracks Remote control unit only 1 Select the MD input and load a prerecorded MD If the MD is already playing press the 7STOP key to stop playback 2 PresstheTRACKEDITkeyrepeat edly until 3Q MOVE is dis played then press the SET key 3 Press the 4or key repeat edly to ...

Page 49: ... the tracks are combined the MD re corder enters pause mode at the beginning of the track created by combining Display when combining track Nos 4 and 5 Combining tracks Use the following procedure to combine two track into a single track The track numbers after the combined tracks are adjusted au tomatically Image of combining tracks Remote control unit only 1 Select the MD input and load a prerec...

Page 50: ...strictions imposed by the MD stand ard When the track is divided the MD recorder enters pause mode at the beginning of the track with the earlier track number EX BASS P R E V 0 s 8 Dividing a track Use the following procedure to divide a track into two The track numbers are adjusted automatically Image of dividing a track Remote control unit only 1 Select the MD input and load a prerecorded MD 2 P...

Page 51: ... is displayed R AS E E EX BASS Erasing a track Use the following procedure to erase the track being played The track numbers will be adjusted automatically Image of erasing a track Remote control unit only 1 Select the MD input and load a prerecorded MD 2 Press the 4 or key repeat edly to select the track to be erased The track will be played back Track No erased Display when erasing track No 3 1 ...

Page 52: ...age 53 Be careful not to turn power off or apply shock or vibrations to the system while MD WRITING is displayed Erasing several tracks at a time Use the following procedure to select up to 32 tracks you want to erase and erase them together The track numbers are adjusted automatically Image of erasing several tracks Remote control unit only 1 Select the MD input and load a prerecorded MD If the M...

Page 53: ...y 2 Press the ENTER key To cancel the CANCEL operation in the mid dle Press the TRACK EDIT key any time before the end of step 1 1 1 23 5ナ JKL 2カ ABC 8ヤ TUV 0ワオン QZ 6ハ MNO 3サ DEF 9ラ WXY 10記号 4タ GHI 1ア 7マ PRS 7 TRACK EDIT REPEAT TAPE TAPE EQ VOLUME ENTER TITLE INPUT POWER PGM CLEAR DELETE MUTE CHARAC SPACE MD STOP MD O T E AUTO MANU TUNING DOWN TUNING UP TAPE O T E DISPLAY TIMEDISPLAY P CALL SET SO...

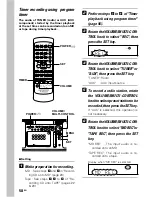
Page 54: ... system is automatically turned off in 1 hour after the start of timer playback The O T T timer works only once after it has been set 7 Setting 1 Make preparations according to the source to be played CD Load a CD MD Load an MD Tape Load a cassette tape Radio Receive the station to be played AUX component Make the required preparation for playback by connect ing an AUX component ON time display ME...

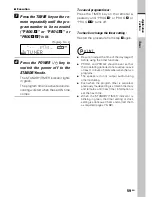
Page 55: ... press the TIMER key on the remote repeatedly until O T T is lit 2 Press the POWER key to switch the power off to the STANDBY mode To check or change the timer setting Restart the procedure from step 1 again Be sure to adjust the time of the day page 7 before using the timer functions When the STANDBY TIMER indicator is blinking in green the timer setting or clock setting is erroneous Check and co...

Page 56: ...1 EX BASS P R O G 1 S T E Program timer PROG 1 PROG 2 The program timer can store the timer oper ating hours and its contents so the timer operation can be activated or deactivated as required any time The program timer can be activated on any time Timer playback using program timer Use the following procedure to play the se lected source at the selected time period Timer ON time 7 Setting 1 Make ...

Page 57: ...til new timer information is set the next time When the STANDBY TIMER indicator is blinking in green the timer setting or clock setting is erroneous Check and correct them as required pages 7 56 to 57 1 7 Rotate the VOLUME MULTI CON TROL knobto select PLAY or AI PLAY then press the SET key PLAY The source will played at the adjusted volume before enter ing the STANDBY mode AI PLAY The listening vo...

Page 58: ...t audio is re corded onto a tape Timer recording using program timer The audio of TUNER radio or AUX AUX component started by the timer playback at the set time can be recorded onto an MD or tape during timer playback 7 Setting 1 Make preparation for recording MD See steps 1 and 3 in Record ing CD onto MD page 20 Tape See steps 1 3 to 5 of Re cording CD onto TAPE pages 22 23 APE T MENU SET VOLUME ...

Page 59: ...G 12 turns off To check or change the timer setting Restart the procedure from step 1 again Be sure to adjust the time of the day page 7 before using the timer functions PROG 1 and PROG 2 should be set so that their operating periods do not overlap Leave at least 1 minute of interval between the two programs The speakers do not output audio during timer recording Even when the program timer is can...

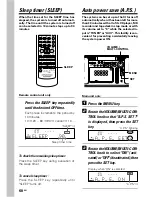
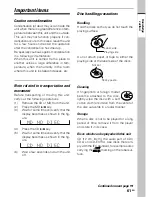
Page 60: ...system is turned off automati cally The time until the system is turned off can be selected in 10 minute steps up to 90 minutes SLEEP lit Auto power save A P S The system can be set up so that it turns off automatically when it has been left for more than 30 minutes with all of its CD player MD recorder and tape deck in stop mode or with its volume set to 0 while the selected in put is TUNER or AU...

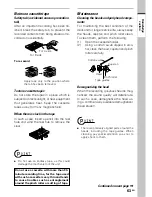
Page 61: ...or some time and verify that the display becomes as shown in the fig ure 4 Press the CD 6 key 5 Wait for some time and verify that the display becomes as shown in the fig ure 6 Wait a few seconds and turn the unit off C D NO DI C S M D NO DI C S Disc handling precautions Handling Hold the discs so that you do not touch the playing surface Do not attach paper or tape to either the playing side or t...

Page 62: ...ged if it is forced open Storage position Do not leave MDs in place where the tem perature and or humidity are extremely high for example in a place subject to direct sunlight Write protect tab Slide close Recording enabled Disc back side Slide open Recording disabled Dust countermeasure The shutter of the disc cartridge is perma nently open while the disc is loaded in the set Therefore to prevent...

Page 63: ... the heads and peripheral compo nents For maintaining the best condition of the deck and for longer service life always keep the heads capstan and pinch roller clean To clean them perform the following 1 Open the cassette holder 2 Using a cotton swab dipped in alco hol clean the head capstan and pinch roller carefully Demagnetizing the head When the recording playback head is mag netized the sound...

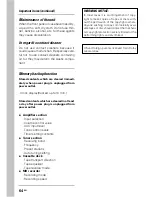
Page 64: ...contents which are cleared in at least a day after power plug is unplugged from power outlet Amplifier section Input selection Volume control value AUX input level Tone control levels Timer setting contents Tuner section Receiving band Frequency Preset stations Auto tuning setting Cassette deck Tape transport direction Tape equalizer Tape reverse mode MD recorder Recording mode Recording speed WAR...

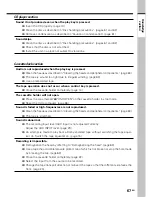
Page 65: ...interferes Turn nearby electrical appliances off Install the audio system more apart from the TV set Amplifier Speaker section The clock display blinks without changing the figures Adjust the present time again page 7 Timer operation is not possible If the present time has not been adjusted or there was a power failure adjust the present time page 7 Set the timer ON time and OFF time pages 54 to 6...

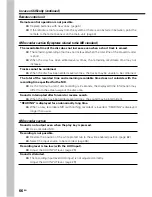
Page 66: ...e does not coincide with the recording time specified for the MD As the minimum unit of disc recording is 2 seconds the displayed time information may differ from the actual usage of the disc area Sound is interrupted after forward or reverse search When the disc has been edited several times the sound may be intermittent READING is displayed for an abnormally long time When a new recordable MD wi...

Page 67: ...der completely page 14 The cassette holder will not open Press the area marked 0PUSH OPEN on the cassette holder in stop mode Reset the microcomputer page 65 Sound is faded or high frequencies are not reproduced Clean the heads as described in Cleaning the heads and peripheral components page 63 The tape is stretched Sound is abnormal The recording input level AUX input is not adjusted correctly A...

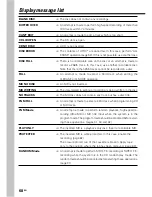
Page 68: ...inserted MD WRITING The data related to editing or recording is being written in the disc NO TRACKS The MD disc does not contain any track but has a disc title PGM FULL An attempt is made to select a 33rd track when programming CD or MD tracks PGM Mode An attempt is made to perform random playback high speed re cording CD MD or MD title input while the system is in the program mode The program mod...

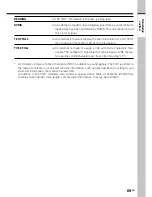
Page 69: ...made to assign a title with more characters than usable The number of characters that can be input is 1792 charac ters per disc or 80 characters per track title including LP All minidiscs contain a Table of Contents TOC in addition to sound signals The TOC is similar to the table of contents in a book and contains information such as track numbers track length and character information that cannot...

Page 70: ...nversion 1 Bit Over sampling frequency 8 fs 352 8 kHz Frequency response 20 Hz to 20 kHz Wow flutter Unmeasurable limit KENWOOD follows a policy of continuous advancements in development For this reason specifi cations may be changed without notice The full performance may not be exhibited in an extremely cold location under a water freezing temperature Specifications Cassette Deck section Track 4...

Page 71: ... the unit is lit a small amount of current is flowing into the unit s internal circuitry to back up the memory This condition is referred to as the standby mode of the unit While the unit is in the standby mode it can be turned ON from the remote control unit Relationship between the STANDBY TIMER indicator and the status of unit Indicator condition Unit status Off Power is ON Red lighting The pow...

Page 72: ... 5ナ JKL 2カ ABC 8ヤ TUV 0ワオン QZ 6ハ MNO 3サ DEF 9ラ WXY 10記号 4タ GHI 1ア 7マ PRS RANDOM SLEEP 7 6 FM AM CD 1 2 3 4 5 6 7 8 9 0 Remote control unit The keys on the remote control unit with the same names as on the main unit have the same function as the keys on the main unit 1 POWER 2 TITLE INPUT 42 3 TRACK EDIT 47 4 PGM 30 5 SPACE 42 CHARAC 42 CLEAR DELETE 30 42 6 4 P CALL Skip SET 7 ENTER 9 7 TAPE EQ 15 ...

Reviews: