background image

1

813$&.,1*$1'&+(&.,1*(48,30(17

Note:

  These unpacking instructions are for use by your 

Kenwood

dealer, an authorized 

Kenwood

 service facility, or the factory.

Carefully unpack the transceiver.  We recommend that you 
identify the items listed in the following list before discarding 

WKHSDFNLQJPDWHULDO,IDQ\LWHPVDUHPLVVLQJRUGDPDJHGÀOH

a claim with the carrier immediately.

6

833/,('

$

&&(6625,(6

Belt clip  . . . . . . . . . . . . . . . . . . . . . . . . . . . . . . . . . . . . . . . . . . . . . . . . 1

Screws for belt clip (3 x 8 mm)  . . . . . . . . . . . . . . . . . . . . . . . . . . . 2

Universal connector cap  . . . . . . . . . . . . . . . . . . . . . . . . . . . . . . . . . . . 1

Dressing screw (preassembled)  . . . . . . . . . . . . . . . . . . . . . . . . . . 1

Packing (preassembled)  . . . . . . . . . . . . . . . . . . . . . . . . . . . . . . . . 1

Instruction manual . . . . . . . . . . . . . . . . . . . . . . . . . . . . . . . . . . . . . . . . 1

Summary of Contents for Nexedge

Page 1: ... B62 XXXX 00 K 09 08 07 06 05 04 03 02 01 00 NX 410 800MHz DIGITAL TRANSCEIVER INSTRUCTION MANUAL ÉMETTEUR RÉCEPTEUR NUMÉRIQUE 800MHz MODE D EMPLOI TRANSCEPTOR DIGITAL 800MHz MANUAL DE INSTRUCCIONES ...

Page 2: ...nput High Impedance I 5 EMC External MIC Input N I 6 ME External MIC GND GND 7 PTT External PTT Input High Impedance I 8 PF Programable Function Key Input High Impedance I 9 OPT Man Down Input High Impedance I 10 E GND GND 11 5V 5V power supply output 5V O 12 TXD Serial Data Output CMOS O 13 RXD Serial Data Input CMOS I 14 NC Not used Antenna Terminal LPSHGDQFH Battery Terminal The battery termina...

Page 3: ...PHQW X 5HIHU VHUYLFH WR TXDOLÀHG WHFKQLFLDQV RQO SAFETY It is important that the operator is aware of and understands hazards common to the operation of any transceiver The AMBE 2TM voice coding Technology embodied in this product is protected by intellectual property rights including patent rights copyrights and trade secrets of Digital Voice Systems Inc This voice coding Technology is licensed s...

Page 4: ...LQVW KDUPIXO LQWHUIHUHQFH LQ D UHVLGHQWLDO LQVWDOODWLRQ 7KLV HTXLSPHQW JHQHUDWHV XVHV DQG FDQ JHQHUDWH UDGLR IUHTXHQF HQHUJ DQG LI QRW LQVWDOOHG DQG XVHG LQ DFFRUGDQFH ZLWK WKH LQVWUXFWLRQV PD FDXVH KDUPIXO LQWHUIHUHQFH WR UDGLR FRPPXQLFDWLRQV RZHYHU WKHUH LV QR JXDUDQWHH WKDW WKH LQWHUIHUHQFH ZLOO QRW RFFXU LQ D SDUWLFXODU LQVWDOODWLRQ I WKLV HTXLSPHQW GRHV FDXVH KDUPIXO LQWHUIHUHQFH WR UDGLR RU ...

Page 5: ... WKHLU RSHUDWLQJ OLIH KDV H SLUHG 7KH 5 5 SURJUDP LV DQ DOWHUQDWLYH WR GLVSRVLQJ 1L G EDWWHULHV ZLWK RXU UHJXODU UHIXVH RU LQ PXQLFLSDO ZDVWH VWUHDPV ZKLFK LV LOOHJDO LQ VRPH DUHDV RU LQIRUPDWLRQ RQ 1L G EDWWHU UHF FOLQJ LQ RXU DUHD FDOO WROO IUHH 77 5 KenwoodҋV LQYROYHPHQW LQ WKLV SURJUDP LV SDUW RI RXU FRPPLWPHQW WR SUHVHUYH RXU HQYLURQPHQW DQG FRQVHUYH RXU QDWXUDO UHVRXUFHV 7KH 5 5 5HF FOH VHDO...

Page 6: ...LRQ WR WKH YROXPH OHYHO ZKHQ WXUQLQJ WKH VTXHOFK RII R QRW SODFH WKH PLFURSKRQH FDEOH DURXQG RXU QHFN ZKLOH QHDU PDFKLQHU WKDW PD FDWFK WKH FDEOH R QRW SODFH WKH WUDQVFHLYHU RQ XQVWDEOH VXUIDFHV QVXUH WKDW WKH HQG RI WKH DQWHQQD GRHV QRW WRXFK RXU H HV KHQ WKH WUDQVFHLYHU LV XVHG IRU WUDQVPLVVLRQ IRU PDQ KRXUV WKH UDGLDWRU DQG FKDVVLV ZLOO EHFRPH KRW R QRW WRXFK WKHVH ORFDWLRQV ZKHQ UHSODFLQJ WKH ...

Page 7: ...ch use Intrinsically Safe such as approved by Factory Mutual CSA Q H SORVLYH DWPRVSKHUHV LQÁDPPDEOH JDV GXVW SDUWLFOHV PHWDOOLF SRZGHUV JUDLQ SRZGHUV HWF KLOH WDNLQJ RQ IXHO RU ZKLOH SDUNHG DW JDVROLQH VHUYLFH VWDWLRQV 7KH RUDQJH VHDO RQ WKH UHYHUVH VLGH RI WKH WUDQVFHLYHU LV LPSRUWDQW ZLWK UHVSHFW WR WKH ZDWHUSURRI HIÀFLHQF RI WKH WUDQVFHLYHU R QRW SODFH VWLFNHUV RU RWKHU PDWHULDOV RQ RU DURXQG W...

Page 8: ...QJ 7UDQVPLWWLQJ DW VXFK D WLPH PD UHVXOW LQ D KLJK IUHTXHQF EXUQ I DQ DEQRUPDO RGRU RU VPRNH LV GHWHFWHG FRPLQJ IURP WKH WUDQVFHLYHU VZLWFK WKH WUDQVFHLYHU SRZHU RII LPPHGLDWHO UHPRYH WKH EDWWHU SDFN IURP WKH WUDQVFHLYHU DQG FRQWDFW RXU Kenwood GHDOHU 8VH RI WKH WUDQVFHLYHU ZKLOH RX DUH GULYLQJ PD EH DJDLQVW WUDIÀF ODZV 3OHDVH FKHFN DQG REVHUYH WKH YHKLFOH UHJXODWLRQV in your area R QRW H SRVH WKH...

Page 9: ... FXUUHQW ZLOO ÁRZ DQG WKH EDWWHU PD JHQHUDWH KHDW RU VPRNH UXSWXUH RU EXUVW LQWR ÁDPH W ZLOO DOVR FDXVH PHWDO objects to heat up Do not incinerate or apply heat to the battery I WKH LQVXODWRU LV PHOWHG WKH JDV UHOHDVH YHQW RU VDIHW IXQFWLRQ LV GDPDJHG RU WKH HOHFWURO WH LV LJQLWHG WKH EDWWHU PD JHQHUDWH KHDW RU VPRNH UXSWXUH RU EXUVW LQWR ÁDPH Do not use or leave the battery near fires stoves or o...

Page 10: ... RU GHIRUP WKH EDWWHU FDXVLQJ D VKRUW FLUFXLW 7KH EDWWHU PD JHQHUDWH KHDW RU VPRNH UXSWXUH RU EXUVW LQWR ÁDPH Do not jar or throw the battery Q LPSDFW PD FDXVH WKH EDWWHU WR OHDN JHQHUDWH KHDW RU VPRNH UXSWXUH DQG RU EXUVW LQWR ÁDPH I WKH EDWWHU ҋV SURWHFWLRQ FLUFXLW LV GDPDJHG WKH EDWWHU PD FKDUJH DW DQ DEQRUPDO FXUUHQW RU YROWDJH DQG DQ DEQRUPDO FKHPLFDO reaction may occur Do not use the battery...

Page 11: ...RGRU DSSHDUV WR KDYH GLIIHUHQW FRORULQJ LV GHIRUPHG RU VHHPV DEQRUPDO IRU DQ RWKHU UHDVRQ UHPRYH LW IURP WKH FKDUJHU RU RSHUDWLQJ HTXLSPHQW DQG GR QRW XVH LW 7KH EDWWHU PD JHQHUDWH KHDW RU VPRNH UXSWXUH RU EXUVW LQWR ÁDPH Do not reverse charge or reverse connect the battery 7KH EDWWHU SDFN KDV SRVLWLYH DQG QHJDWLYH SROHV I WKH EDWWHU SDFN GRHV QRW VPRRWKO FRQQHFW ZLWK D FKDUJHU RU RSHUDWLQJ HTXLSP...

Page 12: ...HEADSET 3 77 1 48 17 4 DISPLAY 6 352 5 00 81 7 216 6 23 5 7 216 9 SWITCHING POWER ON OFF 9 ADJUSTING THE VOLUME 9 SELECTING A ZONE AND CHANNEL GROUP ID 10 TRANSMITTING 10 RECEIVING 11 0 18 02 MENU ACCESS 12 MENU CONFIGURATION 12 CHARACTER ENTRY 14 6 1 TEMPORARY CHANNEL LOCKOUT 15 PRIORITY SCAN 15 SCAN REVERT 16 SCAN DELETE ADD 16 PRIORITY CHANNEL SELECT 16 OHHW6ync 3 180 5 3 1 81 7 21 SELCALL SELE...

Page 13: ...NALING 23 VOICE OPERATED TRANSMISSION VOX 24 5281 23 5 7 216 CLOCK 26 VIBRATOR 26 TIME OUT TIMER TOT 26 BATTERY SAVER 27 KEY LOCK 27 LOW BATTERY WARNING 27 SIGNAL STRENGTH INDICATOR 27 COMPANDER 28 BUSY CHANNEL LOCKOUT BCL 28 CONTROL CHANNEL HUNT 28 PTT ID 28 9 6 237 21 92 8 6725 81 7 VOICE RECORDER 29 VOICE GUIDE 30 ...

Page 14: ...ack the transceiver We recommend that you identify the items listed in the following list before discarding WKH SDFNLQJ PDWHULDO I DQ LWHPV DUH PLVVLQJ RU GDPDJHG ÀOH a claim with the carrier immediately 6833 6625 6 Belt clip 1 Screws for belt clip 3 x 8 mm 2 Universal connector cap 1 Dressing screw preassembled 1 Packing preassembled 1 Instruction manual 1 ...

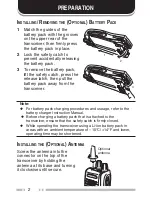
Page 15: ...the transceiver Note X For battery pack charging procedures and useage refer to the battery charger Instruction Manual X Before charging a battery pack that is attached to the WUDQVFHLYHU HQVXUH WKDW WKH VDIHW FDWFK LV ÀUPO FORVHG X While operating the transceiver using a Li ion battery pack in areas with an ambient temperature of 10 C 14 F and lower operating time may be shortened 167 1 7 237 21 ...

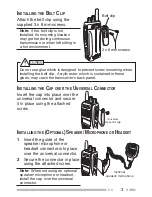
Page 16: ... continuous transmission or when left sitting in a hot environment Insert the cap into place over the universal connector and secure it in place using the attached screw 167 1 7 237 21 63 5 0 523 21 25 6 7 1 Insert the guide of the speaker microphone or headset connector into place over the universal connector 2 Secure the connector in place using the attached screw Note When not using an optional...

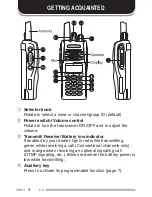
Page 17: ... the volume Transmit Receive Battery low indicator If enabled by your dealer lights red while transmitting green while receiving a call Conventional channels only and orange when receiving an optional signaling call DTMF signaling etc Blinks red when the battery power is low while transmitting Auxiliary key Press to activate its programmable function page 7 ...

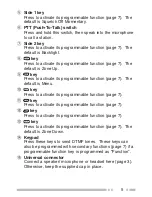
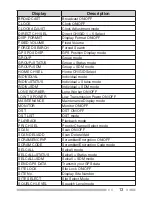
Page 18: ...tivate its programmable function page 7 The default is Menu key Press to activate its programmable function page 7 key Press to activate its programmable function page 7 key Press to activate its programmable function page 7 key Press to activate its programmable function page 7 The default is Zone Down Keypad Press these keys to send DTMF tones These keys can also be programmed with secondary fun...

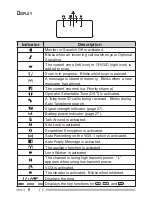
Page 19: ...T is activated A Telephone ID call is being received Blinks during Auto Telephone search Signal strength indicator page 27 Battery power indicator page 27 Talk Around is activated Site Lock is activated Scrambler Encryption is activated Auto Recording on the VGS 1 option is activated Auto Reply Message is activated The auxiliary function is activated Lone Worker is activated The channel is using h...

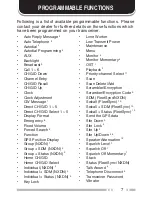
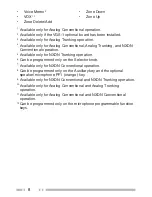
Page 20: ...Position Display Group NXDN 7 Group SDM NXDN 9 Group Status NXDN 9 Home CH GID Home CH GID Select Individual NXDN 9 Individual SDM NXDN 9 Individual Status NXDN 9 Key Lock Lone Worker Low Transmit Power Maintenance Menu Monitor 4 Monitor Momentary 4 OST 1 Playback 2 Priority channel Select 11 Scan Scan Delete Add Scrambler Encryption Scramber Encryption Code 9 SDM FleetSync NXDN Selcall FleetSync ...

Page 21: ...lable only for NXDN Trunking operation 6 Can be programmed only on the Selector knob 7 Available only for NXDN Conventional operation 8 Can be programmed only on the Auxiliary key and the optional speaker microphone PF1 orange key 9 Available only for NXDN Conventional and NXDN Trunking operation 10 Available only for Analog Conventional and Analog Trunking operation 11 Available only for Analog C...

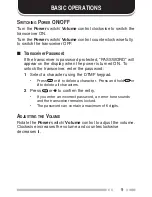
Page 22: ... when the power is turned ON To unlock the transceiver enter the password 1 Select a character using the DTMF keypad Press or to delete a character Press and hold or to delete all characters 2 Press or WR FRQÀUP WKH HQWU If you enter an incorrect password an error tone sounds and the transceiver remains locked The password can contain a maximum of 6 digits 867 1 7 92 80 Rotate the Power switch Vol...

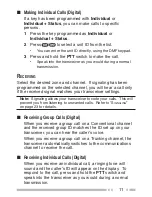
Page 23: ...esired zone and channel group ID 2 Press the key programmed as Monitor or Squelch Off to check whether or not the channel is free If the channel is busy wait until it becomes free 3 Press the PTT switch and speak into the microphone Release the PTT switch to receive For best sound quality hold the transceiver approximately 1 5 inches 3 4 cm from your mouth Q 0DNLQJ URXS DOOV LJLWDO If a key has be...

Page 24: ...our transceiver settings Note Signaling allows your transceiver to code your calls This will prevent you from listening to unwanted calls Refer to SIGNALING on page 23 for details Q 5HFHLYLQJ URXS DOOV LJLWDO When you receive a group call on a Conventional channel and the received group ID matches the ID set up on your transceiver you can hear the caller s voice When you receive a group call on a ...

Page 25: ...ress or to set up the selected function item Press or to return to the category list 6 Press to select your desired setting For settings with more than 1 level repeat steps 5 and 6 7 Press or to set the selected setting and exit Menu mode Press or at any time to return to the previous display Press at any time to exit Menu mode 0 18 21 85 7 21 Some transceiver keys may already be programmed with f...

Page 26: ... mode INDIV SDM Individual SDM mode LONE WORKER Lone Worker ON OFF LOW TX POWER Low Transmission Power ON OFF MAINTENANCE Maintenance Display mode MONITOR Monitor ON OFF OST OST ON OFF OST LIST OST mode PLAYBACK Playback mode PRI CH SEL Priority Channel Select mode SCAN Scan ON OFF SCAN DEL ADD Scan Delete Add SCRAM ENCRYP Scrambler Encryption ON OFF SCRAM CODE Scrambler Encryption Code mode SELCA...

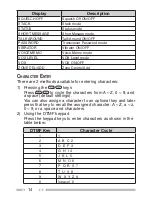
Page 27: ...5 175 There are 2 methods available for entering characters 1 Pressing the keys Press to cycle the characters from A Z 0 9 and a space default settings You can also assign a character to an optional key and later press that key to recall the assigned character A Z a z 0 9 or a space and characters 2 Using the DTMF keypad Press the keypad keys to enter characters as shown in the table below DTMF Ke...

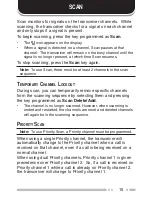
Page 28: ...UHPRYH VSHFLÀF FKDQQHOV from the scanning sequence by selecting them and pressing the key programmed as Scan Delete Add The channel is no longer scanned However when scanning is ended and restarted the channels are reset and deleted channels will again be in the scanning sequence 35 25 7 6 1 Note To use Priority Scan a Priority channel must be programmed When using a single Priority channel the tr...

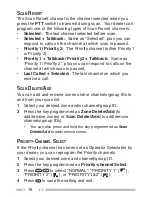
Page 29: ... paused Last Called Selected The last channel on which you receive a call 6 1 7 You can add and remove zones and or channels group IDs to and from your scan list 1 Select your desired zone and or channel group ID 2 Press the key programmed as Zone Delete Add to add remove zones or Scan Delete Add to add remove channels group IDs You can also press and hold the key programmed as Scan Delete Add to ...

Page 30: ...TT switch and begin your conversation Q 5HFHLYLQJ An alert tone will sound and the transceiver will enter Selcall mode The calling station s ID will appear when a Selcall is received You can respond to the call by pressing the PTT switch and speaking into the microphone Q GHQWLILFDWLRQ RGHV An ID code is a combination of a 3 digit Fleet number and a 4 digit ID number Each transceiver has its own I...

Page 31: ...enter Status mode proceed to step 5 or Selcall Status to enter Selcall mode proceed to step 3 3 Press to select the station you want to call If Manual Dialing is enabled you can enter a station ID by using the DTMF keypad or by using When using cycle through the digits to select a digit then press to set the digit and move the cursor to the right Repeat this process until the entire ID is entered ...

Page 32: ...e Status Short Message CH GID Time Stamp 3 Press to return to normal operation To delete the selected message press or 7R FRQÀUP the deletion press or To delete all messages press and hold or for VHFRQG 7R FRQÀUP WKH GHOHWLRQ SUHVV or 6 257 21 0 66 6 Received short messages are displayed the same as Status messages and are stored in the same stack memory To send and receive long messages you must ...

Page 33: ...essing the DTMF keys Store Send 1 Press the key programmed as Autodial 2 Enter up to 30 digits using the DTMF keypad Alternatively you can enter digits by using 3 Press the PTT switch to make the call Q XWRGLDO Autodial allows you to quickly call DTMF numbers that have been programmed onto your transceiver 1 Press the key programmed as Autodial or access the Menu page 12 7KH ÀUVW HQWU LQ WKH XWRGL...

Page 34: ...red zone and telephone group ID 2 Press the PTT switch to start the call 3 Enter your desired number using the DTMF keys Selecting a Number from the List 1 Select your desired zone and telephone group ID 2 Press the key programmed as Autodial The last called unit appears on the display 3 Press to select your desired list number 4 Press the PTT switch to make the call Q 5HFHLYLQJ D 7HOHSKRQH DOO Wh...

Page 35: ...If the Emergency mode completes a preset number of cycles Emergency mode will automatically end and the transceiver will return to the zone and channel that was in use before Emergency mode was entered Note X Your dealer can set the transceiver to emit a tone when transmitting in Emergency mode X Your dealer can set the transceiver to emit tones and received signals as normal or mute the speaker d...

Page 36: ...ey programmed as OST for 1 second 3 Press to select your desired tone or code Your dealer can set up to 40 tones codes 4 Press to save your new setting 5 KHQ RX KDYH ÀQLVKHG RSHUDWLQJ XVLQJ 267 SUHVV WKH OST key again to turn the OST function OFF Q 5DGLR FFHVV 1XPEHU 5 1 RAN is a new signaling system designed for digital radio communications When a channel is set up with a RAN squelch will only op...

Page 37: ...be activated or deactivated by your dealer VOX operation allows you to transmit hands free Note To operate VOX you must use an optional KHS 11 KHS 14 KHS 15 BH or KHS 15 OH headset Q 92 DLQ HYHO 1 Connect the headset to the transceiver 2 Press the key programmed as VOX The current VOX Gain level appears on the display 3 Press to increase or decrease the VOX Gain level The VOX Gain can be adjusted ...

Page 38: ...tive it will transmit when there is noise in the background If it is not sensitive enough it will not pick up your voice when you begin speaking 4 KHQ RX ÀQLVK VSHDNLQJ WUDQVPLVVLRQ HQGV 5 To turn the VOX function OFF press and hold the VOX key again for 2 seconds Note If a speaker microphone is connected to the transceiver while VOX is ON and the VOX Gain Level is set to a sensitive level louder ...

Page 39: ...ss to set the year and cycle to the month setting 4 Repeat steps 2 and 3 to set the month day hour and minute 5 Press to exit Clock Adjustment mode You can press at any time to exit Clock Adjustment mode 9 5 725 When an optional vibrator is installed the vibrator function will alert you when an optional signaling call is received Press the key programmed as Vibrator or access the Menu page 12 to t...

Page 40: ...ff Momentary Function Key Lock PTT 2 77 5 51 1 Low Battery Warning alerts you when the battery needs to be recharged Your dealer can set an alert tone to sound and the LED indicator to blink red when the battery power is low The battery power icon displays the battery power remaining as illustrated below High 6XIÀFLHQW Low Very low When the battery power is very low recharge or replace the battery...

Page 41: ...as been programmed you can transmit over the current signal 1 Press and hold the PTT switch If the channel is already in use a warning tone will sound 2 Quickly release and then press the PTT switch again 3 Speak into the transceiver as you would during a normal call 21752 11 817 On digital Trunking channels the transceiver automatically searches for a control channel KLOH VHDUFKLQJ IRU D FRQWURO ...

Page 42: ...rding memory will appear on the display and begin counting down 2 Speak into the microphone to record your memo 3 Press to end the recording and store it in memory If the memory becomes full recording will stop and the voice memo will be stored in memory Q XWR 5HSO 0HVVDJH You can set the transceiver to automatically respond to Individual Calls while using FleetSync NXDN 1 Press the key programmed...

Page 43: ...TORE will appear on the display otherwise a recording channel with the time of the recording will appear 2 Press to select the channel you want to play AR represents auto recorded conversations RM represents auto reply messages and VM represents voice memos 3 The transceiver will announce the time and channel then the recording will play back When the entire recording has been played END OF MESSAG...

Page 44: ......
Page 45: ...nce of their employment may not be fully aware of the potential for exposure or cannot exercise control over their exposure The following list provides you with the information required to ensure that you are aware of RF exposure and of how to operate this transceiver so that the FCC RF exposure limitations are not exceeded While transmitting holding the PTT switch or speaking with VOX enabled alw...

Reviews: