NXR-800H
120
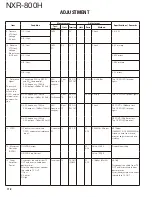
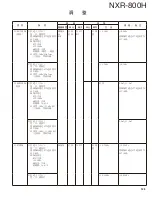
ADJUSTMENT
Item
Condition
Measurement
Adjustment
Specifi cations / Remarks
Test-
equipment
Unit
Terminal
Unit
Parts
Method
15. High
Transmit
Power
(Pre ADJ)
1) Center
Power meter
PC
Rear
TX ANT
PC
ADJ
Value: 1024
Fixed value writing
Final
VR2
25.0W
±0.5W
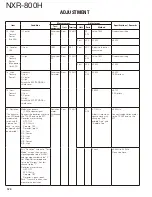
16. Coupler
ADJ
1) Low
DVM
Final
REF
Final
VR1
Adjust to the mini-
mum value.
17. High
Transmit
Power
(Max power
limit ADJ)
1) High
Power meter
PC
Rear
TX ANT
PC
ADJ
Value: 1024
Fixed value writing
Final
VR2
30.0W
±1.0W
18. High
Transmit
Power
Frequency
1) Low
2) Center
3) High
Attach the EXCITER/FINAL
shield cover.
Power meter
Ammeter
Rear
TX ANT
PC
ADJ
25.0W
±0.5W
10.0A or less
19. Low
Transmit
Power
Frequency
1) Low
2) Center
3) High
Attach the EXCITER/FINAL
shield cover.
5.00W
±0.1W
5.5A or less
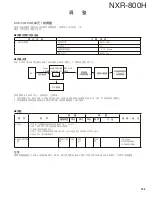
20. Deviation
(The transmis-
sion VCO band
is separated
into A and B.
3-points for
each, i.e., total
of 6-points shall
be adjusted.)
Modulation pattern
: 100Hz square signal
Connect the deviation meter to
the TX ANT end via the ATT.
Deviation meter setting
HPF: OFF
LPF: 15kHz
De-emp: OFF
Detector: (p-p)/2
1) A: Low
2) A: Center
3) A: High
4) B: Low
5) B: Center
6) B: High
Deviation
meter
Oscilloscope
PC
Rear
TX ANT
PC
ADJ
±1.10kHz
Adjust it into clean
square wave with
changing “Sub-
audible Gain” and
“Audible Gain”.
±0.05kHz
Connect the deviation meter
to the TX ANT end via the
ATT.
Exit “Deviation” screen to “Test
Mode” screen, then set test
signaling mode to be “NXDN”
and signaling number to be “3”.
Set Wide/Narrow drop down
list to be “Narrow”. Set test
channel to be “1”.
Deviation meter setting
HPF: OFF
LPF: 15kHz
De-emp: OFF
Detector: +peak, –peak
Push “Transmit” button, then
measure the deviation.
Check
±3.06kHz±0.20kHz
Clean sine wave.
Summary of Contents for NXR-800H
Page 180: ...1 E CN300 RX_IF_VN 168 ...


