Output current l
0
= ' ™
x
x
R
3
[A]
l
0
[A]: O u t p u t c u r r e n t
I,™* [A]: M a x i m u m r a t e d c u r r e n t
R
3
[ k f i ] : E x t e r n a l r e s i s t a n c e
Note:
R V
3
must be 10 k ohms or less (R
3
^ 10 kQ). Use a two-core
shield cable and connect the shield line to
(Q) .
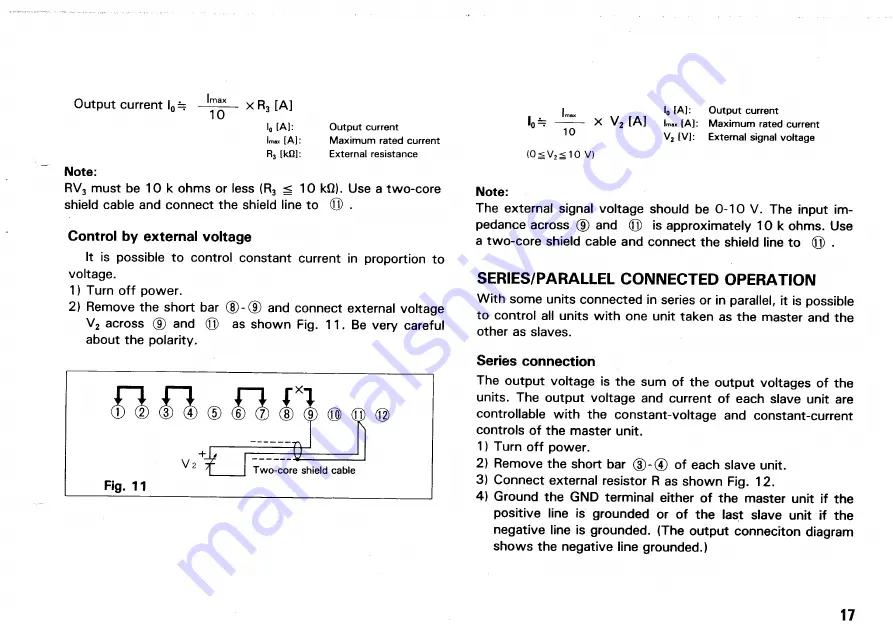
Control by external voltage
It is possible to control constant current in proportion to
voltage.
1) Turn off power.
2) Remove the short bar ®-(D and connect external voltage
V
2
across (9) and © as shown Fig. 1 1 . Be very careful
about the polarity.
Fig. 11
|
m
w
l„ [A]: O u t p u t c u r r e n t
l
0
=r
—
X
V
2
[A]
Imax [A]:
M a x i m u m r a t e d c u r r e n t
1
0
V
2
[ V ] : E x t e r n a l s i g n a l v o l t a g e
( 0 g V
2
< 1 0 V)
Note:
The external signal voltage should be 0-10 V. The input im-
pedance across (9) and @ is approximately 10 k ohms. Use
a two-core shield cable and connect the shield line to
(Q) .
SERIES/PARALLEL CONNECTED OPERATION
With some units connected in series or in parallel, it is possible
to control all units with one unit taken as the master and the
other as slaves.
Series connection
The output voltage is the sum of the output voltages of the
units. The output voltage and current of each slave unit are
controllable with the constant-voltage and constant-current
controls of the master unit.
1) Turn off power.
2) Remove the short bar © - © of each slave unit.
3) Connect external resistor R as shown Fig. 12.
4) Ground the GND terminal either of the master unit if the
positive line is grounded or of the last slave unit if the
negative line is grounded. (The output conneciton diagram
shows the negative line grounded.)
17
T w o - c o r e s h i e l d c a b l e
V
2
Summary of Contents for PD110-3
Page 8: ...CONTROLS AND INDICATORS FRONT PANEL Fig 3 ...
Page 10: ...10 Fig 4 REAR PANEL ...
Page 26: ...DIMENSIONS Fig 2 0 26 ...


