background image

16

Preparations

XD-DV series (EN/K,M,T,X,Y)/2

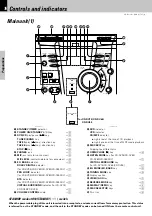
Controls and indicators

1

STANDBY/TIMER

 indicator

2

POWER ON/STANDBY (

)

 key

(

3

DVD/CD 

play/pause

 (

6

6

6

6

6

)

 key

¢

TUNER /BAND

  key

·

TAPE A

 play

 (

`

`

`

`

`

)

 key / direction key

e

TAPE B

 play

 (

`

`

`

`

`

)

 key / direction key

e

STOP (

7

7

7

7

7

)

 key

¢

4

PHONES

 jack

¡

5

MIC

 jack (only for some areas)

o

MIC LEVEL.

 control knob (only for some areas)

o

6

EX. BASS

 indicator

DOLBY DIGITAL

 indicator

(for XD-DV95/XD-DV85/XD-DV80/XD-A950DV)

U

PRO LOGIC

 indicator

(for XD-DV95/XD-DV85/XD-DV80/XD-A950DV)

U

DTS

 indicator

(for XD-DV95/XD-DV85/XD-DV80/XD-A950DV)

U

VIRTUAL SURROUND

 indicator (for XD-DV75/

XD-DV65/XD-DV55)

U

7

VOLUME CONTROL

 knob

¡

8

DVD

 indicator

VCD

 indicator

CD/MP3

 indicator

÷

Lights red at the time of CD playback.

÷

Lights green at the time of MP3 media playback.

9

DISC SKIP

 key

Skipping to a different disc

0

OPEN/CLOSE (

0

0

0

0

0

)

 key

¢

!

LISTEN MODE

 key (for XD-DV95/XD-DV85/

XD-DV80/XD-A950DV)

U

VIRTUAL SORROUND

 key

(for XD-DV75/XD-DV65/XD-DV55)

U

@

EQ MODE/EX. BASS

 key

#

TUNING MODE

 key

·

$

Display section

%

VIDEO/AUX

 key

¡

^

REVERSE MODE

 key

e

&

DISPLAY/DEMO

 key

4

*

DISC SELECTOR

 keys

¢

(

Disc tray

¢

Main unit (1)

STANDBY mode of ON/STANDBY (  

  ) switch

When the power cable plug of this unit is inserted into a receptacle, a minute current flows for memory protection. This status
is referred to as the STANDBY mode, and the unit in the STANDBY mode can be turned ON from the remote control unit.

EX.BASS

VOLUME

CONTROL

DISC SELECTOR

DISC SKIP

0

OPEN/CLOSE

STANDBY

/TIMER

DISPLAY/DEMO

REVERSE MODE

VIDEO/AUX

POWER

DVD/CD

TAPE A

PHONES

MIC

MIC LEVEL

TAPE B

STOP

DOLBY DIGITAL

DTS

PRO LOGIC

TUNER

BAND

ON/STANDBY

LISTEN MODE

DVD

VCD

CD/MP3

SELECT

EN

TER

TUNING MODE

EQ MODE
/EX.BASS

SMART

MENU

M

U

LT

I C

O

N

T

R

O

L

/P

.C

A

L

L

REC/ARM

4

¢

DISC 1

DISC 2

DISC 3

23

23

7

1

2

3

4

5

6

7

8

9

0

!

@

#

$

%

^

*

(

&

EX.BASS

VIRTUAL SURROUND

for XD-DV75/XD-DV65/

XD-DV55

Summary of Contents for XD-A850DV

Page 1: ...RATION B60 5154 18 01 K Y T M X OC 01 03 DIGITAL VIDEO COMPACT DIGITAL AUDIO COMPACT This instruction manual is used to describe multiple models listed above Model availability and features functions may differ depending on the country and sales area FOR XD DV95 XD DV85 XD DV80 XD A950DV FOR XD DV75 XD DV65 XD DV55 ...

Page 2: ...n the mains lead are coloured in accordance with the following code Blue Neutral Brown Live Do not connect those leads to the earth terminal of a three pin plug For the United Kingdom WARNING TO PREVENT FIRE OR ELECTRIC SHOCK DO NOT EXPOSE THIS APPLIANCE TO RAIN OR MOISTURE The marking is located on the rear panel and says that the component uses laser beams that have been clas sified as Class 1 I...

Page 3: ...er stabilizer 12 XD DV75 LS N90V XD DV65 LS N70V XD DV55 LS N50V XD A950DV LS N70V CRS N90V Center speaker 1 surround speakers 2 speaker cords 3 speaker stabilizer 12 The space between radio channels has been set to the one that prevails in the area to which the system is shipped However if the current channel space setting does not match the setting in the area where the system is to be used for ...

Page 4: ...ith CD DVD DVD DVD CD VCD DVD DVD DVD DVD CD Higher video quality than S VHS video and LaserDisc Higher audio quality than music CD Graphical user interface GUI compatibility 6 Channel independent outputs using built in Dolby Digital AC 3 decoder only for XD DV95 XD DV85 XD DV80 XD A950 DTS decoder only for XD DV95 XD DV85 XD DV80 XD A950 DTS digital output compatibility Versatile DVD playback fea...

Page 5: ...ll warnings on the appliance and in the instruction manual Follow all the safety and operating instructions These safety and operating instructions should be retained for future reference 1 Power sources The appliance should be connected to a power supply only of the type described in the instruction manual or as marked on the appliance If you are not sure of the type of power supply to your home ...

Page 6: ...discharge unit size of grounding conductors location of antenna discharge unit connection to grounding electrodes and requirements for the grounding electrode See Figure 18 Power lines An outside antenna system should not be located in the vicinity of overhead power lines or other electric light or power circuits or where it can fall into such power lines or circuits When installing an outside ant...

Page 7: ...25 Repeat play 26 A B repeat play 26 Random play 27 Program play Using the On screen display DVD CD VCD 28 MP3 function 30 Guidance of MP3 30 MP3 On Screen display 31 Playing back MP3 31 Selecting MP3 files or folders 32 MP3 program playback 33 Using the On screen banner display 34 Selecting a Title 35 Selecting a Chapter or Track 35 Changing the Audio Language 36 Changing the Subtitle Language 36...

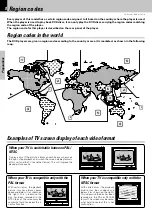
Page 8: ...ack picture may have black spaces above and below it as shown on the right This is because the disc has been recorded in the NTSC format The screen may be somewhat hard to see but this is not malfunction When your TV is switchable between PAL NTSC Try play a disc If the picture is black and white or as shown on the right stop playback and switch the screen display formats of this unit and the TV t...

Page 9: ...and PAL Districts 1 2 2 and 4 2 Set the TV to NTSC Districts 2 1 4 1 and 5 Set the TV to PAL Districts 2 3 3 and 6 Set the TV according to each disc to be played Video formats of DVD discs that can be played on this unit TV Format NTSC PAL Your TV format NTSC only PAL only NTSC PAL switchable Playable Disc Formats District 1 NTSC NTSC NTSC District 2 1 NTSC PAL NTSC PAL NTSC PAL District 2 2 NTSC ...

Page 10: ... languages recorded with the audio function The number in the icon indicates the number of voice languages Max 8 languages Number of subtitle languages recorded with the subtitle function The number in the icon indicates the number of subtitle languages Max 32 languages Number of angles provided by the angle function The number in the icon indicates the number of angles Max 9 angles Aspect ratios ...

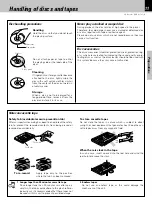
Page 11: ...e to avoid danger never use a cracked or deformed disc or a disc repaired with tape or adhesive agent Please do not use discs which are not round because they may cause a malfunction 2 Endless tapes Do not use an endless tape as this could damage the mechanism of the unit To re record Safety tab accidental erasure prevention tab After an important recording has been finished break the safety tab t...

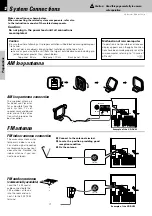
Page 12: ...NNA L R L L R R VIDEO AUX IN OUT FRONT SPEAKERS 6Ω SPEAKERS S VIDEO FM 75Ω AM GND ANTENNA SUB WOOFER PRE OUT SURROUND 8Ω COMPONENT VIDEO OUTPUT VIDEO OUTPUT DIGITAL OUT OPTICAL CENTER 6Ω AC 110 120V AC 220 240V Cr Cb Y L R L L R R VIDEO AUX IN OUT FRONT SPEAKERS 6Ω SPEAKERS S VIDEO FM 75Ω AM GND ANTENNA SUB WOOFER PRE OUT SURROUND 8Ω COMPONENT VIDEO OUTPUT VIDEO OUTPUT DIGITAL OUT OPTICAL CENTER 6...

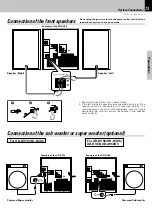
Page 13: ...er cords are connected with reversed polarity the sound becomes unnatural with ambiguous acoustic image positioning Be sure to connect the speakers and speaker cords correctly Example of the XD DV95 1 2 3 L R L L R R VIDEO AUX IN OUT FRONT SPEAKERS 6Ω SPEAKERS S VIDEO FM 75Ω AM GND ANTENNA SUB WOOFER PRE OUT SURROUND 8Ω COMPONENT VIDEO OUTPUT VIDEO OUTPUT DIGITAL OUT OPTICAL CENTER 6Ω AC 110 120V ...

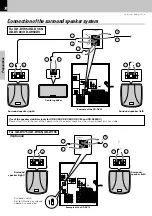
Page 14: ...AKERS 6Ω ON OFF SURROUND SPEAKERS 8 16Ω SURROUND S VIDEO Cr Cb Y FM 75Ω AM GND ANTENNA SUPER WOOFER PRE OUT COMPONENT VIDEO OUTPUT VIDEO OUTPUT DIGITAL OUT OPTICAL AC 110 120V AC 220 240V L R SURROUND SPEAKERS 8 16Ω ON OFF Surround speaker right Surround speaker left Example of the XD DV75 Example of the XD DV95 For XD DV75 XD DV65 XD DV55 Optional Use of the speaker stabilizer only for XD DV95 XD...

Page 15: ...bit signals and the video may be disturbed when the video of such discs is recorded onto a VCR and played back L R L L R R VIDEO AUX IN OUT FRONT SPEAKERS 6Ω SPEAKERS S VIDEO FM 75Ω AM GND ANTENNA SUB WOOFER PRE OUT SURROUND 6Ω COMPONENT VIDEO OUTPUT VIDEO OUTPUT DIGITAL OUT OPTICAL CENTER 6Ω AC 110 120V AC 220 240V Cr Cb Y L R VIDEO AUX IN OUT S VIDEO COMPONENT VIDEO OUTPUT VIDEO OUTPUT DIGITAL O...

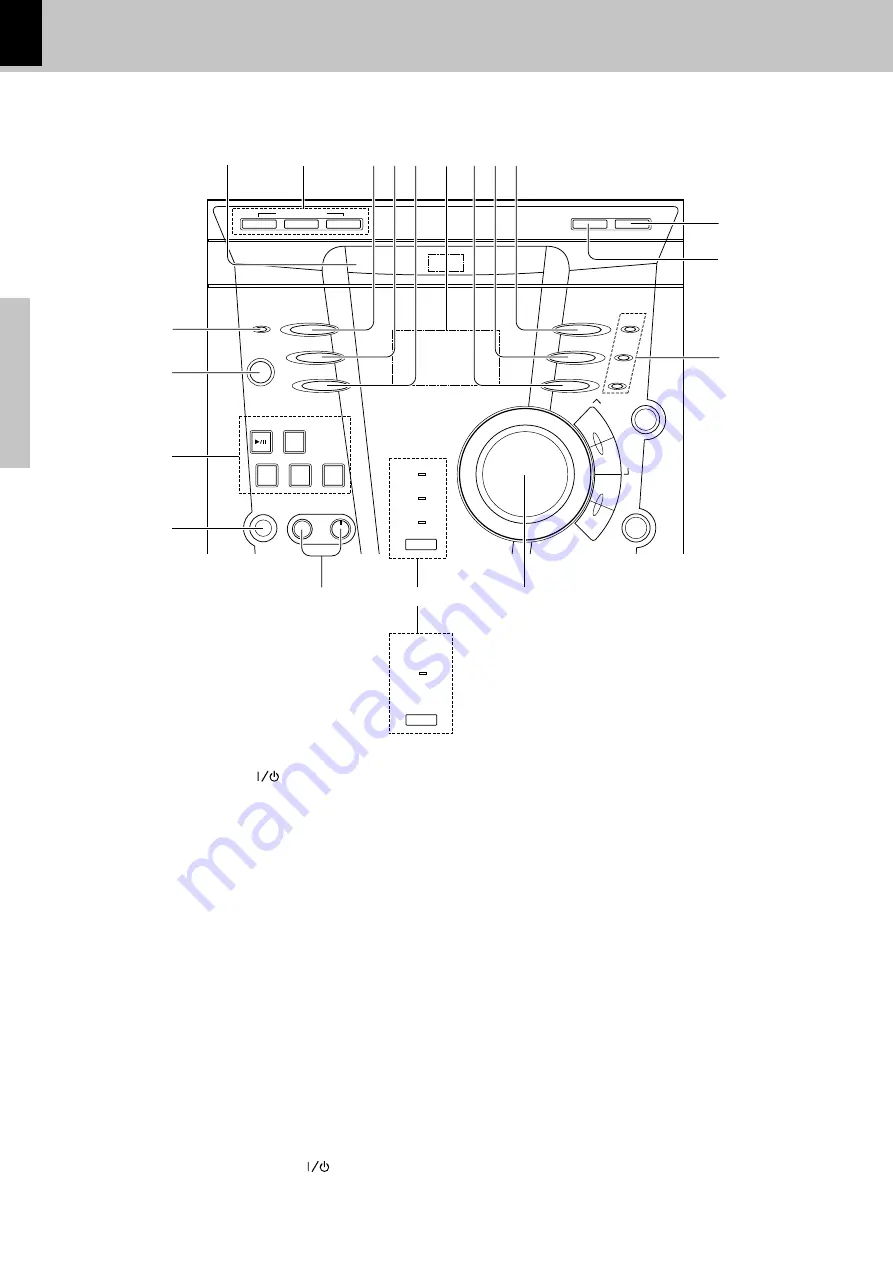
Page 16: ...isc 0 OPEN CLOSE 0 0 0 0 0 key LISTEN MODE key for XD DV95 XD DV85 XD DV80 XD A950DV U VIRTUAL SORROUND key for XD DV75 XD DV65 XD DV55 U EQ MODE EX BASS key TUNING MODE key Display section VIDEO AUX key REVERSE MODE key e DISPLAY DEMO key 4 DISC SELECTOR keys Disc tray Main unit 1 STANDBY mode of ON STANDBY switch When the power cable plug of this unit is inserted into a receptacle a minute curre...

Page 17: ... CD DVD or VCD related indicators This section contains the CD DVD or VCD play and pause mode indicators 2 Character information display Displays the input selection frequency volume level etc 3 Tuner related indicators 4 R D S PTY indicators Only for Europe and U K 5 A P S Auto Power Save indicators 6 PARENTAL lock indicator 7 EQUALIZER indicator 8 Timer related indicators 9 Cassette deck related...

Page 18: ...power has been turned ON press the desired key To turn power off press the on standby POWER key again When pressing more than one remote control keys succes sively press the keys securely by leaving an interval of 1 second or more between keys Operating range approx Remote sensor 1 The provided batteries are intended for use in operation checking and their service life may be short 2 When the remo...

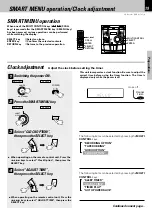
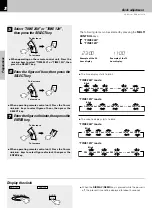
Page 19: ...then press the SELECT key SELECT M U L T I C O N T R O L P C A L L 4 When operating on the remote control unit Press the 4 keys to select ADJUST TIME then press the SELECT key STANDBY TIMER ThefollowingitemscanbeselectedbypressingtheMULTI CONTROL keys SLEEP TIMER ADJUST TIME TIMER PLAY AUTO POWER SAVE Continued on next page 2 REMOTE MAIN UNIT POWER 3 REMOTE MAIN UNIT SMART MENU S MENU 4 Goes off S...

Page 20: ...ease To decrease The time display starts to blink Blink TIME 24H mode 0 00 j 1 00 j 2 00 j j 22 00 j 23 00 AM 12 00 j AM 1 00 j AM 2 00 j j PM11 00 Blink TIME 12H mode The minute display starts to blink Blink TIME 24H mode Blink TIME 12H mode 19 00 j 19 01 j 19 02 j j 19 58 j 19 59 PM 7 00 j PM 7 01 j PM 7 02 j j PM 7 59 5 When operating on the remote control unit Press the 4 keys to select TIME 2...

Page 21: ...unit Each time the VIDEO AUX key is pressed for more than 2 seconds the display is switched between VIDEO and AUX When one of the keys on the left is pressed while the power is off thepowerwillbeswitchedonautomaticallyandtheinputwill be selected WhenadiscissetinthedisctrayandtheDVD CDkeyispressed disc playback will start automatically Trays without a disc will be skipped Whenacassetteissetinthehol...

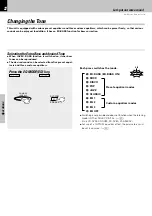
Page 22: ... bass tones can be reproduced The desired sound can be selected from five preset equal izers and three custom equalizers Press the EQ MODE EQ key REMOTE MAIN UNIT 1 EX BASS EX BASS ON 2 ROCK 3 DISCO 4 POP 5 JAZZ 6 CLASSIC 7 EQ 1 8 EQ 2 9 EQ 3 0 EQ OFF Each press switches the mode Preset equalizer modes Custom equalizer modes Lit EX BASS Switchingisnotpossibleanddoesnotfunctionwhenthelistening mode...

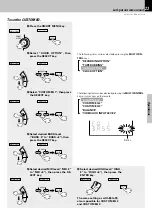
Page 23: ...the SELECT key 5 Select desired MID level MID 8 to MID 8 then press the SE LECT key REMOTE MAIN UNIT REMOTE MAIN UNIT REMOTE MAIN UNIT REMOTE MAIN UNIT SELECT M U L T I C O N T R O L P C A L L 4 SELECT M U L T I C O N T R O L P C A L L 4 SELECT M U L T I C O N T R O L P C A L L 4 ENTER ENTER ThefollowingitemscanbeselectedbypressingtheMULTICON TROL keys RECORDING OPTION TAPE DUBBING AUDIO OPTION CL...

Page 24: ...he screen DVD or VCD In case of interactive DVDs a Disc Menu appears on the screen ThenpressENTERtoselectspecificmenuyouwanttoplaybyusing Cursor keys Each press pauses and plays the disc alternately DVD CD 6 DVD CD RESUME playback When playback has been stopped while watching a movie it may be desired to restart playback from the stopped part This unit memorizes the stop position even when the pow...

Page 25: ...e time of VCD playback there will be no return to the preceding track 1 TUNING During playback press the 1 1 1 1 1 or key Each press switches the searching speed 1 F SEARCH 1 R SEARCH 1 2 F SEARCH 2 R SEARCH 2 3 F SEARCH 3 R SEARCH 3 4 F SEARCH 4 R SEARCH 4 At the time of DVD playback At the time of CD VCD playback Press the 6 key at any time to resume normal playback 1 F SEARCH 1 R SEARCH 1 2 F S...

Page 26: ...peat Chapter 5 Repeat Off LED display The Repeat A display appears 1 Press the A B key on the remote when you want to choose a scene sound as the beginning point 2 Press the A B key again to choose a scene sound as the end point The Repeat A B display appears At the time of DVD playback To cancel repeat playback press the REPEAT key and select Repeat off To cancel A B Repeat playback press the A B...

Page 27: ...sc being played will be selected in random order for playback After all tracks of a disc have been played in random order playback will stop Random mode will be cancelled When the RANDOM key is pressed during random playback return to normal playback will be made from that track on CD When All Disc Repeat is selected and the RANDOM key is pressed random playback will be performed for the disc bein...

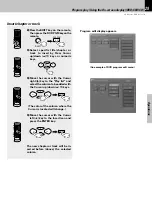
Page 28: ...he Cursor is located will change 2 PresstheCursorleft 2 key usethe Cursor up down keys to move the Cursor to the Delete icon and press the ENTER key Program edit display appears An example of DVD program edit menu blue Selected icon An icon which can be selected An icon which presently can not be selected When you don t add values onto Playlist and return to play mode select Done icon and press EN...

Page 29: ...xample of DVD program edit menu 3 Move the cursor with the Cursor right key to the Play list and selectthecolumntobeaddedwith the Cursor up down 5 keys The color of the column where the Cursor is located will change 4 Move the cursor with the Cursor left 2 key to the Insert icon and press the ENTER key The new chapter or track will be in serted before above the selected column SHIFT EQ DVD PGM 2 2...

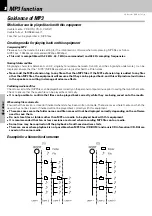
Page 30: ...d noises in the speakers resulting in damage of adverse effects Confirming media and files ChecktoascertainthatMP3filescanbeplayedbackcorrectlyonthepersonalcomputerinusepriortosavingthemontothemedia Check to ensure that the saved file can be played back normally It is not possible to confirm that files can be played back correctly while they are being saved onto the media When saving files onto me...

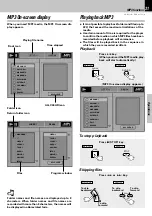
Page 31: ...which MP3 files have been recorded before playback will commence The files will be played back in the sequence in which they were recorded written Playback MY SONG1 HALLOW 1 MEGADETH MADONNA RCY23MNN EXTREME CARMAN 1 ITALY EAGLES ALL CLEAR To stop playback Skipping files Playing file name Time elapsed Root icon Folder icon ALL CLEAR icon Program window Files Return folder icon Note Note Folder nam...

Page 32: ...r layer Selects the folders to be played back directly 2 Press Cursor up down 5 keys on the remote to select the upper folder icon then press DVD CD key 1During stop mode press Cursor up down 5 keys on the re mote to select the folder then press the ENTER key Playback will start from selected folder Files in the next folder will be played back when no files exsit in the selected folder MP3 functio...

Page 33: ... ALL CLEAR icon then press the ENTER key The program deletes You can delete file one by one by selecting in Program window and pressing CLEAR key on the re mote MADONNA LUCKY 1 LIKEA 1 LIKEA 1 TRUE 1 LUCKY 1 OPEN 1 HOLIDAY INTO 1 WHIHE 1 EVERY 1 ALL CLEAR LUCKY 1 TRUE 1 OPEN 1 WHIHE 1 HOLIDAY INTO 1 0 04 56 MADONNA LUCKY 1 LIKEA 1 LIKEA 1 TRUE 1 LUCKY 1 OPEN 1 HOLIDAY INTO 1 WHIHE 1 EVERY 1 ALL CL...

Page 34: ...ature i e if you select the Subtitle icon youwon tbeabletochangethesubtitlelanguageunlessthe author of the disc created the disc with subtitles The invalid symbol appears on the screen when you press a key that doesn t have any function If one of the icons is grayed out the banner display feature isn t available for the disc you re playing 2 Press the Cursor left right 2 3 keys to highlight a bann...

Page 35: ...ress 0 first and the other value Then play starts This varies depending on number of Title within the disc you re playing Note Note Some discs only have one title 1During playback press the OSD key on the remote 2 Press the Cursor left right 2 3 keys until the CHAPTER or TRACK icon is highlighted 3 Press the ENTER key C__ or Tr__ appears 4Use the numeric keys to enter the chapter or track number W...

Page 36: ...nu in the Language Pref erences menu within Setup menu temporarily Notes Notes 1 During playback press the OSD key on the remote 1 During playback press the OSD key on the remote 2Press the Cursor left right 2 3 keys until the SUBTITLE icon is high lighted 3Press the ENTER key The subtitle menu appears 4 Select the subtitle language with press the ENTER key 5 Press the SHIFT key then press the SUB...

Page 37: ...on t work IntroScan plays the first few seconds of each track on the CD Using the on screen banner display 2 Press the Cursor left right 2 3 keys until the IntroScan icon is highlighted 3 Press the ENTER key 1During playback press the OSD key on the remote The first 10 seconds of each track play After Intro Scan goes through all of the tracks it stops If you want to stop IntroScan while it s in pr...

Page 38: ...ickly You can store up to 9 bookmarks 5 Use the Cursor left right 2 3 keys on the remote to select the bookmarked scene you want to acti vate 6Press the ENTER key to active the bookmark The bookmark is cleared each time a disc is removed from the player or when the power is turned off Notes Notes If all 9 bookmarks are in use you can still mark new scenes but the previous bookmarks will be erased ...

Page 39: ...ll AUTO auto tuning MANUAL manual tuning REMOTE MAIN UNIT REMOTE Use the manual tuning mode when re ception is noisy due to weak reception In the manual mode stereo broadcasts are received in monaural Press the TUNING key to receive the next tuned station automatically PresstheMULTICONTROLkeysorpress the P CALL keys to select a preset sta tion TUNER BAND BAND TUNER TUNER BAND BAND TUNER TUNING MOD...

Page 40: ...ne presetting Press the ENTER key 2 REMOTE Select the desired preset number 3 REMOTE Press the ENTER key 4 REMOTE Repeat steps 1 to 4 to preset other sta tions Blinks 4 P CALL ENTER 23 23 7 MULTI CONTROL ENTER ENTER P CALL 1 2 3 Blinks 1 2 3 ENTER 1 2 3 4 5 6 7 8 9 0 DISC 1 DISC 2 KEY CONTROL ECHO HIT MASTER DISC 3 In case of input with the number keys a preset number will be decided simply by inp...

Page 41: ...lay 3 RT display 4 CT display 5 Current FM frequency display PS NAME If the PS information is being received the PS name BBC AFO NDR etc is shown on the display If the PS information is not received the original FM fre quency is shown Even though no RDS key is pressed the reception of PS information ensues the PS name is displayed RT display Text data accompanying the RDS broadcast scrolls across ...

Page 42: ...Music OLDIES Folk Music FOLK M Documentary DOCUMENT Program Type Name Receiver Display PTY function ThePTYinformationiscomposedofanidentificationsymbol which helps the FM radio to recognize the program type of each FM station The 29 PTY modes are shown in the display by pressing the PTY key Using the PTY search function Select the FM band 1 Press the PTY key 2 ThePTYMODE POPM ROCKMetc appears on t...

Page 43: ...corresponding to this Tape direction indicators of cur rently selected deck To wind tape at high speed REMOTE MAIN UNIT To stop playback REMOTE MAIN UNIT Longer tape than 90 minutes cassette tape Since longer tape than 90 minutes cassette tape is very thin the tape could adhere to the pinch roller or be easily cut It is recommended that these tapes not be used with this unit to prevent possible da...

Page 44: ...opposite to the desired direction press the play key corresponding to this Tape direction indicators of currently selected deck Start recording 4 REMOTE MAIN UNIT REMOTE MAIN UNIT Start playback the source then press the REC ARM key To pause recording To stop recording REMOTE MAIN UNIT MAIN UNIT ONLY MAIN UNIT ONLY Lit Pressing the key pauses recording after leaving a non recorded space of about 4...

Page 45: ...MOTE MAIN UNIT Select CD DIRECT RECORDING then press the SELECT key 5 REMOTE MAIN UNIT The following items can be selected by pressing the MULTI CONTROL keys or cursor keys on the remote CD DIRECT RECORDING TIMER RECORDING SELECT M U L T I C O N T R O L P C A L L 4 REMOTE MAIN UNIT ENTER ENTER 4 P CALL SELECT The following items can be selected by pressing the MULTI CONTROL keys RECORDING OPTION T...

Page 46: ...REMOTE REC ARM MAIN UNIT 1 The recording will end and the tape will stop at the end in reverse direction no matter whether record ing was started in forward direction or in reverse direction 2 In recording mode this is the same as 3 Record stops after having recorded one side of tape Each press switches the modes as follows If the tape transport direction is opposite to the desired direction press...

Page 47: ...A forward direction DECK A backward direction Select tape transport direction of TAPE B then press the SELECT key 5 REMOTE MAIN UNIT The following items can be selected by pressing the MULTI CONTROL keys or cursor keys on the remote DECK B forward direction DECK B backward direction SELECT M U L T I C O N T R O L P C A L L 4 SELECT M U L T I C O N T R O L P C A L L 4 TAPE DUBBING 4 P CALL SELECT T...

Page 48: ...ay be displayed When a number of menus are connected in multiple layers in this way it is said that the menus have a hierarchical structure In this structure the desired scene can be reached by repeating item selections on the menu screens Example for a hierarchical structure Depending on the software the jacket indication may differ from the above Examples of operation keys and indications used d...

Page 49: ...ding to the key of the singer s voice 9 HIT MASTER HIT MASTER ON HIT MASTER OFF 4 5 6 KEY CONTROL Remote control unit only Remote control unit only Downward Upward SHIFT SHIFT SHIFT Press the next key within 5 seconds of pressing the SHIFT key Within 5 seconds of pressing the next key operation is possible without pressing the SHIFT key The sound level of the vocal part of the disc is suppressed s...

Page 50: ...ottom of the screen 4 x 3 Pan Scan Choose this setting if you want the movie to fill the entire screen of your TV You won t see part of the picture particularly the right and left edge Some disc produced in a wide screen format can t be cropped in this fashion which means the black bars would appear at the top and the bottom of the screen 16 x 9 Widescreen Choose this setting if your DVD player is...

Page 51: ...th same way 3 Select OK icon and press ENTER DVD menu language code list Á 1 Press Cursor up down 5 keys on the remote to select Subtitle on the set up menu display then press the ENTER key 2 Press Cursor up down 5 keys on the remote to select specific Subtitle language then press the ENTER key To select other language 1 Select Other and press EN TER key 2 Input code in the first digit by Press Cu...

Page 52: ...down 5 keys on the remote to highlight rated titles then press the ENTER key Press PLAY key to resume normal playback When a password already has been set the screen for change of the entered password will be displayed In that case enter the password E Set Up functions 2 2 ENTER 2 2 ENTER 2 2 ENTER 2 2 ENTER Parental lock level Level 8 All DVDs can be played back Factory preset Level 7 to 2 DVDs f...

Page 53: ...TER key 3 Press Cursor up down 5 keys or numeric keys on the remote to enter password 4 Press ENTER key to finish pass word input Confirm Password display appears below Enter Pass word display 5 Press Cursor up down 5 keys or numeric keys on the remote to enter again password that you entered then press the ENTER key 6 Select OK and press the ENTER key Press PLAY key to resume normal playback Set ...

Page 54: ...lect OK and press ENTER key 3 Press Cursor up down 5 keys to select Change Password then press ENTER key 5Press ENTER key to finish pass word input Confirm Password display appears below Enter Pass word display 4Press Cursor up down 5 keys or numeric keys on the remote to enter password 6Press Cursor up down 5 keys or numeric keys on the remote to enter again password that you entered then press t...

Page 55: ... remote to enter password Select OK and press ENTER key 3 Press Cursor up down 5 keys to select Clear Password then press ENTER key DVD TVaspect 1Press Cursor up down 5 keys on the remote to select TV Aspect on the set up menu display then press the ENTER key TV Aspect menu appears 2 Press Cursor up down 5 keys on the remote to select TV Aspect menu then press the ENTER key Press PLAY key to resum...

Page 56: ... Press PLAY key to resume normal playback Set Up functions 2 2 ENTER 2 2 ENTER DVD DigitalAudioOut 1Press Cursor up down 5 keys on the remote to select Digital Au dio Out on the set up menu dis play then press the ENTER key Digital Audio Out menu appears 2 Press Cursor up down 5 keys on the remote to select Digital Au dio mode then press the ENTER key Press PLAY key to resume normal playback 2 2 E...

Page 57: ...ts nearly identical to those in a theater Sounds seem to zoom from one place to another or entirely surround you Like Dolby Digital DTS has much improved clarity surround and sound movement capability compared with Dolby Pro Logic This listen mode is available on DVD media DTS is a strictly digital format that can be supplied only by a CD LD or DVD player that supports DTS sound only for XD DV95 X...

Page 58: ...ay a disc marked Dolby Digital 2Stop the playback DVD CD Surroundspeaker 2 2 ENTER STOP 7 SPEAKER SETUP only for XD DV95 XD DV85 XD DV80 XD A950DV MENU RDS 2 2 ENTER Left Front Speaker Right Front Speaker Center Speaker Left Surround Speaker Right Surround Speaker Subwoofer Continued on next page At the time of shipping from the factory the setting is for no subwoofer no indication To achieve the ...

Page 59: ... 2 ENTER When only the accessory speakers are to be used the most suitable setting already has been made Please do not make any change but continue to Delay time setting Left front speaker and right front speaker are changed at the same time Select in the same way for center speaker surround speaker and subwoofer Notes If you select FRONT speakers Large subwoofer select off automatically If you se...

Page 60: ... virtually The center and surround speakers can be set as if they are laid out on the dotted line circle shown below Center speaker setting A R Dc Surround speaker setting B R Ds Distance A Setting 0 cm 0 ms Approx 40 cm 1 ms Approx 80 cm 2 ms Approx 120 cm 3 ms Approx 160 cm 4 ms Approx 200 cm 5 ms Distance B Setting 0 cm 0 ms Approx 200 cm 5 ms Approx 400 cm 10 ms Approx 600 cm 15 ms Ideal cente...

Page 61: ...urn to the previous step and adjust the level for that speaker Level settings 2 Press the cursor up down 5 keys or cursor left right 2 3 keys to select the desired speaker level button then press the ENTER key 2 2 ENTER 3 Press the cursor up down 5 keys to select the level then press the ENTER key 2 2 ENTER TEST button Adjust in the same way so that the sound volume of all speak ers except for the...

Page 62: ...key Select SLEEP TIMER then press the SELECT key Select the time until power OFF then press ENTER key 1 2 3 REMOTE MAIN UNIT SMART MENU S MENU SELECT M U L T I C O N T R O L P C A L L 4 SELECT M U L T I C O N T R O L P C A L L 4 The following items can be selected by pressing the MULTI CONTROL keys 1 SLEEP OFF sleep timer off 2 SLEEP 10 10 minutes 9 SLEEP 80 80 minutes 0 SLEEP 90 90 minutes The fo...

Page 63: ...keyandenterthe figure of minute Press the SELECT key 7Select OFF time 8Select the input source Continued on next page Timer Play POWER ON STANDBY SMART MENU SELECT M U L T I C O N T R O L P C A L L 4 SELECT M U L T I C O N T R O L P C A L L 4 SELECT M U L T I C O N T R O L P C A L L 4 SELECT M U L T I C O N T R O L P C A L L 4 SELECT M U L T I C O N T R O L P C A L L 4 SELECT M U L T I C O N T R O...

Page 64: ...ted by pressing the MULTI CONTROL keys RECORDING OPTION TAPE DUBBING AUDIO OPTION CLOCK OPTION 4Select TIMERRECORDING then press the SELECT key SELECT M U L T I C O N T R O L P C A L L 4 The following items can be selected by pressing the MULTI CONTROL keys or cursor keys on the remote CD DIRECT RECORDING TIMER RECORDING 5Select desired timer mode then press the SELECT key SELECT M U L T I C O N T...

Page 65: ...then press the SELECT key SELECT M U L T I C O N T R O L P C A L L 4 4Select AUTOPOWERSAVE then press the SELECT key SELECT M U L T I C O N T R O L P C A L L 4 5 Select A P S ON or A P S OFF then press the ENTER key M U L T I C O N T R O L P C A L L 4 ENTER 1 APS OFF Auto power save is not used 2 APS ON Auto power save is used When the TUNER or VIDEO AUX input is selected this function operates on...

Page 66: ...778 7779 7782 7783 7784 7789 7865 7869 7876 7879 7982 8065 Croatian Hungarian Armenian Interlingua Indonesian Icelandic Italian Hebrew Japanese Yiddish Javanese Geogian Kazakh Greenlandic Cambodian Kannada Korean Kashmiri Kurdish Kirghiz Latin Lingala Laothian Lithuanian Latvian Lettish Malagasy Maori Macedonian Malayalam Mongolian Moldavian Marathi Malay Maltese Burmese Nauru Nepali Dutch Nowegia...

Page 67: ...a great difference in temperature between this unit and the outside This unit may not function properly if condensation occurs In this case leave the unit for a few hours with the power left ON and restart the operation after the condensation has dried up Be specially cautious against condensation in a fol lowing circumstance When this unit is carried from a place to another across a large differe...

Page 68: ...cted The frequency of the station to be received is not tuned Car ignition noise Influence of an electric appliance A TV set is installed near the system The frequency of the preset station is not tunable The preset memory has been cleared be cause the power cord has been unplugged for a long period The speaker connection is abnormal The surround speaker switch on the rear of the unit is set to OF...

Page 69: ...irregular winding A nonrecorded tape is played The cassette holder is not closed com pletely A tape is not inserted in the unit The tape is wound too tight due to irregular winding The tape is fully wound to one of the reels The head is dirty The tape is stretched or shrunk The tape head is magnetized External noise is induced A tape recorded with Dolby NR ON is being played on this unit The capst...

Page 70: ...disc being played The TV is not turned on The connection cords are not properly con nected The picture is slightly disrupted during fast forward and fast reverse operations The volume control of this set is not ad justed properly The player is in a special playback mode A nearby device is generating noise The disc is dirty The disc is damaged There is condensation on the optical lens Time is requi...

Page 71: ...ched Use a DVD disc containing the recording of the selected voice or subtitle language Set Display function to on Setthediscmenulanguagefunction MENU as required Set the surround speakers to Used in the speaker mode setting of initial setup SPEAKER SETUP For playback of a Dolby Digital 5 1 ch source set the Surround mode selected with the LISTEN MODE key to STEREO Set the Surround mode selected w...

Page 72: ...fective output power during SURROUND operation Front 1 kHz 10 T H D at 6 Ω 124 W 124 W Center 1 kHz 10 T H D at 6 Ω 62 W Surround 1 kHz 10 T H D at 8 Ω 46 W 46 W Input sensitivity impedance VIDEO AUX 400 mV 35 kΩ MIC only some areas 4 0 mV 8 2 kΩ Output level impedance VIDEO AUX 400 mV 1 0 kΩ SUB WOOFER PREOUT 1 0 V 2 2 kΩ XD DV75 for Europe and U K Rated output power during STEREO operation DIN 1...

Page 73: ...found on the back of the unit in the spaces designated on the warranty card and in the space provided below Re fer to the model and serial numbers whenever you call upon your dealer for information or service on this product Model Serial Number ...

Reviews: