background image

9

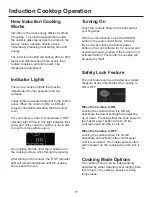
Grill Operation

Turning On

Touch the controls firmly with the flat part of 

your fingertips.

With the unit unlocked, touch the POWER 

button in the main control frame.  Activate 

the element by holding the element power 

button in the control frame for 2 seconds and 

choose a cooking option. If the element is not 

activated within 15 seconds, the grill will 

de-power by itself. 

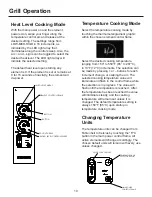
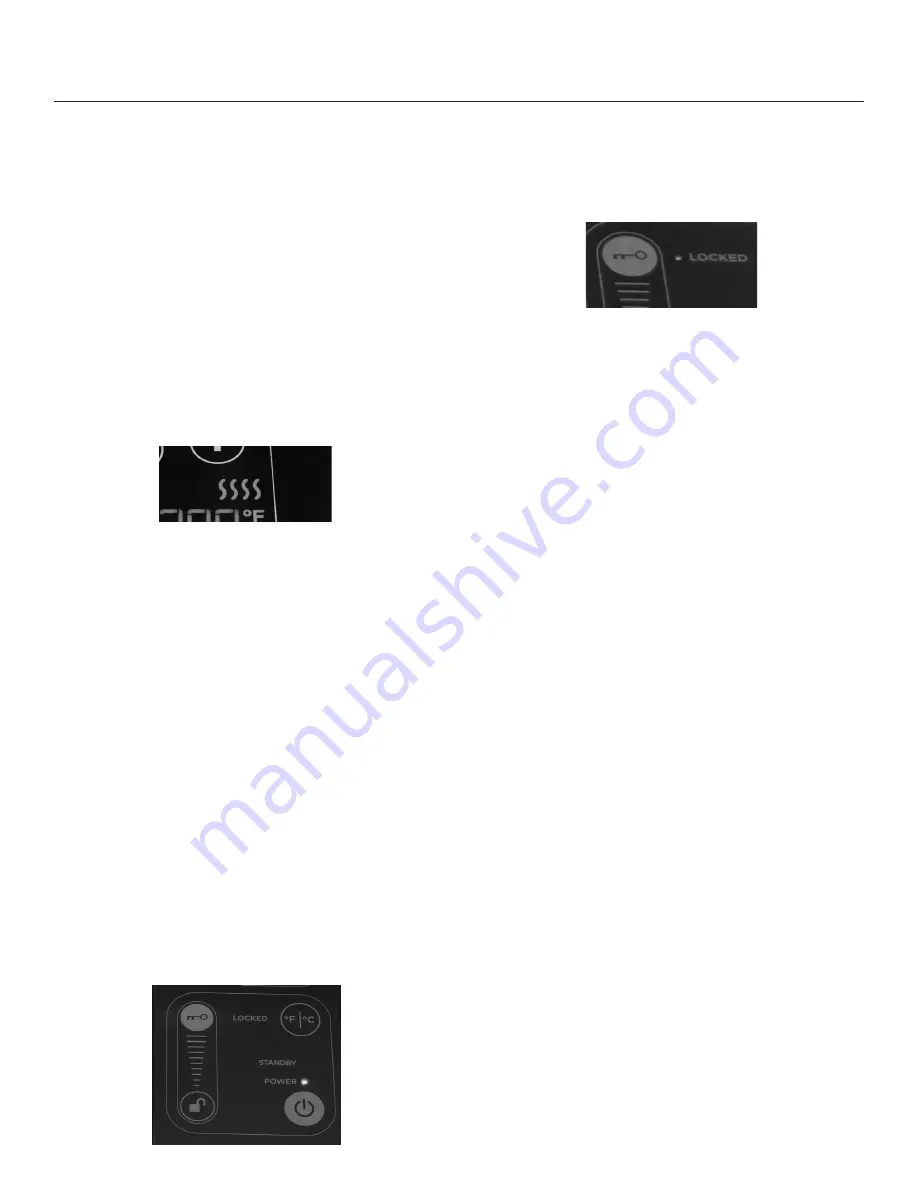
Safety Lock Feature

The lock feature can be activated as a safety 

measure at any time whether the grill is ON or 

OFF.

When the Grill is ON:

Locking the grill when it is ON will deactivate 

the power settings from adjusting up or down.  

Pressing either the zone power or the master 

power button will turn off the grill even when 

the lock is on.

When the Grill is OFF:

Locking the grill when it is off will deactivate 

all functions of the control panel until it is 

unlocked.  The master power button will not 

power on the grill when the lock is on.

Cooking Mode Options

The grill element can be independently 

operated by either a heating level ranging from 

low to high, or by setting a specific cooking 

temperature.

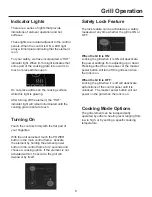
Indicator Lights

There are a series of lights that provide 

indications of element operation and hot 

surfaces. 

These lights are located adjacent to the control 

panels. When the control is ON, a LED light 

array will illuminate indicating that the element 

is on.

For your safety, we have incorporated a “HOT” 

indicator light. When lit, this light indicates that 

some part of the cooking grate is too warm to 

touch or place articles upon. 

Do not place articles on the cooking surface 

while this light is glowing.

After turning off the element, the “HOT” 

indicator light will remain illuminated until the 

cooking grate is safe to touch.

Summary of Contents for B70450

Page 1: ...Part 145492 Created June 26 2018 www CookWithKenyon com COMBI SYSTEM 240V OWNERS MANUAL ...

Page 2: ...NSTRUCTIONS Product Specifications Before Using the Grill Quick Start Tips Grill Operation Indicator Lights Turning On Safety Lock Feature Cooking Mode Options Heat Level Cooking Mode Temperature Cooking Mode Changing Temperature Units Timer Options Automatic Shut Off Time Temperature Guide Error Code Readout Grill Parts Lid Removal Handle Lock Induction Cooktop Cleaning and Care Cleaning the Cook...

Page 3: ... not operate appliance with a damaged power cord or plug If the appliance malfunctions discontinue use Contact KENYON Customer Care immediately at 860 664 4906 The use of accessory attachments not supplied by the manufacturer of the appliance may cause injuries Suitable shelter must be provided to prevent direct exposure to rain Do not let cord hang over edge of table or counter or touch hot surfa...

Page 4: ...n or on Appliance Flammable materials should not be stored above under or near surface cooking units Wear proper clothing apparel Loose fitting or hanging garments should never be worn while using the appliance Fabric or other flammable materials may contact hot surfaces during operation and may ignite and result in personal injury NEVER HEAT AN EMPTY PAN It may damage the cooktop or cookware and ...

Page 5: ... example Vegetables Temp setting 350 F Power setting 4 Pork and fish Temp setting 400 F Power setting 5 Burgers Temp setting 500 F Power setting 9 Steak Temp setting 550 F Power setting 16 Preheat grill with the lid closed for 7 to 9 minutes Enjoy the best grilled food you have ever tasted Once cool place grate griddle in the dishwasher along with the dirty dishes so that it s ready for its next t...

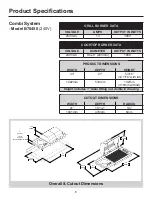
Page 6: ...ATA VOLTAGE DIAMETER OUTPUT IN WATTS 240V AC One 8 203mm 1800 COOKTOP BURNER DATA Overall Cutout Dimensions 20 1 8 512mm 21 533mm 1092mm 43 26 5 16 668mm 470mm 184mm 7 1 4 1041mm 41 18 1 2 4 102mm 5 3 16 132mm WITH DRAIN FITTING WIDTH DEPTH HEIGHT 43 21 5 3 16 12 7 16 with lid 1092mm 533mm 132mm 316mm with lid PRODUCT DIMENSIONS Height includes 1 drain fitting not visible in drawing ...

Page 7: ...ng 16 Burgers Temp setting 500 F Power setting 9 Pork and Fish Temp setting 400 F Power setting 5 Vegetables Temp setting 350 F Power setting 4 Close the lid s and cook Enjoy the best grilled food you have ever tasted Clean up Take a few pieces of paper towel and place on the grilling surface Pour about one ounce of water on the towel and then using your high temperature nylon tongs swab the paper...

Page 8: ...with a sample bottle of stainless steel cleaner Use this cleaner once a month to protect the stainless The touch control area is ceramic glass which is sealed from the effects of rain snow and ice To clean the glass use a glass cleaner and soft towel If stains appear use a ceramic glass cleaner which can be found in your local grocery store 13 14 15 8 ...

Page 9: ...ill when it is off will deactivate all functions of the control panel until it is unlocked The master power button will not power on the grill when the lock is on Cooking Mode Options The grill element can be independently operated by either a heating level ranging from low to high or by setting a specific cooking temperature Indicator Lights There are a series of lights that provide indications o...

Page 10: ... will change accordingly The chosen default units will remain with every use unless changed Heat Level Cooking Mode With the main power on and the element powered on swipe your finger along the temperature control arc and release at the desired setting The settings range from LOW MED HIGH in 16 increments as indicated by the LED light array that illuminates along the control sweep Also the arc and...

Page 11: ...activate Cooking Timer Each element has its own cooking timer that can be activated to shut the heating element off at the end of the set time At any time during cooking for each element set the desired time duration by first touching the clock graphic then touching the and buttons holding the button to increase or decrease the setting A beep will sound at the start of the setting and the set time...

Page 12: ...llowing is meant to be a guideline Factors such as wind and outside temperatures food temperature when placed on grill can affect cooking times The grill is designed and engineered for optimal cooking performance with the lid down or closed SETTING FOOD TYPES 1 2 Fried eggs on griddle 3 4 Pancakes French toast on griddle 5 6 Vegetables 7 8 Vegetables Fish 9 10 Fish Chicken 11 12 Chicken Hamburgers...

Page 13: ...e If your grill requires service this must be preformed by Authorized Personnel only Please call Kenyon Customer Care at 860 664 4906 K E N Y O N G R I L L M A I N T E N A N C E De power and re start the unit to clear the display Allow the unit to cool as necessary Lock out the main power supply to the unit by closing the breaker before performing any wiring operations If the problem persists plea...

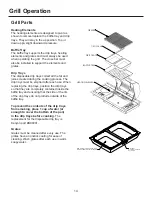
Page 14: ...ust be emptied after each use When replacing the drip trays position the drip trays so that they are completely contained inside the baffle tray and ensuring that the side or the rim of the drip trays do not protrude outside of the baffle tray To prevent the contents of the drip trays from smoking place 1 cup of water or enough to cover the bottom of the pan in the drip trays before cooking The re...

Page 15: ...ge and slide the lid away from the center of the grill until the outer hinge is free of it s pivot pin Once the lid s have been removed they can be washed in warm soapy water Installation is reverse of removal Handle Lock The handle lock allows the user to lock both lids together for ease of opening and accessing the entire grilling surface The lids can also be unlocked and opened individually for...

Page 16: ... surface Do not let anything that melts plastic aluminum foil sugar etc come into contact with the cooktop surface when it is hot Should something melt onto the surface immediately move it to a cool area of the cooktop with a razor blade scraper and then remove it from the cooktop as soon as possible If they are allowed to harden the cooktop may become pitted Use Good Quality Cookware Since cookwa...

Page 17: ...y than radiant cooktops and offers quick fine temperature adjustment 17 Induction Cooktop Operation Turning On Touch the controls firmly with the flat part of your fingertips With the unit unlocked touch the POWER button in the main control frame Activate the burner by holding the burner power button in the control frame for 1 2 second and choosing a cooking option If the burner is not activated w...

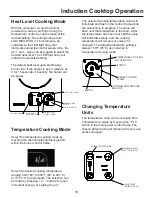
Page 18: ...ttings range from LOW MED HIGH in 16 increments as indicated by the LED light array that illuminates along the control sweep Also the arc and signs can be toggled to select the desired heat level The LED light array will indicate the selected setting The default heat level upon starting any burner is 0 If the burner is set or remains at 0 for 15 seconds of inactivity the burner will de power TEMPE...

Page 19: ...f no activity after the time has elapsed the timer will shut off and the hot indicator light will remain illuminated until the unit has cooled Timer Options Kitchen Timer The kitchen timer is a general timer that has many uses around the kitchen independent of cooking activity on the induction cooktop Activate the main power and touch the timer clock graphic within the burner control frame Set the...

Page 20: ...ndex below and take action as noted ERROR CODE DESCRIPTION ACTION TO REMEDY ERROR E01 Incorrect operating voltage line voltage lower than specified or internal electronic control issue Ensure that the electrical hookup voltage to the unit is correct Refer to the identification label affixed to the underside of the unit If correct call Customer Care E02 Incorrect operating voltage line voltage high...

Page 21: ...2 1 E F E F MOUNTING BRACKET ASSY SHEET 1 OF 1 UNLESS OTHERWISE SPECIFIED SCALE 1 2 WEIGHT REV DWG NO C SIZE TITLE KENYON INTERNATIONAL 8 HERITAGE PARK PO BOX 925 CLINTON CT 06413 NAME DATE COMMENTS Q A MFG APPR ENG APPR CHECKED DRAWN FINISH MATERIAL INTERPRET GEOMETRIC TOLERANCING PER ANSI ASME Y14 5M 2009 DIMENSIONS ARE IN INCHES TOLERANCES ANGULAR MACH 0 50 BEND 1 00 TWO PLACE DECIMAL 010 THREE...

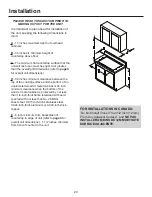
Page 22: ...d with a factory installed polished stainless steel flange that accepts nine oval head wood screws for mounting The trim flange of this unit is designed to hold the unit firmly in place in the countertop If desired you may seal the edge of the countertop beneath the trim flange We recommend a NON ADHESIVE such as plumbers putty This will help reduce the chance of damage to the trim flange should t...

Page 23: ...tal cabinet or 24 inch minimum clearance when the bottom of the wood or metal cabinet is protected by not less than 1 4 inch thick flame retardant mill board covered with not less than No 28 MSG sheet steel 0 015 inch think stainless steel 0 024 inch thick aluminum or 0 020 inch thick copper E 6 inch minimum from backsplash of countertop to edge of unit refer to page 6 for overall unit dimensions ...

Page 24: ...s a soft pliable sealing compound that is used to make watertight seals around faucets drains and other plumbing parts Grill Drain Connection 4 For your convenience the grill is equipped with a 1 2 NPT brass pipe fitting and 90º brass elbow which you can attach the 5 8 ID flexible hose that came with your grill 5 Remove the protective plastic film from the lid and ceramic glass Clean the unit befo...

Page 25: ...shall not be liable for any damage resulting from failures due to use of the product in applications for which they are not intended failures due to corrosion wear and tear abuse neglect improper installation or maintenance failures due to breakage of glass accidental or otherwise 4 The Company shall be responsible for ground shipping charges to the location of the appliance home within the Contin...

Reviews: