background image

BOPHV020411

3-15

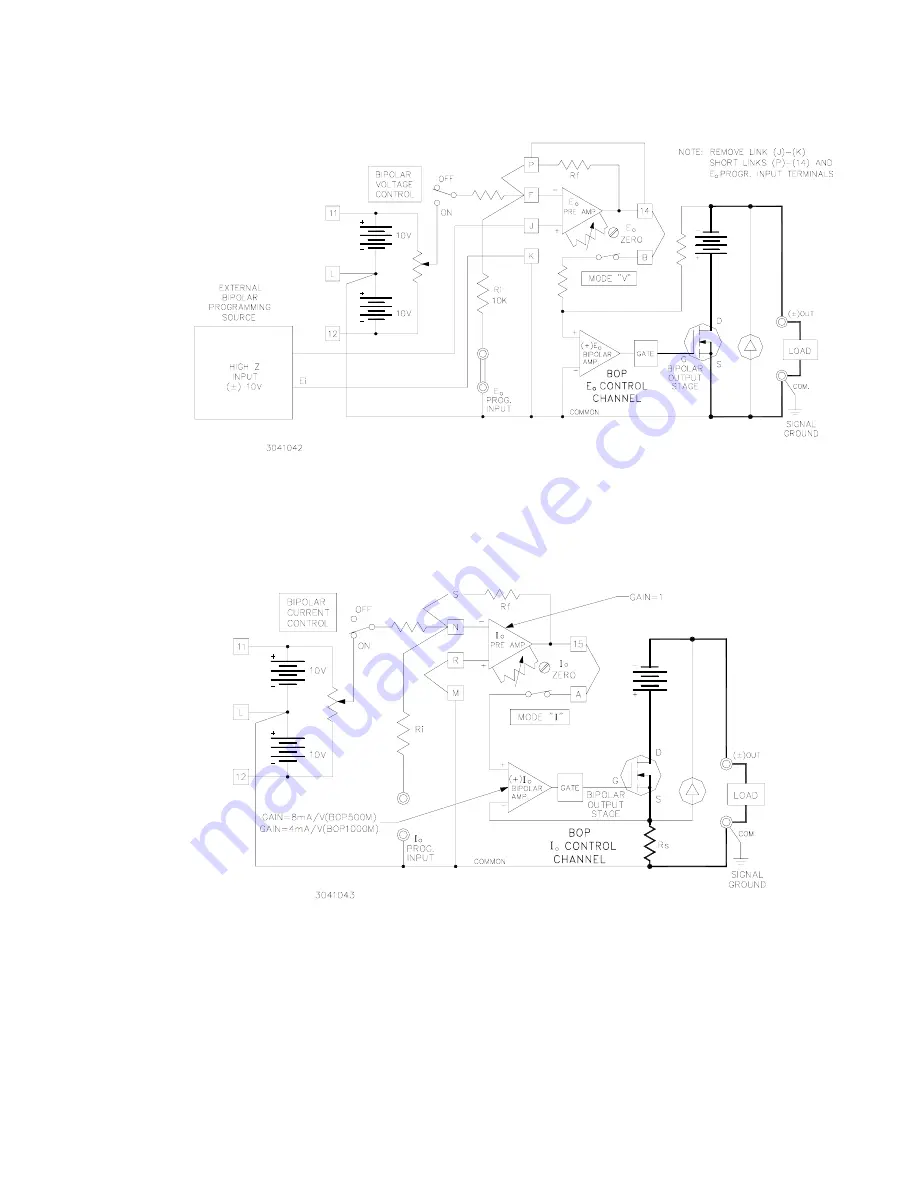
FIGURE 3-14.    PROGRAMMING CIRCUIT FOR DRIVING THE BOP OUTPUT VOLTAGE WITH A HIGH 

IMPEDANCE SOURCE, USING THE NON-INVERTING INPUT OF THE PRE-AMPLIFIER

FIGURE 3-15.    LOCAL (FRONT PANEL) CONTROL OF THE BOP OUTPUT CURRENT 

WITH THE BIPOLAR CURRENT CONTROL

3.4.1

REMOTE CONTROL OF THE BOP CURRENT CHANNEL

Since the requirements for the control of the BOP output current are the same as for program-
ming the output voltage, and since the control circuitry is almost identical, all programming cir-
cuit descriptions for programming the output voltage of the BOP can be applied for current

Summary of Contents for BOP 500M

Page 1: ...pco Representative or the Kepco Docu mentation Office in New York 718 461 7000 requesting the correct revision for your particular model and serial number 3 The contents of this manual are protected by copyright Reproduction of any part can be made only with the specific written permission of Kepco Inc Data subject to change without notice KEPCO THE POWER SUPPLIER KEPCO INC 131 38 SANFORD AVENUE F...

Page 2: ......

Page 3: ...UTION If this power supply is used in OEM equipment the OEM equipment manufacturer is responsible for attaching appropriate warning labels on the OEM equipment Operating the power supply outside the specified limits for input voltage temperature or other environ mental conditions noted in this manual can damage the power supply and void the warranty Safety Messages The BOP HV protection circuit is...

Page 4: ......

Page 5: ...5 USA Importer s Name and Address Type of Equipment Component Power Supply Model No PRODUCT MODEL NUMBER Year of Manufacture I the undersigned declare that the product specified above when used in conjunction with the condi tions of conformance set forth in the product instruction manual complies with the requirements of the Low Voltage Directive 73 23 EEC which forms the basis for application of ...

Page 6: ...e installed within a suitably wired equipment rack utilizing a three wire grounded mains con nection See wiring section of this manual for complete electrical wiring instructions EN61010 1 Cl 6 5 4 and Cl 6 10 1 5 This power supply has secondary output circuits that are considered hazardous and which exceed 240 VA at a potential of 2V or more 6 The output wiring terminals of this power supply have...

Page 7: ...r connection on the product s rear panel To reconfigure the product input for other nominal mains voltages as listed herein the product must be modified by a trained service technician The PROTECTIVE EARTHING CONDUCTOR TERMINAL must be properly con nected prior to application of source power to the product see instructions on instal lation herein in order to ensure safety from electric shock PROTE...

Page 8: ......

Page 9: ...6 SECTION 3 OPERATION 3 1 Introduction 3 1 3 2 BOP Operation with Local Front Panel Output Control 3 7 3 2 1 Voltage Mode Operation with Current Limiting 3 7 3 2 2 Current Mode Operation with Voltage Limiting 3 7 3 3 BOP Operation with Remote Control of the Voltage Control Channel 3 8 3 3 1 Remote D C Output Voltage Control By Resistance 3 8 3 3 2 Remote D C Voltage Control By Means of D C Signal ...

Page 10: ...e of the BOP as a Bipolar Amplifier Voltage Mode 3 13 3 13 Programming Circuit for Driving the BOP Output Voltage with a Bipolar 1V Signal 3 14 3 14 Programming Circuit for Driving the BOP Output Voltage with a High Impedance Source Using the Non inverting Input of the Pre amplifier 3 15 3 15 Local Front Panel Control of the BOP Output Current with the Bipolar Current Control 3 15 3 16 Remote Pote...

Page 11: ...F TABLES TABLE TITLE PAGE 1 1 Output Ranges and Impedance 1 2 1 2 Output Effects Offsets and Reference Specifications 1 2 1 3 Dynamic Specifications 1 4 2 1 Internal Calibration Controls 2 1 2 2 BOP Terminations and Controls 2 3 ...

Page 12: ...iv BOPSVC020411 FIGURE 1 1 BOP HIGH VOLTAGE OPERATIONAL POWER SUPPLY 1107 1108 ...

Page 13: ...w A VOLTAGE MODE OPERATION Current limiting either front panel adjusted or remotely programmed using the current limiting channel 1 High speed bipolar d c voltage source remote or locally controlled output 2 Scaling or summing amplifier with or without d c bias B CURRENT MODE OPERATION Voltage limiting either front panel adjusted or remotely programmed using the voltage limiting channel 1 High spe...

Page 14: ... MΩ 0 4µF TABLE 1 2 OUTPUT EFFECTS OFFSETS AND REFERENCE SPECIFICATIONS INFLUENCE QUANTITY OUTPUT EFFECTS 1 PRE AMPLIFIER OFFSETS REFERENCES VOLTAGE MODE CURRENT MODE EIO IIO SOURCE 105 125 210 250Va c 0 0005 0 0005 5 5µV 4 1nA 0 0005 LOAD No Load full load 0 0005 0 005 _ _ 0 0005 TIME 8 hour drift 0 01 0 01 20µV 4 1nA 0 005 TEMPERATURE Per C 0 01 0 01 20µV 4 1nA 0 005 UNPROGRAMMED OUTPUT 10 mV 25...

Page 15: ...ent channel preamplifiers The tabulated OFFSET values see Table 1 2 may be used to calculate the BOP output effects if the BOP voltage or current channel is remotely programmed and different values for the feedback resistors Rf and the input resistors Ri are used In this case the tabulated preamplifier offsets and the values of the feedback and input resistors are combined in an Error Equation whi...

Page 16: ...operation as either a SOURCE OR A SINK See FIG 1 2 NOTE Operation in the second quadrant of the graph must be derated as indicated TABLE 1 3 DYNAMIC SPECIFICATIONS DYNAMIC SPECIFICATIONS VOLTAGE CHANNEL CURRENT CHANNEL BOP 500M BOP 1000M BOP 500M BOP 1000M Closed Loop Gain 50 V V 100 V V 8 mA V 4 mA V Bandwidth d c to f 3 dB 5 3 KHz 1 8 KHz 2 0 KHz 1 5 KHz Programming Time Constant 30 µsec 88 µsec...

Page 17: ... for control and biasing purposes These reference sources are available at the rear programming connector with reference to the COMMON terminal Their specifications are tabulated in Table 1 2 C OFFSET NULLING Controls are provided to zero the initial offsets Eio Iio of both the volt age and current control preamplifiers D LOAD REACTANCE To realize the full high speed potential of the BOP the load ...

Page 18: ...oltage current limiting circuits EO LIMIT EO LIMIT IO LIMIT IO LIMIT for overvoltage overcurrent protection in either operating mode All limiting circuits can be screwdriver adjusted by means of four front panel controls In addition all four limits can be remotely controlled by means of 0 to 10 volts d c control voltages The four limits may be programmed independently or the voltage and current li...

Page 19: ... 19 inch equipment rack refer to Section 2 FIG 2 5 A pair included with each BOP Kepco Part No 128 1282 right 128 1281 left B REAR PROGRAMMING CONNECTOR Kepco Model PC 9 30 terminal printed circuit connector for all rear programming connections and flag signal outputs One included with each BOP ...

Page 20: ...1 8 BOPHV020411 FIGURE 1 4 MECHANICAL OUTLINE DRAWING BOP HV ...

Page 21: ... responsible transport service 2 2 TERMINATIONS A FRONT PANEL Refer to FIG 2 2A and Table 2 2 B REAR Refer to FIG 2 2B and Table 2 2 C INTERNAL CALIBRATION CONTROLS Refer to FIG 2 1 and Table 2 1 FIGURE 2 1 LOCATION OF INTERNAL CALIBRATION CONTROLS TABLE 2 1 INTERNAL CALIBRATION CONTROLS REFERENCE DESIGNATION CONTROL PURPOSE ADJUSTMENT PROCEDURE R18 10V CAL Reference Voltage Calibration Section 5 ...

Page 22: ...2 2 BOPHV 020411 FIGURE 2 2 BOP TERMINATIONS AND CONTROLS ...

Page 23: ...age with switch ON 11 EO METER d c output voltmeter reads also average a c signals 12 EO MODE LED lamp indicating voltage mode operation 13 CURRENT LIMIT LED lamp indicating current limiting operation 14 CURRENT LIMIT Controls for manual adjustment of the current limits BOP 500M BOP 1000M A 80mA to 0 40mA to 0 B 0 to 80mA 0 to 40mA 15 IO INPUT Programming input terminals for current pre amp 16 BIP...

Page 24: ... MUST BE KEPT CLEAR FROM ALL OBSTRUCTIONS TO ENSURE PROPER AIR CIRCULATION Periodic cleansing of the interior of the power supply is recommended If the BOP is rack mounted or installed in confined spaces care must be taken that the ambient temperature the temperature immediately sur rounding the power supply does not rise above 65 C 149 F 2 5 PRELIMINARY CHECKOUT A simple operating check after unp...

Page 25: ...he indicator lamp part of the A C POWER switch 1 will be ON The OUTPUT READY lamp 2 AND EO MODE lamp 12 will also be ON E Turn the BIPOLAR VOLTAGE CONTROL 10 clockwise through its range while observing the front panel EO METER 11 The BOP output voltage should smoothly follow from the maximum negative output voltage over zero to the maximum positive output voltage of the BOP Turn A C POWER SWITCH 1...

Page 26: ...nt of the BOP Turn A C POWER switch 1 OFF Remove the short circuit from the output termi nals THIS CONCLUDES THE PRELIMINARY CHECK OUT OF THE BOP 2 6 INSTALLATION Refer to FIG 2 5 The BOP is delivered with mounted SLIDE SUPPORT BRACKETS and MOUNTING FLANGES and ready for installation into any standard 19 inch instrument rack Please refer to PAR 2 4 COOLING if the BOP is to be mounted into a multip...

Page 27: ...IS CAPABLE OF PRODUCING LETHAL VOLTAGES Exercise extreme care in making all connections to and from the BOP terminals REMOVE A C POWER FROM THE BOP BEFORE MAKING ANY CONNECTIONS 2 An interlock device removes the A C source power from the BOP if the rear terminal cover plate if lifted DO NOT BYPASS THE INTERLOCK 3 Wires and or cables connected from the BOP terminals to external components or progra...

Page 28: ... is represented at the beginning of Section 4 see FIG 4 1 THE FOUR CIRCUITS CAN BE PROGRAMMED SEPARATELY AS DESCRIBED IN THE EXAMPLES IN THIS SECTION OR THEY CAN BE USED SIMULTANEOUSLY AS AN APPLICATION REQUIRES WITH THE EXCEPTION OF THE TWO 2 MAIN BIPO LAR VOLTAGE AND CURRENT CHANNELS WHICH ARE SELECTED BY THE FRONT PANEL MODE SWITCH AND CANNOT BE OPERATED SIMULTANEOUSLY The numbered terminals in...

Page 29: ...BOPHV020411 3 3 FIGURE 3 2 BOP CURRENT CONTROL CHANNEL FIGURE 3 3 BOP VOLTAGE LIMITING CIRCUIT ...

Page 30: ...keep the series resistance and inductance low In addition the load wire pair should be tightly twisted to reduce possible pick up from stray magnetic fields The basic 2 wire connection is useful where the voltage drop in the load wires is of minor con sequence as for example operation into a constant load or in a constant current operating mode FIGURE 3 5 BASIC 2 WIRE LOAD CONNECTION AND GROUNDING...

Page 31: ...common side of the BOP output is shown grounded in FIG s 3 5 and 3 6 since it is common to both internal reference source and any external signal source If the application requires the common side of the BOP may be floated up to 500V d c off ground In this case however the com mon mode current specified in Section 1 PAR 1 3E will flow through the impedance of whatever circuit is placed between com...

Page 32: ...a apply In addi tion such specifications as listed below should be carefully considered if the application requires 1 END RESISTANCE 2 LINEARITY 3 CAPACITIVE AND INDUCTIVE EFFECTS H ACTIVE PROGRAMMING SOURCES External programming sources Signal Generators etc or reference sources should have temperature coefficients and drift specifications comparable to or better than the BOP Power Supply I CAUTI...

Page 33: ...LAMP is ON Repeat the same procedure for the other polarity If the application is unipolar choose zero limit for the undesired polarity 5 Go back to the BIPOLAR VOLTAGE CONTROL and adjust for zero output voltage 6 Set the BOP A C POWER switch to OFF and connect the load 7 Turn the A C POWER switch ON again adjust the operating voltage by means of the BIPOLAR VOLTAGE CONTROL to the value required N...

Page 34: ...TAGE CONTROL with the BIPOLAR VOLTAGE CONTROL SWITCH in the ON position Since the EO PRE AMP with the built in feedback and input resistors has a gain of one and the EO BIPOLAR AMPS have respective gains of 50 BOP 500M and 100 BOP 1000M a d c input signal of zero to 10V will control the BOP output through its specified range In the local front panel control mode the d c control potential is applie...

Page 35: ...to 10 volts with the change in the decade resistance Rf As a consequence the BOP output voltage will also vary linearly with the change in decade resistance Inversion provided by the final output stage means that the BOP output voltage will be the same polarity as Eref FIGURE 3 7 REMOTE POTENTIOMETER CONTROL OF THE BOP D C OUTPUT VOLTAGE FIGURE 3 8 REMOTE D C OUTPUT VOLTAGE CONTROL BY MEANS OF A T...

Page 36: ...des a resolution of 12 bits with a linearity of 0 01 The digital and the power supply grounds are isolated optical isolation to 1000 volts Calibra tion of the system is performed with the controls provided by the Kepco Digital Programmer FIGURE 3 9 DIGITAL CONTROL OF THE BOP D C OUTPUT VOLTAGE Since all terminals of the EO PRE AMP are available at the REAR PROGRAMMING CONNEC TOR d c output voltage...

Page 37: ...rol can be used for the low end while the feedback resistor Rf 18k can be trimmed to calibrate the high end of the range 3 3 3 THE BOP AS AN AMPLIFIER If instead of the previously used d c control signal an a c signal voltage is applied to the EO PROGRAM INPUT the BOP functions as a bipolar amplifier As an amplifier the BOP has a voltage gain of 50 BOP 500M and 100 BOP 1000M respectively so that a...

Page 38: ...shift between the input and output signals of the BOP unit working as an amplifier is 0 in the non inverting configuration inherent or 180 in the inverting con figuration This is only for input signal frequencies smaller than 1 10 of the 3dB band width frequency listed in Section 1 Table 1 3 The basic programming circuit with which all the waveforms shown in FIG 3 11 can be pro duced is shown in F...

Page 39: ...lication To calculate the required components for the new gain require ment the output equation for the EO PRE AMP in the inverting configuration is used where EO PRE AMP 10V and the values of Rf and Ri depend on the available amplitude of the programming source If for example a 1 volt source is available the ratio Rf Ri must be 10 and the two resistor values can be Ri 10K and Rf 100K ohms respect...

Page 40: ... internal component 10K ohms and the following conditions are present the jumpers between pins P and F and between pins J and K are removed and a short circuit is applied across the EO INPUT pro gramming terminals 3 4 BOP OPERATION WITH REMOTE CONTROL OF THE CURRENT CONTROL CHANNEL In the local front panel control mode the BOP output current can be controlled by means of the BIPOLAR CURRENT CONTRO...

Page 41: ... CONTROL OF THE BOP OUTPUT CURRENT WITH THE BIPOLAR CURRENT CONTROL 3 4 1 REMOTE CONTROL OF THE BOP CURRENT CHANNEL Since the requirements for the control of the BOP output current are the same as for program ming the output voltage and since the control circuitry is almost identical all programming cir cuit descriptions for programming the output voltage of the BOP can be applied for current ...

Page 42: ...amming are noted on the diagrams NOTE Adjust the zero output current point by means of the built in IO ZERO control Make sure that the input of the BOP current channel is short circuited to the ground signal FIGURE 3 16 REMOTE POTENTIOMETER CONTROL OF THE BOP OUTPUT CURRENT FIGURE 3 17 REMOTE OUTPUT CURRENT CONTROL BY MEANS OF A TWO TERMINAL RESISTANCE ...

Page 43: ...BOPHV020411 3 17 FIGURE 3 18 DIGITAL CONTROL OF THE BOP OUTPUT CURRENT FIGURE 3 19 BOP OUTPUT CURRENT CONTROL WITH A HIGH IMPEDANCE 1 VOLT SIGNAL SOURCE ...

Page 44: ...URE 3 20 BASIC PROGRAMMING CIRCUIT FOR USE OF THE BOP AS A BIPOLAR CURRENT STABILIZED AMPLIFIER FIGURE 3 21 PROGRAMMING CIRCUIT FOR DRIVING THE BOP OUTPUT CURRENT WITH A BIPOLAR SIGNAL LESS THAN 10V EXAMPLE SHOWN 1V SOURCE ...

Page 45: ...ated and inverted to obtain two reference voltages 10V and 10V respectively These references are applied at the input of the two IO LIMIT CONTROL AMPS Both control amplifiers operate in the inverting configuration and produce the control potential according to the output equation Since Rf is adjustable the control voltage ECONTROL can be varied from zero to 10V and 10V respectively thus providing ...

Page 46: ...reference poten tial setting the front panel controls to their maximum clockwise position and substituting a vari able 0 to 10 volt reference potential The two limits may be controlled simultaneously and symmetrically or separately The necessary connections are shown in FIG s 3 24 and 3 25 respectively FIGURE 3 24 SYMMETRICAL REMOTE CONTROL OF THE BOP CURRENT LIMITS ...

Page 47: ...lled symmetrically with a 0 to 10V d c source or the and voltage limit can be controlled independently by individual 0 to 10V d c sources The necessary circuit connections are illustrated in FIG s 3 27 and 3 28 NOTE The front panel VOLTAGE LIMIT CONTROLS serve as a back up when remote controlling the voltage limits on the BOP The front panel VOLTAGE LIMIT CONTROLS should be set to their maximum po...

Page 48: ...3 22 BOPHV020411 FIGURE 3 27 SYMMETRICAL REMOTE CONTROL OF THE BOP VOLTAGE LIMIT CIRCUIT FIGURE 3 28 INDEPENDENT REMOTE CONTROL OF THE BOP VOLTAGE LIMIT CIRCUITS ...

Reviews: