background image

SELENA

  Multifunctional LED Clock 


USER MANUAL  V32D 

KERA TECHNOLOGIES INC.  2013 


www.ledclocks.com 

INSTALLATION 


NOTE:  Before installation, determine the correct voltage rating required for the particular clock model.


The Clock may be installed using special ceiling mounting kit or on a wall as per attached installation drawing 
and instructions. 
Most models for hanging on the wall and for use as desktop should be plugged into the power line outlet using 
the attached power cord extending from the back panel. 
Keep the clock away from water, excessive heat, moisture and dust or chemically aggressive environment., 
unless your model has a waterproof or a special, environmentally sealed enclosure. 


POWER Connection 


NOTE:  Before installation, determine the correct voltage rating required for the particular clock model. 

Make sure that all power is disconnected.


Please observe local electrical code requirements while installing the power connections. 


For models with the power cord just plug it into available power outlet. 


For models With the Power Terminal block follow the instructions: 
 
1. 

Locate the power screw terminal marked “SUPPLY” on the back panel of the enclosure. 


2. 

Connect the Power Line wires, including the Ground wire, to the corresponding terminals and tighten 
the screws securely. 


If the Ground wire or the Ground Terminal is not available, leave that terminal unconnected. 


NOTE,  that in case the power supply fuse needs to be replaced, use the exact fuse rating as specified for your 

clock model, usually stated in the label on the back panel. Note, that aside from the fuse current 
protection rating, the fuses are also classified as Low Blow or Fast Blow. In most clock models the Slow 
Blow fuses are used. 

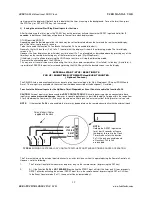
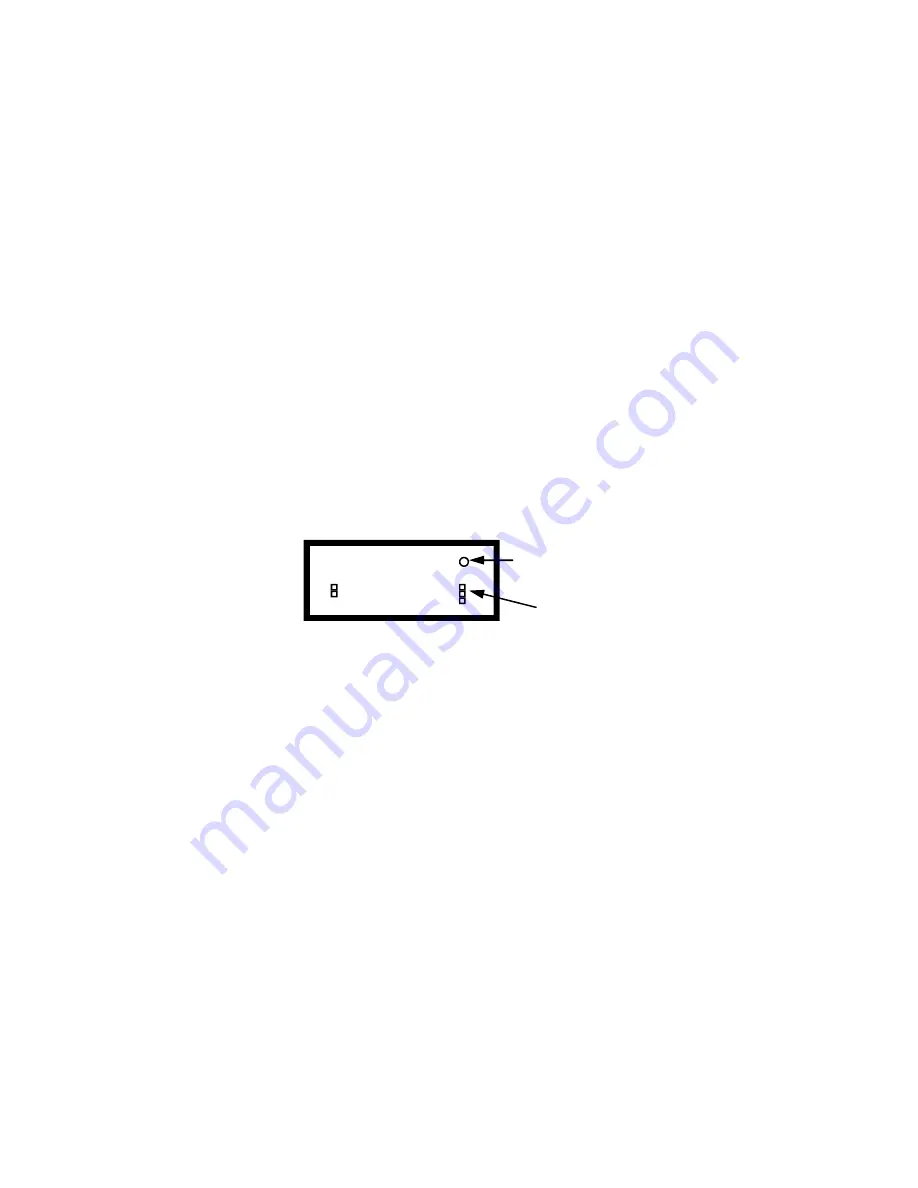
Power Terminal 

Power Fuse 

POWER LINE 

Summary of Contents for SELENA

Page 1: ...SELENA Multifunctional LED CLOCK Rev V32D KERA Technologies Inc E mail sales ledclocks com...

Page 2: ...he display between the Timer and The Real Time Clock 18 External Inputs for Up Down Stopwatch Timer and Event Counter 19 Programmable Multi Event Timer 21 Internal Control Relay 23 Internal Control Re...

Page 3: ...Down Timer recovery after power failure Digital Stopwatch with 1 sec and 1 100 sec resolution Digital Up Down Programmable Event Counter External Timer and Counter inputs interface option Daily Wake U...

Page 4: ...required for the particular clock model Make sure that all power is disconnected Please observe local electrical code requirements while installing the power connections For models with the power cord...

Page 5: ...custom TEXT in memory TALK Initiates spoken announcement optional or start restart the Text display scan in selected models CLK Press it before operating other keys to put the Remote in the clock comm...

Page 6: ...the Programmable Thermostat mode initiates MANUal control HOLD 1 HALTS the display scrolling alternating mode at the current display during regular operation 2 SAVES the preset data into memory for t...

Page 7: ...display MODE used for 4 digits displays This function causes the display to be inverted 180 degrees so that the clock can be rotated upside down Fn 11 Enable for the Preset of the Sync Frequency for...

Page 8: ...memory functions If not enabled the EXTERNAL sensor is used Fn 28 LOOPING TIMER ENABLE For both UP and DOWN counting the timer counter will reset and restart itself automatically upon reaching the PR...

Page 9: ...operates then in the HOURS MINUTES format and allows for presetting of only ONE Alarm Time to be repeated every day See also Fn 38 and Fn 37 Fn 40 ALTERNATING DISPLAY SEQUENCE EQUAL SPLIT When selecte...

Page 10: ...ER ENABLE function is necessary when the EXTERNAL TIMER INPUTS are installed and enabled by Fn 36 Fn 59 REMOTE CONTROL enabled when EXTERNAL TIMER COUNTER inputs used This function enables the remote...

Page 11: ...ter Slave system see Fn 34 53 81 When enabled in the Slave that is a part of the Master Slave system some data like the temperature will display as in the Master clock Fn 83 SLAVE INTERNAL RELAY CONTR...

Page 12: ...tem setup function for displays with 4 digits and with alphanumeric text Fn 93 Selection of the installed temperature probe type as either 50Kohm Fn 93 disabled or 100Kohm Fn 93 enabled model of the s...

Page 13: ...ut of charge or the clock was not previously set If however the time is still correct the clock will resume the normal operation NOTE that it is advisable that the display be set to indicate the Real...

Page 14: ...nnect the power momentarily then restore it and disable Fn 62 within 33 seconds Also see the function Fn 63 to disable the remote communication except the timer functions and the brightness control DA...

Page 15: ...other timer counter modes 5 If the TEXT DATE alternating mode was set as active remember to press the TALK key after the programming of the text is finished in order to resume the alternating mode WA...

Page 16: ...d and Fn 35 enabled NOTE that even in the 6 digit display models the 4 digit format may be selected Fn 9 disabled if necessary C In models with TEXT display Fn 85 enabled Fn 72 HH MM SS hh timer or co...

Page 17: ...h 00 00 preset NOTE When Fn 87 is NOT enabled and the TIMER PRESET is 00 00 00 the Timer will operate in the COUNT UP mode 1 Press the STRT key at any time during normal clock operation In the Event C...

Page 18: ...ernal START input This option may not be available on standard clock models unless specifically ordered 1 100 SECOND RESOLUTION for UP TIMER STOPWATCH Optional Feature Enable the function Fn 35 Note t...

Page 19: ...d EVENT COUNTER Optional Feature The SELENA timers and event counters may be set up to use external inputs for Start Stop count UP count DOWN and Reset These inputs are available via the screw termina...

Page 20: ...D CLOSED COUNT DISABLED RESET JUMPER Common RESET STOP DN START UP SPECIAL OPTION WIRING OF EXTERNAL DRY CONTACT SWITCHES FOR TIMER COUNTER OPERATION WITH THE STOP INPUT OPERATING AS THE TIMER COUNTER...

Page 21: ...the function Fn 69 is also enabled the external START can START STOP the timer The external STOP input does not have to be used The external RESET input still has to be used to RESET the timer PROGRAM...

Page 22: ...d by the timer routine Option 01 no options to perform Option 02 activate the count DOWN timer automatically to count DOWN the time until the next event and DO NOT energize internal Relay 2 Option 03...

Page 23: ...internal Control Relays that can be used to switch external loads up to 10Amp 240VAC Both of the Internal Relays have SPDT contacts available but may not be accessible to the user in some models For i...

Page 24: ...d the Internal relay will be switched ON in response to the Count Up or Down Timer Counter Expiration ALARM only for a period of 3 seconds and will remain NORMALLY switched OFF in all other conditions...

Page 25: ...e MUTE key or the SET key and it will remain silent until the present alarm is reset manually or automatically and a new alarm occurs NOTE 1 In the Programmable Multi Event Timer modes the Buzzer will...

Page 26: ...mats 0 1 2 or 3 C Using the LATHEM compatible protocol ASCII Time Code 6 MINUTE IMPULSE Sync System for 2 wire 3 wire and Reverse Polarity 1 Minute and 1 2 Minute Impulse 7 BCD Time Code Simplex compa...

Page 27: ...E 2 COND ONLY SHIELDING OPTIONAL RS 232 or USB PC SERIAL PORT PC WITH RS 232 or USB PORT AND INSTALLED PC2KERA DRIVER S W option 721 RX GND PC USED AS THE MASTER WITH TWISTED PAIR RS 485 SYNC COMMUNIC...

Page 28: ...PC2KERA driver S W option 721 MASTER CLOCK SELENA or Other GENERAL MASTER SLAVE SYSTEM WITH SELENA OR OTHER MASTER CLOCK OR A PC USED AS THE MASTER RS485 RS232 OR OTHER SYNC COMMUNICATION WIRING AND...

Page 29: ...he Time data from the Master and will set its own internal clock in sync with it In these configurations even if the data connection is lost the Slaves will continue accurate timekeeping based on the...

Page 30: ...INE MODEMS option 724RS POWER LINE RXIN RS D IN PLC IN TXOP PLC OUT RS D OUT JUMPERS RS232 OR RS485 FROM PC SYNC USING PC AS THE MASTER AND BROADCASTER SYNC USING PC AS THE MASTER AND THE CLOCK AS BRO...

Page 31: ...C MODEM and a PC AS THE MASTER GPS WWVB INTERNET 1 2 or 3 PHASE EXTERNAL POWER LINE MODEM WITH RS232 OR RS485 INPUT option 724XRS PLC POWER LINE SLAVE CLOCKS WITH INTERNAL POWER LINE MODEMS option 724...

Page 32: ...POWER LINE JUMPER RS232 OR RS485 FROM GPS WWVB OR ETHERNET SYNC USING THE CLOCK AS THE MASTER AND BROADCASTER SYNC USING GPS WWVB OR ETHERNET AND THE CLOCK AS BROADCASTER RXIN RS D IN PLC IN TXOP PLC...

Page 33: ...ERTER may be necessary option 901 PC COMPUTER with RS232 or USB serial port and with installed PC2KERA driver S W option 721 RXIN RS D IN RFTX IN TXOP RFRX OUT RS D OUT JUMPERS RS232 OR RS485 FROM PC...

Page 34: ...ption 725RF and 725 or 725232 SLAVE CLOCKS WITH INTERNAL RF RADIO MODEMS option 725RF 88 88 88 88 88 88 88 88 OPTIONAL JUMPER RS232 OR RS485 FROM GPS WWVB OR ETHERNET SYNC USING THE CLOCK AS THE MASTE...

Page 35: ...and a PC AS THE MASTER GPS WWVB INTERNET EXTERNAL RF RADIO MODEM WITH RS232 OR RS485 INPUT option 725XRF SLAVE CLOCKS WITH INTERNAL RF RADIO MODEMS option 725RF 88 88 88 88 88 88 OPTIONAL RS232 USB or...

Page 36: ...repeater may be used to improve the signal quality or strength Clocks that are not enabled as slaves may continue to operate in the Stand Alone mode For the SELENA Sync Standard Protocol To keep the S...

Page 37: ...es too weak for the slaves farther down the sync path The Repeater slaves must have the functions Fn 34 and Fn 53 enabled and the appropriate Repeater Channel selected All other slaves in the system m...

Page 38: ...and Fn 13 Note that only the Format 0 or 3 may be selected in the Master NOTE ONLY ONE MASTER IS ALLOWED TO OPERATE ON THE SAME NETWORK OR A COLLISION WILL OCCUR A Twisted Pair cable must be connected...

Page 39: ...RS232 OR USB TO MORE ZONES IF NECESSARY PC COMPUTER With installed PC2KERA driver S W option 721 NOTES 1 For Multi Zone Type A the slave zones should have the function Fn 34 and also function Fn 50 en...

Page 40: ...8 88 88 88 88 88 88 ZONE SLAVE ZONE N 88 88 TO MORE ZONES IF NECESSARY PC COMPUTER With installed PC2KERA driver S W option 721 RS232 RS485 or USB COMMUNICATION RS 232 USB PC to RS 485 CONVERTER may b...

Page 41: ...o an absolute time hours and minutes Offset All methods allow the zones to differ by as little as 1 minute from each other The internal timekeeping by each zone clock allows it to display the zone tim...

Page 42: ...0min 7 Press the SCAN key to return the display to the clock mode 8 Initiate the functions programming mode again and Disable Fn51 zone offset programming enable IMPORTANT The TYPE A Zone Offset progr...

Page 43: ...0 and Fn 1 when enabled will cause the display to show the temperature sensed by one or two probes Up to 2 temperature probes may be connected to the clock terminals optional For the ease of understan...

Page 44: ...le the function Fn 1 and disable all other display functions Fn 0 and Fn 2 to Fn 7 To select the INTERNAL probe enable Fn 0 instead of Fn 1 If the INTERNAL probe is to be selected as the control probe...

Page 45: ...ing it 2 Press the FUN key until the display shows the present temperature reading with the flashing C or F character If necessary toggle between CELSIUS or FAHRENHEIT unit by pressing the UP or DN ke...

Page 46: ...led When both Fn 0 and Fn 1 are enabled the digital display section will also show a short text designating which temperature probe test is about to be displayed This text contents may be selected usi...

Page 47: ...rmostat may be preset for up to 32 events separately for each of the 7 days of the week repeated each week Total of up to 224 events per week The Programmable Thermostat mode allows for programming of...

Page 48: ...ONLY COOLING control is required If only HEATING control is required the HEATING switch over temperature limit SUNDAY event 30 must be programmed as lower than any temperature ever expected and the C...

Page 49: ...e displayed Use the NXT key to scroll through the day temperature and hrs minutes for that event NOTE that at this point the system will also accept new settings for this and other events IMPORTANT NO...

Page 50: ...0 ft 150m Wiring for ONLY Heating or ONLY Air Conditioning system with one Internal SPDT Relay and with one external probe COMMON First Terminal block on the back panel Control Contacts TO THE HEATING...

Page 51: ...preset range 0 to 99Hrs 59min 59sec up or down Long Timer preset events Up to 32 events per each different day 7 day Event duration programmability 0 to 59 seconds in 1 sec steps or extended till next...

Page 52: ...part J This equipment generates uses and can radiate radio frequency energy and if not installed and used in accordance with the instruction manual may cause interference to radio communications It ha...

Page 53: ...WARRANTY For a period of one year from the date of delivery 90 days for the keyboard the Manufacturer warrants to the original user that the display system shall be free from defects in materials and...

Reviews: