background image


EW/EG-N/EWB-e-1627 

42 

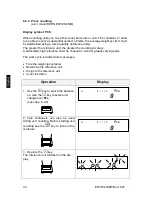
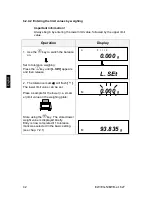
6.2.4.2  Entering the limit values by weighing 

 
Important information !


Always begin by entering the lower limit value, followed by the upper limit 
value. 
 

Operation


Display


1.  Use the 

 key to switch the balance 

on.  


Set to tolerance weighing: 
Press the 

 key until 

[L. SEt] 

appears 

and then release.  


2.  The tolerance mark 


  will flash 

[


]

The lower limit value can be set.  
 
Place a sample for the lower (i.e. small-
er) limit value on the weighing plate:  


Store using the 

 key. The stored lower 

weight value is displayed briefly. 
Entry is now completed if 1 tolerance 
mark was selected in the basic setting 
(see chap. 7.2.1). 


ο


0  I  I  I  F


0.000 

g


L. SEt 


 M


0.000 

g


 M


93.835 

g


Summary of Contents for EG 220-3NM

Page 1: ...ei 1 D 72336 Balingen E Mail info kern sohn com Tel 49 0 7433 9933 0 Fax 49 0 7433 9933 149 Internet www kern sohn com Operating instruction Precision balances KERN EW EG N EWB Version 2 7 04 2016 GB...

Page 2: ...tion place of use 14 5 2 Unpacking 15 5 2 1 Installation 15 5 2 2 List of items supplied 15 5 2 3 Positioning the weighing plate 16 5 2 4 Serial draft shield installation 16 5 2 5 Draft shield install...

Page 3: ...numerous functions 46 7 2 List of the function parameters 47 7 2 1 Parameters when weighing with a tolerance range excl model KERN EW120 4NM 49 7 2 2 Parameters for the serial interface 50 8 Data out...

Page 4: ...ernal internal Stabilization time 3 sec 3 sec 3 sec Weighing plate stainless steel 118 mm 118 mm 118 mm Weight kg net 2 0 2 0 2 0 Units verification switch in verifi cation position chap 5 10 g ct Uni...

Page 5: ...100g E2 Stabilization time 3 sec 3 sec 3 sec Weighing plate stainless steel 180 x 160 mm 180 x 160 mm 80 mm Weight kg net 3 7 3 7 2 4 Units verification switch in verification position chap 5 10 g ct...

Page 6: ...1 2 x 200g E2 500 g E2 Stabilization time 2 sec 2 sec 2 sec Weighing plate stainless steel 118 mm 118 mm 118 mm Weight kg net 1 3 1 3 1 3 Units verification switch in verifi cation position chap 5 10...

Page 7: ...g F1 2000 g F1 2 x 2 kg E2 Stabilization time 2 sec 2 sec 2 sec Weighing plate stainless steel 170 x 142 mm 180 x 160 mm 180 x 160 mm Weight kg net 1 3 2 8 2 8 Units verification switch in verifi cat...

Page 8: ...Stabilization time 3 sec 3 sec Weight kg net 2 8 2 8 Units verification switch in verifica tion position chap 5 10 g ct Units verification switch not in veri fication position chap 5 10 g ct oz lb ozt...

Page 9: ...adjusting weight not included class 200 g M1 500 g F2 1 000 g M1 Stabilization time 2 sec 2 sec 3 sec Weight kg net 1 1 1 1 1 3 Units verification switch in veri fication position chap 5 10 g ct Units...

Page 10: ...1 Weighing unit EG 620 3NM EW 620 3NM EW 820 2NM EG 2200 2NM EW 2200 2NM g 0 001 0 01 0 01 ct 0 01 0 05 0 1 oz 0 0001 0 0005 0 001 lb 0 00001 0 00005 0 0001 ozt 0 0001 0 0005 0 001 dwt 0 001 0 01 0 01...

Page 11: ...7 429 187 145 1 32027 0 08252 1 20337 24 06741 1tl SGP Mal 37 79936 188 99682 1 33333 0 08333 1 21528 24 30556 1tl Taiwan 37 5 187 5 1 32277 0 08267 1 20565 24 11306 1mom 3 75 18 75 0 13228 0 00827 0...

Page 12: ...ur ing equipment Be sure to avoid impact shock and overloading the balance in excess of the pre scribed maximum load rating max minus any possible tare weight that is already present This could cause...

Page 13: ...information 3 1 Observe the information in the operating instructions Please read the operating instructions carefully before erecting and commissioning even if you already have experience with KERN...

Page 14: ...e against direct draughts due to open windows and doors Avoid jarring during weighing Protect the balance against high humidity vapours and dust Do not expose the device to extreme dampness for longer...

Page 15: ...king location 5 2 1 Installation Use the foot screws to level the balance until the air bubble in the bubble level is in the prescribed circle 5 2 2 List of items supplied Standard accessories 1 Balan...

Page 16: ...5 2 3 Positioning the weighing plate Screw the bracket on tightly according to the drawing and subsequently attach the weighing plate 5 2 4 Serial draft shield installation Only for models with reado...

Page 17: ...both screws to the left and right of the bracket guide and re move Now place the draft shield to fit on the housing and and secure through the opened sliding doors using both screws Screw the bracket...

Page 18: ...e packaging and begin by connecting the electric power supply to the circuit board of the rechargeable battery Subsequently set up the plug in connection to the computer circuit board of the bal ance...

Page 19: ...r on adjusting chap 5 7 5 6 1 Power display If the sign can be seen the balance is being supplied with power via the mains adaptor The balance is in weighing mode when the key is operated The power di...

Page 20: ...ur balance to zero at any time and thus ensure that weighing really does commence at zero Set ting to zero when a weight is applied is only possible within a certain type dependent range In the event...

Page 21: ...iodically during weighing operation in order to obtain exact measured values 5 8 Adjusting 5 8 1 Adjusting with externall weight only KERN EW B EW N For verified balances the verification switch is lo...

Page 22: ...ng Zero point will be saved After that CAL on will appear Rotate the turn knob on the right side of the balance in to position CAL Adjustment is carried out automatically CAL on will appear flashing T...

Page 23: ...weight see Chapter 1 Tech nical Data The adjustment can also be carried out with different adjusting weights see table but not ideal from a metrological point of view Information concerning the adjus...

Page 24: ...ly release both keys sim ultaneously The zero point will be stored Place the adjusting weight carefully on the centre of the weighing plate Display flashing on F S then a moment later the weight value...

Page 25: ...case of doubt please contact your local office of weights and measures Verification information An EU qualification approval is available for those balances marked as appropriate for verification in t...

Page 26: ...nce is sealed at the marked position Balance calibration is not valid without the official seals Position of the official seals Move verification switch Balances that are subject to compulsory verific...

Page 27: ...EWB e 1627 27 6 Operation 6 1 Operating elements Bubble level Draft shield Display Keyboard Adjustable device feet Mains adaptor connection RS232C interface connection excl EWB models Adjusting switch...

Page 28: ...ter and percent mode Choice menu for unit and Save function parameters Call up lower and upper tolerance levels Key to alter the weight unit g ct Pcs Entry of lower and upper tolerance levels Choosing...

Page 29: ...ce carry out balance function e g unit count display of stored value CAL Calibration display Signalises calibration procedure Bar graph ct carat oz ounce lb pound ozt fine ounce dwt penny weight upper...

Page 30: ...to weigh as soon as the 0 000 display appears Apply the item to be weighed The weight value is displayed A switch can be made from one unit to anoth er e g from g to another unit for example ct by re...

Page 31: ...l completely for underfloor weighing Place the balance over an opening Hang the item to be weighed on the hanging loop and carry out weighing CAUTION Take care that the hooks used for the underfloor w...

Page 32: ...equent weigh ings Operation Display Place the empty tare container on the weighing plate The total weight of the applied container is displayed Press the key to start the tare pro cedure The weight of...

Page 33: ...ow read off the weight of the added item to be weighed on the display Information The balance is only ever able to store one tare value The stored tare value is displayed prefixed by a minus sign when...

Page 34: ...y A particularly high reference must be chosen for small or greatly varying parts The work cycle is divided into four stages Tare the weighing container Determine the reference unit Weigh in the refer...

Page 35: ...s required by the set reference unit 6 Operate the key The reference unit is stored Now place the items to be counted in the container The appropriate number of items will be shown on the display 7 Us...

Page 36: ...he necessary minimum number of items is automatical ly ensured Operation Display 1 Carry out item 1 5 as in chap 6 2 2 Parts counter e g place 10 items on the weighing plate 2 Operate the key The refe...

Page 37: ...ey The reference unit is stored Now place the items to be counted in the container The appropriate number of items will be shown on the display Use the key to return to the desired weighing mode Infor...

Page 38: ...andard setting 100 Operation Display 1 Use the key to switch the bal ance on Use the key to select unit change over see chap 6 2 1 Information Tare containers can also be used during percent weighing...

Page 39: ...y was operated during step 2 when the weight had been ap plied The 100 reference is preserved until the balance is disconnected from the mains 6 2 4 Weighing using a tolerance range excl model KERN EW...

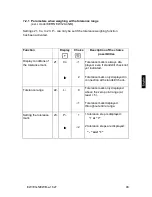
Page 40: ...mode will appear 2 Tolerance weighing Operate the key to call up tolerance weighing mode 2 SEL 0 Off 2 SEL 1 ON Use the key to change the standard factory configuration 3 Tolerance mark display Operat...

Page 41: ...e a zero point range 5 5 Number of tolerance points Use the key to set the tolerance mark 1 tolerance mark can be displayed too light Use the key to change the setting 2 tolerance marks can be display...

Page 42: ...Set to tolerance weighing Press the key until L SEt appears and then release 2 The tolerance mark will flash The lower limit value can be set Place a sample for the lower i e small er limit value on...

Page 43: ...e must now be determined The tolerance mark is flashing and the upper limit value can be set Place a sample for the upper i e larger limit value on the weighing plate 5 Use the key to store The stored...

Page 44: ...s the key The last digit in the display starts to flash 3 Use the key to increase the nu merical value of the selected digit 4 Use the key to select the digit you wish to alter from right to left 5 Fu...

Page 45: ...7 If 2 tolerance marks have been selected the upper limit value must now be determined Please proceed as described in item 2 starting with the last display digit 8 Enter the upper limit value and sto...

Page 46: ...e Press the key for about 4 seconds until FUNC appears When released the following will appear possible configurations are listed in chap 7 2 2 2 Changing the functions Run through the various functio...

Page 47: ...utomatic shutoff activated for rechargea ble battery operation optional Display speed 5 rE 0 Setting for metering 1 Sensitive and fast 2 3 4 5 Non sensitive but slow Vibratory filter 6 S d 1 Sensitive...

Page 48: ...tion is enclosed in brackets Comment Always select this setting before the balance is calibrated as this menu item can no longer be called due to the calibration 3 The printout is only carried out if...

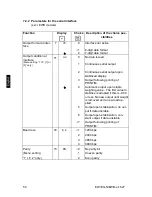
Page 49: ...lities Display conditions of the tolerance mark 21 Co 1 Tolerance mark is always dis played even if standstill check not yet indicated 2 Tolerance mark only displayed in connection with standstill che...

Page 50: ...ontinuous serial output upon stabilised display 3 Output following printing of PRINT M 4 Automatic output upon stable weighing value The first value to stabilise is adopted if this is 0 00 or less No...

Page 51: ...t the rear side of the balance It is a 5 pole standard socket Pin description see following illustration 8 2 Technical data of the interface Transfer format serial data transfer Data bit 8 bit Standar...

Page 52: ...AH CR return travel LF line feed 1 2 3 4 5 6 7 8 9 10 11 12 13 14 P1 D1 D2 D3 D4 D5 D6 D7 U1 U2 S1 S2 CR LF 7 digit data format 1 2 3 4 5 6 7 8 9 10 11 12 13 14 15 P1 D1 D2 D3 D4 D5 D6 D7 D8 U1 U2 S1...

Page 53: ...Percent excl EW 120 4NM P C 50H 43H Quantity Pcs excl EW 120 4NM 8 4 5 Result of the evaluation Type of data S 1 1 Word S 1 Code Meaning When weighing using tolerance range L 4 CH Weighing value below...

Page 54: ...weight value No data output at unstable weight value Data output again after stabilization has been reached O 6 4FH 36H Data output upon stable weight value Continuous data outputting at unstable weig...

Page 55: ...de Description A 0 0 41H 30H 30H No errors E 0 1 45H 30H 31H Error message 9 Maintenance upkeep disposal 9 1 Cleaning Please disconnect the device from the operating voltage before cleaning Only use a...

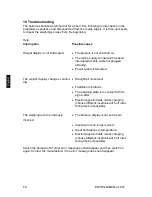
Page 56: ...ted The weight display changes continu ally Draught air movement Table floor vibrations The weighing plate is in contact with for eign matter Electromagnetic fields static charging choose different lo...

Page 57: ...claration of Conformity To view the current EC EU Declaration of Conformity go to www kern sohn com ce The scope of delivery for verified weighing balances conformity rated weighing balances includes...

Reviews: