background image

NEVER LEAVE THE HEATER

UNATTENDED WHILE BURNING!

8

Fig.17

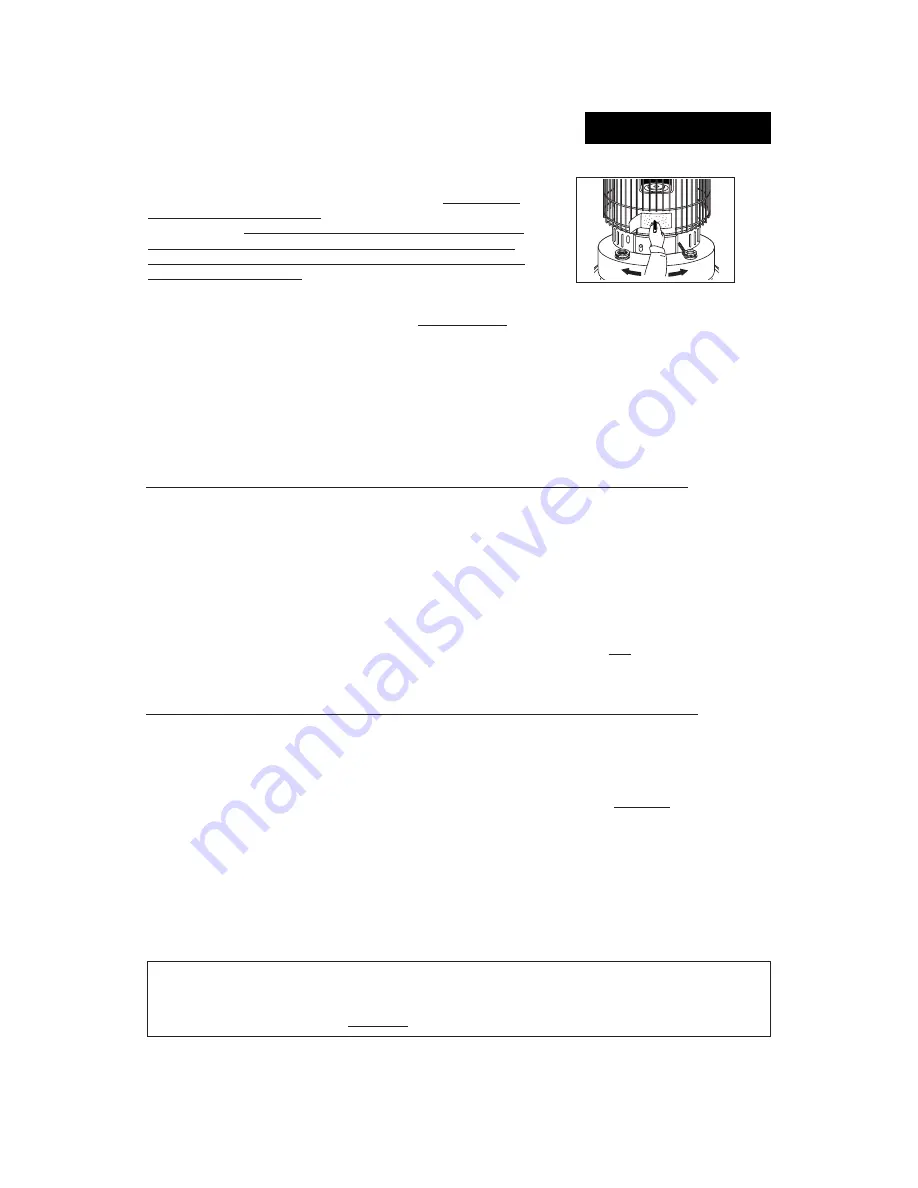
NOTE : During start-up, small adjustments to the flame can be performed
by using the burner knob on the front of the burner and MOVING THE
BURNER FROM SIDE TO SIDE 
until the flame at the top of burner is as
even as possible. DO NOT TOUCH THE BURNER KNOB ONCE THE
HEATER HAS REACHED NORMAL OPERATING TEMPERATURE
AND THE FLAME HAS STABILIZED. THE BURNER KNOB IS VERY
HOT DURING OPERATION.

IMPORTANT NOTE : This heater is designed to operate with a flame height of no more than 1/2" at the top of
the burner. For proper combustion to occur, it is very important that the flame height be adjusted so that it is
neither too high, nor too low.  Operating the heater at a wick setting below the minimum recommended setting
(the wick-stop setting) could result in the risk of fire and / or carbon monoxide poisoning.

NOTE : If you find that the wick will not raise, push the safety reset lever (see diagram on P.2) to engage the

safety shut-off device. Then dial the wick up via the wick adjuster knob.

WARNING : RISK OF INDOOR AIR POLLUTION AND FIRE, DO NOT OPERATE HEATER AT WICK

SETTING LOWER THAN MINIMUM WICK-STOP SETTING.

WICK MAINTENANCE / HOW TO CHECK THE CONDITION OF YOUR WICK

Failure to clean your heater’s wick may result in low heat output, cause your heater to burn with an annoying odor and could
damage or destroy the wick adjusting assembly. It can also make it very difficult to light the wick. 
Carbon and tar will accumulate on top of the wick as the kerosene burns and must be removed. How often you need to "Dry Burn

"

depends on your use of the heater and the quality of fuel available. The best way to know is to check the wick often.

Check Your Wick Often!

If the wick is hard to light using the heater’s ignition system...
If the wick is hard to raise or difficult to adjust by turning the knob...
If the wick fails to drop completely when you push the shut-off knob...
If the top of the wick is stiff & hard like a bristle brush...
It is time to DRY BURN your heater. A wick that is in good condition will feel soft to the touch will light 

easily and extinguish quickly.

Note: Poor fuel or fuel contaminated with water will also turn the wick hard.

"DRY BURNING" YOUR HEATER / REMOVING CARBON FROM YOUR WICK

"Dry burning" your heater will cause a strong odor. For this reason it is best to 

"

dry burn

your heater outdoors on a day that is

completely calm and windless. If it

s too windy outside you can consider a porch, breezeway or other room with all of the windows

open to disperse the strong odor.

Step 1

With your fuel tank nearly empty, burn your heater (without refueling) until the flame starts to burn out then raise the
wick to its highest possible setting and leave it there until it burns out completely. Wait 60 minutes, then re-light the
wick (with a match if necessary) and allow it to burn out again. Once the heater is cool to the touch, remove the cabinet
and brush the top of the wick with and old tooth brush, or other stiff bristle brush to remove any remaining ash. 
A canister type vacuum cleaner may be a useful tool in removing this ash.

Step 2

The first step should remove most carbon and your wick should feel softer to the touch. If any part still feels  hard, you
can use small pliers to pinch these hard spots and break up the carbon into pieces. After doing this, replace the
cabinet, add a small amount of fuel, wait at least one hour and then repeat Step 1.

Carry out Carbon Removal/Dry Burning within 5-7 days after your first use of your new heater to reduce carbon build-up on the
wick’s burning surface. Afterwards, dry burn your heater any time the wick appears to be hard. CHECK YOUR WICK OFTEN! Dry
burn your heater and remove all fuel from your heater at the end of the heating season.

Note: Burn your heater dry, as noted above, weekly during the heating season. Check your wick often
to see if CARBON REMOVAL/DRY BURNING is necessary. Carbon removal will NOT be effective if your
fuel has been contaminated by water or any other liquid. In this case you must clean the fuel tank,
replace the wick and soak it for 60 minutes in fresh, 1-K Kerosene.


Summary of Contents for KC2404

Page 1: ...n designed to instruct you as to the proper manner in which to assemble the heater maintain the heater store the heater and most importantly how to operate the heater in a safe and efficient manner please keep this manual for future reference World Marketing of America Inc 12256 William Penn Hwy Mill Creek PA 17060 Kero World 4221 0016 00 06 11 Rev 00 Printed in So Korea ...

Page 2: ...other small room with the door closed NEVER use heater to heat or boil water or use as a cooking appliance WARNING FAILURE TO INSTALL MAINTAIN AND OR OPERATE THIS KEROSENE HEATER ACCORDING TO MANUFACTURER S INSTRUCTIONS MAY RESULT IN CONDITIONS WHICH CAN PRODUCE BODILY INJURY AND OR PROPERTY DAMAGE NOTE The WARNING and IMPORTANT instructions appearing in this manual are not meant to cover all poss...

Page 3: ...FF DEVICE LONG TERM STORAGE OF YOUR HEATER TROUBLE SHOOTING GUIDE PARTS LIST EXPLODED PARTS DRAWING SPECIFICATIONS 8 9 9 11 12 12 13 13 14 15 15 15 PAGE CONTENTS OF OWNER S MANUAL INTRODUCTION Please read this OWNER S MANUAL carefully It will show you how to assemble maintain and operate the heater safely and efficiently to obtain full benefit from its many built in features FEATURES Carrying hand...

Page 4: ...r Fig 3 B MOUNTING TOP PLATE Fig 4 Align the arrow marking on the top plate with the carrying handle hole on the cabinet and place the top plate on the cabinet C INSTALLING FRONT AND REAR GUARDS Fig 5A and Fig 5B Hang the upper portion of the front guard notched to allow for the igniter door on the Upper Grill brackets with the downward hooked grill rods Fig 5A Snap the lower portion of the front ...

Page 5: ...rd choice large storage tank the likelihood of water being present from condensation increases If you purchase kerosene in bulk know your dealer It is EXTREMELY IMPORTANT to the operation of this heater that you use the proper grade of kerosene The proper grade of kerosene is identified as 1 K Kerosene DO NOT OPERATE THIS HEATER WITH ANY FUEL OTHER THAN 1 K KEROSENE 1 K Kerosene has been refined t...

Page 6: ...the fuel gauge on the base of the heater so that you will know when the tank is getting full When you approach the full mark loosen the cap on top of the siphon pump This will stop the flow of kerosene DO NOT OVERFILL YOUR HEATER Allow the siphon pump to drain thoroughly before you remove it from the tank and the kerosene container To change wick before refilling fresh kero in case wick has been c...

Page 7: ...itioned properly on the wick adjuster Then begin following the steps outlined in Adjusting the wick page 7 IGNITION VIA MATCH If you encounter a problem with the ignition mechanism or if you have dead batteries it is possible to light the heater with a match Fig 14 The procedure is as follows Turn the wick adjuster knob clockwise until the wick has been raised to its maximum height Lift the burn c...

Page 8: ...t 5 7 minutes of operation During the first 5 minutes after ignition the burner chamber warms up and flames will become visible at the top of burner These flames will gradually build up After 5 7 minutes of operation you should use the wick adjuster knob to obtain the proper flame height The proper flame height is a flame of no more than 1 2 at the top of the burner with an even distribution of fl...

Page 9: ... like a bristle brush It is time to DRY BURN your heater A wick that is in good condition will feel soft to the touch will light easily and extinguish quickly Note Poor fuel or fuel contaminated with water will also turn the wick hard DRY BURNING YOUR HEATER REMOVING CARBON FROM YOUR WICK Dry burning your heater will cause a strong odor For this reason it is best to dry burn your heater outdoors o...

Page 10: ...low heat output slow warm up damaged wick Use only a genuine replacement wick REPLACEMENT WICK NUMBER Kero World 32225 Dura Heat DH 145 PW 72 If cleaning the Wick does not improve performance you will need to replace the wick Refer to the TROUBLE SHOOTING GUIDE see page 14 which outlines conditions under which the wick should be replaced CAUTION Use ONLY a genuine Replacement Wick Part Number Kero...

Page 11: ...wick sleeve in the upward direction See the arrow marked up on the wick sleeve 12 Push the new wick into the retainer teeth of the wick sleeve so that the wick adheres tightly around the inside of the wick sleeve smoothing out any wrinkles 10 Remove the wick by folding it to the inside Then remove the wick sleeve from the bottom of the assembly 13 Line up the pins with the slotted holes inside the...

Page 12: ...disassembled check the Automatic Safety Shutoff system Remove the locking pliers or clothes pin from the TOS mechanism if you used them to assist with the wick installation Trip the automatic shutoff system by nudging the pendulum Raise the wick by turning wick adjuster knob Trip it again to make certain it is operating correctly 21 Turn the Wick Adjustment knob to test its operation Be certain th...

Page 13: ...e wick and to replace the wick when necessary in order to prevent the build up of carbon and tar from creating a dangerous situation where the heater does not fully extinguish AUTOMATIC SAFETY SHUT OFF DEVICE This heater is equipped with an automatic safety shut off device The purpose of this device is to quickly and efficiently shut off the heater should the heater be jarred or tipped over while ...

Page 14: ...d rinse the inside of the tank NEVER mix water with the kerosene as it will cause rust inside the tank Pour the kerosene out making sure that you remove it all With the fuel tank empty ignite the heater With the wick at its maximum height keep the wick burning until it burns out completely about 1 hour It is a good idea to do this outside or in an extremely well ventilated area Remove the batterie...

Page 15: ...1 Dangerous volatile fuel mixed with kerosene gasoline benzene alcohol white gas paint thinner camp stove fuel oil compound 1 Drain and clean tank Remove and replace wick Fill tank with water clear 1 K keroseneor or red dyed 1 K kerosene Wick Adjuster Sticks 1 Water present in kerosene 2 Carbon or tar built up 1 Drain tank Remove wick assembly replace wick Reinstall wick assembly Fill tank with wa...

Page 16: ...URNER ASS Y WICK COVER REAR GRILLE CABINET BASE KC2404 CABINET BASE KC2404b WIND COVER WICK ADJUSTER ASS Y WICK WICK ADJUSTER GASKET SAFETY SHUT OFF DEVICE DRIP TRAY ASS Y KC2404 DRIP TRAY ASS Y KC2404b FUEL CAP GASKET FUEL CAP ASS Y WICKADJUSTERKNOB KC2404 WICKADJUSTERKNOB KC2404b BATTERYCASEASS Y KC2404 BATTERYCASEASS Y KC2404b FRONT GRILLE CABINET KC2404 CABINET KC2404b MICA WINDOW DOOR KC2404 ...

Reviews: