background image

When the water tank is full of water, the machine will turn off automatically. 

The indicator light        will flash. After you empty the water from the tank, the 

indicator light 


will turn off. The machine will restart to work.

Speed Button

Control the fan speed. Press to select either High or Low fan speed. Higher fan 

speed will result in quicker moisture removal. Set the speed high for maximum 

moisture removal. When the humidity has been reduced and quiet operation is 

more preferred, set the fan speed back to Low.

- 7 -

Light Function Settings

In the power on state, press the " Lighting " button to make the backlight on and 

press the button one more time to make the backlight off.

Power O

 Memory Function

1. The device automatically restores the working state after power on.
2. If the device is turned on and a power interruption occurred, after starting the 

unit again, it will keep the previous parameters that was set up.
3. If the device is turned off and power interruption occurred, the device will still 

be in a power off status when turned on.

Over

ow Protection

1. Press the "TIMER" button to select the timer by 1-hour increment. You can set 

the timer up to 24 hours. It will start to do the countdown when you start the timer. 

2. Press and hold the "TIMER" button for several seconds to make the selection 

of the timer faster.

3. If the time is set to 00, this is called the invalid time. If you set the timer 

successfully, the light "


"


will be on. The LED screen will show the remaining 

time if you press the "TIMER" button, and display the current humidity 

automatically after a few seconds. 

Timer Setting

This TIMER setting function is designed for you to set a time to turn off or turn on 

the machine, automatically by the timer.

OPERATION 

INSTRUCTION

S


Summary of Contents for PD08A-18

Page 1: ...Home Dehumidifier PD08A 18 Please read the manual carefully before using the unit USER MANUAL www kesnos com...

Page 2: ...to ensure proper use of the dehumidi er Our dehumidi ers are widely used in family bedrooms bathrooms basements o ces and storage rooms etc The dehumidi ers from Kesnos provide quick and e cient oper...

Page 3: ...prevent any internal damage it is very important to keep the unit like this one upright throughout its journey Please leave it standing as the picture shown below and outside the box for before plugg...

Page 4: ...15 18 19 20 The graphics and functions provided in this manual may not be the same as the actual product Please always refer to the actual product The model of the machine on the manual is for referen...

Page 5: ...Customer Service at in order to avoid support Kesnos com a hazard For your safety please read the manual carefully and keep the manual before you use the manual for reference Please use this product...

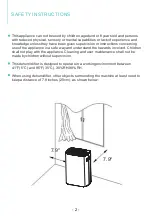
Page 6: ...s appliance can not be used by children aged under 8 years old and persons with reduced physical sensory or mental capabilities or lack of experience and knowledge unless they have been given supervis...

Page 7: ...The xed wiring of the machine connection must be equipped with an all pole disconnect device air switch with at least 0 118 inch distance of electric shock SAFETY INSTRUCTIONS 3...

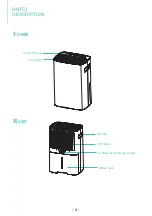
Page 8: ...Front Rear Control Panel Air Outlet Handle Air Intake Continuous Drainage Outlet Water Tank PARTS DESCRIPTION 4...

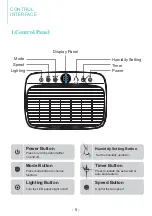
Page 9: ...ss to turn the dehumidi er on and o Humidity Setting Button Set the humidity up down Mode Button Press mode button to choose function Lighting Button Turn the LED panel s light on o Timer Button Press...

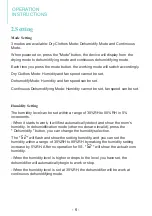
Page 10: ...g The humidity level can be set within a range of 30 RH to 80 RH in 5 increments When it starts to work it will rst automatically detect and show the room s humidity In dehumidi cation mode other mode...

Page 11: ...the device is turned on and a power interruption occurred after starting the unit again it will keep the previous parameters that was set up 3 If the device is turned o and power interruption occurre...

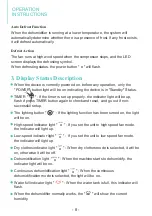
Page 12: ...cted it will be on otherwise it will be o Dehumidi cation light When the machine starts to dehumidify the indicator light will be on Continuous dehumidi cation light When the continuous dehumidi catio...

Page 13: ...9 OPERATION INSTRUCTIONS...

Page 14: ...10 5 Fault Processing Methods OPERATION INSTRUCTIONS...

Page 15: ...r tank out from the bottom with your hand Open the cover of the water tank Invert the water tank to empty the water 1 3 4 2 6 Empty the Water Tank Ways to Empty the Water Tank Use the Water Tank OPERA...

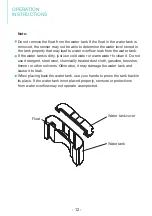
Page 16: ...st use cold water or warm water to clean it Do not use detergent steel wool chemically treated dust cloth gasoline benzene thinner or other solvents Otherwise it may damage the water tank and cause it...

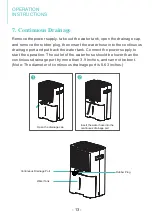
Page 17: ...drainage cap and remove the rubber plug then insert the water hose into the continuous drainage port and put back the water tank Connect the power supply to start the operation The outlet of the wate...

Page 18: ...14 CLEANING AND MAINTENANCE WARNING A Cleaning the dehumidi er body B Cleaning lter C Dehumidi er storage...

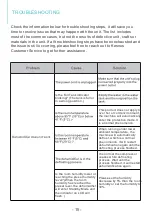
Page 19: ...not apply to over hot or cold environment the machine will automatically enter the protection mode It is a normal phenomenon When running under lower ambient temperature the machine will automatically...

Page 20: ...just now The dehumidi er is designed to work in the humidity range of 30 80 Above or below this range it will not work Room temperature is too low or below 41 5 The machine will not work or undergo po...

Page 21: ...Or change to a higher capacity dehumidi er The oat of water tank has been stuck Move the oat and let it swing freely The magnet on the oat has come o Connect the hose with the drainage port tightly T...

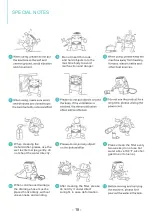
Page 22: ...the wet textile to wipe gently do not shoot the water directly Please clean the lter every two weeks do not use hot water above 104 F alcohol gasoline or toluene When continuous drainage the drainage...

Page 23: ...This product can expose you to chemicals including Styrene and its compounds which is known to the State of California to cause cancer and birth defects or other reproductive harm For more informatio...

Page 24: ...rranty does not apply if damage is caused by other factors including but without limitation of There are our general terms for the warranty service but we always encourage our customers to contact us...

Page 25: ......

Page 26: ...We are expecting to see our products ful ll your life and hear your voice Your satisfaction means a lot to us Please tag us if you share a snap on your social media www kesnos com www kesnos com...

Reviews: