background image

- 1 -

Safety Notes

For your safety, please read the manual carefully and keep the manual for future 
reference.
Please use this product according to the instructions of installation and operation 
of this manual.

SAFETY 
INSTRUCTIONS

Unplug the power supply cord before cleaning or storage.
Do not immerse the unit in water,or place it close to water.
Do not put the unit close to heat-generating devices or near flammable and dangerous 
materials.
Never put your fingers or any stick-form objects into the air inlet or outlet grilles.
Discard water collected in the tank as instructed.
Install the draining hose at a downward direction to make sure that condensed water can 
be drained continuously.
Place and operate the unit on a stable and level floor.
Do not spray or splash water directly onto the unit.
Do not spray any pesticide nor flammable liquid onto the unit.
Do not place any heavy object or let children and pets sit on the unit.
Do not operate dehumidifier in a small and confined space.
Damaged power cord must be replaced by a licensed technician.
Keep the clothes at least 40 cm from the air outlet to prevent water from dripping to the unit.
Machine power supply wiring must be conducted according to national wiring rules.
Power wire need to be connected with the external grounding line. 
This appliance can not be used by children aged under 8 years old and persons with 
reduced physical, sensory or mental capabilities or lack of experience and knowledge 
unless they have been given supervision or instructions concerning use of the appliance in 
a safe way and understand the hazards involved. Children shall not play with the appliance. 
Cleaning and user maintenance shall not be made by children 
without supervision.
Fuse model specifications:3.15A.
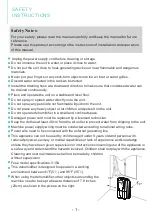
This dehumidifier is designed to operate in a working 
environment between 41°F(5

) and 95°F (35

).

When using the dehumidifier, other objects surrounding the 
machine need to be kept at least a distance of 7.9 inches 
(20cm) as shown in the picture on the right:

 7.9"

 7.9"

POWER

Summary of Contents for PD160A

Page 1: ...Home Dehumidifier PD160A Please read the manual carefully before using the unit USER MANUAL www kesnos com...

Page 2: ...Please read the manual carefully to ensure proper use of the dehumidi er Our dehumidi ers are widely used in family bedrooms bathrooms basements o ces and storage rooms etc The dehumidi ers from Kesn...

Page 3: ...nternal damage it is very important to keep refrigeration units like this one upright throughout their journey Please leave it standing upright and outside the box for 24 HOURS before plugging it in B...

Page 4: ...hics and functions provided in this manual may not be the same as the actual product Please always refer to the actual product The model of the machine on the manual is for reference only please check...

Page 5: ...ets sit on the unit Do not operate dehumidifier in a small and confined space Damaged power cord must be replaced by a licensed technician Keep the clothes at least 40 cm from the air outlet to preven...

Page 6: ...Front Rear Control Panel Air Outlet Grilles Handle Air Inlet the air filter is equipped inside Caster Water Tank 2 PARTS DECARIPTION Air Filter POWER...

Page 7: ...Tank Full Indicator Timer Button Press to turn on off the machine Press the TIMER you can set the timer by 1 hour increment within the range of 1 24 hours Humidity Button Speed Button When power on s...

Page 8: ...on when the machine is off the machine automatically by the timer Press the TIMER button the Timer indicator will flash you can set the timer by 1 hour increment within the range of 1 24 hours which c...

Page 9: ...off automatically the Full indicator light will flash After you empty the water tank this indicator light will go out and the machine will restart to work Caution The water tank must be placed in rig...

Page 10: ...ehumidifier is not affected and can continue to work and can be used normally Repair and replace the humidity sensor Please let the dehumidifier keep working for a period of time after the water on th...

Page 11: ...cted water Use the Water Tank 1 3 2 When the water tank is already full the WATER FULL indicator will light up the dehumidifier will automatically shut down until the tank has been emptied and placed...

Page 12: ...OPERATION INSTRUCTIONS 8...

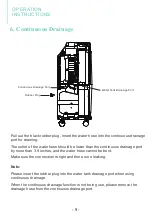
Page 13: ...outlet of the water hose should be lower than the continuous drainage port by more than 3 9 inches and the water hose cannot be bent Make sure the connection is tight and there is no leaking Note Ple...

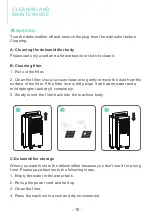
Page 14: ...dehumidifier because you don t use it for a long time Please pay attention to the following steps 1 Empty the water in the water tank 2 Roll up the power cord and tie it up 3 Clean the filter 4 Place...

Page 15: ...11 TROUBLESHOOTING...

Page 16: ...12 TROUBLESHOOTING...

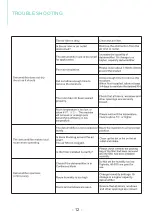
Page 17: ...ifier is still not working properly as expected and the troubleshooting steps or solutions above may not resolve the issue please unplug the power and shut down the dehumidifier then contact Kesnos Cu...

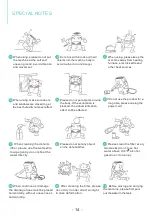
Page 18: ...is blocked the dehumidification effect will be affected 6 If do not use the product for a long time please unplug the power cord 7 When cleaning the dehumi difier please use the wet textile to wipe ge...

Page 19: ...6MPa 90PSIG 0 62MPa MOISTURE REMOVAL 65 F 60 RH 9 0 Pints Day 4 25L Day MOISTURE REMOVAL 80 60 RH MOISTURE REMOVAL 86 80 RH MOISTURE REMOVAL 95 90 RH 14 Pints Day 6 6L Day 25 Pints Day 12L Day 34 Pin...

Page 20: ...damage is caused by other factors including but without limitation of There are our general terms for the warranty service but we always encourage our customers to contact us if any issues regardless...

Page 21: ......

Page 22: ...We are expecting to see our products ful ll your life and hear your voice Your satisfaction means a lot to us Please tag us if you share a snap on your social media www kesnos com www kesnos com...

Reviews: