background image

KIT DI INSTALLAZIONE CON HARD DISK

INSTALLAIONSKIT MIT HARD DISK

INSTALLATION KIT WITH HARD DISK 

KIT D’INSTALLATION AVEC DISQUE DUR

KIT DE INSTALACIÓN CON DISCO DURO

KIT DE INSTALAÇÃO COM O HARD DISK


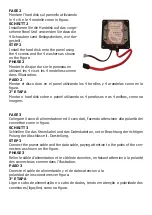
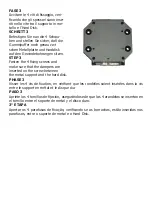
FASE 1

Capovolgere lo strumento sostenendolo con 

i supporti dell’imballo, e svitare le 4 viti utiliz-

zando la chiave esagonale.

SCHRITT 1

Drehen Sie das Instrument um und lösen Sie

die 4 Imbus Schrauben des Abdeckpanels.

STEP 1

Turn the instrument upside down holding it 

on the package supports, then unscrew the 

4 screws using the hexagon wrench.

PHASE 1  

Retourner l’instrument en le soutenant avec les supports de l’emballage, et dévisser 

les 4 vis en utilisant la clé hexagonale.  

PASO 1

Gire el instrumento manteniendolo en el soporte de apoyo del paquete y retire los 4 

tornillos con la llave Allen.

1° ETAPA

Virar o instrumento e apoiá-lo usando o suporte que o embala, desaparafusá-lo com 

a chave hexagonal.

Summary of Contents for MIDjPRO

Page 1: ...INSTALLAZIONE HARD DISK INSTALLAIONS HARD DISK INSTALLATION HARD DISK INSTALLATION DISQUE DUR INSTALACI N DISCO DURO INSTALA O HARD DISK...

Page 2: ...Instrument um und l sen Sie die 4 Imbus Schrauben des Abdeckpanels STEP 1 Turn the instrument upside down holding it on the package supports then unscrew the 4 screws using the hexagon wrench PHASE 1...

Page 3: ...l utilizando os 4 parafusos e as 4 anilhas como na imagem FASE 3 Collegare il cavo di alimentazione ed il cavo dati facendo attenzione alla polarit dei connettori come in figura SCHRITT 3 Schlie en Si...

Page 4: ...back to the bottom of the instrument and fasten the 4 screws using the relevant hexagon wrench PHASE 4 Remonter le panneau sur le fond de l instrument et revisser les 4 vis avec la cl sp ciale hexagon...

Page 5: ...etallhalterung auf der 4 Gummipuffer angebracht sind The kit includes in addition to the power and data cables a metal support on which 4 small rubber dampers are fixed Le Kit est compos du c ble d al...

Page 6: ...correspond ncia com os quatro furos como na imagem FASE 2 Appoggiare il supporto in metallo sopra l Hard Disk assicurandoci che i 4 spes sori rimangano in corrispondenza dei fori filettati di fissaggi...

Page 7: ...screws and make sure that the dampers are inserted on the screw between the metal support and the hard disk PHASE 3 Visser les 4 vis de fixation en v rifiant que les rondelles soient ins r es dans la...

Page 8: ...insert the hard disk into the special space foreseen on your MidjPro PHASE 4 Relier le c ble d alimentation et le c ble de donn es et suivre la proc dure d insertion du disque dur dans l emplacement...

Reviews: