background image

5

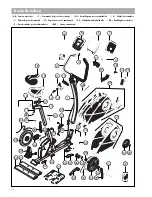
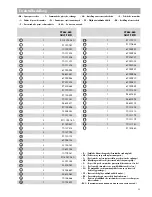
List of spare parts page 34-35

When ordering spare parts, always state the full article number,
spare-partnumber, the quantity required and the S/N of the product
(see handling).

Example order:

Art.no. 07663-660 / spare-part no. 10100030

/ 2 pieces / S/N .................... 
Please keep original packaging of this article, so that it may be
used for transport at a later date, if necessary.

Goods may 

only

be returned after prior arrangement and in

(internal) packaging, which is safe for transportation, in the original
box if possible.
It is important to provide a detailed defect description / damage
report!

Important:

spare part prices do not include fastening material; if

fastening material (bolts, nuts, washers etc.) is required, this should
be clearly stated on the order by adding the words 

„with fastening

material“

.

Waste Disposal

KETTLER products are recyclable. At the end of its useful life please
dispose of this article correctly and safely (local refuse sites).

KETTLER GB Ltd.

Kettler House, Merse Road
North Moons Moat 
Redditch, Worcestershire B98 9HL

+44 1527 591901

+44 1527 62423

www.kettler.co.uk

Mail: sales@kettler.co.uk

KETTLER International Inc.

1355 London Bridge Road

+1 888 253 8853

Virginia Beach, VA 23453

+1 888 222 9333

www.kettlerusa.com

USA

GB

Instructions for Assembly

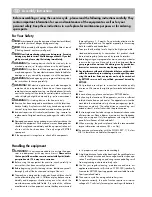
RISK!

Ensure that your working area is free of possible sources

of danger, for example don’t leave any tools lying around. Always
dispose packaging material in such a way that it may not
cause any danger. There is always a 

risk of suffocation

if

children play with plastic bags!

Ensure that you have received all the parts required (see check
list) and that they are undamaged. Should you have any cause
for complaint, please contact your KETTLER dealer.

Before assembling the equipment, study the drawings carefully
and carry out the operations in the order shown by the diagrams.
The correct sequence is given in capital letters.

The equipment must be assembled with due care by an adult
person. If in doubt call upon the help of a second person, if pos-
sible technically talented.

Please note that there is 

always

a danger of injury when

working with tools or doing manual work. Therefore please be
careful when assembling this machine.

The fastening material required for each assembly step is shown
in the diagram inset. Use the fastening material exactly as
instructed. 

Bolt all the parts together loosely at first, and check that they
have been assembled correctly. Tighten the locknuts by hand
until resistance is felt, 

then use spanner to finally tighten nuts

completely against resistance (locking device)

. Then check that

all screw connections have been tightened firmly. 

Attention:

once locknuts have been unscrewed they no longer function cor-
rectly (the locking device is destroyed), and must be replaced.

For technical reasons, we reserve the right to carry out preliminary
assembly work (e.g. addition of tubing plugs).

!

The equipment is dependent of revolutions per minute.

■ 

Please ensure that liquids or perspiration never enter the machine

or the electronics.

■ 

Before use, always check all screws and plug-in connections as
well as respective safety devices fit correctly.

■ 

Always wear suitable shoes when using.

For a comfortable training position please adjust the handlebar
andsaddle position to your body height.

Nobody may be in the moving range of a training person
during training

Summary of Contents for 07663-660

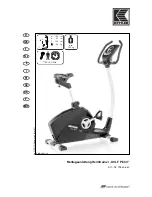
Page 1: ...F D GB NL I E PL CZ DK P RUS Montageanleitung Heimtrainer GOLF P ECO Art Nr 07663 660 Abb ähnlich Auf 100 Altpapier gedruckt A 100 cm B 53 cm C 135 cm 34 kg max 150kg A C B 40 50 Min ...

Page 2: ... for training carefully WARNING All electric appliances emit electromagnetic radiation when in operation Please do not leave especially radiation intensive appliances e g mobile telephones directly next to the cockpit or the electronic controlsystem as otherwise values displayed might be distorted e g pulse measurement WARNING This training device is for home use only Exercise has been designed in...

Page 3: ...he parts required see check list and that they are undamaged Should you have any cause for complaint please contact your KETTLER dealer Before assembling the equipment study the drawings carefully and carry out the operations in the order shown by the diagrams The correct sequence is given in capital letters The equipment must be assembled with due care by an adult person If in doubt call upon the...

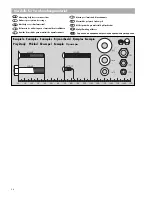
Page 4: ... material de atornilladura Misura per il materiale di avvitamento Wzornik do połączeń śrubowych CZ Měřící pomůcka pro materiál k přišroubování Beispiele Examples Examples Bij voorbeeld Ejemplos Esempio Przyktady Příklad Eksempel Exemplo Примеры DK Hjælp til måling af skruer P Auxiliar de medição para materiais de aparafusamento RUS Справка по определению размеров крепежных материалов ...

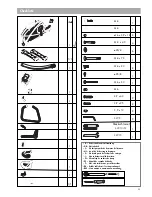
Page 5: ...ht zum Lieferumfang GB Not included F Ne fait pas partie du domaine de livraison NL Is niet bij de levering inbegrepen E No forma parte del volumen de entrega I Non in dotazione alla fornitura PL Nie należy do zakresu dostawy CZ Nepatří do rozsahu dodávky P Não está incluído nas peças fornecidas DK Er ikke inkluderet i leveringsomfanget RUS Не входит в комплект поставки M 6 x 50 M 6 1 1 SW 5 2 SW ...

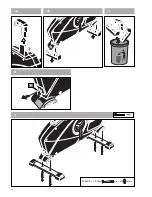
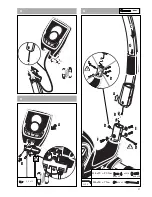
Page 6: ...26 M 8 x 45 ø25 8 1b 1c 2 3 M 8x45 15 Nm 1a ...

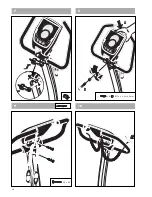
Page 7: ...27 4 A 5 B 3 9 x 13 6 B A E D C F G D D D M 8 x 20 M 8x20 20 Nm M 6 x 50 M 6x50 7 Nm SW 5 M 8 x 20 ø25 8 ...

Page 8: ...28 8 7 M 8 Ø 16 x 3 9x16 5 mm 3 9 x 40 10 B A 9 ...

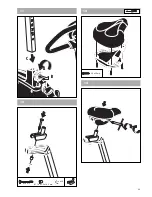
Page 9: ...29 10 9 8 11 3 9x 25mm 12 A B C 13 M8 x 75 Ø 16 x 3 9x16 5 mm M 8 14 D ...

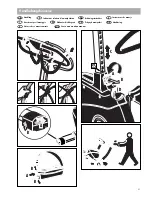
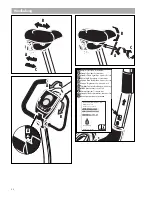
Page 10: ...r verwarmen Para facilitar el montaje témplense las correas de fijación de los pedales en agua caliente Per facilitare il montaggio riscaldare le cinghie dei pedali in acqua calda W celu ułatwienia montażu pasek pedału podgrzać w ciepłej wodzie Za účelem usnadnění montáže nahřejte třmen v teplé vodě Opvarm pedalstropperne i varmt vand så de er nemmere at montere Para facilitar a montagem é conve n...

Page 11: ...se GB F NL E I PL CZ Pokyny k manipulaci Handling Bedieningsinstrukties Indications relatives à la manipulation Instrucciones de manejo Avvertenze per il maneggio Wskazówki obsługowe D DK Håndtering P Notas sobre o manuseamento RUS Указания по обращению ...

Page 12: ...létiqu Numèro de serie Bij voorbeeld Typeplaatje Seriennummer Ejemplo Placa identificativa Número de serie Esempio Targhetta tecnica Numero di serie Przyklady Tabliczka identifikacyna Numer serii Přiklad typového štítku sériové číslo Eksempel type label serienummer Exemploplacadecaracterísticas númerodesérie Не входит в комплект поставки D F GB E I NL PL CZ A B C A B C DK P A A B RUS ...

Page 13: ...a manivela de pedal y apriete un tornillo M12 no forma parte del volumen de suministro en la rosca B Después de haber efectuado algunas vueltas podrá quitar la manivela de pedal C Smontaggio dell attacco del pedale Per togliere l attacco del pedale togliete prima il coperchietto pro tettivo e la vite A Tenete fermo l attacco del pedale e girate una vite M12 non compresa nella fornitura nella filet...

Page 14: ...os I Ordine di pezzi di ricambio PL Zamówiene części zamiennych DK Bestilling af reservedele P Encomenda de peças sobressalentes RUS Заказ запчастей Ersatzteilbestellung 1 2 3 4 5 6 7 8 9 10 11 12 12 13 14 15 16 17 18 19 20 20 21 22 23 24 25 26 27 28 29 30 30 31 31 32 33 34 35 36 37 38 39 40 41 42 43 44 45 46 47 48 49 50 51 52 53 54 55 56 57 ...

Page 15: ... 36 1 91170713 37 1 91170648 38 1 67000953 39 1 67000954 40 1 97202727 41 1 67001035 42 1 67001034 43 1 67000957 44 1 67000956 45 1 67000930 46 1 67000831 47 1 67000959 48 1 70131200 49 1 94601842 50 1 94601974 51 1 94600139 52 1 70131205 53 1 70131210 54 1 70131178 55 1 70131179 56 1 70131180 57 1 91180560 07663 660 GOLF P ECO 07663 660 GOLF P ECO D Farbliche Abweichungen bei Ersatzteilen sind mö...

Page 16: ...HEINZ KETTLER GmbH Co KG Postfach 1020 D 59463 Ense Parsit www kettler net docu 3476d 03 14 ...

Reviews: