background image

4

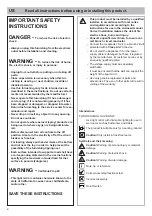
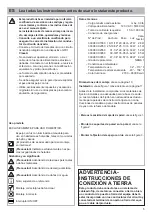
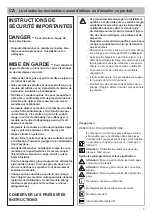
INSTRUCCIONES 
IMPORTANTES DE 
SEGURIDAD

PELIGRO - 

Para reducir el riesgo de 

descarga eléctrica:


Desenchufe siempre este mobiliario de la toma de 
corriente antes de la instalación y limpieza.

ADVERTENCIA - 

Para reducir el 

riesgo de quemaduras, incendios, descargas eléctri-

cas o lesiones para las personas:


Desenchúfelo de la toma de corriente antes de 
poner o quitar piezas. 


Es necesaria una supervisión estricta cuando este 
mobiliario esté cerca o sea utilizado por niños, 
inválidos o personas discapacitadas.


Use este mobiliario exclusivamente para su uso 
previsto tal y como se describe en estas instruc-
ciones. No utilice accesorios no recomendados 
por el fabricante.


Nunca utilice este mobiliario si tiene un cable o 
un enchufe dañado, si no funciona correctamente, 
si se ha caído o dañado o si se ha caído al agua. 
Devuelva el mobiliario al centro de servicio para 
su examen y reparación.


Nunca deje caer ni introduzca ningún objeto en 
ninguna abertura.


No lo utilice en exteriores.


No lo utilice allí donde se usen productos de aero-
sol (espray) o donde se esté administrando oxígeno.


Antes de la desconexión, ponga todos los interrupto-
res en la posición de apagado. Desconecte también la 
electricidad en el interruptor o en la caja de fusibles.


Coloque siempre los artículos más pesados en la 
parte inferior del armario y no cerca de la parte 
superior para evitar la posibilidad de que el mobi-
liario vuelque.


Cada superfi cie destinada a soportar una carga 
debe tener una declaración correspondiente en 
las instrucciones de uso que especifi que la car-
ga máxima prevista para esa superfi cie en libras 
(kilogramos).

ADVERTENCIA - 

California Prop 65


Este espejo con luz contiene productos químicos 
conocidos por el estado de California como caus-
antes de cáncer, malformaciones de nacimiento 
y/u otros.

GUARDE ESTAS INSTRUCCIONES

Button

Function

Washbasin lighting

•  The washbasin lighting is switched on by 

pressing the button when light mirror is 
switched on.

•  Pressing the button again switches the light off.
When both lightings are switched off, the light 
mirror also switches off.


Dimming the front, wall and washbasin 
lighting

•  Press the button when the light mirror is 

switched on and hold until the desired bright-
ness or the end value has been reached.

The setting is stored and reproduced when 
switched on again (only for connection type 1, 
see 

fi

 gure 4 on page 12).

Setting the light colour cooler

•  Press and hold daylight white button and the 

light colour fades to cool white.

•  Release when the desired light colour has 

been reached.

The setting is stored and reproduced when 
switched on again (only for connection type 1, 
see 

fi

 gure 4 on page 12).

Adjusting light colour - daylight white (cool 
white)

•  Press button and the colour temperature sets 

to 6500 Kelvin.

Setting the light colour warmer

•  Press and hold warm white button and the light 

colour fades to warm white.

•  Release when the desired light colour has 

been reached. 

The setting is stored and reproduced when 
switched on again (only for connection type 1, 
see 

fi

 gure 4 on page 12).

Adjusting light colour - warm white

•  Press button and the colour temperature sets 

to 2700 Kelvin.

Heating on/off

•  Press button and the red LED lights up.
•  Pressing the button again switches the heating 

off, and the red LED goes out.

The heating switches off automatically after 
20 minutes.

Replacement parts with order numbers

, see page 14 

and 15.

The light sources may only be replaced by the 
manufacturer, its customer service or by an 
equally quali

fi

 ed person.

For information about warranty and mainte-
nance, see the enclosed 

Care Instructions 

and Warranty Card

.

Disposal instructions

This category of device does not belong in 
the domestic waste, but must be disposed of 
separately in accordance with the relevant 
local national regulations.

US


Read all instructions before using 

or installing this product. 

ES


Lea todas las instrucciones antes 

de usar o instalar este producto.

Summary of Contents for 33098ZZ1550

Page 1: ...US ES Instruction for use Manual de instrucciones de uso CA Instructions de utilisation Plan 311918_001 08 2018 33098 XX3550 33098 XX2550 33098 XX3050 33098 XX1550 33098 XX2050 ...

Page 2: ...lograms WARNING California Prop 65 This light mirror contains chemicals known to the state of California to cause cancer birthdefects and or other SAVE THESE INSTRUCTIONS This product must be installed by a qualified installer in accordance with local codes and regulations and according to the instructions for use in the enclosed manual Correct installation reduces the risk of fire electric shock ...

Page 3: ...tor must be run with the circuit con ductors and connected to the equipment grounding terminal or lead on the product Wiring diagram see figure 4 on page 12 The mirror can be optionally actuated similar to a toggle switch with a button on the mirror A or with an external light switch B A B Connect the light mirror to the power supply see figure 5a 5b Remove the adhesive cover from the light mirror...

Page 4: ... lighting The washbasin lighting is switched on by pressing the button when light mirror is switched on Pressing the button again switches the light off When both lightings are switched off the light mirror also switches off Dimming the front wall and washbasin lighting Press the button when the light mirror is switched on and hold until the desired bright ness or the end value has been reached Th...

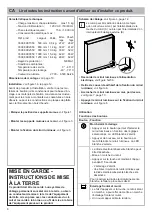
Page 5: ...adas Símbolos y su significado Precaución Advertencia de lesiones personales o daños materiales Precaución Advertencia de descarga eléctrica Precaución Advertencia de daños por agua Nota sugerencia o referencia Montaje correcto prueba funcional Montaje incorrecto Interruptor ON OFF Datos técnicos Carga máxima cada estante máx 3 3 lb Voltaje de alimentación 120 V AC 50 60 Hz Toma de corriente reque...

Page 6: ...on el espejo conectado y manténgala pulsada hasta que se haya alcanzado el valor de luminosidad deseado o el valor final El ajuste se guarda y se ajusta en la próxima conexión sólo con el tipo de conexión 1 véase imagen 4 en la página 12 Ajustar el color de luz más frío Pulse y mantenga pulsada la tecla de luz diurna blanca el color de luz pasa a blanco frío Suelte la tecla al alcanzar el color de...

Page 7: ...urface en livres kilogrammes CONSERVER LES PRÉSENTES INSTRUCTIONS Ce produit doit être monté par un installateur qualifié en conformité avec les codes et régle mentations locaux ainsi que les instructions d utilisation données dans le manuel joint Un montage correct réduit le risque d incen die de chocs électriques de brûlures et de blessures Consulter un électricien qualifié pour s assu rer que l...

Page 8: ...nducteur de mise à la terre de l équipement doit être mis en place avec les conducteurs du cir cuit et raccordé à la borne ou au fil de mise à la terre de l équipement placé sur le produit Schéma de câblage voir figure 4 page 12 Le miroir peut être actionné de la même façon qu un circuit va et vient par l intermédiaire de la touche du miroir A ou bien par l intermédiaire d un interrupteur d éclair...

Page 9: ...Appuyer sur la touche la température de couleur se règle sur 6 500 Kelvin Réglage d une couleur de la lumière plus chaude Appuyer sur la touche blanc chaud et maintenir l appui la couleur de la lumière se superpose au blanc chaud Relâcher la touche lorsque la couleur de lumière souhaitée est atteinte Le réglage est enregistré et il sera le même lors de la prochaine mise en marche seulement pour le...

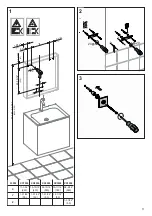
Page 10: ...0 4 3 16 105 19 11 16 500 max 200 max 7 7 8 max 200 max 7 7 8 33098 XX1550 XX2050 XX2550 XX3050 X 19 11 16 500 25 9 16 650 31 1 2 800 39 3 8 1000 Y max 7 7 8 max 200 max 10 13 16 max 275 max 13 13 16 max 350 max 17 11 16 max 450 27 9 16 700 4 19 11 16 100 500 4 3 16 105 47 1 4 1200 21 5 8 550 max 550 max 21 5 8 max 550 max 21 5 8 33098 XX3550 X Y Y ...

Page 11: ...Ø6 70 2 3 4 40 1 9 16 20 15 16 533 1 14 16 47 2 3 4 70 Z Y 1 33098 XX1550 XX2050 XX2550 XX3050 XX3550 X 11 1 32 280 16 15 16 430 22 13 16 580 30 11 16 780 38 9 16 980 Y 1 31 32 50 1 31 32 50 1 31 32 50 1 31 32 50 Z 1 31 32 50 20 3 20 2 ...

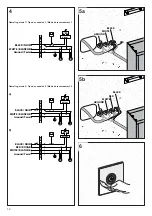
Page 12: ... LED BLACK NOIR WHITE BLANCHE Ground Terre Operating mode 2 Tipo de conexión 2 Mode de raccordement 2 driver LED driver LED BLACK NOIR RED ROUGE WHITE BLANCHE Ground Terre BLACK NOIR WHITE BLANCHE Ground Terre 4 a b BLACK WHITE GROUND RED 5a RED WHITE GROUND BLACK 5b 6 ...

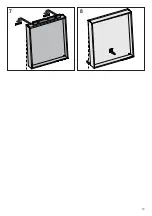
Page 13: ...13 7 8 ...

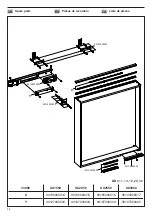
Page 14: ... de pièces 90106000005 90105000015 90106000003 90103000000 90103000002 90107000004 90105000020 XX 11 14 18 29 30 33098 XX1550 XX2050 XX2550 XX3050 X 90105000014 90105000015 90105000016 90105000017 Y 90107000004 90107000004 90107000004 90107000005 X Y ...

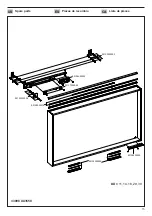
Page 15: ...15 US Spare parts ES Piezas de recambio CA Liste de pièces 90105000022 90106000003 90105000018 90103000000 90103000002 90107000005 90106000005 XX 11 14 18 29 30 33098 XX3550 ...

Page 16: ...P4 2DT Phone 44 10442865220 E Mail admin keuco co uk FR KEUCO SARL 5 Rue du Martelberg F 67700 Monswiller Téléphone 33 3 88700200 E Mail bureau keuco fr NL KEUCO GmbH Co KG Kantoor Nederland Postbus 1286 5004 BG Tilburg Telefoon 31 88 6 333 999 E Mail info keuco nl RU KEUCO GmbH Co KG Представительство в России Космодамианская набережная дом 4 22 корпус Б 115035 Москва Электронная почта US KEUCO M...

Reviews: