background image

1

K150P

Owner’s manual

Keurig

®

 K-Cup

®

 K150P Brewer

manuel D’uTIlIsaTIOn

Système d’infusion Keurig

®

 K-Cup

®

 K150P

Série


COMMERCIALE

SINGLE SERVE COFFEE MAKER

SYSTÈME D’INFUSION UNE TASSE À LA FOIS 

P1  20162461  T5274_K150P_UCG_FINAL.pdf  4C(CMYK)  ZB2319  2016-11-02  Size:8.5X5.5in

Summary of Contents for K150P

Page 1: ...p K150P Brewer MANUEL D UTILISATION Système d infusion Keurig K Cup K150P Série COMMERCIALE SINGLE SERVE COFFEE MAKER SYSTÈME D INFUSION UNE TASSE À LA FOIS P1 20162461 T5274_K150P_UCG_FINAL pdf 4C CMYK ZB2319 2016 11 02 Size 8 5X5 5in ...

Page 2: ...ig Authorized Distributor to report any malfunction of or damage to the brewer 12 Do not let the Power Cord hang over the edge of the table or counter or touch hot surfaces 13 To disconnect press the Power Switch on the brewer to OFF status and then remove the plug from the wall outlet 14 Close supervision is necessary when any appliance is used by or near children 15 Do not lift the Handle while ...

Page 3: ...uncture the K Cup pod one above the K Cup Pod Holder and the other in the bottom of the K Cup Pod Holder To avoid risk of injury do not put your fingers in the K Cup Pod Assembly Housing CAUTION There is extremely hot water in the K Cup Pod Holder during the brew process To avoid risk of injury do not lift the Handle or open the K Cup Pod Assembly Housing during the brewing process CAUTION Please ...

Page 4: ...ieties and brew the size that s right for you The smaller the brew size the more intense the flavor in your cup The larger the brew size the less intense the flavor in your cup 5 Brewing into a travel mug To brew into a travel mug simply remove the Drip Tray Assembly and place the travel mug on the Drip Tray Base 6 Descale the brewer regularly Please refer to pages 15 and 16 for instructions Unpac...

Page 5: ...cket O Omnipure KQ8A Water Filter 5572 not included N and O are the Filter Kit Assembly P 3 4 Garden Hose Connector Part 50 201004 010 not included Q Brewer Inlet Connect R Drain Hatch and Knob S Drain Tubes and Plugs T Removable Puncture Plate K I S R C G F E N O H J B D A P Q FeaturesK150P Brewer K150P Brewer Back view with optional Omnipure KQ8A Water Filter 5572 connected T P5 20162461 T5274_K...

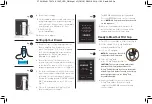
Page 6: ...port to a container or sink 7 Turn on water supply and allow at least 4 gallons of water to flush through the filter fig 4 IMPORTANT You cannot use your Keurig brewer until it has been set up for its first use NOTE If the brewer has been exposed to temperatures below freezing allow the brewer at least two hours to reach room temperature before brewing A frozen or extremely cold brewer will not ope...

Page 7: ...rig 150P Brewing System Designed For The K Cup Pod Español Français 8 Turn off water supply 9 Cut the tubing to proper length and connect to inlet plumbing port on the brewer by using water inlet valve 3 4 hose connector available from Keurig Green Mountain Inc Part 50 201004 010 not included fig 5 10 Turn on water supply Setting Up Your Brewer 1 Remove all pieces of packing tape from the brewer a...

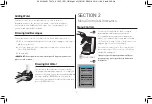
Page 8: ...o not push the BREW Button in 60 seconds the BREW Button will be disabled to prevent accidental activation Re activate the BREW Button by lifting and lowering the Handle completely 7 There may be a short pause prior to coffee being dispensed The entire brew process lasts for approximately 1 minute and ends with a burst of air to remove all liquid from the K Cup pod CAUTION There is extremely hot w...

Page 9: ...Authorized Distributor Brewing Iced Beverages Your iced tea and iced coffee taste best when fresh brewed hot over ice 1 Fill a 16 oz mug do not use glass to the top with ice and place a K Cup pod into your brewer 2 Select your brew size we recommend selecting a 6 oz or 8 oz brew Press the BREW Button 3 Stir and enjoy IMPORTANT Do not brew into a cup made of glass Doing so may cause the glass to cr...

Page 10: ...OFF Auto Off allows you to program your brewer to automatically turn off two hours after the last brew Refer to page 12 for programming instructions ON OFF Time You can leave your brewer on all the time and use the Power Switch to turn it off Or you can program the brewer to automatically turn on or off at a specific time as shown on page 12 Language This brewer is shipped with English as the defa...

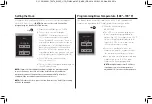
Page 11: ... follow the instructions below 1 From the Menu Mode press BREW TEMP 2 The LCD Screen will now display the Brew Temperature programming options fig 16 The temperature 193 F initial setting will be displayed at the top of the LCD Screen to indicate the current temperature setting 3 Press the symbol to increase the temperature and the symbol to lower the temperature one degree at a time 4 Once you ha...

Page 12: ...appear on the screen and press OK 3 Program the brewer for a specific On Off Time NOTE To use this programming feature the clock must be set to the correct time Programming Your Brew Size All brew sizes are enabled in the default setting If you want to disable any brew size just press on the appropriate icon s Please follow instructions outlined below 1 From the Menu Mode press SET BREW SIZE S 2 T...

Page 13: ...E KEURIG GREEN MOUNTAIN INC Contact OK Language Español English Français OK a After setting the correct time see Setting The Clock page 11 return to the Menu Mode and press ON OFF TIME b To set the ON time press DISABLED The display will change to a time of day Press H to set the hours and M to set the minutes Once the desired time is set press OK to accept this time c To set the OFF time press DI...

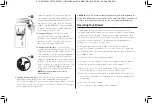
Page 14: ...certified instructions please refer to the Cleaning and Sanitization Guide 1 Never immerse the brewer in water or other liquids The Housing and other external components may be cleaned with a damp soapy lint free non abrasive cloth 2 The Drip Tray can accumulate up to 12 oz of overflow The Drip Tray and Drip Tray Plate should be periodically inspected and rinsed clean To remove the Drip Tray Assem...

Page 15: ...wer operation fig 26 CAUTION There are sharp needles that puncture the K Cup pod above the K Cup Pod Holder and in the bottom of the K Cup Pod Holder To avoid risk of injury do not put your fingers in the K Cup Pod Assembly Housing Descaling Your Brewer Depending on the mineral content of your water calcium deposits or scale may build up in your brewer Scale is non toxic but if left unattended can...

Page 16: ...up pod Pour the contents of the mug into the sink STEP 2 SECOND DESCALING SOLUTION RINSE Repeat the brew process without a K Cup pod until ADD WATER is indicated Let the brewer stand for at least 30 minutes while still on After 30 minutes discard any residual solution through the drain tubes STEP 3 FRESH WATER RINSE Ensure the internal cold water tank is filled with fresh water Place a large mug o...

Page 17: ...drain the water from the cold and hot water tanks respectively CAUTION If the brewer was not allowed to cool sufficiently the water draining from the tube may be very hot Recap the tube NOTE To avoid losing parts when finished re insert the tube and screw the panel back onto the brewer If you need assistance with your brewer please contact your Keurig Authorized Distributor Storage Drain the inter...

Page 18: ...Keurig Authorized Distributor Situation Chlorine or mineral taste in coffee Brewing a partial cup The time is not displayed on the LCD Screen Brewer shuts off or turns on automatically Solution Be sure to use filtered water If you have any questions contact your Keurig Authorized Distributor The exit needle may be clogged refer to page 15 CleantheK Cup PodHolderAssemblyifnecessary andrinseunderfau...

Page 19: ...NOT COVER INCIDENTAL COSTS AND EXPENSES RESULTING FROM ANY BREACH OF THIS WARRANTY EVEN IF FORESEEABLE Some states or provinces do not allow the exclusion or limitations of incidental or consequential damages so the above limitation or exclusion may not apply to you depending on the state or province of purchase Nor does this warranty cover damages caused by use of non KeurigHOT K Cup brand pods o...

Page 20: ...ères vacillent que les fusibles sautent ou que les disjoncteurs se déclenchent 11 Ne jamais utiliser un appareil dont la fiche ou le cordon d alimentation est endommagé ou un appareil qui présente un trouble de fonctionnement ou qui a été endommagé Communiquer avec votre distributeur Keurig autorisé pour signaler tout mauvais fonctionnement du système d infusion ou tout dommage à celui ci 12 Ne pa...

Page 21: ...ier du support à capsule K Cup ATTENTION L eau se trouvant dans le support à capsule K Cup durant l infusion est extrêmement chaude Pour éviter tout risque de blessure ne pas soulever la poignée ni ouvrir le boîtier du support à capsule K Cup durant l infusion ATTENTION Toujours garder le système d infusion en position verticale pour éviter toute blessure ou tout dommage au système d infusion DIRE...

Page 22: ...sissez une capsule K Cup très intense qui contient 30 plus de café que nos cafés ordinaires et le format d infusion qui vous convient Plus le format d infusion est petit plus la saveur sera forte Plus le format d infusion est grand plus la saveur sera douce 5 Infusez votre café dans une tasse de voyage Pour infuser un café dans une tasse de voyage vous n avez qu à retirer la cuvette d égouttage et...

Page 23: ...ion BREW L Interrupteur M Cordon d alimentation N Support de montage du filtre O Filtre Omnipure KQ8A no 5572 non inclus N et O forment l ensemble de filtration P Raccord de boyau po pièce no 50 201004 010 non inclus Q Valve d arrivée R Panneau et bouton de retenue des tuyaux de vidange S Tuyaux de vidange et bouchons T Plaque de perforation amovible Vue arrière avec ensemble de filtration no 5572...

Page 24: ...rig avant de l avoir préparé pour une première utilisation REMARQUE Si le système d infusion a été placé dans un endroit où la température était sous le point de congélation laissez lui au moins deux heures pour atteindre la température ambiante avant de l utiliser Un système d infusion gelé ou très froid ne pourra pas fonctionner ATTENTION Ce système d infusion est conçu pour fonctionner à une pr...

Page 25: ...e boyau 3 4 po de Keurig Green Mountain Inc pour valve d arrivée d eau non inclus no de pièce 50 201004 010 fig 5 10 Ouvrez l alimentation en eau Préparation de votre système d infusion 1 Retirez tous les morceaux de ruban adhésif du système d infusion et de la cuvette d égouttage Retirez la pellicule de plastique transparent de l écran ACL Déballez le cordon d alimentation et branchez le système ...

Page 26: ...vation accidentelle Pour réactiver le bouton d infusion soulevez et rabaissez complètement la poignée 7 Il peut y avoir un léger délai avant que le café commence à couler Le processus d infusion complet dure environ une minute et se termine par un jaillissement d air permettant d évacuer tout le liquide de la capsule K Cup ATTENTION L eau se trouvant dans le support à capsule K Cup durant l infusi...

Page 27: ...n peut préparer une tasse d eau chaude pour cuisiner ou préparer une soupe un gruau etc Il suffit de soulever et de rabaisser la poignée sans insérer de capsule K Cup Le bouton d infusion bleu BREW clignotera Assurez vous qu une tasse est posée sur le plateau à tasse puis appuyez sur le bouton d infusion BREW Menu des commandes Pour accéder au mode Menu le système d infusion doit être branché et é...

Page 28: ...uvez laisser votre système d infusion en marche en tout temps et utiliser l interrupteur pour l éteindre Vous pouvez aussi programmer votre système d infusion pour qu il se mette en marche ou s éteigne automatiquement à une heure déterminée comme il est indiqué à la page 30 Langue La langue par défaut utilisée sur ce système d infusion est l anglais Pour changer la langue d affichage suivez les in...

Page 29: ...fiche DÉSACTIVÉ si le système d infusion est neuf ou s il y a eu interruption de l alimentation électrique Appuyez sur DÉSACTIVÉ pour régler l horloge Appuyez plusieurs fois sur H pour faire avancer les heures une à une ou appuyez de façon continue pour les faire défiler rapidement Une fois les heures réglées appuyez sur M pour régler les minutes Appuyez plusieurs fois pour les faire avancer une à...

Page 30: ...d infusion peut être laissé allumé en tout temps de manière à ce qu il soit toujours prêt à infuser une tasse de café gourmet de thé ou de chocolat chaud À tout moment pour éteindre le système d infusion appuyez simplement sur l interrupteur Appuyez de nouveau sur l interrupteur pour remettre le système d infusion en marche Vous devrez attendre que l eau soit chaude avant que le système d infusion...

Page 31: ...l OK ABC DEF GHI JKL MNO PQRS TUV WXYZ Delete Space KEURIG GREEN MOUNTAIN INC OK ABC abc 123 Langue Français English renseignements suivants Keurig Green Mountain Inc et www Keurig com Vous pouvez reprogrammer le système d infusion avec vos propres coordonnées L écran de coordonnées s affiche dans l économiseur d écran 1 Dans le mode Menu appuyez sur COORDONNÉES Les coordonnées par défaut de Keuri...

Page 32: ...re du lave vaisselle Pour enlever le support à capsule K Cup du système d infusion ouvrez le couvercle en soulevant la poignée changements soient sauvegardés 3 Appuyez sur l onglet du centre no de téléphone Un clavier numérique s affiche ainsi que les renseignements actuellement en mémoire fig 23 a Effacez le numéro de téléphone en mémoire et entrez les nouveaux renseignements à l aide du clavier ...

Page 33: ... du détergent jusqu à ce qu elle soit propre puis rincez la au besoin Après le nettoyage remettez la bien en place pour assurer le bon fonctionnement de l appareil ATTENTION Les parties inférieure et supérieure du support à capsule K Cup sont munies d aiguilles pointues servant à perforer la capsule K Cup Pour éviter tout risque de blessure ne pas mettre les doigts dans le boîtier du support à cap...

Page 34: ...on en choisissant le plus grand format d infusion Vous aurez probablement à remplir le réservoir d eau froide au moins une fois durant le processus REMARQUE L action nettoyante de la solution de détartrage KeurigMC peut entraîner la formation de mousse dans le système d infusion Ce phénomène est naturel et résulte de la réaction de la solution avec le tartre Il est possible qu un système d infusio...

Page 35: ...éservoir d eau chaude dans un grand récipient placé dessous ATTENTION Si le système d infusion n a pas eu suffisamment de temps pour refroidir l eau vidangée par le tuyau pourrait être très chaude Rebouchez le tuyau REMARQUE Pour éviter de perdre des pièces réinsérez le tuyau et vissez le panneau arrière du système d infusion dès que vous avez terminé Si vous avez besoin d aide concernant votre sy...

Page 36: ...plète L heure n apparaît pas sur l écran ACL Le système d infusion s allume ou s éteint automatiquement Solution Essayez d utiliser de l eau filtrée Pour toute question veuillez communiquer avec votre distributeur Keurig autorisé L aiguille de sortie est peut être obstruée voir la page 33 Nettoyez l assemblage du support à capsule K Cup si nécessaire et rincez le sous le robinet voir les pages 32 ...

Page 37: ...RÉS PAR UNE VIOLATION DE LA GARANTIE MÊME S ILS SONT PRÉVISIBLES Certaines provinces ou certains États n autorisent pas l exclusion ou la limitation de dommages indirects Par conséquent selon la province ou l État où vous avez acheté l appareil les exclusions ou les limitations susmentionnées peuvent ne pas s appliquer à vous La présente garantie ne s applique pas non plus aux dommages résultant d...

Page 38: ...domestique et commercial Pat Brevets www KeurigGreenMountain com patents To learn more about Keurig visit www Keurig com or call Pour en savoir plus sur Keurig rendez vous à www Keurig ca ou composez le 1 866 901 2739 P38 20162461 T5274_K150P_UCG_FINAL pdf 4C CMYK ZB2319 2016 11 02 Size 8 5X5 5in 1 888 CUP BREW 287 2739 P38 20162461_V01 T5274_K150P_UCG_FINAL p38R1 pdf 4C CMYK ZB2319 2016 11 25 Siz...

Reviews: