background image


for reference about the indicator lights and charge cycles.   

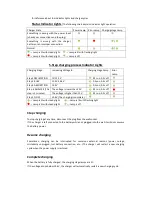
Status Indicator Lights:

 The following chart explains indicator light operation: 

Charger State 

Power Lamp  Error Lamp  Charging stage Lamp 

Something  is  wrong with the  power input 
(check your connections and the plug) 


Something  is  wrong with the  charger, 
battery or an improper connection. 


Normal 


--- Lamp is lit with steady light          --- Lamp is lit with flashing light       
--- Lamp is lit with steady light          --- Lamp is off 


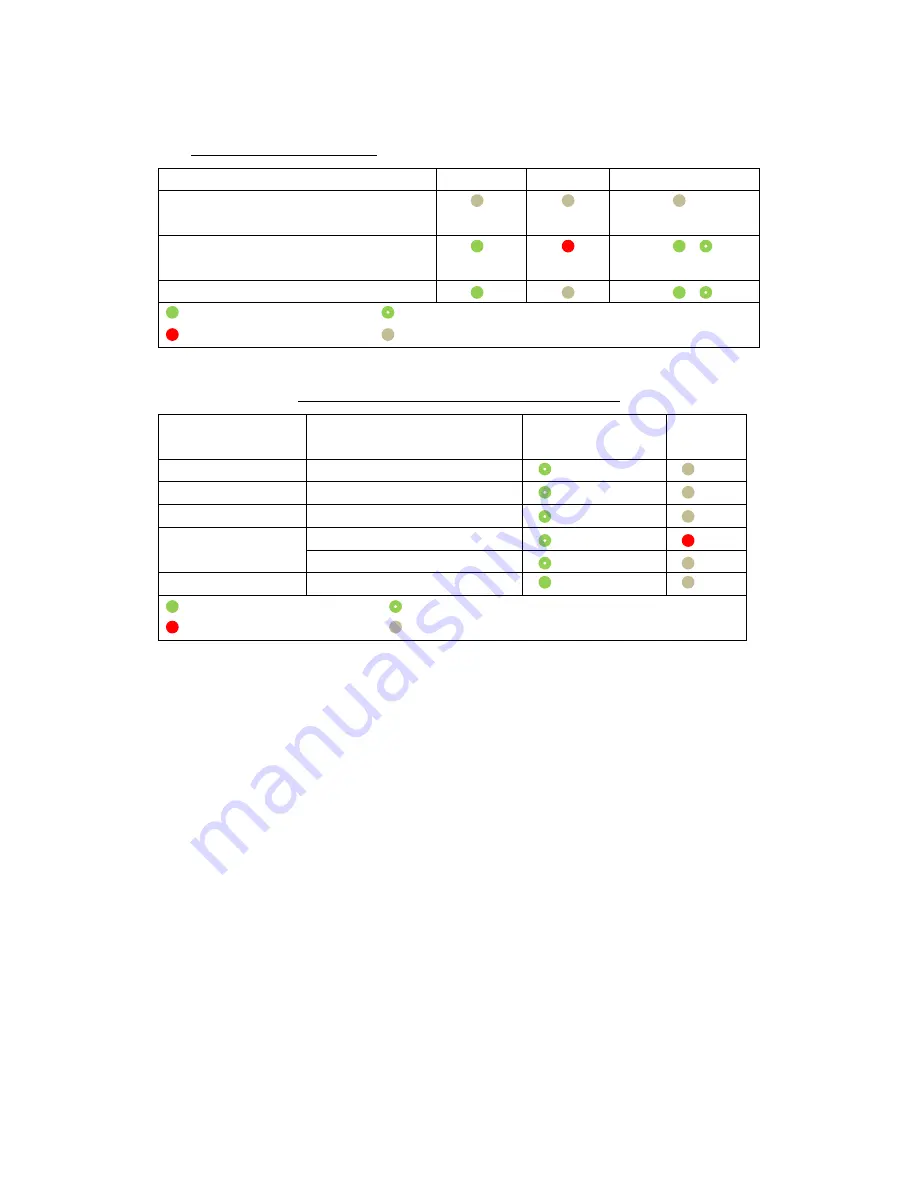
5-Step charging process Indicator Lights 

Charging Stage 

Increasing Voltage to 

Charging stage Lamp  Error 

Lamp 

Step1 DESULFATION 

7V-11.5V 

0.2s on, 0.2s off   

Step 2 BULK 

11.5V-14.4V 

    0.5s on, 0.5s off   

Step 3 ABSORPTION 

14.4V 

    0.5s on, 0.5s off   

Step 4 ANALYSE  (This 
step is 3 minutes) 

The voltage is lower than 12V 

0.5s on, 0.5s off   

The voltage is higher than 12V 

0.5s on, 0.5s off   

Step 5 FLOAT 

13.6V (The charging is complete)   


  --- Lamp is lit with steady light            --- Lamp is lit with flashing light   
  --- Lamp is lit with steady light      --- Lamp is off 
 

Stop charging 

To stop charging at any time, disconnect the plug from the wall socket. 
If the charger is left connected to the battery while not plugged into the wall it will not consume 
the battery power. 
 

Resume charging 

Sometimes,  charging  can be  interrupted  for numerous external  reasons  (power outage, 
mistakenly unplugged, lost battery connection, etc…) The  charger will restart a new charging 
cycle when the power supply is restored. 
 

Complete charging 

When the battery is fully charged, the charging stage lamps are lit.   
If the voltage drops below 13.6V, the charger will automatically restart a new charging cycle.   


Summary of Contents for Mini-Pro

Page 1: ...ed and can sustain a short circuit connection directly across its DC outlet terminals indefinitely without damaging charger equipment and without risk of shock spark or excessive heat IP65 Weather Pro...

Page 2: ...well and are typically used for often connected and disconnected vehicles or externally charged batteries Multiple Battery Type Compatibility KeyLIne uses advanced micro computing to adjust charging...

Page 3: ...12 Personal Precautions a Working with or close to lead acid batteries is dangerous These batteries generate explosive gases during normal battery operation for this reason it is imperative that you f...

Page 4: ...and should always be used with a properly grounded receptacle Operation Guide Automatic Charging and Battery Progress Monitoring KeyLine Chargers are fully automatic and may be left connected to AC po...

Page 5: ...range is still a good indicator of charge Working with a low voltage or dead battery When you attempt to charge a low or dead battery with low voltage 9 volts or less the Mini Pro will provide full c...

Page 6: ...Step 4 ANALYSE This step is 3 minutes The voltage is lower than 12V 0 5s on 0 5s off The voltage is higher than 12V 0 5s on 0 5s off Step 5 FLOAT 13 6V The charging is complete Lamp is lit with steady...

Page 7: ...etimes no desulfation or very little is necessary and this step may only last a second or less Nothing to be concerned about it just means that your battery is in good shape and does not require desul...

Page 8: ...0 240VAC Input Frequency 50 60Hz Charging Voltage 14 4VDC Output Current 1 25A MAX Dimensions 4 02 x 1 97 x 1 22inch Operating Temperature 20 40 or 4 F 104 F Design Conformance and Revisions All KeyLi...

Reviews: