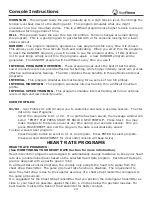
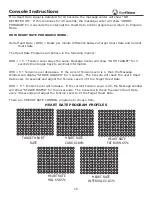
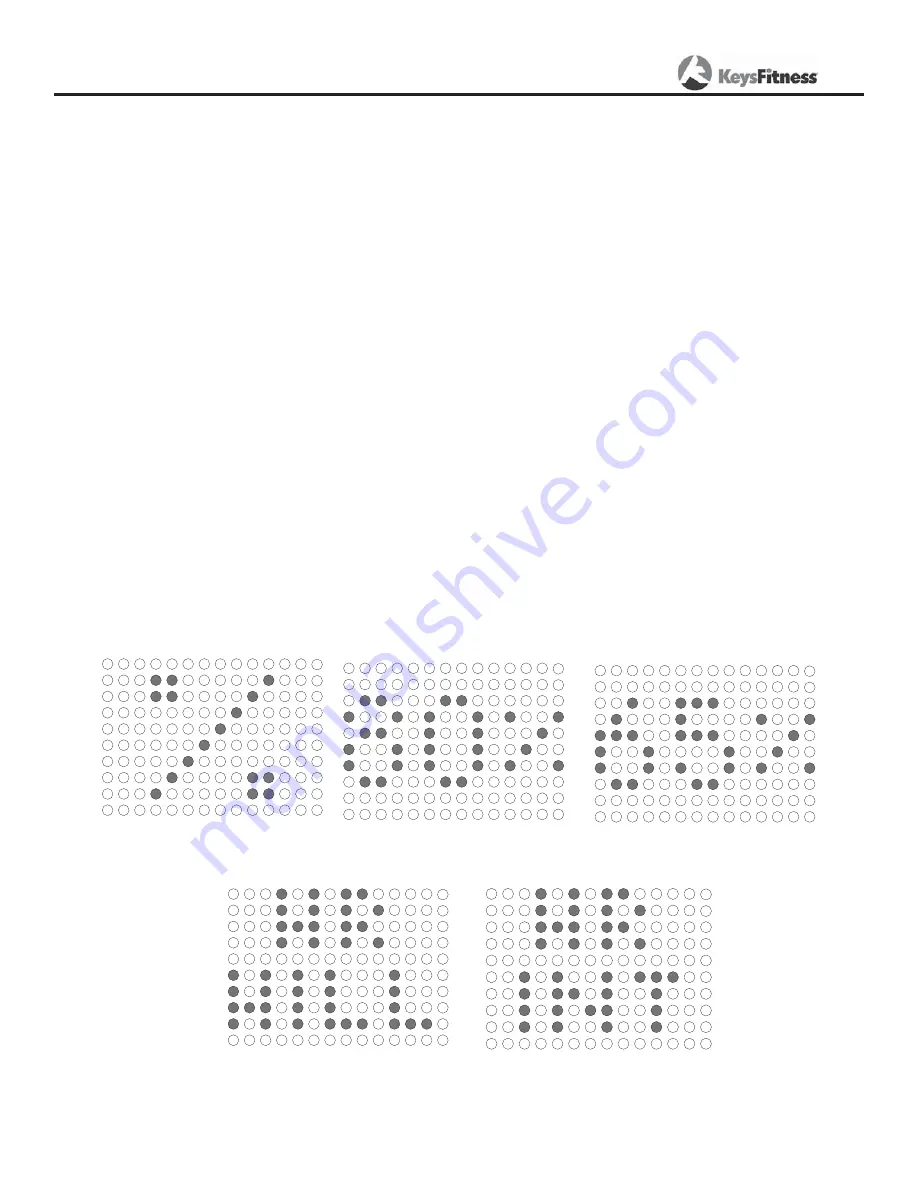
background image

15


TARGET HEART  

          RATE

HEART RATE

CARDIO 80%

 HEART RATE

FAT BURN 65%

HEART RATE

HILL 65-85%

     HEART RATE

INTERVAL 65-85%

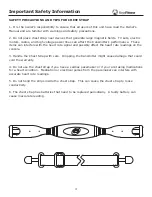
If no Heart Rate signal is detected for 10 seconds, the message center will show “NO 
DETECTED HR”.  If this continues for 40 seconds, the message center will show “ABORT 
PROGRAM” for 3 seconds then interrupt the Heart Rate Control program and return to Program 
Mode.

HOW HEART RATE PROGRAMS WORK - 

Delta Heart Rate  (DHR) = Beats per minute difference between Target Heart Rate and Current  
 Heart 

Rate

The Heart Rate Programs will behave in the following manner:

DHR <= 5 

J


Tension Level stays the same, Message Center will show “IN HR TARGET” for 3 


seconds then toggle back to workout information.

DHR >5 

J


Tension Level decreases.  If the current Tension Level is 1, then the Message. 

Window will display “STRIDE SLOWER” for 3 seconds.  The Console will check the user’s Heart 
Rate every 40 seconds and adjust the Tension Level to fit the Target Heart Rate.

DHR < 5 

J


Tension Level will increase.  If the current Tension Level is 20, the Message window 

will show “STRIDE FASTER” for three seconds.  The Console will check the user’s Heart Rate 
every 40 seconds and adjust the Tension Level to fit the Target Heart Rate.

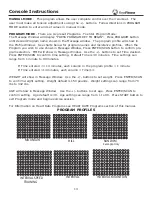
There are 5 HEART RATE CONTROL programs to choose from.  

Console Instructions

HEART RATE PROGRAM PROFILES

Summary of Contents for Center G CG2

Page 1: ...A Owner s Manual CG2 Elliptical Customer Service 888 340 0482 4009 Distribution Drive Suite 250 Garland TX 75041 www keysfitness com CAUTION Read all precautions and instructions in this manual before using this equipment ...

Page 2: ...Information 3 4 Assembly 5 9 Console Instructions 10 16 Monitoring Your Heart Rate 17 Warm Up Exercises 18 Troubleshooting Cleaning Maintenance 19 Parts List 20 Exploded Views 21 Warranty Information 22 Table of Contents ...

Page 3: ...placed under the unit to protect floor or carpet and for easier cleaning 4 Follow safety information in regards to plugging in your unit Do not run the power cord underneath your unit Do not operate the unit with a damaged or frayed power cord 5 Wear comfortable good quality walking or running shoes and appropriate clothing Do not use the unit with bare feet sandals socks or stockings 6 Always exa...

Page 4: ...re with the heart rate signal and possibly affect the heart rate readings on the console 3 Handle the Chest Strap with care Dropping the transmitter might cause damage that could void the warranty 4 Do not use the chest strap if you have a cardiac pacemaker or if your are taking medications for a heart condition Medication or electrical pulses from the pacemaker can interfere with accurate heart r...

Page 5: ...ct the medication will have on your exercise heart rate If you have heart problems your are not active and or are over the age of 35 years do not use the pre set programs or start an exercise program without first contacting and receiving approval from your physician To avoid the risk of electrical shock always keep the console dry Do not spill liquids on the console Keys Fitness recommends a seal...

Page 6: ... as possible to its final location Tools have been provided for use while assem bling this product Assembly Parts 1 Owner s Manual 2 Linkage 3 Left and Right Handlebars 4 Console 5 Console Cable 6 Console Mast 7 Rear Cover 8 M8 50mm Hex Bolt Qty 3 9 M8 12mm Hex Bolt Qty 4 10 M8 20mm Hex Bolt Qty 6 11 M5 12mm Screw Qty 9 Assembly Figure 1 Lift pedal and place left Linkage onto Sleeve and align hole...

Page 7: ... 2 Attach Handlebars to Main Frame using three M8 20mm Hex Bolts Repeat for other handlebar M8 20mm Hex Bolt Right Handlebar Left Handlebar Figure 2 Figure 3 Remove Rear Cover from unit by removing five screws Figure 3 ...

Page 8: ...console Be careful not to pinch wires 7 PIN CONNECTOR M8 50mm Hex Bolt 7PIN CONNECTOR Console Mast Figure 4 Attach Console Tube to Main Frame Slide Tube down into Main Frame Secure using three M8 50mm Hex Head Bolts Cable should extend thru bottom and top of Console Tube Figure 4 3 PIN CONNECTOR CONSOLE CABLES 7 PIN CONNECTOR 3 PIN CONNECTOR 2 GROUND CONNECTORS Figure 5a Figure 5 GROUNDING TERMINA...

Page 9: ...mm Philip Head Screws removed in figure 3 Note Do not force Rear Cover back into place this will damage Rear Cover Figure 6 REAR COVER M5 12MM SCREW Figure 7 Level machine so that no wobble is pres ent Leveler feet screw in and out to level machine After machine is level tighten leveler nut to secure levelers in place Figure 7 LEVELER ...

Page 10: ...ll place the main console window in Auto Scan Mode The display will change every four seconds from TIME DISTANCE SPEED STRIDES PER MIN to CALORIES PULSE LEVEL CAL HR To exit Auto Scan Mode and enter Manual Scan Mode Press and Hold button for two seconds Console will beep twice Manual Scan Mode allows you to toggle display from TIME DISTANCE SPEED STRIDES PER MIN to CALORIES PULSE LEVEL CAL HR by p...

Page 11: ...ndow The program profile will show in the profile window There are two information windows on the console MESSAGE WINDOW Displays Program Name Messages TIME DISTANCE SPEED RPM revolutions per minute CALORIES PULSE RESISTANCE LEVEL and CAL HOUR PROFILE WINDOW This 10 X 14 LED Window displays Program Profile Tension Bar Heart Rate Bar HR Programs only Lap Progress Display and Lap Counter The Profile...

Page 12: ...Weight is set at 150 lbs LAP DISPLAY Shows your progress around an imaginary track This also shows the ten sion level in the first column Every dot in the tension column represents an increase of two Tension is adjustable from 1 20 One dot on the lap counter is equal to 15 revolutions One revolution is equal to 2 steps Current position on track will blink Lap Progress Display 19 20 17 18 15 16 13 ...

Page 13: ...e the buttons to set Time desired Press ENTER SCAN to confirm time setting Default Time is 30 minutes Time settings can range from 1 minute to 99 minutes If Time entered 14 minutes each column in the program profile 1 minute If Time entered 14 minutes each column Time 14 WEIGHT will show in Message Window Use the buttons to set weight Press ENTER SCAN to confirm weight setting Weight default is 15...

Page 14: ...mined level based on the selected Heart Rate program Each Heart Rate pro gram is designed with a specific goal in mind In all Heart Rate Control programs the console only accepts the heart rate signal from the chest strap transmitter The pulse grip heart rate function is disabled The requirement to wear the chest strap is due to the superior accuracy of a chest strap transmitter compared to the pu...

Page 15: ...wing manner DHR 5 J Tension Level stays the same Message Center will show IN HR TARGET for 3 seconds then toggle back to workout information DHR 5 J Tension Level decreases If the current Tension Level is 1 then the Message Window will display STRIDE SLOWER for 3 seconds The Console will check the user s Heart Rate every 40 seconds and adjust the Tension Level to fit the Target Heart Rate DHR 5 J ...

Page 16: ...e motor does not reply then the console will display the error message MOTOR ERROR immediately and disable button operation until power is reset To clear this error message plug and unplug the unit TO CHANGE UNIT OF MEASURE FROM STANDARD TO METRIC Press the PAUSE RESET button for 2 seconds Use the buttons to change unit of measure Press ENTER SCAN to confirm setting Console Instructions TARGET HEA...

Page 17: ...nd taking your heart rate at these times at rest after warming up during your workout and two minutes into your cool down to accurately track your progress as it relates to better fitness During your first several months of exercising the AHA recommends aiming for the lower part of the target heart rate zone 60 then gradually progressing up to 75 According to the AHA exercising above 75 of your ma...

Page 18: ... tendons and ankles QUADRICEPS STRETCH With one hand against a wall for balance reach back and grasp one foot with your other hand Bring your heel as close to your buttocks as possible Hold for 15 counts then relax This will stretch your quadriceps and hip muscles INNER THIGH STRETCH Image Not Shown Sit with the soles of your feet together and your knees outward Pull your feet toward your groin ar...

Page 19: ... firmly inserted into the sockets Check to make sure that the batteries in the chest strap are installed correctly Replace the chest strap batteries Check to see if the receiver is properly installed Check to see if the chest strap is being properly worn by user if skin is extremely dry then moisten contact points on chest with water and try again No HR signal or incorrect HR signal Computer is re...

Page 20: ... 307 00110 D C MOTOR ASS Y CENTER G ACHIEVER CDT 1 0J9C 302 01308 SPRING WASHER M10 ZINC 2 0K3X 302 01292 CR RE PAN HD SCREW WASHER M5 0 8 14 2 2CQQ 323 00145 HANDRIAL LEFT UPPER 1 2BKF 306 00946 END CAP 35 6MM OD CENTERG 2 22RS 306 00666 LOCKING CABLE TIE GTP 110M NYLON 4 27S2 310 00114 LEVELER 4 2DM4 306 00666 LOCKING CABLE TIE GTP 110M NYLON 2 0KNM 302 01287 HEX NUT M10X1 5 CT 8 4 2CUA 323 0039...

Page 21: ...0KNM4 C 01HU 2 0HVY 2 2 20W4 0J93 21A7 0JEG 22FT 22LR 21AA 3 0K2W 3 21X8 L 01HR 0K90 2D9F 2D56 24FK 2 2D8A K 0KQZ 2 21NP 2 21LG 2 2DL8 G D 2D9G 2 2BKF 2 4 E 4 U 0K4R 2DB7 2DB6 K 21BJ S 0KR0 2 E P 0K4R 01J8 M A 2AX2 2 2CMQ R Q N H G D 2 0KR0 L 2 2DZV 2DSP 2D3A 8 0K7M 2 2D3G N 2DJ9 3 2 6 A 2 0K3X 2 21BA 01HL 01HH 2D3F2 2CQR 0J9C 2DFX T 2D41 P 0K4R11 2D3C 2 6 28UH 2 0JEJ C 0J3V 2D3E 2 2 2 21B8 2 22RR...

Page 22: ...r vice You must prepay any shipping charges export taxes custom duties and taxes or any other charges associated with transportation of the parts or Product In addition you are responsible for insuring any parts or Product shipped or returned You assume the risk of loss during shipment You must present Keys with proof of purchase documents including the date of purchase Any evidence of alteration ...

Page 23: ...Customer Service 888 340 0482 Keys Fitness Products 4009 Distribution Drive Suite 250 Garland TX 75041 www keysfitness com ...

Reviews: