background image

Keysight M8000 Series of BER Test Solutions Installation Guide

73

Controlling Multiple Instruments

3


To run this configuration, use in the following syntax:

> keysight.M8070B.exe /chassisid 1 /slotnumber 1 

/workspace "InstrumentOne"

> keysight.M8070B.exe /chassisid 1 /slotnumber 8 

/workspace "InstrumentTwo"

> keysight.M8070B.exe /chassisid 2 /workspace 

"InstrumentThree"

4 Workaround to identify a particular frame when multiple frames are 

connected to a PC

Follow the given steps to identify a particular frame when multiple 

frames connected to one PC:

a

Switch on all the frames connected to the PC.

b

Start one instance of the M8070B system software.

c

Using the command line arguments (described in previous steps), 

switch to /chassisid 1 and observe the frames. The blinking LEDs 

show the addressed frame.

d

Start the next instance M8070B system software with /chassisid 2 

and so on.

e

This will let you know which frame is associated with the entered 

/chassisid. 

f

If you restart the M8070B system software with the same command 

line arguments, it will address the same frame again. In other words 

as long as the set-up is not changed e.g. /chassisid 1 will address 

always the same frame.

Summary of Contents for J-BERT M8020A

Page 1: ...Installation Guide Keysight M8000 Series of BER Test Solutions J BERT M8020A High Performance BERT M8030A Multi Channel BERT M8040A High Performance BERT ...

Page 2: ...n No additional government requirements beyond those set forth in the EULA shall apply except to the extent that those terms rights or licenses are explicitly required from all providers of commercial computer software pursuant to the FAR and the DFARS and are set forth specifically in writing elsewhere in the EULA Keysight shall be under no obligation to update revise or otherwise modify the Soft...

Page 3: ...itudes of up to 2000 meters Refer to the specifications tables for the ac mains voltage requirements and ambient operating temperature range Before Applying Power Verify that all safety precautions are taken The power cable inlet of the instrument serves as a device to disconnect from the mains in case of hazard The instrument must be positioned so that the operator can easily access the power cab...

Page 4: ...e equipment is Class A suitable for professional use and is for use in electromagnetic environments outside of the home Indicates that anti static precautions should be taken Indicates the time period during which no hazardous or toxic substance elements are expected to leak or deteriorate during normal use Forty years is the expected useful life of the product The RCM Mark is a compliance mark to...

Page 5: ...to the EU Safety and EMC Directives ISM GRP 1A classification according to the international EMC standard ICES NMB 001 compliance marking to the Canadian EMC standard This symbol on all primary and secondary packaging indicates compliance to China standard GB 18455 2001 Symbol Description ...

Page 6: ...xed label indicates that you must not discard this electrical electronic product in domestic household waste Product Category With reference to the equipment types in WEEE Directive Annex I this product is classed as a Monitoring and Control instrumentation product Do not dispose in domestic household waste To return unwanted products contact your local Keysight office or see http about keysight c...

Page 7: ...ures in this guide are not required for bundled systems such as the M8020A BU1 M8020A BU2 M8030A BU1 M8030A BU2 M8040A BU1 M8040A BU2 or M8040A BU3 For these systems refer to the Keysight M8000 Series BER Test Solutions Getting Started Guide and Keysight M8040A Getting Started Guide After performing the procedures in this document you are directed to procedures in the Keysight M8000 Series BER Tes...

Page 8: ......

Page 9: ...15 M8020A Base System Configuration 15 M8020A Four Channel System Configuration 16 M8020A 32 Gb s BERT Configuration Pattern Generator Only 17 M8062A 32Gb s Front end for J BERT M8020A High Performance BERT 18 Single M8020A LAN Network Configuration 19 Hardware Configurations for M8030A 20 Hardware Configurations for M8040A 22 M8045A Pattern Generator Module 22 M8046A Analyzer Module 23 M8057A B R...

Page 10: ...rt Assembly 40 Rack Mounted Configuration 40 Installing the AXIe Embedded Controller Module 41 Setting up the M8030A 43 Removing Filler Panels 46 Installing the AXIe Embedded Controller Module 46 Installing a Module 49 Removing a Module 52 Synchronization Cable Configuration 52 Installing M8040A Module s 55 To install the M8045A module 56 To install the M8045A and M8046A modules 58 To Connect the ...

Page 11: ... Contents 3 Controlling Multiple Instruments Controlling Multiple Instruments by Multiple Instances of M8070B System Software 70 Remote Control of Multiple M8070B Software Instances 74 Command Line Options 74 Creating M8070B Software Shortcut on the Desktop 75 Index ...

Page 12: ......

Page 13: ...Requirements Hardware and Software Requirements 14 Hardware Configurations for M8020A 15 Hardware Configurations for M8030A 20 Hardware Configurations for M8040A 22 This chapter provides information about possible configurations for Keysight M8020A M8030A and M8040A systems ...

Page 14: ...nection PCIe 2 0 8x only for highest data throughput and desktop PC VGA resolution 1024 x 768 1 5 GB or more free hard disc space Software requirements The following operating systems are supported Windows 7 64 bit SP1 Windows 8 64 bit Windows 8 1 64 bit Windows 10 64 bit Keysight I O libraries version 17 2 NOTE The M8070B software is required to control the M8020A M8030A and M8040A systems NOTE I...

Page 15: ...ingle channel system a second channel can be added with license consisting of the 5 slot M9505A AXIe Chassis and an M8041A module The M8041A occupies three slots A maximum of two M8020A modules can be installed in a 5 slot chassis Figure 1 M8020A configuration for 16 Gb s BERT with 1 to 2 channel NOTE The M8041A module must be installed in slots 1 through 3 of the M9505A AXIe Chassis for proper lo...

Page 16: ... 5 slot M9505A AXIe Chassis an M8041A module and an M8051A module The M8041A occupies three slots and the M8051A occupies two slots Figure 2 M8020A configuration for 16 Gb s BERT for up to 4 channels NOTE This configuration requires a cable provided with the M8051A that connects the M8041A SYNC OUT to the M8051A SYNC IN to synchronize the two modules to a common system clock ...

Page 17: ...rn Generator Only A typical configuration using the M8061A 32 Gb s multiplexer with de emphasis consists of the 5 slot M9505A AXIe Chassis an M8041A module and an M8061A module The M8041A occupies three slots and the M8061A occupies two slots Figure 3 M8020A configuration for 32 Gb s BERT external demultiplexer is recom mended ...

Page 18: ...s Front end for J BERT M8020A High Performance BERT A typical configuration for an M8020A 32 Gb s full BERT consists of the 5 slot M9505A AXIe Chassis an M8041A module and an M8062A module The M8041A occupies three slots and the M8062A occupies two slots Figure 4 M8020A configuration for 32 Gb s BERT ...

Page 19: ...mber of licenses available for use In addition the host PC can be a dedicated computer running the license server or it can also run the M8070B software concurrently The M9536A or M9537A AXIe Embedded Controller can also be used as the host PC in this configuration Figure 5 Single M8020A LAN network configuration Host PC with M8070B J BERT M8020A with M8041A M8051A M8061A or M8062A Modules USB Con...

Page 20: ...or analyzer 8 16 Gb s M8192A Multi channel synchronization module The modules must be installed in the M9514A AXIe 14 slot chassis as shown in Table 3 on page 20 Table 3 M8030A modules arrangement in the M9514A AXIe chassis Slot Number Module 1 For M8030A BU1 M9536A or M9537A AXIe embedded controller For M8030A BU2 this slot is empty and covered with filler front panel 2 4 M8041A module 5 6 M8051A...

Page 21: ...0 Series of BER Test Solutions Installation Guide 21 System Requirements 1 Figure 6 on page 21 shows an example of modules arrangement in the M9514A AXIe 14 slot chassis Figure 6 Example of M8030A module arrangement ...

Page 22: ...ules M8045A Pattern Generator Module The M8045A module can be a one or two data channel system a second channel can be added with license A one channel instrument has to be returned to the factory for installing the second channel hardware and license It occupies three slots of the 5 slot M9505A AXIe chassis The following figure illustrates an M8045A module two data channel system installed in an ...

Page 23: ...n M9505A AXI chassis Figure 8 M8045A and M8046A configuration M8057A B Remote Head The M8057A B remote head is an external box which can be connected to each channel of M8045A module using the matched pair of cables It helps in minimizing signal degradations caused by lossy channels The following figure illustrates an M8057A B remote head connected with one channel of M8045A module Figure 9 M8045A...

Page 24: ... out and the number of licenses available for use In addition the host PC can be a dedicated computer running the license server or it can also run the M8070B software concurrently The M9537A AXIe Embedded Controller can also be used as the host PC in this configuration Figure 10 M8040A LAN network configuration Host PC with M8070B M8040A with M8045A M8046A and M8057A B Modules USB Connection LAN ...

Page 25: ...trument Modules 26 Installing M8020A Module s 27 Setting up the M8020A 39 Setting up the M8030A 43 Installing M8040A Module s 55 Setting up the M8040A 63 Completing the Installation and Setup Process 66 This chapter provides hardware installation procedures for M8020A M8030A and M8040A modules ...

Page 26: ...ise one or more instruments for signal injection data acquisition and measurement Install them in any available AXIe slot The drawing below illustrates the AXIe module s general layout backplane connections and chassis fasteners viewed from the top Test connections are made at the module s front panel The front panel and backplane connectors will vary depending on the module ...

Page 27: ...required if your system is an M8020A BU1 or M8020A BU2 which have their modules pre installed NOTE If you plan to use the M9536A or M9537A AXIe Embedded Controller as the host computer then you must reserve slot 1 of the chassis for this module s installation CAUTION The instrument modules are not hot swappable You must power down the AXIe chassis and host PC before inserting replacing or removing...

Page 28: ... cover slots 1 2 and 3 Loosen the retaining screws on both sides of the filler panel module until the filler panel module is completely disengaged Then gently pull the module out of the chassis holding the screws 2 If you are installing the M9536A or M9537A AXIe Embedded Controller remove the filler panel modules that cover slots 2 3 and 4 Loosen the retaining screws on both sides of the filler pa...

Page 29: ...atches to engage 6 Using your thumbs press inward firmly on the insertion extraction handles until the module is seated firmly in the chassis backplane The module front panel should lie flush with the chassis front panel 7 Push the handles ends towards the edge of the chassis to tuck them away 8 Tighten the retaining screws on either end of the module to ensure the ground connection Figure 13 Tigh...

Page 30: ...led M8041A and M8051A module Ensure that the chassis is NOT powered up or connected to a power source while installing an instrument embedded controller module 1 Remove the filler panel modules that cover slots 1 through 5 Loosen the retaining screws on both sides of the filler panel module until the filler panel module is completely disengaged Then gently pull the module out of the chassis holdin...

Page 31: ...inst the front surface of the chassis The insertion extraction latch handles should be perpendicular to the front surface of the chassis aligned with the direction of module insertion Nudge the module gently inward to allow the latches to engage 5 Using your thumbs press inward firmly on the insertion extraction handles until the module is seated firmly in the chassis backplane The module front pa...

Page 32: ...on requires the synchronization cable provided with the M8051A which connects the M8041A SYNC OUT to the M8051A SYNC IN to synchronize the two modules to a common system clock While connecting a module which requires the sync cable connection e g M8051A M8062A to the test setup make sure to connect the sync cable after completing the other connections and also remove the sync cable first while dis...

Page 33: ... M8041A and M8061A module Ensure that the chassis is NOT powered up or connected to a power source while installing an instrument embedded controller module 1 First remove the filler panel modules that cover slots 1 through 5 Loosen the retaining screws on both sides of the filler panel module until the filler panel module is completely disengaged Then gently pull the module out of the chassis hol...

Page 34: ...hassis slot until the leading edges of the insertion extraction latches rest against the front surface of the chassis The insertion extraction latch handles should be perpendicular to the front surface of the chassis aligned with the direction of module insertion Nudge the module gently inward to allow the latches to engage 5 Using your thumbs press inward firmly on the insertion extraction handle...

Page 35: ... M8041A and M8062A module Ensure that the chassis is NOT powered up or connected to a power source while installing an instrument embedded controller module 1 First remove the filler panel modules that cover slots 1 through 5 Loosen the retaining screws on both sides of the filler panel module until the filler panel module is completely disengaged Then gently pull the module out of the chassis hol...

Page 36: ...hassis slot until the leading edges of the insertion extraction latches rest against the front surface of the chassis The insertion extraction latch handles should be perpendicular to the front surface of the chassis aligned with the direction of module insertion Nudge the module gently inward to allow the latches to engage 5 Using your thumbs press inward firmly on the insertion extraction handle...

Page 37: ...rds each other Figure 26 Removing an instrument module 3 To remove the module Open the module insertion extraction handles by pivoting them out towards you This unseats the module from the chassis backplane 4 Once the module is unseated use the module insertion extraction handles by pulling directly outward to remove the module from the chassis CAUTION The enclosure surface of the module may becom...

Page 38: ... of BER Test Solutions Installation Guide 2 Installing Modules CAUTION Do not remove the AXIe ESM which is integral to the operation of the chassis An AXIe ESM that needs servicing should be removed by Keysight personnel only ...

Page 39: ...de 39 Installing Modules 2 Setting up the M8020A Benchtop Configuration If you want to use the M8020A in a benchtop configuration then retain the plastic bumpers and carry handle s for benchtop use Figure 27 Chassis bumpers and carry handles Carry Handle Bumpers ...

Page 40: ...op of the M8020A with screws provided as shown in Figure 28 on page 40 Rack Mounted Configuration If you want to use the M8020A in a rack mounted configuration 1 Remove the bumpers and carry handle s from the chassis The procedure and tools needed to remove these is documented in the Keysight M9502A M9505A AXIe chassis User s Guide which is available on www keysight com 2 Attach the rack mount bra...

Page 41: ...tivity later to perform firmware upgrades download instrument module control software or the latest Keysight I O libraries suite NOTE This module must be installed in slot 1 of the M9505A AXIe chassis NOTE Do not use the ESM LAN port as the remote control port Use the LAN port of the controller on M9536A or M9537A or external PC NOTE You do not need to manually establish any external PCIe USB or L...

Page 42: ...ilable at www keysight com find M9536A www keysight com find M9537A NOTE The M9536A or M9537A Embedded Controller module will successfully connect with M8020A only when installed in slot 1 of the M9505A chassis Make sure that you install the module in the M8020A before powering up the complete setup NOTE You should not connect the M8020A to multiple operating host computers at the same time If you...

Page 43: ...AXIe chassis The slots are identified by the slot numbers written on the front panel of the chassis NOTE The procedure described in this section is not required in case of a bundled system wherein modules are pre installed NOTE Slot 1 is reserved for M9536A or M9537A AXIe Embedded Controller CAUTION The instrument modules are not hot swappable You must power down the AXIe chassis and host PC befor...

Page 44: ...panel or an instrument module into empty slots This is especially important for the slots on either side of an instrument module This allows proper air flow and cooling and provides EMI shielding for the chassis and installed components Leaving slots empty can increase fan speed raise ambient noise overheat components and shut down modules ASM The AXIe System Module is integral to the operation of...

Page 45: ...utions Installation Guide 45 Installing Modules 2 Figure 30 M9514A AXIe 14 slot chassis at a glance Detailed information consisting of user guide and other documents for the M9514A AXIe chassis is available at www keysight com find M9514A ...

Page 46: ...37A Embedded Controller 3 If needed connect the M9536A or M9537A Embedded Controller to LAN using the GbE LAN port on the front panel of this module You need Internet connectivity later to perform firmware upgrades download instrument module control software or the latest Keysight I O libraries suite CAUTION Ensure you fully loosened the captive module retaining screws before trying to extract any...

Page 47: ...XIe chassis NOTE You do not need to manually establish any external PCIe USB or LAN connection between the M9536A or M9537A AXIe Embedded Controller and M8020A because this controller communicates with the ASM through the chassis backplane You do not need to manually install any operating system or drivers for this module The Windows 7 64 bit operating system is pre installed based on your choice ...

Page 48: ...537A NOTE The M9536A or M9537A Embedded Controller module will successfully connect with M8030A only when installed in slot 1 of the M9514A chassis Make sure that you install the module in the M8030A before powering up the complete setup NOTE You should not connect the M8030A to multiple operating host computers at the same time If you plan to use the M9536A or M9537A AXIe Embedded Controller as t...

Page 49: ...ules 2 Installing a Module 1 Power down the AXIe chassis 2 Locate the top and bottom guide rails for each slot The example below shows the guide rails in the chassis with all slots empty typically one or more will be covered Figure 32 Guide rails in the chassis with all slots empty ...

Page 50: ...ard back out and recheck alignment 4 Locate the insertion extraction handles at each side of the module s front panel Extend the ends of both handles by pulling them inwards towards each other the plastic handle end slides about 1 cm on the metal handle shaft Then fully open the handles by pivoting them out towards you until they are perpendicular to the front panel The left handle is shown below ...

Page 51: ...sides of the module 8 Retract the handle ends by sliding them outward on their metal shafts away from each other toward the chassis edge this secures them out of the way of test connections 9 Repeat steps 3 through 8 for additional modules as needed Ensure that each slot has an instrument module or filler panel installed 10 Power up the AXIe chassis Verify that the chassis fans are operating and f...

Page 52: ...st to do with thumb and forefinger of both hands simultaneously Place each thumb at the inside of the handle forefinger outside the handle and rotate the handles with your thumbs When the handles are perpendicular with the chassis stop The module should now be unseated the module from the chassis backplane and its faceplate from the chassis front panel 5 Grasp the levers to slide the module out of...

Page 53: ...f BER Test Solutions Installation Guide 53 Installing Modules 2 Figure 34 Cross wired synchronization cable M8041 61614 Route the synchronization cable as shown in the following figure Figure 35 Synchronization cable routing ...

Page 54: ...stalling Modules NOTE While connecting a module which requires the sync cable connection e g M8051A M8062A to the test setup make sure to connect the sync cable after completing the other connections and also remove the sync cable first while disconnecting the connections ...

Page 55: ...equired if your system is an M8040A BU1 M8040A BU2 or M8040A BU3 which have their modules pre installed NOTE If you plan to use the M9537A AXIe Embedded Controller as the host computer then you must reserve slot 1 of the chassis for this module s installation CAUTION The instrument modules are not hot swappable You must power down the AXIe chassis and host PC before inserting replacing or removing...

Page 56: ... cover slots 1 2 and 3 Loosen the retaining screws on both sides of the filler panel module until the filler panel module is completely disengaged Then gently pull the module out of the chassis holding the screws 2 If you are installing the M9537A AXIe Embedded Controller remove the filler panel modules that cover slots 2 3 and 4 Loosen the retaining screws on both sides of the filler panel module...

Page 57: ...atches to engage 6 Using your thumbs press inward firmly on the insertion extraction handles until the module is seated firmly in the chassis backplane The module front panel should lie flush with the chassis front panel 7 Push the handles ends towards the edge of the chassis to tuck them away 8 Tighten the retaining screws on either end of the module to ensure the ground connection Figure 38 Tigh...

Page 58: ... M8045A and M8046A module Ensure that the chassis is NOT powered up or connected to a power source while installing an instrument embedded controller module 1 Remove the filler panel modules that cover slots 1 through 5 Loosen the retaining screws on both sides of the filler panel module until the filler panel module is completely disengaged Then gently pull the module out of the chassis holding t...

Page 59: ...chassis slot until the leading edges of the insertion extraction latches rest against the front surface of the chassis The insertion extraction latch handles should be perpendicular to the front surface of the chassis aligned with the direction of module insertion Nudge the module gently inward to allow the latches to engage 5 Using your thumbs press inward firmly on the insertion extraction handl...

Page 60: ...the M8045A remote head controls P and N as shown in the Figure 42 on page 60 Figure 42 Installing M8045A M8046A modules and M8057A B remote head Ensure that the chassis is NOT powered up or connected to a power source while making connections to M8057A B Also make sure NOT to remove the M8057A B connections when it is powered on However if you wish to remove the M8057A B connections ensure that th...

Page 61: ...rds each other Figure 44 Removing an instrument module 3 To remove the module Open the module insertion extraction handles by pivoting them out towards you This unseats the module from the chassis backplane 4 Once the module is unseated use the module insertion extraction handles by pulling directly outward to remove the module from the chassis CAUTION The enclosure surface of the module may becom...

Page 62: ... of BER Test Solutions Installation Guide 2 Installing Modules CAUTION Do not remove the AXIe ESM which is integral to the operation of the chassis An AXIe ESM that needs servicing should be removed by Keysight personnel only ...

Page 63: ...f the M8040A with screws provided Rack Mounted Configuration If you want to use the M8040A in a rack mounted configuration 1 Remove the bumpers and carry handle s from the chassis The procedure and tools needed to remove these is documented in the Keysight M9502A M9505A AXIe chassis User s Guide which is available on www keysight com 2 Attach the rack mount brackets to the chassis and mount onto a...

Page 64: ...y later to perform firmware upgrades download instrument module control software or the latest Keysight I O libraries suite NOTE This module must be installed in slot 1 of the M9505A AXIe chassis NOTE Do not use the ESM LAN port as the remote control port Use the LAN port of the controller on M9537A or external PC NOTE You do not need to manually establish any external PCIe USB or LAN connection b...

Page 65: ... Controller module is available at www keysight com find M9537A NOTE The M9537A Embedded Controller module will successfully connect with M8040A only when installed in slot 1 of the M9505A chassis Make sure that you install the module in the M8040A before powering up the complete setup NOTE You should not connect the M8040A to multiple operating host computers at the same time If you plan to use t...

Page 66: ...Power up and power down the system Verify basic operation Install Keysight IO Libraries Suite Install M8070B software Install the measurement plugins Install module licenses for on site upgrades only The Keysight M8020A M8030A Getting Started Guide also contains the following information Starting the M8070B software interface Making a basic measurement Detailed information consisting of User Guide...

Page 67: ...ents Controlling Multiple Instruments by Multiple Instances of M8070B System Software 70 Remote Control of Multiple M8070B Software Instances 74 Creating M8070B Software Shortcut on the Desktop 75 This chapter describes how the M8070B system software allows a PC to control multiple instruments ...

Page 68: ... connected to an AXIe 5 Slot frame and runs a M8045A as generator module a M8046A as analyzer module and a M8195A M8196A as AWG module Ensure that the M8195A M8196A soft front panel should be properly installed on the host PC Also ensure that the M8195A M8196A should be always be mounted in a slot number higher that M8045A modules in the AXIe chassis In other words the M8195A M8196A module should ...

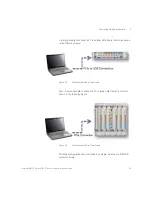
Page 69: ... smaller AXIe frame 2 slots as shown in the following figure Figure 48 PC connected to AXIe 2 slot frame Also it is also possible to connect a PC to large AXIe frame 14 slots as shown in the following figure Figure 49 PC connected to AXIe 14 slot frame All these configurations are controlled by a single instance of a M8070B system software ...

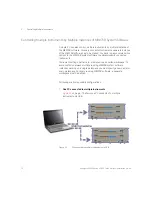
Page 70: ...line options to the M8070B system software to address specify connected instruments Instrument settings pattern etc are stored in a so called workspace To avoid conflicts between multiple running M8070B system software instances working on a single workspace you must specify a new name for every workspace For every running M8070B software a separate workspace must be defined Following are some pos...

Page 71: ...wo M8070B instances simultaneously and both control their assigned instrument 2 One PC with multiple instruments in a M9514A frame Figure 51 on page 71 shows two instruments shaded transparent rectangles hosted by a M9514A and controlled by a single PC only Figure 51 PC connected to AXIe frame 14 slot via PCIe NOTE A second or further instance of M8070B software is only required if there is anothe...

Page 72: ...e slot number specifies the first module to be built an instrument For starting the software specify following command line option keysight M8070B exe chassisid 1 slotnumber 1 workspace InstrumentOne keysight M8070B exe chassisid 1 slotnumber 8 workspace InstrumentTwo 3 Mixed connection One PC with multiple M8070B instances and multiple instruments in a M9514A frame In this configuration multiple ...

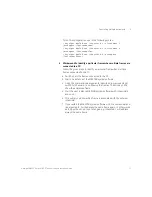
Page 73: ...rticular frame when multiple frames connected to one PC a Switch on all the frames connected to the PC b Start one instance of the M8070B system software c Using the command line arguments described in previous steps switch to chassisid 1 and observe the frames The blinking LEDs show the addressed frame d Start the next instance M8070B system software with chassisid 2 and so on e This will let you...

Page 74: ...Strings for SCPI access as shown in the following figures Figure 53 SCPI Server Information showing VISA Resource Strings for SCPI Access Figure 54 SCPI Server Information showing VISA Resource Strings for SCPI Access Command Line Options The following command line options are required for connecting a PC with instrument s chassisid Chassis Identifier defines a number for using the corresponding f...

Page 75: ...age 75 Figure 55 File explorer 2 Click on the highlighted executable with the right mouse button and move the cursor with pressed button on the desktop release the mouse button and select in the context menu Create shortcut 3 Rename the created shortcut to a meaningful name right click and select in the context menu Properties 4 Choose the Shortcut tab and change the Target entry field as shown in...

Page 76: ... of BER Test Solutions Installation Guide 3 Controlling Multiple Instruments Figure 56 Changing shortcut target 5 Click Apply You can now start the configured M8070B system software by a simple double click on the desktop icon ...

Page 77: ...guration 16 Installing modules 27 Modules 15 22 M8030A 10 channel system configuration 20 22 Install a module 49 Install M9536A embedded controller 46 Removing module 52 Sync cable 53 M8040A 22 Installing modules 55 M8040A LAN Network Configuration 24 M8041A and M8051A install 30 58 M8041A and M8061A install 33 35 60 M8041A module 15 22 M8041A install 28 49 56 M8045A Pattern Generator Module 22 M8...

Page 78: ...This information is subject to change without notice Keysight Technologies 2019 Edition 2 0 May 2019 www keysight com ...

Reviews: