background image

Features and Functions

4

Keysight 34970A/34972A User’s Guide

113

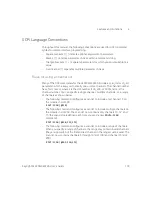
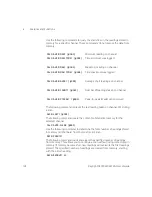
Then, send the 

*TRG

 (trigger) command to begin each scan sweep. You can 

also trigger the instrument from the GPIB interface by sending the IEEE-488 

Group Execute Trigger (

GET

) message. The following statement shows how to 

send a 

GET

 message.

External scanning

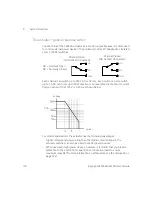
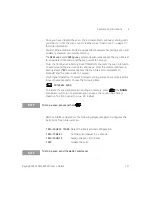
In this configuration, the instrument sweeps through the scan list once each time 

a low-going TTL pulse is received on the rear-panel 

Ext Trig Input

 line (pin 6).

– You can specify a scan count which sets the number of external pulses the 

instrument will accept before terminating the scan. 

See “Scan Count” on page 

117 for more information.


– If the instrument receives an external trigger before it is ready to accept one, it 

will buffer one trigger before generating an error. 

– All readings from the scan are stored in non-volatile memory. Readings 

accumulate in memory until the scan is terminated (until the scan count is 

reached or until you abort the scan). 

– Mx+B scaling and alarm limits are applied to measurements during the scan 

and all data is stored in non-volatile memory. 

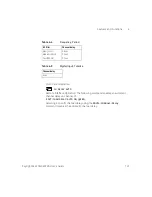
TRIGGER 709

Group Execute Trigger

NOTE

To stop a scan, send the 

ABORt

 command. 

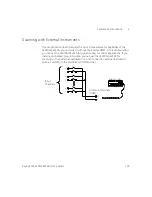
Ext Trig Input
Gnd

Input

Ext Trig Connector

> 1 ms

5V

0V

Summary of Contents for 34970A

Page 1: ...Keysight 34970A 34972A Data Acquisition Switch Unit User s Guide Sie haben Fragen oder wünschen eine Beratung Angebotsanfrage unter 07121 51 50 50 oder über info datatec de Distributed by ...

Page 2: ...hts customarily provided to the public to use modify reproduce release per form display or disclose commercial computer software or commercial com puter software documentation No additional government requirements beyond those set forth in the EULA shall apply except to the extent that those terms rights or licenses are explicitly required from all providers of commercial computer software pursu a...

Page 3: ...o to the product page at www keysight com find 34970A www keysight com find 34972A Restricted Rights Legend If software is for use in the performance of a U S Government prime contract or subcontract Software is delivered and licensed as Commercial computer software as defined in DFAR 252 227 7014 June 1995 or as a commercial item as defined in FAR 2 101 a or as Restricted computer software as def...

Page 4: ... to maintain safe operation of the instrument Alternating current AC Frame or chassis ground terminal Standby supply Unit is not completely disconnected from AC mains when switch is off Caution risk of electric shock Caution risk of danger refer to this manual for specific Warning or Caution information Protective earth ground terminal IEC Measurement CAT I ...

Page 5: ...be impaired if it is used in a manner not specified in the operation instructions Before applying power Verify that all safety precautions are taken Make all connections to the unit before applying power and select the appropriate power line voltage on the fuse module Ground the instrument This product is provided with protective earth terminals To minimize shock hazard the instrument must be conn...

Page 6: ...operative and secured against unintended operation until they can be repaired by qualified service personnel CAUTION Unless otherwise noted in the specifications this instrument or system is intended for indoor use in an installation category II pollution degree 2 environment per IEC 61010 1 and 664 respectively It is designed to operate at a maximum relative humidity of 20 to 80 at 40 C or less n...

Page 7: ...ars is the expected useful life of the product The CE mark is a registered trademark of the European Community This CE mark shows that the product complies with all the relevant European Legal Directives ICES NMB 001 indicates that this ISM device complies with the Canadian ICES 001 Cet appareil ISM est conforme a la norme NMB 001 du Canada ISM GRP 1 Class A indicates that this is an Industrial Sc...

Page 8: ...d Control Instrument product The affixed product label is as shown below Do not dispose in domestic household waste To return this unwanted instrument contact your nearest Keysight Service Center or visit http about keysight com en companyinfo environment takeback shtml for more information Sales and Technical Support To contact Keysight for sales and technical support refer to the support links o...

Page 9: ... and period Interval scanning with storage of up to 50 000 time stamped readings Independent channel configuration with function Mx B scaling and alarm limits available on a per channel basis Intuitive user interface with knob for quick channel selection menu navigation and data entry from the front panel Portable ruggedized case with non skid feet BenchLink Data Logger 3 Software for Microsoft Wi...

Page 10: ...ser s Guide GPIB IEEE 488 interface and RS 232 interface are standard on the 34970A Local Area Network LAN and Universal Serial Bus USB are standard on the 34972A SCPI Standard Commands for Programmable Instruments compatibility ...

Page 11: ...uration Menu 5 Alarm Alarm Output Configuration Menu 6 Scan to Scan Interval Menu 7 Scan List Single Step Read Key 8 Advanced Measurement Utility Menus 9 Low Level Module Control Keys 10 Single Channel Monitor On Off Key 11 View Scanned Data Alarms Errors Menu 12 Shift Local Key 13 Knob 14 Navigation Arrow Keys Denotes a menu key See the next page for details on menu operation ...

Page 12: ... key 1 Press the menu key You are automatically guided to the first level of the menu Rotate the knob to view the other choices on the first level of the menu The menu will automatically time out after about 20 seconds of inactivity You will be returned to the operation in progress prior to entering the menu 2 Press the same menu key again to move to the next item of the menu Typically this is whe...

Page 13: ...it the menu 3 Rotate the knob to view the choices on this level of the menu When you reach the end of the list rotate the knob in the opposite direction to view all of the other choices The current selection is highlighted for emphasis All other choices are dimmed 4 Press the same menu key again to accept the change and exit the menu A brief confirmation message is displayed ...

Page 14: ... external scan interval ONCE Scan Once mode is enabled Press to initiate and hold key to disable MEM 34970A MEM 34972A Reading memory overflow new readings will overwrite the oldest readings A USB drive is connected to the instrument annunciator on or data is being written to or read from the USB drive annunciator flashing AUTO 34972A USB logging is active LAST Viewed data is the last reading stor...

Page 15: ...y 5 Power Line Voltage Setting 6 Chassis Ground Screw 7 GPIB IEEE 488 Interface Connector Use the Menu to Select the GPIB or RS 232 interface see Chapter 2 Set the GPIB address see Chapter 2 Set the RS 232 baud rate parity and flow control mode see Chapter 2 WARNING For protection from electrical shock the power cord ground must not be defeated If only a two contact electrical outlet is available ...

Page 16: ...ction or data loss in the presence of an electrical transient from the main power line You can re establish the USB communication by performing a reboot cycle power on the instrument You can make the USB connection less susceptible to a potential power line transient by inserting a USB hub in the connection between the computer and the instrument Use the Menu to Select and configure the LAN and US...

Page 17: ...osed Output 4 Power Line Fuse Holder Assembly 5 LAN Connector 6 USB Drive Connector 7 USB Interface Connector Use the Menu to Select and configure the LAN and USB interfaces see Chapter 2 WARNING For protection from electrical shock the power cord ground must not be defeated If only a two contact electrical outlet is available connect the instrument s chassis ground screw see above to a good earth...

Page 18: ...naming deleting and editing easy access to data export A data log name template Automatic data export with preconfigured preferences control of the decimal character and field separator control of the export contents Graph configurations saved and restored automatically the next time Data Logger 3 is opened Graph preferences to allow easy control of graph look and feel Split graphs for easy viewin...

Page 19: ... Each of the 20 channels switches both HI and LO inputs thus providing fully isolated inputs to the internal multimeter The module is divided into two banks of 10 two wire channels each When making four wire resistance measurements channels from Bank A are automatically paired with channels from Bank B Two additional fused channels are included on the module 22 channels total for making calibrated...

Page 20: ...his module only if you have not configured any channels to be part of the scan list Otherwise all channels on the module are break before make 34903A 20 Channel Actuator General Purpose Switch 300 V 1 A actuation and switching SPDT Form C latching relays Breadboard area for custom circuits For detailed information and a module diagram see page 216 Use this module for those applications that requir...

Page 21: ...ailed information and a module diagram see page 222 These modules offer wideband switching capabilities for high frequency and pulsed signals Each module is organized in two independent banks of 4 to 1 multiplexers Both modules offer low crosstalk and excellent insertion loss performance To create larger RF multiplexers you can cascade multiple banks together Only one channel in each bank may be c...

Page 22: ...g Built in thermocouple reference junction Switching speed of up to 60 channels per second Connects to the internal multimeter For detailed information and a module diagram see page 227 Use this module for high density switching applications which require single wire inputs with a common LO All relays are break before make to ensure that only one relay is connected at any time ...

Page 23: ...Electrical and Electronic Equipment WEEE Directive 2002 96 EC 8 Product category 8 Sales and Technical Support 8 Keysight 34970A 34972A Data Acquisition Switch Unit 9 The Front Panel at a Glance 11 The Front Panel Menu at a Glance 12 Display Annunciators 14 The 34970A Rear Panel at a Glance 15 The 34972A Rear Panel at a Glance 16 BenchLink Data Logger 3 at a Glance 17 The Plug In Modules at a Glan...

Page 24: ...a Scan Interval 60 To Apply Mx B Scaling to Measurements 61 To Configure Alarm Limits 62 To Read a Digital Input Port 64 To Write to a Digital Output Port 65 To Read the Totalizer Count 66 To Output a DC Voltage 67 To Configure the Remote Interface 34970A 68 To Configure the Remote Interface 34972A 71 To Store the Instrument State 74 3 System Overview Data Acquisition System Overview 76 The comput...

Page 25: ... 103 Rules for using a channel list 103 Scanning 104 Rules for scanning 104 Power failure 107 Adding channels to a scan list 108 Scan interval 110 Scan count 117 Reading format 118 Channel delay 119 Automatic channel delays 120 Viewing readings stored in memory 122 Scanning with External Instruments 125 General Measurement Configuration 129 Measurement range 129 Measurement resolution 131 Custom A...

Page 26: ...148 Alarm Limits 151 Viewing stored alarm data 155 Using the alarm output lines 157 Using alarms with the multifunction module 159 Digital Input Operations 162 Totalizer Operations 164 Digital Output Operations 167 DAC Output Operations 169 System Related Operations 170 State storage 170 Error conditions 172 Self test 173 Display control 174 Real time system clock 175 Internal DMM disable 175 Firm...

Page 27: ...232 191 Flow control selection RS 232 192 Remote Interface Configuration 34972A 194 Enabling and disabling LAN connectivity 194 Determining the status of LAN connectivity 194 Resetting the LAN 194 Enabling and disabling DHCP 195 Setting the IP address 195 Setting the subnet mask 196 Setting the default gateway 196 Setting the DNS server 196 Viewing the MAC address 197 Calibration Overview 198 Cali...

Page 28: ...rrors 248 Plug In Module Errors 251 6 Application Programs Application Programs 254 Example Programs for Excel 7 0 255 Excel 7 0 Example takeReadings Macro 256 Excel 7 0 Example Port Configuration Macro 258 Excel 7 0 Example ScanChannels Macro 260 Example Programs for C and C 263 C C Example dac_out c 264 C C Example stat_reg c 265 7 Tutorial System Cabling and Connections 268 Cable Specifications...

Page 29: ...easurements 307 Strain Gage Measurements 308 Frequency and Period Measurements 312 Low Level Signal Multiplexing and Switching 314 One Wire Single Ended Multiplexers 315 Two Wire Multiplexers 316 Four Wire Multiplexers 317 Signal Routing and Multiplexing 318 Sources of Error in Multiplexing and Switching 319 Actuators and General Purpose Switching 321 Snubber Circuits 322 RC Protection Networks 32...

Page 30: ...A User s Guide Totalizer 333 Totalizer Errors 334 Voltage DAC Output 335 DAC Errors 336 Relay Life and Preventive Maintenance 337 Relay Life 338 Relay Load 338 Switching Frequency 339 Replacement Strategy 339 8 Specifications ...

Page 31: ...of Tables Table 4 1 DC Voltage Thermocouple DC Current for all ranges 116 Table 4 2 Resistance RTD Thermistor 2 and 4 wire 116 Table 4 3 AC Voltage AC Current for all ranges 116 Table 4 4 Frequency Period 117 Table 4 5 Digital Input Totalize 117 ...

Page 32: ...32 Keysight 34970A 34972A User s Guide THIS PAGE HAS BEEN INTENTIONALLY LEFT BLANK ...

Page 33: ...strument 53 One of the first things to do with your instrument is to become acquainted with the front panel We have written the exercises in this chapter to prepare the instrument for use and help you get familiar with some of its front panel operations The front panel has several groups of keys to select various functions and operations A few keys have a shifted function printed in blue below the...

Page 34: ...ate of Calibration if you ordered the internal DMM BenchLink Data Logger 3 Software on CD ROM To install the software see page 36 Quick Start Package if you ordered the internal DMM One RS 232 cable 34970A only One J type thermocouple and a flatblade screwdriver Any plug in modules that you ordered are delivered in a separate shipping container 2 Verify that the fuse on the back is set to the prop...

Page 35: ... in order for it to boot up The battery is installed when you receive the unit from the factory this is only a consideration if you remove the battery for some reason If the instrument does not turn on properly see page 49 4 Perform a complete self test The complete self test performs a more extensive set of tests than those performed at power on Hold down as you turn on the instrument and hold do...

Page 36: ...ta logging and decision making with no programming required For system requirements and additional details on the features of the software refer to the specifications in Chapter 8 BenchLink Data Logger 3 software installation procedure Microsoft Windows Vista XP 2000 1 Insert the 34825A Product CD ROM into your drive 2 From the Product CD ROM window that is displayed locate Keysight BenchLink Data...

Page 37: ...shipped with an extensive on line Help system to help you learn the features of the software as well as troubleshoot any problems that might arise as you are using the software As you are installing the software you will notice that the on line Help system is available in several languages ...

Page 38: ...lief 5 Install the module into mainframe Cable Tie Wrap optional 4 Replace the module cover Wiring Hints For detailed information on each module refer to the section starting on page 209 To reduce wear on the internal DMM relays wire like functions on adjacent channels For information on grounding and shielding see page 270 The diagrams on page 38 show how to connect wiring to a multiplexer module...

Page 39: ...RTD Types 0 00385 0 00391 Thermistor Types 2 2 k 5 k 10 k DC Current AC Current Valid only on channels 21 and 22 on the 34901A Ranges 10 mA 100 mA 1A Channel n source is automatically paired with Channel n 10 sense on the 34901A or Channel n 8 sense on the 34902A Ranges 100 1 k 10 k 100 k 1 M 10 M 100 MW RTD Types 0 00385 0 00391 DC Voltage AC Voltage Frequency Ranges 100 mV 1 V 10 V 100 V 300 V 4...

Page 40: ... Set the date Use and to select the field to modify and turn the knob to change the value TIME 03 45 PM JUN 01 2009 WARNING TO PREVENT ELECTRICAL SHOCK To prevent electrical shock use only wire that is rated for the highest voltage to any channel Before removing a module cover turn off all power to external devices connected to the module WARNING CAUTION WITH MULTIPLE SIGNALS To avoid the possibil...

Page 41: ...le should have insulation rated for the maximum voltage or have additional insulation added rated for the maximum voltage and should be isolated from conductive parts using a thermal compound or tape rated for the maximum voltage applied Do not mount move or remove any thermocouples when the device under test is connected to a supply source WARNING ENVIRONMENTAL HEALTH AND SAFETY When any channel ...

Page 42: ...A multiplexer installed in slot 100 and select channel 103 2 Select the measurement parameters for the selected channel Use the knob to scroll through the measurement choices on each level of the menu When you press to make your selection the menu automatically guides you through all relevant choices to configure a measurement on the selected function When you have finished configuring the paramet...

Page 43: ...dings taken during a scan are automatically time stamped and stored in non volatile memory During the scan the instrument calculates and stores the minimum maximum and average on all channels in the scan list You can read the contents of memory at any time even during a scan From the front panel data is available for the last 100 readings on each channel readings taken during a scan all of the dat...

Page 44: ...g on Channel Time of Last Reading Minimum Reading on Channel Time of Minimum Reading Maximum Reading on Channel Time of Maximum Reading Average of Readings on Channel Second Most Recent Reading on Channel Third Most Recent Reading on Channel 99th Most Recent Reading on Channel and ...

Page 45: ... digital channels on the multifunction module This feature makes it easy to configure several channels for the same measurement When you copy the configuration from one channel to another the following parameters are automatically copied to the new channel Measurement configuration Mx B scaling configuration Alarm configuration Advanced measurement configuration New serial number prefixes start wi...

Page 46: ...to scroll through the measurement choices until you see COPY CONFIG When you press to make your selection the menu automatically guides you to the next step 3 Select the channel to copy the configuration to Turn the knob until the desired channel is shown on the right side of front panel display For this example let s copy the configuration to channel 105 4 Copy the channel configuration to the se...

Page 47: ...y configured any multiplexer channels for scanning you cannot independently close and open individual relays on that module 1 Select the channel Turn the knob until the desired channel is shown on the right side of front panel display For this example select channel 213 2 Close the selected channel 3 Open the selected channel NOTE will sequentially open all channels on the module in the selected s...

Page 48: ...6 Channel Mux 34908A 40 Channel Single Ended Mux a 34903A 20 Channel Actuator 34904A 4x8 Matrix 34905A Dual 4 Channel RF Mux 50Ω b 34906A Dual 4 Channel RF Mux 75Ω b 34907A Multifunction Module DIO 34907A Multifunction Module Totalizer 34907A multifunction Module DAC a Only one channel can be closed at a time on this module b Only one channel in each bank can be closed at a time on this module ...

Page 49: ...ocated on the lower left side of the front panel 2 Verify that there is a battery in the instrument A battery must be present for the instrument to boot up 3 Verify the power line voltage setting The line voltage is set to the proper value for your country when the instrument is shipped from the factory Change the voltage setting if it is not correct The settings are 100 120 220 or 240 VAC See the...

Page 50: ...voltage appears in the window 1 Remove the power cord Remove the fuse holder assembly from the rear panel 100 120 127 220 230 or 240 VAC 2 Remove the line voltage selector from the assembly 4 Replace the fuse holder assembly in the rear panel Fuse 500 mAT for all line voltages Keysight Part Number 2110 0458 ...

Page 51: ...e the fuse holder assembly from the rear panel 2 Remove the line voltage selector from the assembly Fuse 250 mAT for all line voltages Keysight Part Number 2110 1704 3 Replace the fuse holder assembly in the rear panel New serial number prefixes starts with MY59000101 and SG59000101 ...

Page 52: ...ight 34970A 34972A User s Guide To Adjust the Carrying Handle To adjust the position grasp the handle by the sides and pull outward Then rotate the handle to the desired position Bench top viewing position Carrying position ...

Page 53: ...dware are included with each rack mounting kit Any Keysight System II instrument of the same size can be rack mounted beside the 34970A 34972A NOTE Remove the carrying handle and the front and rear rubber bumpers before rack mounting the instrument To remove the handle rotate it to the vertical position and pull the ends outward Front Rear bottom view To remove the rubber bumper stretch a corner a...

Page 54: ...o rack mount two instruments side by side order lock link kit 5061 9694 and flange kit 5063 9212 Be sure to use the support rails inside the rack cabinet To install one or two instruments in a sliding support shelf order shelf 5063 9255 and slide kit 1494 0015 for a single instrument also order filler panel 5002 3999 ...

Page 55: ...otalizer Count 66 To Output a DC Voltage 67 To Configure the Remote Interface 34970A 68 To Configure the Remote Interface 34972A 71 To Store the Instrument State 74 This chapter introduces you to the front panel keys and menu operation This chapter does not give a detailed description of every front panel key or menu operation It does however give you an overview of the front panel menus and many ...

Page 56: ... autorange Select measurement resolution Copy and paste measurement configuration to other channels Configure the scaling parameters for the displayed channel Set the gain M and offset B value for the displayed channel Make a null measurement and store it as the offset value Specify a custom label RPM PSI etc for the displayed channel Configure alarms on the displayed channel Select one of four al...

Page 57: ...ect the binary or decimal mode for digital operations digital input output only Configure the totalizer reset mode totalizer only Select which edge is detected rising or falling for totalizer operations Configure system related instrument parameters Set the real time system clock and calendar Query the firmware revisions for the mainframe and installed modules Select the instrument s power on conf...

Page 58: ...ation Recall stored states power down state factory reset state or preset state Configure the remote interface 34970A Select the GPIB address Configure the RS 232 interface baud rate parity and flow control Configure the remote interface 34972A Configure the LAN settings IP Address Hostname DHCP etc Configure the USB settings Enable USB ID etc Configure and use the USB drive Logging etc ...

Page 59: ...monitored Only one channel can be monitored at a time but you can change the channel being monitored at any time by turning the knob 2 Enable monitoring on the selected channel Any channel that can be read by the instrument can be monitored the MON annunciator turns on This includes any combination of temperature voltage resistance current frequency or period measurements on multiplexer channels Y...

Page 60: ...st a specified number of times 1 Select the interval scan mode For this example select the Interval Scan mode which allows you to set the time from the start of one scan sweep to the start of the next scan sweep Set the interval to any value between 0 and 99 hours 2 Select the scan count You can specify the number of times that the instrument will sweep through the scan list the default is continu...

Page 61: ...t configuration scaling is turned off on that channel and the gain and offset values are reset M 1 and B 0 2 Set the gain and offset values The scaling values are stored in non volatile memory for the specified channels A Factory Reset turns off scaling and clears the scaling values on all channels An Instrument Preset or Card Reset does not clear the scaling values and does not turn off scaling 3...

Page 62: ...ou plan to use Mx B scaling on a channel which will also use alarms be sure to configure the scaling values first 2 Select which of the four alarms you want to use 3 Select the alarm mode on the selected channel You can configure the instrument to generate an alarm when a measurement exceeds the specified HI or LO limits or both on a measurement channel 4 Set the limit value The alarm limit values...

Page 63: ...ed in reading memory as the readings are taken Each time you start a new scan the instrument clears all readings including alarm data stored in reading memory from the previous scan As alarms are generated they are also logged in an alarm queue which is separate from reading memory Up to 20 alarms can be logged in the alarm queue Reading the alarm queue using the View menu clears the alarms in the...

Page 64: ...ion module and continue turning the knob until DIN is displayed channel 01 or 02 2 Read the specified port You can specify whether you want to use binary or decimal format Once you have selected the number base it is used for all input or output operations on the same port To change the number base press the key and select USE BINARY or USE DECIMAL The bit pattern read from the port will be displa...

Page 65: ... the port is now converted to an output port DOUT 3 Edit the bit pattern Use the knob and or keys to edit the individual bit values You can specify whether you want to use binary or decimal format Once you have selected the number base it is used for all input or output operations on the same port To change the number base press the key and select USE BINARY or USE DECIMAL 4 Output the bit pattern...

Page 66: ...ze mode The internal count starts as soon as you turn on the instrument You can configure the totalizer to reset the count to 0 after being read or it can count continuously and be manually reset 3 Read the count The count is read once each time you press the count does not update automatically on the display As configured in this example the count is automatically reset to 0 each time you read it...

Page 67: ...he slot containing the multifunction module and continue turning the knob until DAC is displayed channel 04 or 05 2 Enter the output voltage editor 3 Set the desired output voltage Use the knob and or keys to edit the individual digits 4 Output the voltage from the selected DAC The output voltage will be displayed until you press another key or turn the knob To manually reset the output voltage to...

Page 68: ...instrument is shipped from the factory 1 Select the GPIB interface 2 Select the GPIB address You can set the instrument s address to any value between 0 and 30 The factory setting is address 9 3 Save the change and exit the menu GPIB Configuration GPIB 488 ADDRESS 09 NOTE Your computer s GPIB interface card has its own address Be sure to avoid using the computer s address for any instrument on the...

Page 69: ...and number of data bits Select one of the following None 8 data bits factory setting Even 7 data bits or Odd 7 data bits When you set the parity you are also indirectly setting the number of data bits 4 Select the flow control method Select one of the following None no flow control RTS CTS DTR DSR XON XOFF factory setting or Modem 5 Save the changes and exit the menu RS 232 Configuration RS 232 19...

Page 70: ...el is connected to a hazardous voltage source all channels in the module should be treated as hazardous and all channel wiring in the module should be rated for the maximum voltage applied Thermocouples attached to any other channel on the module should have insulation rated for the maximum voltage or have additional insulation added rated for the maximum voltage and should be isolated from conduc...

Page 71: ... Universal Serial Bus USB interface Both interfaces can be enabled at the same time and both interfaces are selected when the instrument is shipped from the factory 1 Select the LAN interface 2 Enable the LAN This is enabled by default 3 Configure the instrument LAN settings according the instructions provided by your LAN administrator LAN Configuration LAN INTERFACE LAN ENABLED ...

Page 72: ...D or USB DISABLED 3 View the USB ID String The instrument will display its USB identification USB ID string This is helpful in identifying the device on the USB network Use the left and right arrows above the knob to view the full string 4 Save the changes and exit the menu USB Configuration USB INTERFACE USB ENABLED USB0 2391 8199 MY01023529 0 INSTR ...

Page 73: ...el is connected to a hazardous voltage source all channels in the module should be treated as hazardous and all channel wiring in the module should be rated for the maximum voltage applied Thermocouples attached to any other channel on the module should have insulation rated for the maximum voltage or have additional insulation added rated for the maximum voltage and should be isolated from conduc...

Page 74: ...ess before power down will also be resumed 1 Select the storage location From the front panel you have the ability to assign names up to 12 characters to each of the five stored states The storage locations are numbered 1 through 5 The power down state is automatically stored and can be recalled from the front panel the state is named LAST PWR DOWN 2 Store the instrument state The instrument store...

Page 75: ...User s Guide 75 3 System Overview Data Acquisition System Overview 76 Signal Routing and Switching 86 Measurement Input 90 Control Output 98 This chapter provides an overview of a computer based system and describes the parts of a data acquisition system ...

Page 76: ...es You can use the 34970A 34972A to perform data storage data reduction mathematical calculations and conversion to engineering units You can use the PC to provide easy configuration and data presentation You can remove the analog signals and measurement sensors from the noisy PC environment and electrically isolate them from both the PC and earth ground You can use a single PC to monitor multiple...

Page 77: ...d in the operating system Only one instrument or device can be connected per serial port Additional system flexibility multiple instruments can be connected to the same GPIB port Requires an expansion slot plug in card in PC and associated drivers Cables readily available and inexpensive The 34970A is shipped with a serial cable if internal DMM is ordered Cabling is susceptible to noise causing sl...

Page 78: ...e particularly useful feature is 34972A s Web Interface Simply enter the IP address of your instrument in your browser s navigation bar to launch the Web Interface The remote control page of the Web Interface shown below allows you to monitor your instrument set up and initiate scans save data to the USB drive and much more For help simply click on the large question mark on the far left side of t...

Page 79: ...nalyzing measurements Use this software to set up your test acquire and archive measurement data and perform real time display and analysis of your measurements The Keysight BenchLink Data Logger Pro option available at additional cost provides advanced data logging and decision making with no programming required Automated Testing with Multiple Instruments Keysight VEE TransEra HTBASIC for Window...

Page 80: ... communicates with the floating section to provide PC connectivity The 34970A is shipped with both an GPIB IEEE 488 interface and an RS 232 interface Only one interface can be enabled at a time The 34972A is shipped with Local Area Network LAN and Universal Serial Bus USB connectivity The earth referenced section also provides four hardware alarm outputs and external trigger lines You can use the ...

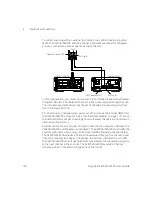
Page 81: ...surements and stores data in non volatile memory Plug In modules The 34970A 34972A offers a complete selection of plug in modules to give you high quality measurement switching and control capabilities The plug in modules communicate with the floating logic via the internal isolated digital bus The multiplexer modules also connect to the internal DMM via the internal analog bus Each module has its...

Page 82: ...the internal DMM 34907A Multifunction Module Digital Input Event Counting Signal routing 34901A 20 Channel Mux with T C Compensation Multiplexing of signals to or from external instruments 34902A 16 Channel Reed Mux with T C Compensation 34908A 40_Channel Single Ended Mux with T C Compensation 34904A 4x8 Matrix Switch 32 Crossppoint Matrix switching 34905A Dual 4 Channel RF Mux 50Ω 50Ω high freque...

Page 83: ...iring insulation and usage is described in more detail in System Cabling and Connections starting on page 268 Cable type Common uses Comments Thermocouple Extension Wire Thermocouple measurements Available in specific thermocouple types Also available in a shielded cable for added noise immunity Twisted Pair Shielded Twisted Pair Measurement inputs voltage outputs switching counting Most common ca...

Page 84: ...C voltage and mathematically converts it to a corresponding temperature in C F or K Measurement Typical transducer types Typical transducer output Temperature Thermocouple 0 mV to 80 mV RTD 2 wire or 4 wire resistance from 5Ω to 500Ω Thermistor 2 wire resistance from 10Ω to 1 MΩ Pressure Solid State 10 VDC Flow Rotary Type Thermal Type 4 mA to 20 mA Strain Resistive Elements 4 wire resistance from...

Page 85: ...ny of the four available alarms numbered 1 through 4 For example you can configure the instrument to generate an alarm on Alarm 1 when a limit is exceeded on any of channels 103 205 or 320 You can also assign alarms to channels on the multifunction module For example you can generate an alarm when a specific bit pattern or bit pattern change is detected on a digital input channel or when a specifi...

Page 86: ...n the instrument and stores the total count in non volatile memory on each switch module Use this feature to track relay failures and to predict system maintenance requirements For more information on using this feature refer to Relay cycle count on page 177 Switching topologies Several switching plug in modules are available with different topologies for various applications The following switchi...

Page 87: ...or more information see page 315 Two Wire Multiplexers for floating measurements For more information see page 316 Four Wire Multiplexers for resistance and RTD measurements For more information see page 317 Very High Frequency VHF Multiplexers for switching frequencies up to 2 8 GHz For more information see page 327 Common Channel 1 Channel 2 Channel 4 Channel 3 ...

Page 88: ...ly A matrix is arranged in rows and columns For example a simple 3x3 matrix could be used to connect three sources to three test points as shown below Any one of the signal sources can be connected to any one of the test inputs Be aware that with a matrix it is possible to connect more than one source at the same time It is important to make sure that dangerous or unwanted conditions are not creat...

Page 89: ...ator contains 20 Form C switches also called single pole double throw You can use Form C switches to route signals but they are typically used to control external devices Channel Open NC Contact Connected Channel Closed NO Contact Connected NO Normally Open NC Normally Closed NO NC COM NO NC COM ...

Page 90: ...cer or sensor converts a physical quantity being measured into an electrical signal which can be measured by the internal DMM To make these measurements the internal DMM incorporates the following functions Temperature thermocouple RTD and thermistor Voltage dc and ac up to 300V Resistance 2 wire and 4 wire up to 100 MΩ Current DC and AC up to 1A Frequency and Period up to 300 kHz The internal DMM...

Page 91: ...strument automatically selects the range to use for each measurement based on the input signal For fastest scanning operation use manual ranging for each measurement some additional time is required for autoranging since the instrument has to make a range selection Analog to Digital Conversion ADC The ADC takes a prescaled DC voltage from the signal conditioning circuitry and converts it to digita...

Page 92: ...mbine a DMM either internal or external with multiplexer channels to create a scan During a scan the instrument connects the DMM to the configured multiplexer channels one at a time and makes a measurement on each channel Before you can initiate a scan you must set up a scan list to include all desired multiplexer or digital channels Channels which are not in the scan list are skipped during the s...

Page 93: ...shown below You can also program a time delay between channels in the scan list You can manually control a scan by repeatedly pressing from the front panel You can start a scan by sending a software command from the remote interface You can start a scan when an external TTL trigger pulse is received You can start a scan when an alarm condition is logged on the channel being monitored Scan List 1 s...

Page 94: ...n order it without the internal DMM In this configuration you can use the 34970A 34972A for signal routing or control applications If you install a multiplexer plug in module you can use the 34970A 34972A for scanning with an external instrument You can connect an external instrument such as a DMM to the multiplexer COM terminal H L H L H L H L External DMM Common Terminals COM Input Channel ...

Page 95: ...g with an external instrument two control lines are provided When the 34970A 34972A and the external instrument are properly configured you can synchronize a scan sequence between the two Channel Closed OUT 34970A 34972A External DMM Ext Trig IN VM Complete OUT Ext Trig IN GND ...

Page 96: ... described in more detail on page 84 Digital input The multifunction module has two non isolated 8 bit input output ports which you can use for reading digital patterns You can read the live status of the bits on the port or you can configure a scan to include a digital read Each port has a separate channel number on the module and contains 8 bits You can combine the two ports to read a 16 bit wor...

Page 97: ... can configure a scan to read the count You can configure the totalizer to count on the rising edge or falling edge of the input signal The maximum count is 67 108 863 226 1 The count rolls over to 0 after reaching the maximum allowed value You can configure the totalizer to read without affecting the count or reset the count to zero without losing any counts Channel 03 IN IN Gate 26 Bits Totalize...

Page 98: ...nal control output capabilities to the system digital output and voltage DAC output The multifunction module also contains digital input and event totalizer capabilities which are described in more detail starting on page 96 Digital Output The multifunction module has two non isolated 8 bit input output ports which you can use to output digital patterns Each port has a separate channel number on t...

Page 99: ...annel can be used as a programmable voltage source for analog input control of other devices A simplified diagram is shown below You can set the output voltage to any value between 12 VDC and 12 VDC in 1 mV steps Each DAC is earth referenced it cannot float Each DAC channel is capable of supplying 10 mA maximum current DAC 1 DAC 2 16 16 Channel 04 Channel 05 NOTE You must limit the output current ...

Page 100: ...nt that you can switch at 120 V is 0 45 A as shown below For control applications the actuator has the following advantages Higher voltage and power rating than the digital output channels The actuator switches can also be used to control power devices When used with high power devices however it is critical that you provide protection to the switch from capacitive and inductive loads to ensure ma...

Page 101: ...urement Configuration 147 Mx B Scaling 148 Alarm Limits 151 Digital Input Operations 162 Totalizer Operations 164 Digital Output Operations 167 DAC Output Operations 169 System Related Operations 170 Single Channel Monitoring 179 Mass Memory USB Subsystem 34972A 181 USB Drive Front Panel 34972A 187 Remote Interface Configuration 34970A 189 Remote Interface Configuration 34972A 194 Calibration Over...

Page 102: ...5A 6A Dual 4 Channel RF Multiplexers 222 223 34908A 40 Channel Single Ended Multiplexer 227 You will find that this chapter makes it easy to look up all the details about a particular feature of the 34970A 34972A Whether you are operating the instrument from the front panel or over the remote interface this chapter will be useful ...

Page 103: ... where s is the slot number 100 200 or 300 and cc is the channel number You can specify a single channel multiple channels or a range of channels as shown below The following command configures a scan list to include only channel 10 on the module in slot 300 ROUT SCAN 310 The following command configures a scan list to include multiple channels on the module in slot 200 The scan list now contains ...

Page 104: ...F multiplexer modules In addition a scan cannot include a write to a digital port or a voltage output from a DAC channel However you can write your own program to manually create a scan to include these operations Rules for scanning Before you can initiate a scan you must set up a scan list to include all desired multiplexer or digital channels Channels which are not in the scan list are skipped d...

Page 105: ...e a new scan all readings are cleared from memory When you add a multiplexer channel to a scan list that entire module is dedicated to the scan The instrument issues a Card Reset to open all channels on that module You cannot perform low level close or open operations on any channels on that module even those channels that are not configured While a scan is running you can perform some low level c...

Page 106: ...mpletes If you are logging to a USB drive the instrument will not log any scans that occur between the removal of the module and the reboot of the instrument You can use either the internal DMM or an external DMM to make measurements of your configured channels However the instrument allows only one scan list at a time you cannot scan some channels using the internal DMM and others using an extern...

Page 107: ...can sweep when power fails all readings from that partially completed sweep will be discarded a sweep is one pass through the scan list For example assume that your scan list includes four multiplexer channels and you want to sweep through the scan list three times see diagram A power failure occurs after the second reading in the third scan sweep The instrument will discard the last two of the 10...

Page 108: ...rify your wiring connections and channel configuration also valid during a scan When you reconfigure a channel and add it to the scan list it is important to note that the previous configuration on that channel is lost For example assume that a channel is configured for DC voltage measurements When you reconfigure that channel for thermocouple measurements the previous range resolution and channel...

Page 109: ...eadings are not stored in memory The INITiate command stores readings in memory Use the FETCh command to retrieve stored readings from memory See the Keysight 34970A 34972A Programmer s Reference Help for more information on using these commands When you reconfigure a channel and add it to the scan list using MEASure or CONFigure it is important to note that the previous configuration on that chan...

Page 110: ...r pulse is received You can start a scan when an alarm event is logged on the channel being monitored Interval scanning In this configuration you control the frequency of scan sweeps by selecting a wait period from the start of one sweep to the start of the next sweep called the scan to scan interval The countdown time is shown on the front panel display between one scan sweep and the start of the...

Page 111: ...s From the remote interface a Factory Reset RST command sets the scan interval to immediate 0 seconds and the scan count to 1 sweep Front Panel Operation To select interval scanning and set a scan interval time hour minutes seconds choose the following item INTERVAL SCAN To initiate the scan and store all readings in memory press the SCAN annunciator will turn on Between scan sweeps the count down...

Page 112: ...n trigger commands that will be accepted before terminating the scan See Scan Count on page 117 for more information Mx B scaling and alarm limits are applied to measurements during a Scan Once operation and all data is stored in non volatile memory Front Panel Operation MANUAL SCAN To initiate the scan and store all readings in memory press The ONCE annunciator turns on as a reminder that a Scan ...

Page 113: ...ich sets the number of external pulses the instrument will accept before terminating the scan See Scan Count on page 117 for more information If the instrument receives an external trigger before it is ready to accept one it will buffer one trigger before generating an error All readings from the scan are stored in non volatile memory Readings accumulate in memory until the scan is terminated unti...

Page 114: ... can generate an alarm when a specific bit pattern is detected or when a specific count is reached In this scan configuration you may use the Monitor function to continuously take readings on a selected channel and wait for an alarm on that channel The monitored channel can be part of the scan list but you can also use a channel on the multifunction module which does not have to be part of the sca...

Page 115: ...ed until the scan count is reached or until you abort the scan Mx B scaling and alarm limits are applied to measurements during the scan and all data is stored in non volatile memory Front Panel Operation SCAN ON ALARM To enable the Monitor function select the desired channel and then press To initiate the scan press When an alarm event occurs the scan starts and readings are stored in memory Remo...

Page 116: ...IG COUNT 2 Sweep the scan list 2 times CALC LIM UPPER 5 103 Set the upper limit CALC LIM UPPER STATE ON 103 Enable the upper limit OUTPUT ALARM1 SOURCE 103 Report alarms on Alarm 1 ROUT MON 103 Select monitor channel ROUT MON STATE ON Enable monitoring INIT Initiate the scan NOTE To stop a scan send the ABORt command ...

Page 117: ... be accepted before terminating the scan During an Alarm Scan see page 114 the scan count sets the number of alarms that will be allowed before terminating the scan You can store up to 50 000 readings in non volatile memory during a scan If you set a continuous scan and memory overflows the MEM annunciator will turn on a status register bit is set and new readings will overwrite the first readings...

Page 118: ...ute time time of day with date or relative time time since start of scan Use the FORMat READ TIME TYPE command to select absolute or relative time From the front panel the time stamp is always returned in absolute time The MEASure and CONFigure commands automatically turn off the units time channel and alarm information A Factory Reset RST command turns off the units time channel and alarm informa...

Page 119: ... the channel delay to any value between 0 seconds and 60 seconds with 1 ms resolution You can select a different delay for each channel The default channel delay is automatic the instrument determines the delay based on function range integration time and AC filter setting see Automatic Channel Delays on the next page The MEASure and CONFigure commands set the channel delay to automatic A Factory ...

Page 120: ...e DC Current for all ranges Integration time Channel delay PLC 1 PLC 1 2 0 ms 1 0 ms Table 4 2 Resistance RTD Thermistor 2 and 4 wire Range Channel delay for PLC 1 Range Channel delay for PLC 1 100Ω 1 kΩ 10 kΩ 100 kΩ 1 MΩ 10 MΩ 100MΩ 2 0 ms 2 0 ms 2 0 ms 25 ms 30 ms 200 ms 200 ms 100Ω 1 kΩ 10 kΩ 100 kΩ 1 MΩ 10 MΩ 100MΩ 1 0 ms 1 0 ms 1 0 ms 20 ms 25 ms 200 ms 200 ms Table 4 3 AC Voltage AC Current ...

Page 121: ... enables an automatic channel delay on channel 01 ROUT CHAN DELAY AUTO ON 101 Selecting a specific channel delay using the ROUTe CHANnel DELay command disables the automatic channel delay Table 4 4 Frequency Period AC filter Channel delay Slow 3 Hz Medium 20 Hz Fast 200 Hz 0 6 sec 0 3 sec 0 1 sec Table 4 5 Digital Input Totalize Channel delay 0 sec ...

Page 122: ... all readings in memory after a Factory Reset RST command or Instrument Preset SYSTem PRESet command Reading memory is not cleared when you read it While a scan is running the instrument automatically stores the minimum and maximum readings and calculates the average for each channel You can read these values at any time even during a scan Each reading is stored with measurement units time stamp c...

Page 123: ...rs turn on to indicate what data is currently being viewed Reading memory is not cleared when you read it Note that you can view readings from the front panel even while the instrument is in remote READINGS Remote Interface Operation The following command retrieves stored readings from memory the readings are not erased FETCH Select Channel Last Reading on Channel Time of Last Reading Minimum Read...

Page 124: ...els from the most recent scan DATA POINTS The following command reads and clears the specified number of readings from memory This allows you to continue a scan without losing data stored in memory if memory becomes full new readings will overwrite the first readings stored The specified number of readings are cleared from memory starting with the oldest reading DATA REMOVE 12 CALC AVER MIN 305 Mi...

Page 125: ...u can order it without the internal DMM In this configuration you can use the 34970A 34972A for signal routing or control applications If you install a multiplexer plug in module you can use the 34970A 34972A for scanning with an external instrument You can connect an external instrument such as a DMM to the multiplexer COM terminal H L H L Input Channels H L H L External DMM Common Terminals COM ...

Page 126: ... disable it see Internal DMM Disable on page 175 Since the internal DMM is not used readings from multiplexer channels are not stored in internal reading memory External connections are required to synchronize the scan sequence between the 34970A 34972A and the external instrument The 34970A 34972A must notify the external instrument when a relay is closed and settled including channel delay The 3...

Page 127: ...the specified number of sweeps have occurred the scan stops For more information refer to Scan Count on page 117 An externally controlled scan can also include a read of a digital port or a read of the totalizer count on the multifunction module When the channel advance reaches the first digital channel the instrument scans through all of the digital channels in that slot and stores the readings i...

Page 128: ... externally controlled scan To configure the instrument for 4 wire external scanning send the following command ROUTe CHANnel FWIRe OFF ON ch_list TRIG SOUR TIMER Select the scan interval ROUT CHAN ADV SOUR EXT Select the channel advance source TRIG TIMER 5 Set the scan interval to 5 seconds TRIG COUNT 2 Sweep the scan list 2 times INIT Initiate the scan ...

Page 129: ... additional time is required for autoranging since the instrument has to make a range selection Autorange thresholds Down range at 10 of range Up range at 120 of range If the input signal is greater than can be measured on the selected range the instrument gives an overload indication OVLD from the front panel or 9 90000000E 37 from the remote interface For a complete list of the measurement range...

Page 130: ...n optional range parameter which allows you to specify the range or autoranging The instrument returns to autoranging when the measurement function is changed and after a Factory Reset RST command An Instrument Preset SYSTem PRESet command or Card Reset SYSTem CPON command does not change the range setting Front Panel Operation First select the measurement function on the active channel You are au...

Page 131: ...surements taken from the remote interface the resolution is fixed at 6 digits From the front panel you can set the resolution in terms of the number of digits displayed past the decimal point Measure menu For AC voltage measurements the resolution is fixed at 6 digits The only way to control the reading rate for AC measurements is by changing the channel delay see page 119 or by setting the AC fil...

Page 132: ...y guided to the next level of the menu where you can select the number of digits The default is 5 digits 6 1 2 DIGITS For temperature measurements go to the menu and select the number of digits displayed past the decimal point on the selected channel DISPLAY 1 C Remote Interface Operation Specify the resolution in the same units as the measurement function not in number of digits For example if th...

Page 133: ... and 4 seconds with 10 µs resolution The only way to control the reading rate for AC measurements is by changing the channel delay see page 119 or by setting the AC filter to the highest frequency limit see page 143 The specified integration time is used for all measurements on the selected channel If you have applied Mx B scaling or have assigned alarms to the selected channel those measurements ...

Page 134: ... the choices in PLCs for the active channel INTEG 2 PLC To select the aperture time select INTEGRATE T from the Advanced menu and then specify a value in seconds for the active channel INTEGRATE T Remote Interface Operation You can set the integration time using the SENSe commands For example the following statement specifies an integration time of 10 PLC for DC voltage measurements on channel 301...

Page 135: ...temperature DC voltage 2 wire ohms and DC current measurements only Autozero is enabled when you select 4 wire ohms measurements The autozero mode is set indirectly when you set the resolution and integration time Autozero is automatically turned off when you select an integration time less than 1 PLC You can set autozero from the remote interface only you cannot directly set autozero from the fro...

Page 136: ... Fahrenheit or K Kelvin You can mix temperature units on different channels within the instrument and on the same module The instrument selects Celsius when the probe type is changed and after a Factory Reset RST command An Instrument Preset SYSTem PRESet command or Card Reset SYSTem CPON command does not change the units setting Setting the Mx B measurement label to C F or K has no effect on the ...

Page 137: ...t to select the external reference source before configuring the reference channel An error is also generated if you change the function on the reference channel after selecting the external reference for a thermocouple channel If you select a fixed reference temperature specify a value between 20 C and 80 C always specify the temperature in C regardless of the temperature units currently selected...

Page 138: ...obe type and thermocouple type For example the following statement configures channel 301 for a J type thermocouple measurement CONF TEMP TC J 301 You can also use the SENSe command to select the probe type and thermocouple type For example the following statement configures channel 203 for a J type thermocouple measurement SENS TEMP TRAN TC TYPE J 203 The following statements use the SENSe comman...

Page 139: ...he 4 wire method For 4 wire RTD measurements the instrument automatically pairs channel n with channel n 10 34901A or n 8 34902A to provide the source and sense connections For example make the source connections to the HI and LO terminals on channel 2 and the sense connections to the HI and LO terminals on channel 12 Front Panel Operation To select the 2 wire or 4 wire RTD function for the active...

Page 140: ...al resistance For example the following statement configures channel 103 for 4 wire measurements of an RTD with α 0 00391 channel 103 is automatically paired with channel 113 for the 4 wire measurement SENS TEMP TRAN FRTD TYPE 91 103 The following statement sets the nominal resistance R0 to 1000Ω on channel 103 SENS TEMP TRAN FRTD RES 1000 103 ...

Page 141: ...ect the thermistor type for the active channel choose from the following items TYPE 2 2 KOHM TYPE 5 KOHM TYPE 10 KOHM Remote Interface Operation You can use the MEASure or CONFigure command to select the probe type and thermistor type For example the following statement configures channel 301 for measurements of a 5 kΩ thermistor CONF TEMP THER 5000 301 You can also use the SENSe command to select...

Page 142: ...ance to greater than 10 GΩ for the 100 mVDC 1 VDC and 10 VDC ranges Applies to DC voltage measurements only The instrument selects 10 MΩ fixed input resistance on all DC voltage ranges when the measurement function is changed or after a Factory Reset RST command An Instrument Preset SYSTem PRESet command or Card Reset SYSTem CPON command does not change the input resistance setting Front Panel Ope...

Page 143: ...ium filter 20 Hz when the function is changed or after a Factory Reset RST command An Instrument Preset SYSTem PRESet command or Card Reset SYSTem CPON command does not change the setting Front Panel Operation First select the AC voltage or AC current function on the active channel Then go to the Advanced menu and select the slow filter 3 Hz medium filter 20 Hz or fast filter 200 Hz for the active...

Page 144: ...ned on and one with the current source turned off Applies only to 2 wire and 4 wire ohms measurements on the 100Ω 1 kΩ and 10 kΩ ranges For detailed information about offset compensation see page 306 The instrument disables offset compensation when the measurement function is changed or after a Factory Reset RST command An Instrument Preset SYSTem PRESet command or Card Reset SYSTem CPON command d...

Page 145: ...ve faster AC settling times The instrument selects the slow medium or fast filter based on the input frequency that you specify for the selected channels Applies to AC current and AC voltage measurements only The instrument selects the medium filter 20 Hz when the function is changed or after a Factory Reset RST command An Instrument Preset SYSTem PRESet command or Card Reset SYSTem CPON command d...

Page 146: ... or fast filter 200 Hz for the active channel The default is the medium filter LF 3 HZ SLOW Remote Interface Operation Specify the lowest frequency expected in the input signal on the specified channels The instrument selects the appropriate filter based on the frequency you specify see table on previous page The MEASure and CONFigure commands automatically select the 20 Hz medium filter SENS VOLT...

Page 147: ...m CPON command does not change the setting Front Panel Operation First select the frequency function on the active channel Then go to the Advanced menu and select the slow timeout 3 Hz medium timeout 20 Hz or fast timeout 200 Hz for the active channel The default is the medium timeout value LF 3 HZ SLOW Remote Interface Operation Specify the lowest frequency expected in the input signal on the spe...

Page 148: ...hannel which will also use alarms be sure to configure the scaling values first If you attempt to assign the alarm limits first the instrument will turn off alarms and clear the limit values when you enable scaling on that channel If you specify a custom measurement label with scaling it is automatically used when alarms are logged on that channel If you remove a channel from the scan list by sele...

Page 149: ...e following equations to calculate the gain and offset M B Where GF is the gage factor and R0 is the unstrained gage resistance For example a 350Ω strain gage with a gage factor of 2 would use the following gain and offset values M 0 001428571 B 0 5 be sure to use 6 digits of resolution for this measurement The maximum gain allowed is 1E 15 and the maximum offset allowed is 1E 15 The MEASure and C...

Page 150: ... the menu and select SCALING OFF SET GAIN TO 1 SET OFST TO 0 DEFAULT LABEL To make a null measurement and store it as the offset go to SET OFFSET in the menu and turn the knob SET OFFSET Remote Interface Operation Use the following commands to set the gain offset and custom measurement label CALC SCALE GAIN 1 2 101 CALC SCALE OFFSET 10 101 CALC SCALE UNIT PSI 101 After setting the gain and offset ...

Page 151: ... is running when the alarm occurs 1 If an alarm event occurs on a channel as it is being scanned that channel s alarm status is stored in reading memory as the readings are taken Each reading outside the specified alarm limits is logged in memory You can store up to 50 000 readings in memory during a scan You can read the contents of reading memory at any time even during a scan Reading memory is ...

Page 152: ...configure the scaling values first If you attempt to assign the alarm limits first the instrument will turn off alarms and clear the limit values when you enable scaling on that channel If you specify a custom measurement label with scaling it is automatically used when alarms are logged on that channel If you remove a channel from the scan list by selecting CHANNEL OFF from the front panel or by ...

Page 153: ...table shows the different combinations of front panel annunciators that may appear while using alarms In addition to being stored in reading memory alarms are also recorded in their own SCPI status system You can configure the instrument to use the status system to generate a Service Request SRQ when alarms are generated See the Keysight 34970A 34972A Programmer s Reference Help for more informati...

Page 154: ...om the following items NO ALARM USE ALARM 1 USE ALARM 4 Then choose from the following alarm conditions HI LO ALARMS HI ALARM ONLY LO ALARM ONLY Then set the desired limit values and exit the menu Note that the instrument does not start evaluating the alarm conditions until you exit the Alarm menu Remote Interface Operation To assign the alarm number to report any alarm conditions on the specified...

Page 155: ...g memory from the previous scan Therefore the contents of memory are always from the most recent scan Up to 20 alarms can be logged in the alarm queue If more than 20 alarms are generated they will be lost only the first 20 are saved The alarm queue is cleared by the CLS clear status command when power is cycled and by reading all of the entries A Factory Reset RST command or Instrument Preset SYS...

Page 156: ...s in the queue the command returns 0 for each field The following command retrieves scanned readings and alarm data from reading memory the readings are not erased FETCH 1 1 Reading with Units 31 009 C 2 2 Date May 1 1997 3 3 Time 2 39 40 058 PM 4 4 Channel Number 5 5 Limit Threshold Crossed 0 No Alarm 1 LO 2 HI 6 6 Alarm Number Reported 1 2 3 or 4 ...

Page 157: ... lines A Factory Reset RST command clears all four alarm outputs but does not clear the alarm queue in either configuration Latch Mode In this mode the corresponding output line is latched true when the first alarm occurs and remains asserted until you clear it by initiating a new scan or cycling power You can manually clear the output lines at any time even during a scan and the alarm data in mem...

Page 158: ... for all four output lines choose from the following items LATCH ON FAIL TRACK PASS F To configure the slope of all four output lines choose from the following items FAIL HIGH FAIL LOW Remote Interface Operation To clear the specified output lines or to clear all four lines use one of the following commands To select the output configuration for all four output lines use the following command OUTP...

Page 159: ...ring a scan Each time you start a new scan the instrument clears all readings including alarm data stored in reading memory from the previous scan However alarm data stored in the alarm queue from the multifunction module is not cleared Therefore although the contents of reading memory are always from the most recent scan the alarm queue may contain data that occurred during previous scans or whil...

Page 160: ... the port is equal to CALC COMP DATA after being masked by CALC COMP MASK Select NEQual not equal to generate an alarm when the data read from the port is not equal to CALC COMP DATA after being masked by CALC COMP MASK Use CALC COMP MASK to designate the don t care bits Bits that you set to 0 in the mask are ignored To enable the specified alarm mode send the following command CALCulate COMPare S...

Page 161: ...following command OUTPut ALARm 1 2 3 4 SOURce ch_list To configure an alarm on a totalizer channel specify the desired count as the upper limit using the following command CALCulate LIMit UPPer count ch_list To enable the upper limit on the specified totalizer channel use the following command CALCulate LIMit UPPer STATe ON ch_list A B X OR 0 0 0 0 1 1 1 0 1 1 1 0 1 0 0 1 0 0 1 0 1 0 0 0 0 0 0 0 0...

Page 162: ...form write operations on the port From the front panel you can read data from only one 8 bit input port at a time From the remote interface you can read both ports simultaneously as a 16 bit word only if neither port is in the scan list If one or both ports are included in the scan list you can read only one 8 bit port at a time However if you have included both ports in the scan list the data wil...

Page 163: ... you can specify whether you want to use binary or decimal format USE DECIMAL USE BINARY Remote Interface Operation From the remote interface you can read an 8 bit byte from one port or a 16 bit word from both ports using the following commands If you are going to read both ports simultaneously you must send the command to port 01 and neither port can be included in the scan list To redefine the s...

Page 164: ...nal enables counting and a low signal disables counting A TTL low signal applied to the terminal enables counting and a high signal disables counting The totalizer only counts when both terminals are enabled You can use either the G terminal the terminal or both When a gate is not connected the gate terminal floats to the enabled state effectively creating a gate always condition Using the hardwar...

Page 165: ... see Using Alarms With the Multifunction Module on page 159 You can monitor a totalizer channel even if the channel is not part of the scan list the internal DMM is not required either The count on a totalizer channel is not reset when it is being monitored the Monitor ignores the totalizer reset mode A Factory Reset RST command Instrument Preset SYSTem PRESet command and Card Reset SYSTem CPON co...

Page 166: ...re information SENS TOT DATA 303 To configure the totalizer reset mode send either of the following commands RRESet means read and reset SENSe TOTalize TYPE READ RRESet ch_list CONFigure TOTalize READ RRESet scan_list To configure the totalizer to count on the falling edge negative or rising edge positive of the input signal send the following command SENSe TOTalize SLOPe NEG POS ch_list To immedi...

Page 167: ...panel only you can specify whether you want to use binary or decimal format Once you have selected the number base it is used for all input or output operations on the same port A Factory Reset RST command Instrument Preset SYSTem PRESet command and Card Reset SYSTem CPON command from the remote interface will reconfigure both ports as input ports Front Panel Operation After selecting the output p...

Page 168: ...8 bit byte to one port or a 16 bit word to both ports simultaneously using the following commands You must specify a decimal value binary data is not accepted If you are going to read both ports simultaneously you must send the command to port 01 SOUR DIG DATA BYTE 10 302 Write to port 02 SOUR DIG DATA WORD 10327 301 Write to both ports ...

Page 169: ...nd 12 VDC in 1 mV steps Each DAC is earth referenced it cannot float Each DAC channel is capable of 10 mA maximum output current A Factory Reset RST command Instrument Preset SYSTem PRESet command and Card Reset SYSTem CPON command from the remote interface will reset both DACs to 0 VDC Front Panel Operation After selecting the desired DAC press to edit the output voltage Press again to output the...

Page 170: ...However keep in mind that location 0 is automatically overwritten when power is cycled The instrument stores the state of all modules including all channel configurations scanning setups alarm values and scaling values When shipped from the factory storage locations 1 through 5 are empty location 0 has the power on state When shipped from the factory the instrument is configured to automatically r...

Page 171: ...ws you to cancel the last recall operation and revert to the previous state You can also select LAST PWR DOWN to recall the state of the instrument at the power down To configure the instrument to recall the power down state or issue a Factory Reset when power is restored select from the following PWR ON LAST PWR ON RESET Remote Interface Operation Use the following commands to store and recall in...

Page 172: ...he most recent error is replaced with Error queue overflow No additional errors are stored until you remove errors from the queue If no errors have occurred when you read the error queue the instrument responds with No error The error queue is cleared by the CLS clear status command or when power is cycled The errors are also cleared when you read the queue The error queue is not cleared by a Fact...

Page 173: ... pass you can have a high confidence that the instrument and all installed plug in modules are operational If the complete self test is successful PASS is displayed on the front panel If the self test fails FAIL is displayed and the ERROR annunciator turns on See the 34970A 34972A Service Guide for instructions on returning the instrument to Keysight for service Front Panel Operation To perform th...

Page 174: ...om the remote interface The instrument can display up to 13 characters on the front panel if you attempt to send more than 13 characters an error is generated You can use letters A Z numbers 0 9 and special characters like etc Use the character to display a degree symbol Commas periods and semicolons share a display space with the preceding character and are not considered individual characters Wh...

Page 175: ...ed channels using either the internal DMM or an external instrument For externally controlled scans you must either remove the internal DMM from the instrument or For information on controlling a scan with an external instrument refer to Scanning with External Instruments on page 125 When shipped from the factory the internal DMM is enabled When you change the state of the internal DMM the instrum...

Page 176: ...4972A Turn the knob to read the firmware revision number for the module installed in each of the three slots If a slot does not contain a module EMPTY SLOT is displayed Remote Interface Operation Use the following command to read the system firmware revision numbers be sure to dimension a string variable with at least 40 characters IDN The above command returns a string in the form Keysight Techno...

Page 177: ...hed HI only using only 20 relays Each relay is used to switch HI on two different channels and only one channel can be closed at a time The channels are arranged such that channels 01 and 21 use different contacts on the same relay The remaining channels are also paired in the same manner channels 02 and 22 channels 03 and 23 etc Therefore when you query the relay count on a channel the number ref...

Page 178: ...al DMM all three relays or the specified module channels send the following commands DIAG DMM CYCLES DIAG RELAY CYCLES 305 399 To clear the count on either the specified internal DMM relay or the specified module channels the instrument must be unsecured send the following commands DIAG DMM CYCLES CLEAR 2 DIAG RELAY CYCLES CLEAR 305 399 ...

Page 179: ... scaling and alarm limits are applied to the selected channel during a Monitor and all alarm data is stored in the alarm queue which will be cleared if power fails A scan in progress always has priority over the Monitor function The instrument will take at least one monitor reading per scan sweep and will take more as time permits You can monitor a multiplexer channel only if the internal DMM is i...

Page 180: ...d the monitor data from the selected channel send the following command This command returns the reading only the units time channel and alarm information are not returned the FORMat READing commands do not apply to monitor readings ROUT MON DATA SCPI language version query The instrument complies with the rules and conventions of the present version of SCPI Standard Commands for Programmable Inst...

Page 181: ... and then overflow discarding the oldest data The USB streaming will continue after reading memory overflows allowing you to capture all of the data up to 232 sweeps or up to the limits imposed by the USB drive 2 Copying of data from reading memory to USB drive Files are automatically named After a scan finishes you can export reading memory to your USB drive up to 50 000 readings 3 Setup of your ...

Page 182: ...ask for a user name and password The user name is Anonymous and the password is any string such as xyz Enter the command CD DATA to log onto the USB drive Enter the command DIR to obtain a directory of the USB drive Enter the command CD MY00012345 20091210_134523123 to change to the directory containing the data you wish to download from the USB drive to your local computer Of course the exact dir...

Page 183: ...s available to program the instrument over the remote interface see the MMEMory commands in the Keysight 34970A 34972A Programmer s Reference Help Folder and file structure Folder description Each saved scan will be stored in a top level folder named 34972A data instrument_SN yyyymmdd_hhmmssmmm The square brackets are not actually part of the directory name and the yyyymmdd_hhmmssmmm is a timestam...

Page 184: ...ed as follows dat csv If you use the command MMEMory FORMat READing RLIMit OFF all of the data will be stored in one file named dat00001 csv You can issue the command MMEMory FORMat READing RLIMit ON to limit the data to 64K 1 65 535 sweeps per file in which case the sweeps are stored in multiple files named dat00001 csv dat00002 csv dat00003 csv and so on This is helpful for importing data into s...

Page 185: ...120 201 220 or 301 320 The format for all USB data files is similar to what Keysight BenchLink Data Logger produces by default The default field separator is a comma but you can use the following command to specify a different separator MMEMory FORMat READing CSEParator TAB COMMa SEMicolon Module Description Channels 34901A 20 channel 2 wire armature multiplexer s01 s20 34902A 16 channel 2 wire re...

Page 186: ...ntinues where it left off in the previous file Thus the first scan in the second data file would be number 65 536 the first scan in the third data file would be number 131 071 and so on Sweep Time Chan 201 VDC Chan 202 VDC 1 01 26 2009 08 07 12 237 0 36823663 1 23895216 2 01 26 2009 08 07 13 237 0 62819233 0 98372939 3 01 26 2009 08 07 14 237 0 38238212 0 39382906 4 01 26 2009 08 07 15 237 0 46773...

Page 187: ... the USB drive for automatic logging of readings Front Panel Operation LOG READINGS AUTO OFF Exporting readings You can export readings from reading memory onto the USB drive Front Panel Operation EXPORT READNG YES NO Formatting readings You can control how readings are formatted on the USB drive In particular you can choose whether the readings are stored in one large file ROWS FILE AUTO or in a ...

Page 188: ... 34972A User s Guide Importing an instrument configuration You can import an instrument configuration stored in an Keysight BenchLink Data Logger configuration BLCFG file in the root directory of your USB drive Front Panel Operation IMPORT CONFIG ...

Page 189: ...device on the GPIB IEEE 488 interface must have a unique address You can set the instrument s address to any value between 0 and 30 The address is set to 9 when the instrument is shipped from the factory The GPIB address is displayed at power on You can set the GPIB address from the front panel only The address is stored in non volatile memory and does not change when power has been off after a Fa...

Page 190: ...n on the instrument If you select the RS 232 interface you must also set the baud rate parity and flow control mode for the instrument RS 232 is displayed on the front panel when you turn on the instrument Front Panel Operation GPIB 488 RS 232 Remote Interface Operation SYSTem INTerface GPIB RS232 Baud rate selection RS 232 You can select one of eight baud rates for RS 232 operation The rate is se...

Page 191: ...You can set the parity from the front panel only Select one of the following None 8 data bits Even 7 data bits or Odd 7 data bits When you set the parity you are also indirectly setting the number of data bits The parity selection is stored in non volatile memory and does not change when power has been off after a Factory Reset RST command or after an Instrument Preset SYSTem PRESet command Front ...

Page 192: ...ta it continues sending data until the XOFF character 13H is received When the XON character 11H is received the instrument resumes sending data DTR DSR In this mode the instrument monitors the state of the DSR data set ready line on the RS 232 connector When the line goes true the instrument sends data over the interface When the line goes false the instrument stops sending information typically ...

Page 193: ...nstrument sets the RTS line true when it is ready to receive data The modem sets the CTS line true when it is ready to accept data The instrument sets the RTS line false when the input buffer is almost full approximately 100 characters and releases the line when space is available again The flow control selection is stored in non volatile memory and does not change when power has been off after a ...

Page 194: ...TERFACE Enabling and disabling LAN connectivity You can enable or disable the LAN connectivity If you are not controlling the instrument via LAN it is a good idea to disable LAN connectivity in order to prevent others from connecting to your instrument over the LAN Front Panel Operation LAN ENABLED DISABLED Determining the status of LAN connectivity You can determine whether you are connected to t...

Page 195: ...ng in the Automatic Private IP Addressing range 169 254 xxx xxx When DHCP is disabled the instrument will use the static IP address Subnet Mask Default Gateway and DNS Server during power on Front Panel Operation DHCP ENABLED DISABLED Setting the IP address You can set the IP address for your 34972A This menu option assigns the static IP address for the instrument You must disable DHCP in order to...

Page 196: ...fault gateway for your LAN connection Contact your network administrator to determine whether subnetting is being used and for the correct address If DHCP is enabled DHCP will auto assign the gateway This auto assigned gateway takes precedence over the static gateway assigned with this menu option You must disable DHCP in order to set this on the front panel Front Panel Operation DEF GATEWAY Setti...

Page 197: ...w the MAC address of your 34972A This address is of the form where each is a hexadecimal digit 0 9 or A F The LAN relies on every device attached to the network having a unique MAC address The MAC address for each instrument is set at the factory and cannot be changed Front Panel Operation MAC ADDRESS ...

Page 198: ...ct security code The security code is set to either KT034970 or KT034972 depending on the product number when the instrument is shipped from the factory The security code is stored in non volatile memory on the mainframe and does not change when power has been off after a Factory Reset RST command or after an Instrument Preset SYSTem PRESet command The security code may contain up to 12 alphanumer...

Page 199: ...t from the front panel you must use that same code to unsecure it from the remote interface Front Panel Operation UNSECURE CAL When you first enter the Utility menu the calibration entries toggle between CAL SECURED and UNSECURE CAL To unsecure the instrument select UNSECURE CAL and press After entering the correct security code press again When you return to the menu you will see new choices CAL ...

Page 200: ...return to the menu you will see new choices CAL SECURED and UNSECURE CAL Remote Interface Operation To secure the instrument send the following command with the desired security code CAL SECURE STATE ON KT034970 To change the security code To change the security code you must first unsecure the instrument and then enter a new code Make sure you have read the security code rules described on page 1...

Page 201: ...nt panel or over the remote interface You can read the calibration message whether the instrument is secured or unsecured The calibration message may contain up to 40 characters From the front panel you can view 13 characters of the message at a time Press to scroll through the text of the message Press again to increase the scrolling speed Storing a calibration message will overwrite any message ...

Page 202: ...on volatile memory in the mainframe and does not change when power has been off after a Factory Reset RST command or after an Instrument Preset SYSTem PRESet command The calibration count increments up to a maximum of 65 535 after which it rolls over to 0 Since the value increments by one for each calibration point a complete calibration may increase the value by many counts The calibration count ...

Page 203: ...ay Count Not Reset When Read Rising Edge Scanning Operation Scan List Reading Memory Min Max and Average Scan Trigger Source Scan Interval used with TRIGger SOURce TIMer Scan Count Scan Reading Format Monitor in Progress Factory Reset State Empty All Readings are Cleared Not Changed Immediate 10 Seconds 1 Reading Only No Units Channel Time Stopped Mx B Scaling Gain Factor M Scale Factor B Scale La...

Page 204: ...908A 34903A 34904A 34905A 34906A 34907A Factory Reset State All Channels Open All Channels Open Channels s11 and s21 Selected Both DIO Ports Input Totalizer Count 0 Both DACs 0 VDC System Related Operations Display State Error Queue Stored States Factory Reset State On Errors Not Cleared No Change ...

Page 205: ... When Read Rising Edge Scanning Operation Scan List Reading Memory Min Max and Average Scan Interval Source Scan Interval Scan Count Scan Reading Format Monitor in Progress Instrument Preset State No Change All Readings are Cleared No Change No Change No Change No Change No Change Stopped Mx B Scaling Gain Factor M Scale Factor B Scale Label Instrument Preset State No Change No Change No Change Al...

Page 206: ...903A 34904A 34905A 34906A 34907A Instrument Preset State All Channels Open All Channels Open Channels s11 and s21 Selected Both DIO Ports Input Totalizer Count 0 Both DACs 0 VDC System Related Operations Display State Error Queue Stored States Instrument Preset State No Change Errors Not Cleared No Change ...

Page 207: ...couple Type Open T C Detection Reference Junction Source RTD Type RTD Reference Resistance Thermistor Type Channel Delay Default Setting C 1 PLC 0 1 C Type J Off Internal α 0 00385 Ro 100Ω 5 kΩ Automatic Delay Voltage Measurements Range Resolution Integration Time Input Resistance AC Low Frequency Filter Channel Delay Default Setting Autorange 5 digits 1 PLC 10 MΩ fixed for all DCV ranges 20 Hz me...

Page 208: ... Resolution AC Low Frequency Filter Channel Delay Default Setting Autorange 5 digits frequency 6 digits period 20 Hz medium Automatic Delay Current Measurements Range Resolution Integration Time AC Low Frequency Filter Channel Delay Default Setting Autorange 5 digits 1 PLC 20 Hz medium Automatic Delay ...

Page 209: ...easy to document your wiring configuration for each module For complete specifications on each plug in module refer to the module sections in Chapter 8 34901A 20 Channel Multiplexer on page 210 34902A 16 Channel Multiplexer on page 213 34903A 20 Channel Actuator on page 216 34904A 4x8 Matrix Switch on page 219 34905A 6A Dual 4 Channel RF Multiplexers on page 222 on page 223 34908A 40 Channel Singl...

Page 210: ... highest voltage to any channel Before removing a module cover turn off all power to external devices connected to the module WARNING CAUTION WITH MULTIPLE SIGNALS To avoid the possibility of multiple signal sources becoming connected together we recommend when multiplexing two or more sources they should be connected on separate modules or on separate banks of the same module WARNING CAUTION WITH...

Page 211: ...e Internal DMM Input Current 01 10 Com Com 4W Sense 11 20 21 Current Channels 22 Com Current 98 99 97 96 Fuse Fuse 94 93 Bank Switches Shunt Switches Junction NOTE Only one of channels 21 and 22 can be connected to the internal DMM and or Com at a time connecting one channel will close the other thus shorting the input I to LO If any channels are configured to be part of the scan list you cannot c...

Page 212: ...witching Power 50 W Not Used Not Used WIRING LOG Slot Number 100 200 300 Ch Name Function Comments 01 02 03 04 05 06 07 08 09 10 H COM L COM 11 12 13 14 15 16 17 18 19 20 H COM L COM Current Channels Only 21 22 I COM L COM 6mm 20 AWG Typical WARNING To prevent electrical shock use only wire that is rated for the highest voltage applied to any channel Before removing a module cover turn off all pow...

Page 213: ...he module has a built in thermocouple reference junction to minimize errors due to thermal gradients when measuring thermocouples Backplane Switches Channel Switches Bank Switches 01 08 Com Com 4W Sense 09 16 97 98 99 Internal DMM Input Reference Sensor Junction Internal DMM Input 4W Sense 100Ω 100Ω 100Ω 100Ω NOTE If any channels are configured to be part of the scan list you cannot close multiple...

Page 214: ...nel is connected to a hazardous voltage source all channels in the module should be treated as hazardous and all channel wiring in the module should be rated for the maximum voltage applied Thermocouples attached to any other channel on the module should have insulation rated for the maximum voltage or have additional insulation added rated for the maximum voltage and should be isolated from condu...

Page 215: ...annels are paired to Channel n 8 Refer to the diagrams on page 38 to connect wiring to the module Maximum Input Voltage 300 V CAT 1 Maximum Input Current 50 mA Maximum Switching Power 2 W 6mm 20 AWG Typical WARNING To prevent electrical shock use only wire that is rated for the highest voltage applied to any channel Before removing a module cover turn off all power to external devices connected to...

Page 216: ...ided near the screw terminals to implement custom circuitry such as simple filters snubbers and voltage dividers The breadboard area provides the space necessary to insert your own components but there are no circuit board traces here You must add your own circuitry and signal routing 01 20 NOTE You can close multiple channels at the same time on this module The channel CLOSE and OPEN commands con...

Page 217: ...nel is connected to a hazardous voltage source all channels in the module should be treated as hazardous and all channel wiring in the module should be rated for the maximum voltage applied Thermocouples attached to any other channel on the module should have insulation rated for the maximum voltage or have additional insulation added rated for the maximum voltage and should be isolated from condu...

Page 218: ...n NC Normally Closed Refer to the diagrams on page 38 to connect wiring to the module Maximum Input Voltage 300 V CAT 1 Maximum Input Current 1 A Maximum Switching Power 50 W 6mm 20 AWG Typical WARNING To prevent electrical shock use only wire that is rated for the highest voltage applied to any channel Before removing a module cover turn off all power to external devices connected to the module ...

Page 219: ... of inputs and outputs at the same time This module does not connect to the internal DMM Each crosspoint relay has its own unique channel label representing the row and column For example channel 32 represents the crosspoint connection between row 3 and column 2 as shown below Row 1 Row 2 Row 3 Row 4 Col 1 Col 2 Col 8 Channel 32 Row 3 Column 2 NOTE You can close multiple channels at the same time ...

Page 220: ...nel is connected to a hazardous voltage source all channels in the module should be treated as hazardous and all channel wiring in the module should be rated for the maximum voltage applied Thermocouples attached to any other channel on the module should have insulation rated for the maximum voltage or have additional insulation added rated for the maximum voltage and should be isolated from condu...

Page 221: ...ow 3 and Column 2 Refer to the diagrams on page 38 to connect wiring to the module Maximum Input Voltage 300 V CAT 1 Maximum Input Current 1 A Maximum Switching Power 50 W 6mm 20 AWG Typical WARNING To prevent electrical shock use only wire that is rated for the highest voltage applied to any channel Before removing a module cover turn off all power to external devices connected to the module ...

Page 222: ...directly to the on board SMB connectors or to the SMB to BNC cables provided with the module 11 12 Com1 13 14 21 22 Com2 23 24 98 99 Bank Switch Bank Switch NOTE The 34905A is used for 50W applications The 34906A is used for 75W applications mini SMBs You can close only one channel per bank at a time on these modules closing one channel in a bank will open the previously closed channel One channel...

Page 223: ... connect wiring to the module Maximum Input Voltage 42 V Maximum Input Current 700 mA Maximum Switching Power 20 W Ten color coded cables are included with the module To order additional cables use the following cable kit part numbers 10 cables are included 34905 60001 50Ω cables 34906 60001 75Ω cables Ch Name Comments 11 12 13 14 COM1 21 22 23 24 COM2 ...

Page 224: ...nel is connected to a hazardous voltage source all channels in the module should be treated as hazardous and all channel wiring in the module should be rated for the maximum voltage applied Thermocouples attached to any other channel on the module should have insulation rated for the maximum voltage or have additional insulation added rated for the maximum voltage and should be isolated from condu...

Page 225: ...lizer to count on the rising edge or falling edge of the input signal A TTL high signal applied to the G terminal enables counting and a low signal disables counting A TTL low signal applied to the terminal enables counting and a high signal disables counting The totalizer only counts when both terminals are enabled Move the Totalize Threshold jumper to the AC position to detect changes through 0 ...

Page 226: ... 04 DAC 1 Output GND 05 DAC 2 Output GND Gate Threshold Jumper Position rTTL rAC Refer to the diagrams on page 38 to connect wiring to the module Digital Input Output Vin L 0 8V TTL Vin H 2 0V TTL Vout L 0 8V lout 400 mA Vout H 2 4V lout 1 mA Vin H Max 42V with external open drain pull up Totalizer Maximum Count 67 108 863 226 1 Totalize Input 100 kHz max Signal Level 1 Vp p min 42 Vpk max DAC Out...

Page 227: ...ference Junction Sensor 01 20 Com 21 40 98 99 Switch Com NOTE Refer to the diagrams on page 38 to connect wiring to the module Only one channel can be closed at a time closing one channel will open the previously closed channel This module cannot be used to directly measure current or any 4 wire measurements When connecting thermocouples to the screw terminals on this module not recommended due to...

Page 228: ...d the possibility of multiple signal sources becoming connected together we recommend when multiplexing two or more sources they should be connected on separate modules or on separate banks of the same module WARNING CAUTION WITH HAZARDOUS VOLTAGES When any channel is connected to a hazardous voltage source all channels in the module should be treated as hazardous and all channel wiring in the mod...

Page 229: ...70A 34972A User s Guide 229 WARNING ENVIRONMENTAL HEALTH AND SAFETY When any channel is connected to a hazardous voltage source the instrument and the device under test should be supervised following local EHS practices to restrict access ...

Page 230: ...Keysight 34970A 34972A User s Guide WIRING LOG Slot Number 100 200 300 Ch Name Function Comments 01 02 03 04 05 06 07 08 09 10 11 12 13 14 15 16 17 18 19 20 21 22 23 24 25 26 27 28 29 30 31 32 33 34 35 36 37 38 39 40 LO H COM L COM ...

Page 231: ... 34970A 34972A Data Acquisition Switch Unit User s Guide 231 5 Error Messages Error Messages 232 Execution Errors 233 Instrument Errors 238 Self Test Errors 246 Calibration Errors 248 Plug In Module Errors 251 ...

Page 232: ...errors have occurred when you read the error queue the instrument responds with No error The error queue is cleared by the CLS clear status command or when power is cycled The errors are also cleared when you read the queue The error queue is not cleared by a Factory Reset RST command or an Instrument Preset SYSTem PRESet command Front Panel Operation ERRORS If the ERROR annunciator is on press to...

Page 233: ...and string You may have used a comma instead of a colon semicolon or blank space or you may have used a blank space instead of a comma Examples TRIG COUNT 1 or CONF FREQ 1000 0 1 105 GET not allowed A Group Execute Trigger GET is not allowed within a command string 108 Parameter not allowed More parameters were received than expected for this command You may have entered an extra parameter or adde...

Page 234: ...pecified for a parameter Example TRIG TIMER 12 34 123 Numeric overflow A numeric parameter was found whose exponent was too large for this command Example CALC SCALE GAIN 1E34000 124 Too many digits A numeric parameter was found whose mantissa contained more than 255 digits excluding leading zeros 128 Numeric data not allowed The wrong parameter type was found in the command string You may have sp...

Page 235: ...e list of parameters to verify that you have used a valid parameter type Example CALC SCALE STATE ON 168 Block data not allowed Data was sent to the instrument in SCPI definite length block format but this command does not accept this format Example SOUR DIG DATA 128 178 Expression data not allowed A channel list was received but is not allowed for this command Example SYST CTYPE 100 211 Trigger i...

Page 236: ...ot a valid choice for this command You may have used an invalid parameter choice Example TRIG SOURCE ALARM ALARM is not a valid choice 230 Data stale A FETCh or DATA REMove command was received but internal reading memory was empty The readings retrieved may be invalid 310 System error A firmware defect has been found This is not a fatal error but you should contact your nearest Keysight Service C...

Page 237: ...nerate data and then attempted to read data from the remote interface 430 Query DEADLOCKED A command was received which generates too much data to fit in the output buffer and the input buffer is also full Command execution continues but all data is lost 440 Query UNTERMINATED after indefinite response The IDN command must be the last query command within a command string The IDN command returns a...

Page 238: ...usable This error is most likely caused by a dead battery memory is battery backed Refer to the 34970A 34972A Service Guide to replace the internal battery 202 Memory lost power on state This error is reported at power on to indicate that the power down state of the instrument normally recalled when power is turned on has become unusable This error is most likely caused by a dead battery memory is...

Page 239: ...e 224 Settings conflict chan adv source changed to IMM This error is generated if you attempt to set the scan trigger source TRIGger SOURce command to the same source used for the channel advance source ROUTe CHAN ADVance SOURce command The command has been accepted and executed but the channel advance source is reset to IMMediate 225 Settings conflict DMM disabled or missing This command is valid...

Page 240: ...ck the channel list that you sent with this command to see if it contains more than one channel This error is generated by the ROUTe MON and DATA LAST commands 291 Not able to recall state it is empty You can only recall a state from a location that contains a previously stored state The state location that you attempted to recall is empty The storage locations are numbered 0 through 5 292 Not abl...

Page 241: ...cally reserves channel 01 on the multiplexer in the lowest slot as the reference channel Before configuring a thermocouple channel with an external reference you must configure the reference channel channel 01 for a thermistor or RTD measurement This error is also generated if you change the function on the reference channel channel 01 after selecting the external reference source on a thermocoupl...

Page 242: ...s storage error failed to remove directory The instrument was unable to remove the directory on the USB drive 410 Not enough disk space The external USB drive is full 411 No external disk detected The operation requires a USB drive which is not detected 412 External disk has been detached The external USB drive has been unplugged 413 File already exists The instrument was unable to create new file...

Page 243: ... Not able to execute while importing a configuration from USB Operation can not be completed while a measurement configuration is being imported from USB 457 Logging request ignored USB device is busy Logging was not started because USB is busy but the scan will continue to run normally placing data in reading memory 458 External USB drive is inaccessible External USB drive can not be accessed eit...

Page 244: ...cations error 469 Internal processor returned an invalid measurement config Configuration data returned by secondary processor was bad Measurement configuration could not be determined 470 Measurement was reconfigured Cannot save configuration data Measurement configuration no longer agrees with the corresponding set of readings Configuration data will not be saved to the USB drive 471 USB operati...

Page 245: ...ked by another I O session The requested operation is not allowed because another I O session has locked the instrument 521 Communications input buffer overflow 522 Communications output buffer overflow 532 Not able to achieve requested resolution The instrument cannot achieve the requested measurement resolution You may have specified an invalid resolution in the CONFigure or MEASure command 540 ...

Page 246: ...to calibrate rundown gain 606 Self test Cal rundown gain out of range 607 Self test rundown too noisy 608 Self test serial configuration readback 609 Self test DC gain x1 610 Self test DC gain x10 611 Self test DC gain x100 612 Self test Ohms 500 nA source 613 Self test Ohms 5 uA source 614 Self test DC 300V zero 615 Self test Ohms 10 uA source 616 Self test DC current sense 617 Self test Ohms 100...

Page 247: ... 5 Keysight 34970A 34972A User s Guide 247 623 Self test not able to calibrate precharge 624 Self test not able to sense line frequency 625 Self test I O processor not responding 626 Self test I O processor self test ...

Page 248: ...code may contain up to 12 alphanumeric characters The first character must be a letter but the remaining characters can be letters numbers or an underscore _ You do not have to use all 12 characters but the first character must always be a letter The security code is set to KT034970 or KT034972 when the instrument is shipped from the factory 704 Cal secure code too long The security code may conta...

Page 249: ...ur nearest Keysight Service Center for repair 710 Cal full scale correction out of range 720 Cal DCV offset out of range 721 Cal DCI offset out of range 722 Cal RES offset out of range 723 Cal FRES offset out of range 724 Cal extended resistance self cal failed 725 Cal 300V DC correction out of range 730 Cal precharge DAC convergence failed 731 Cal A D turnover correction out of range 732 Cal AC f...

Page 250: ...corrections 744 Cal data lost RES corrections 745 Cal data lost FRES corrections 746 Cal data lost AC corrections 747 34970A only Config data lost HP IB address 747 34972A only Calibration failed 748 34970A only Config data lost RS 232 748 34972A only Cal checksum failed internal data 749 DMM relay count data lost ...

Page 251: ...bit 903 Module hard ware data overrun 904 Module hard ware protocol violation 905 Module hard ware early end of data 906 Module hard ware missing end of data 907 Module hard ware module srq signal stuck low 908 Module hard ware not responding 910 Module reported an unknown module type 911 Module reported command buffer overflow 912 Module reported command syntax error 913 Module reported nonvolati...

Page 252: ...5 Error Messages 252 Keysight 34970A 34972A User s Guide THIS PAGE HAS BEEN INTENTIONALLY LEFT BLANK ...

Page 253: ...Keysight 34970A 34972A Data Acquisition Switch Unit User s Guide 253 6 Application Programs Application Programs 254 Example Programs for Excel 7 0 255 Example Programs for C and C 263 ...

Page 254: ...nterface and require a VISA Virtual Instrument Software Architecture library for use with your GPIB interface card in your PC You will want to make sure that you have the visa32 dll file in your c windows system directory for the examples to work properly These programs were written for the 34970A but other than the connectivity the principles and code should generally apply to the 34972A as well ...

Page 255: ...e takeReadings type the text as shown on page 256 into the Send Commands module Then type the text for configuring the interface as shown on page 258 into the Port Configuration module After entering the information for both modules go to a spreadsheet and run the example program Note that you must run the macro from a spreadsheet With the cursor in the spreadsheet select Macro from the Tools menu...

Page 256: ... Dim measurementDelay As Single Delay between relay closure and measurement Dim points As Integer To change the GPIB address modify the variable VISAaddr below VISAaddr 9 OpenPort Open communications on GPIB SendSCPI RST Issue a Factory Reset to the instrument SET UP Modify this section to select the number of readings channel delay and channel number to be measured numberMeasurements 10 Number of...

Page 257: ... 1 reading from memory Cells I 3 1 I The reading number Cells I 3 2 Val getScpi The reading value Do Wait for instrument to put another reading in memory SendSCPI DATA POINTS Get the number of readings stored points Val getScpi Loop Until points 1 Or I numberMeasurements Next I ClosePort Close communications on GPIB End Sub ...

Page 258: ...tCount As Long As Long Error Codes Global Const VI_SUCCESS 0 Global Variables Global videfaultRM As Long Resource manager id for VISA GPIB Global vi As Long Stores the session for VISA Dim errorStatus As Long VTL error code Global VISAaddr As String This routine requires the file VISA32 DLL which typically resides in the c windows system directory on your PC This routine uses the VTL Library to se...

Page 259: ...If getScpi replyString End Function Sub OpenPort Be sure that the GPIB address has been set in the VISAaddr variable before calling this routine Open the VISA session errorStatus viOpenDefaultRM videfaultRM Open communications to the instrument errorStatus viOpen videfaultRM GPIB0 VISAaddr INSTR 0 2500 vi If an error occurs give a message If errorStatus VI_SUCCESS Then Range A2 Select Cells 1 1 Un...

Page 260: ...m instrument Dim scanList As String List of channels included in scan Dim channelDelay As Single Delay between relay closure and measurement Dim Channel As Integer Range a1 ba40 ClearContents Clear the spreadsheet To change the GPIB address modify the variable VISAaddr below VISAaddr 9 OpenPort Open communications on GPIB SendSCPI RST Issue a Factory Reset to the instrument SET UP Modify this sect...

Page 261: ...nvert the time to Excel format and put into cells B2 and C2 Cells 2 2 ConvertTime replyString Cells 2 3 Cells 2 2 Cells 2 3 NumberFormat d mmm yy Format for date Cells 2 2 NumberFormat hh mm ss Format for time Range a1 ba1 ClearContents Clear out row 1 Step through the number of scan sweeps For columnIndex 1 To numberScans Start of scan data Do Wait for instrument to put a reading in memory SendSC...

Page 262: ... column Cells Channel 4 columnIndex 2 Cells 1 1 Get the time stamp and put into the column to the right of data to convert relative time to Excel time divide by 86400 Cells Channel 4 columnIndex 2 1 Cells 1 2 86400 Cells Channel 4 columnIndex 2 1 NumberFormat mm ss 0 End Sub Function ConvertTime TimeString As String As Date This routine will take the string returned from the SYSTem TIME SCAN comma...

Page 263: ...commands for the instrument with the VISA functionality and does not include error trapping Error trapping however is good programming practice and is recommended for your application For more information on error trapping refer to the Keysight VISA User s Guide The example programs are written in Microsoft Visual C Version 1 52 using project type QuickWin application and using the large memory mo...

Page 264: ...ned from instrument char Visa_address 40 VISA address sent to module double voltage Value of voltage sent to DAC Build the address required to open communication with GPIB card The address format looks like this GPIB0 9 INSTR strcpy Visa_address GPIB0 strcat Visa_address ADDR strcat Visa_address INSTR Open communication session with the 34970A viOpenDefaultRM defaultRM viOpen defaultRM Visa_addres...

Page 265: ... VI_NULL DataAcqu Reset instrument to power on and clear the Status Byte viPrintf DataAcqu RST CLS n Configure the Status Registers to generate an interrupt whenever an alarm is detected on Alarm 1 or when the operation is complete viPrintf DataAcqu STATUS ALARM ENABLE 1 n Enable Alarm 1 viPrintf DataAcqu ESE 1 n Enable the Operation Complete bit Enable Status Byte Register bit 1 2 and 5 32 for SR...

Page 266: ...tion port viClose defaultRM This function will be called when the instrument interrupts the controller with an SRQ for alarm and or Operation Complete ViStatus _VI_FUNCH SRQ_handler ViSession DataAcqu ViEventType eventType ViEvent context ViAddr userHdlr ViUInt16 statusByte viReadSTB DataAcqu statusByte Read status byte register and clear SRQ Bit 6 64 indicates this SRQ is for our instrument bit 1...

Page 267: ...tors and General Purpose Switching 321 Matrix Switching 325 RF Signal Multiplexing 327 Multifunction Module 329 Relay Life and Preventive Maintenance 337 This chapter describes methods that you can use to reduce errors that can affect your measurements You will also find information to help you better understand how the 34970A 34972A makes measurements and what you can do to get the best results ...

Page 268: ...e specified in a variety of ways Be sure to check the following specifications for the cable type you intend to use continued on the following page Nominal Impedance insulation resistance Varies with the frequency of the input signal Check for HI to LO channel to channel and HI or LO to shield High frequency RF applications have exact requirements for cable impedance Dielectric Withstand Voltage M...

Page 269: ...Ω ft 2 conductors at 25 C 14 16 18 20 a 22 24 a Recommended wire size for the screw terminals on 34970A 34972A plug in modules 5 mΩ 10 mΩ 15 mΩ 20 mΩ 30 mΩ 50 mΩ Cable Type Nominal Impedance Capacitance Attenuation Twisted Pair 100Ω at 1 MHz 10 to 20 pF ft Up to 1 dB 100 ft at 1 MHz Shielded Twisted Pair 100Ω at 1 MHz 10 to 20 pF ft Up to 1 dB 100 ft at 1 MHz Coaxial 50Ω or 75Ω at 100 MHz 15 to 25...

Page 270: ...equencies below 1 MHz or for low level signals use single point grounding see below Parallel grounding is superior but is also more expensive and more difficult to wire If single point grounding is adequate the most critical points those with the lowest levels and or the most precise measurement requirements should be positioned near the primary ground point For frequencies above 10 MHz use the se...

Page 271: ...ic coupling Use shielded twisted pair for immunity from magnetic and capacitive pickup For maximum protection below 1 MHz make sure that the shield is not one of the signal conductors Separation of High Level and Low Level Signals Signals whose levels exceed a 20 to 1 ratio should be physically separated as much as possible The entire signal path should be examined including cabling and adjacent c...

Page 272: ...nstrument use a common mode choke in the system cabling as shown below to attenuate instrument emissions Thermal EMF Errors Thermoelectric voltages are the most common source of error in low level DC voltage measurements Thermoelectric voltages are generated when you make circuit connections using dissimilar metals at different temperatures Each metal to metal junction forms a thermocouple which g...

Page 273: ...fields are commonly present around electric motors generators televisions and computer monitors Also make sure that your input wiring has proper strain relief and is tied down securely when operating near magnetic fields Use twisted pair connections to the instrument to reduce the noise pickup loop area or dress the wires as close together as possible Noise Caused by Ground Loops When measuring vo...

Page 274: ...low caused by Vground Z ZCi 10 MΩ at 50 or 60 Hz VL To minimize ground loop errors If Vground is a DC voltage keep RL small compared to Ri If Vground is an AC voltage keep RL small compared to Z and set the DMM s integration time to 1 PLC or greater see page 133 for a discussion of integration time DMM HI LO RL RL Vground I Vtest Ci 250 pF Ri 10 GW Vground RL Z 1 2πfC I RL ...

Page 275: ...eptible to noise pickup than a low impedance source You can reduce the high frequency impedance of a source by placing a capacitor in parallel with the instrument s input terminals You may have to experiment to determine the correct capacitance value for your application Most extraneous noise is not correlated with the input signal You can determine the error as shown below Voltage Measured Correl...

Page 276: ...urements is described in the following sections of this chapter Temperature thermocouple RTD and thermistor Voltage dc and AC up to 300V Resistance 2 wire and 4 wire up to 100 MΩ Current dc and AC up to 1A Frequency and Period up to 300 kHz Rejecting Power Line Noise Voltages A desirable characteristic of an integrating analog to digital A D converter is its ability to reject spurious signals Inte...

Page 277: ...ration time The following graph shows the attenuation of AC signals measured in the DC voltage function for various A D integration time settings Note that signal frequencies at multiples of 1 T exhibit high attenuation PLCs Digits Bits Integration Time 60 Hz 50 Hz NMR 0 02 0 2 1 2 10 20 100 200 4 5 5 6 6 6 6 6 15 18 20 21 24 25 26 26 400 μs 400 μs 3 ms 3 ms 16 7 ms 20 ms 33 3 ms 40 ms 167 ms 200 ...

Page 278: ...ransducer itself Your measurement requirements will help you to determine which temperature transducer type to use Each transducer type has a particular temperature range accuracy and cost The table below summarizes some typical specifications for each transducer type Use this information to help select the transducer for your application The transducer manufacturers can provide you with exact spe...

Page 279: ...from 49Ω to 2 1 kΩ You can measure RTDs using a 2 wire or 4 wire measurement method The 4 wire method provides the most accurate way to measure small resistances Connection lead resistance is automatically removed using the 4 wire method Thermistor Measurements A thermistor is constructed of materials that non linearly changes resistance with changes in temperature The internal DMM measures the re...

Page 280: ...of copper and constantan wire might look like this Notice however that the connections made between the thermocouple wire and the internal DMM make a second unwanted thermocouple where the constantan C lead connects to the internal DMM s copper Cu input terminal The voltage generated by this second thermocouple affects the voltage measurement of the T type thermocouple If the temperature of the th...

Page 281: ...nput terminals If another type of thermocouple is used two additional thermocouples are created For example take a look at the connections with a J type thermocouple iron and constantan Two additional thermocouples have been created where the iron Fe lead connects to the internal DMM s copper Cu input terminals Since these two junctions will generate opposing voltages their effect will be to cance...

Page 282: ... at a known temperature The Law of Intermediate Metals eliminates the need for the extra connection This empirical law states that a third metal iron Fe in this example inserted between two dissimilar metals will have no effect upon the output voltage provided the junctions formed are at the same temperature Removing the reference thermocouple makes the connections much easier This circuit is the ...

Page 283: ...erature of the isothermal block is known accurate temperature measurements can be made A temperature sensor is mounted to the isothermal block to measure its temperature Thermocouples are available in a variety of types The type is specified by a single letter The table on the following page shows the most commonly used thermocouple types and some key characteristics of each Measurement Thermocoup...

Page 284: ... 1 C 2 2 C For vacuum inert environments Least expensive Not recommended for low temperature K U S British DIN Japanese French Nickel Chromium Yellow Brown Red Red Yellow Nickel Aluminum Red Blue Green White Purple 200 C 1370 C 1 1 C 2 2 C For oxidizing environments Good linearity above 8 C T U S British DIN Japanese French Copper Blue White Red Red Yellow Constantan Red Blue Brown White Blue 200 ...

Page 285: ...ratures R U S British DIN Japanese French Platinum 13 Rhodium Black White Red Red Yellow Rhodium Red Blue White White Green 50 C 1760 C 0 6 C 1 5 C High Temperature Beware of contamination Do not insert in metal tubes S U S British DIN Japanese French Platinum 10 Rhodium Black White Red Red Yellow Platinum Red Blue White White Green 50 C 1760 C 0 6 C 1 5 C Low error good stability High temperature...

Page 286: ...k feature If you enable this feature the instrument measures the channel resistance after each thermocouple measurement to ensure a proper connection For more information on using the thermocouple check feature see page 137 Diffusion Error Diffusion in a thermocouple wire is the process of changing the alloy type along the wire itself Atmospheric particles can actually diffuse into the metal These...

Page 287: ...er lines and electrical motors The noise is coupled to the unshielded thermocouple wires through distributed capacitance As the induced current flows to ground through the internal DMM voltage errors are generated along the distributed resistance of the thermocouple wire Adding a shield to the thermocouple wire will shunt the common mode noise to earth ground and preserve the measurement Common mo...

Page 288: ... large signals to produce a selection of measuring ranges Signal Conditioning for DC Measurements Input signal conditioning for DC voltage measurements includes both amplification and attenuation A simplified input to the internal DMM is shown below For input voltages less than 12 VDC the Low V switch is closed and applies the input signal directly to the input amplifier For higher voltages the Hi...

Page 289: ...ge 142 Sources of Error in DC Voltage Measurements Common Mode Rejection Ideally the internal DMM is completely isolated from earth referenced circuits However there is finite resistance and capacitance between the input LO terminal and earth ground If the input terminals are both driven by an earth referenced signal Vf then a current will flow through RS and create a voltage drop VL as shown belo...

Page 290: ...4970A 34972A User s Guide Where Vf Common mode float voltage Rs LO lead resistance Ri Isolation resistance Ci Isolation capacitance Zi Parallel impedance of Ri Ci Error VL DMM Ri 10 GW Ci 250 pF HI Vtest Vf Rs LO VL Vf Rs Rs Z ...

Page 291: ...ion A see below the injected current flows from the earth connection provided by the circuit to the LO terminal of the internal DMM This configuration adds no noise to the measurement However with Connection B the injected current flows through the resistor R thus adding noise to the measurement With Connection B larger values of R will make the problem worse The measurement noise caused by inject...

Page 292: ...minimize loading errors set the DMM s DC input resistance to greater than 10 GΩ when needed for more information on DC input resistance see page 142 Loading Errors Due to Input Bias Current The semiconductor devices used in the input circuits of the internal DMM have slight leakage currents called bias currents The effect of the input bias current is a loading error at the internal DMM s input ter...

Page 293: ...Tutorial 7 Keysight 34970A 34972A User s Guide 293 Where Ib DMM bias current Rs DUT source resistance Ri Input resistance 10 MΩ or 10 GΩ Ci DMM input capacitance Error V Ib X Rs Vs DMM Rs HI LO Ri Ci Ib ...

Page 294: ...attenuation from the first stage amplifier and gain from the second stage amplifier The first stage implements a high input impedance 1 MΩ switchable compensated attenuator The second stage provides variable gain signal amplification to scale the input to the AC converter to the full scale level Any residual DC offset from the attenuator and amplifier stages is blocked by a capacitor An AC voltage...

Page 295: ...c true RMS value shown above Only the heating value of the AC component of the input waveform is measured dc is rejected For sinewaves triangle waves and square waves the AC and AC DC values are equal since these waveforms do not contain a DC offset Non symmetrical waveforms such as pulse trains contain DC voltages which are rejected by ac coupled true RMS measurements An ac coupled true RMS measu...

Page 296: ...ttle at 1 reading per second and the fast filter 200 Hz will settle at 10 readings per second If the sample to sample levels are similar little settling time is required for each new reading Under this specialized condition the medium filter 20 Hz will provide reduced accuracy results at 5 readings per second and the fast filter 200 Hz will provide reduced accuracy results at 50 readings per secon...

Page 297: ...the square root of the inverse of the duty cycle as shown in the table on page 295 In general the greater the crest factor the greater the energy contained in higher frequency harmonics All multimeters exhibit measurement errors that are crest factor dependent Crest factor errors are shown in the specifications in Chapter 8 Note that the crest factor errors do not apply for input signals below 100...

Page 298: ...n input with a crest factor of 3 and a fundamental frequency of 20 kHz The internal DMM is set to the 1 V range For this example use the 90 day accuracy specifications of 0 05 of reading 0 04 of range as shown in Chapter 8 Errorsine 0 05 0 04 0 09 Errorcrest factor 0 15 Errorbandwidth 100 1 4 Total Error 0 09 0 15 1 4 1 6 3 2 20000 4 3 14159 1000000 ...

Page 299: ...itional capacitance and loading The table below shows the approximate input resistance at various frequencies For low frequencies Error Additional error for high frequencies Error 100 x F Input frequency Rs Source resistance Cin Input capacitance 150 pF Cable capacitance Use low capacitance cable when measuring high frequency AC signals see page 269 Input Frequency Input Resistance 100 Hz 1 kHz 10...

Page 300: ...value for your application Most extraneous noise is not correlated with the input signal You can determine the error as shown below Voltage Measured Correlated noise while rare is especially detrimental Correlated noise will always add directly to the input signal Measuring a low level signal with the same frequency as the local power line is a common situation that is prone to this error You shou...

Page 301: ...sures and removes internal offset voltages when you select a different function or range When manual ranging to a new range in an overload condition the internal offset measurement may be degraded for the selected range Typically an additional 0 01 of range error may be introduced This additional error will remain until the next periodic removal typically 15 minutes ...

Page 302: ...ible to minimize the instrument s burden voltage or IR drop This voltage drop is sensed by the internal DMM and scaled to the proper current value to complete the measurement see the discussion on the following page AC current measurements are very similar to DC current measurements The output of the current to voltage sensor is measured by an AC voltmeter The input terminals are direct coupled ac...

Page 303: ...elow Vs Source voltage Rs Source resistance Vb Burden voltage R Current shunt resistance Error Sources of Error in AC Current Measurements Burden voltage errors which apply to DC current also apply to AC current measurements However the burden voltage for AC current is larger due to the internal DMM s series inductance and the measurement connections The burden voltage increases as the input frequ...

Page 304: ...ons are required Since no current flows in the sense leads the resistance in these leads does not give a measurement error 4 Wire Ohms Measurements The 4 wire ohms method provides the most accurate way to measure small resistances Test lead multiplexer and contact resistances are automatically reduced using this method The 4 wire ohms method is often used in automated test applications where long ...

Page 305: ...e long The 4 wire ohms method has the obvious disadvantage of requiring twice as many switches and twice as many wires as the 2 wire method The 4 wire ohms method is used almost exclusively for measuring lower resistance values in any application especially for values less than 10Ω and for high accuracy requirements such as RTD temperature transducers HI Sense Vmeter Itest LO Source HI Source R Vm...

Page 306: ...cted from the first prior to scaling the result thus giving a more accurate resistance measurement Refer to Offset Compensation on page 144 for more information Offset compensation can be used for 2 wire or 4 wire ohms measurements but not for RTD or thermistor measurements The 34970A 34972A disables offset compensation when the measurement function is changed or after a Factory Reset RST command ...

Page 307: ...articularly important if you are measuring resistances above 100 kΩ Settling due to RC time constant effects can be quite long Some precision resistors and multifunction calibrators use large parallel capacitances 1000 pF to 0 1 μF with high resistance values to filter out noise currents injected by their internal circuitry Non ideal capacitances due to dielectric absorption soak effects in cables...

Page 308: ...als and their typical resistances Strain Gage Measurements Although the instrument does not directly support strain measurements you can measure a strain gage using a 4 wire resistance measurement with scaling However BenchLink Data Logger 3 software has built in strain gage measurement capability When a force is applied to a body the body deforms The deformation per unit length is called strain ε...

Page 309: ...loading applied to a material with its ability to carry the load Stress σ in a material can not be measured directly it must be computed from material properties and measurable quantities such as strain and force Strain Sensors The metal foil resistance strain gage is by far the most widely used strain measurement sensor It consists of a thin metallic foil grid bonded to a thin insulating adhesive...

Page 310: ...plications of strain gages include weight pressure flow and level measurements Making Strain Gage Measurements A Wheatstone bridge is commonly used to enable instruments with low sensitivity measuring capabilities to measure small resistance changes common in strain measurements Instruments with high resolution resistance measuring capabilities like the 34970A 34972A internal DMM can directly meas...

Page 311: ... of a strain gage will produce a resistance change ΔR due to measured strain as well as changes in gage temperature This will create an apparent strain change which is undesirable A second gage of similar type can be used to detect temperature changes and thus remove this error source You should mount the second gage in close proximity and at 90 to the first gage thus responding to local temperatu...

Page 312: ... determine the input frequency The counter is then reset before the next gate period The resolution of the measurement is tied to the timebase and not the input frequency This increases measurement speed especially at low frequencies The reciprocal counter has the advantage of a constant number of digits of display no matter what the input frequency is With a reciprocal counter the number of digit...

Page 313: ...asure the frequency or period of an input following a DC offset voltage change You must allow the internal DMM s input DC blocking capacitor to fully settle before making frequency measurements If the external noise pickup becomes large enough to exceed the hysteresis of the measuring circuitry the frequency function may actually become unusable External shielding and low pass filtering may help I...

Page 314: ...Channel Single Ended Multiplexer An important feature of a multiplexer used as a DMM input channel is that only one channel is connected at a time For example using a multiplexer module and the internal DMM you could configure a voltage measurement on channel 1 and a temperature measurement on channel 2 The instrument first closes the channel 1 relay makes the voltage measurement and then opens th...

Page 315: ...only with a common LO for the module The module also provides a thermocouple reference junction for making thermocouple measurements for more information on the purpose of an isothermal block see page 283 Channel 1 Channel 2 Channel 3 Channel 4 To DMM NOTE Only one channel can be closed at a time closing one channel will open the previously closed channel ...

Page 316: ...an external instrument These modules also provide a thermocouple reference junction for making thermocouple measurements for more information on the purpose of an isothermal block see page 283 To DMM Channel 1 Channel 2 Channel 3 Channel 4 NOTE If any channels are configured to be part of the scan list you cannot close multiple channels closing one channel will open the previously closed channel ...

Page 317: ...e source connections to the HI and LO terminals on channel 2 and the sense connections to the HI and LO terminals on channel 12 When making a 4 wire measurement the test current flows through the source connections from the HI terminal through the resistor being measured To eliminate the test lead resistance a separate set of sense connections are used as shown below Channel 1 Source Channel 11 Se...

Page 318: ...rs can be closed at the same time You must be careful that this does not create a hazardous condition for example connecting two power sources together Note that a multiplexer is not directional For example you can use a multiplexer with a source such as a DAC to connect a single source to multiple test points as shown below Source HI LO R Sense _ Channel 1 Channel 2 Channel 3 Channel 4 DAC OUT GN...

Page 319: ...selves Csw or between adjacent cabling Cadj Capacitive noise coupling is a function of area and proximity A simple method to reduce the noise coupling is to physically separate the switches and cables from each other However this may not be practical for all applications Another solution is to keep large amplitude signals and small amplitude signals away from each other Group similar signals toget...

Page 320: ...nd Bank 2 For example if you are multiplexing eight channels using the 16 channel multiplexer use four channels in the lower bank and four channels in the upper bank For even better noise immunity leave one unused grounded channel between each input channel Module Bank 1 Bank 2 34901A Channels 1 through 10 Channels 11 through 20 34902Α Channels 1 through 8 Channels 9 through 16 34908A Channels 1 t...

Page 321: ...ions For example you can use an actuator to build a simple resistance ladder as shown below In the above diagram the resistance is 60Ω when all of the actuator channels are open not connected to COM Note that when the actuator channels are open as shown above the normally closed contacts not shown above are connected to COM Values from 10Ω to 50Ω are selected by closing the appropriate channel s o...

Page 322: ... no circuit board traces here You can build these networks to provide contact protection when actuating AC power line for reactive loads Although many types of contact protection networks can be used only RC networks and varistors are described in this section RC Protection Networks When designing RC protection networks the protection resistor Rp is selected as a compromise between two resistance ...

Page 323: ... determining the minimum allowable circuit capacitance is where L is the inductance of the load and Io is the current value calculated earlier The total circuit capacitance C is actually made up of the wiring capacitance plus the value of the protection network capacitor Cp Therefore the minimum value for Cp should be the value obtained for the total circuit capacitance C Note that the actual valu...

Page 324: ... attenuator circuit is shown below To select the attenuator components use the following equation One typical use for the shunt component is with 4 to 20 mA transducers A 50Ω 1 0 5 watt resistor can be installed in the R2 location The resultant voltage drop transducer current through the resistor can be measured by the internal DMM Thus the 50Ω resistor converts the 4 to 20 mA current to a 0 2 to ...

Page 325: ...A matrix is arranged in rows and columns For example a simple 3x3 matrix could be used to connect three sources to three test points as shown below Any one of the signal sources can be connected to any one of the test inputs Be aware that with a matrix it is possible to connect more than one source at the same time It is important to make sure that dangerous or unwanted conditions are not created ...

Page 326: ...rovide more complex switching For example the 34904A provides a 4 row by 8 column matrix You can combine two of these modules as either a 4 row by 16 column matrix or an 8 row by 8 column matrix An 8x8 matrix is shown below 8 Rows Row 1 Row 4 Row 1 Row 4 Col 1 Col 8 Col 1 Col 8 8 Columns Matrix Module 1 Matrix Module 2 ...

Page 327: ...ou can expand RF multiplexers to provide additional test inputs or outputs For example you can combine two 4 to 1 multiplexers to create a 7 to 1 multiplexer as shown below On the 34905A 50Ω and 34906A 75Ω RF multiplexers you can close only one channel per bank at a time closing one channel in a bank will open the previously closed channel These modules respond only to the CLOSE command OPEN does ...

Page 328: ...ng Use the correct cable and connector for the circuit impedance 50Ω or 75Ω Note that it is difficult to visually differentiate a 50Ω connector from a 75Ω connector Be sure that all leads and signal paths are properly terminated Unterminated sections of line can appear as near shorts at RF frequencies Note that the 34905A and 34906A do not automatically terminate open channels Insertion Loss 75Ω I...

Page 329: ... alarm when a specific bit pattern or bit pattern change is detected on an input channel The channels do not have to be part of the scan list to generate an alarm The internal 5V pull up circuitry allows you to use the digital input to detect contact closures like micro switches or limit switches An open input floats to 5V and is read as a 1 An input shorted to ground is read as a 0 An example of ...

Page 330: ...t is used to drive a high output from the internal 5V supply through the diode The drive is rated at 2 4V minimum at 1 mA Each output bit is also an active sink capable of sinking up to 400 mA from an external power supply The FET is used to sink currents and has a nominal on resistance of 0 2Ω For non TTL logic you must provide an external pull up A description of the pull up calculation is given...

Page 331: ...TL levels For example to use a 12V external power supply the value of the external pull up resistor is calculated as follows VDC Imax Iout low x safety factor 1 mA x 0 5 0 5 ma 24 kΩ The value of the logic high level with the external 24 kΩ pull up resistor is calculated as follows Vhigh Vcc x 12 x 8 47 VDC Vcc 12 R Vcc Imax 12 0 0005 Rexternal Rexternal Rexternal 24 kΩ 24 kΩ 10 kΩ ...

Page 332: ...trol an external switch For example you can drive the Keysight 876X series of microwave switches using an external power supply and two digital output channels The state of the 2 to 1 multiplexer is changed by setting the appropriate output bit low 0 Digital Output Channel Keysight 876X Microwave Switc Power 24 Volt Supply ...

Page 333: ...r labeled Totalize Threshold on the module you can control the threshold at which an edge is detected Move the jumper to the AC position to detect changes through 0 volts Move the jumper to the TTL position factory setting to detect changes through TTL threshold levels The maximum count is 67 108 863 226 1 The count rolls over to 0 after reaching the maximum allowed value Signal Conditioning Thres...

Page 334: ...r the G terminal the terminal or both When a gate is not connected the gate terminal floats to the enabled state effectively creating a gate always condition Totalizer Errors Noise on the totalizer input can be a problem especially on signals with a slow rise time This noise can create a false indication of a threshold crossing For more information on cabling noise see page 268 Contact bounce on e...

Page 335: ...ices You can set the output voltage to any value between 12 VDC and 12 VDC in 1 mV steps Each DAC is earth referenced it cannot float Each DAC channel is capable of supplying 10 mA maximum current To maintain the rated output accuracy the load RL in the diagram shown above must be greater than 1 kΩ Limit Switch 5 V Switch Closed Totalizer Noise caused by bounce creates a false count 16 Bit Digital...

Page 336: ...ts two other types of errors differential error and integral error Differential Error refers to the smallest possible change in voltage The DAC output is not linear but is stepped as progressively larger or smaller voltages are programmed The step size is 1 mV Integral Error refers to the difference between the programmed voltage and the actual output voltage from the DAC This error is included in...

Page 337: ...you a better understanding of relay wear out mechanisms In general relay lifetimes depend heavily upon the signals that are being switched and the types of measurements being performed Switching typical signal levels will result in relay lifetimes from 1 000 000 to 10 000 000 operations High power switching 25 rating or high voltage switching 100V applications will yield relay lifetimes from 100 0...

Page 338: ...d The graph below shows the typical contact resistance characteristics of the relays used on the 34970A 34972A switching modules Relay Load For most applications the load switched by the relay is the most important factor affecting relay life As shown in the graph below relay life is maximized by switching low power As the power switched increases relay life deteriorates 1k 10k 100k 1M 10M 100M 0Ω...

Page 339: ...s needed after it fails or becomes erratic This is suitable if you are switching higher loads on only a few relays on the module The disadvantage of this strategy is the inconvenience of continually replacing relays as they near the end of their life at different times The second strategy is to replace all relays on the module or simply purchase a new module as the relays near the end of their lif...

Page 340: ...7 Tutorial 340 Keysight 34970A 34972A User s Guide THIS PAGE HAS BEEN INTENTIONALLY LEFT BLANK ...

Page 341: ...ion Switch Unit User s Guide 341 8 Specifications For the characteristics and specifications of the 34970A 34972A Data Acquisition Switch Unit refer to the technical overview at http literature cdn keysight com litweb pdf 5965 5290EN pdf ...

Page 342: ...8 Specifications 342 Keysight 34970A 34972A User s Guide THIS PAGE HAS BEEN INTENTIONALLY LEFT BLANK ...

Page 343: ...62 current limitations DAC 165 327 decimal format 62 158 description 217 driving microwave switches 324 gate signal 160 maximum totalizer count 161 module overview 20 217 simplified block diagrams 217 Totalize Threshold jumper 160 totalizer reset mode 161 using alarms 155 34908A module channel numbering 219 description 219 module overview 21 219 simplified schematic 219 34970A block diagram 76 fir...

Page 344: ...c recall power down 70 103 autorange threshold values 125 autozero definition 131 vs integration time 131 average responding error 287 average during scan 101 AWG wire gauge size 260 B backplane relays 206 209 311 bandwidth ac ac current 141 ac voltage 139 vs channel delays 116 bank switch 206 209 219 311 baud rate RS 232 factory setting 67 69 186 selecting 67 69 186 BenchLink Data Logger Software...

Page 345: ... accuracy RTD 270 thermistor 270 thermocouple 270 copying channel configuration 44 correlated noise 265 292 count calibration 198 clearing relay cycles 174 reading relay cycles 173 329 count scan continuous 58 113 default value 58 113 settings 58 113 count down time 106 counter adding to scan list 64 manually reset 64 reading count 64 reset mode 64 crest factor defined 289 crosspoint switching 84 ...

Page 346: ...tching 310 period measurements 304 reading error queue 168 223 RF multiplexing 320 thermal EMF 264 thermocouple calculation 280 thermocouple reference junction 278 totalizer 326 example programs C and C 255 Excel 7 0 247 Excel macro example programs 247 Exporting readings to USB 183 EXT annunciator 14 Ext Trig connector 15 16 109 121 external DMM connections 121 scanning with 121 external referenc...

Page 347: ... loading errors 284 dc voltage 138 139 284 INPut IMP AUTO command 139 insertion loss 320 installing BenchLink Data Logger software 36 Instrument configuration importing 184 instrument preset state 201 instrument state storage definition 70 front panel operation 167 naming states 70 166 power down recall 166 remote operation 167 integral error DAC 328 integrating ADC 87 integration time definition ...

Page 348: ...e 125 overload 125 selecting 126 measurement resolution half digit 127 selecting 128 vs integration time 129 medium ac filter 139 141 288 medium frequency timeout 143 MEM annunciator 14 memory reading scanned readings 118 menus front panel 12 summary 54 message calibration 197 front panel display 170 Microsoft Visual C 255 microwave switches driving 324 MIN annunciator 14 minimum reading during sc...

Page 349: ... selector module 48 power line rejecting noise 268 preset state 201 programming examples C and C 255 Excel 7 0 247 PT100 RTD 135 271 Q Quick Start Kit 34 R R0 RTD default 135 range 135 rack mounting filler panel 52 flange kit 52 lock link kit 52 sliding shelf kit 52 radio frequency interference 264 random noise 304 range autorange 125 overload 125 selecting 126 ranges by function 2 wire ohms 140 4...

Page 350: ...ith alarms 144 null stored as offset 144 setting gain M 59 146 setting offset B 59 146 strain measurements 302 valid gain M values 145 valid offset B values 145 while scanning 101 144 SCAN annunciator 14 scan configuration copying 44 scan configuration front panel 41 scan count continuous 58 113 default value 58 113 settings 58 113 scan interval default value 58 107 resolution 107 setting from fro...

Page 351: ...ion 70 front panel operation 167 naming states 70 166 power down recall 166 remote operation 167 statistics while scanning 101 Status of LAN Connectivity 190 Step key 104 Sto Rcl key 56 70 stored states definition 70 front panel operation 167 naming states 70 166 power down recall 166 remote operation 167 strain gage common uses 302 gage factor 301 measurements 145 300 Mx B equations 145 poisson s...

Page 352: ...s 153 transducer types 80 tree switch 311 triangle brackets syntax 99 TRIG SOUR command 107 108 110 112 TRIGger COUNt command 113 triggering buffering 109 external 109 scan 106 true RMS 287 TTL drive digital output 322 twisted pair cables 79 two wire multiplexers 83 306 two wire ohms 296 U UNIT TEMP command 132 units temperature 132 with readings 114 unsecure calibration 195 USB Front Panel 183 US...

Page 353: ...n at the Keysight website for the latest revision Keysight Technologies 2009 2019 Edition 6 November 2019 Printed in Malaysia 34972 90001 34972 90001 www keysight com Sie haben Fragen oder wünschen eine Beratung Angebotsanfrage unter 07121 51 50 50 oder über info datatec de Distributed by ...

Reviews: