Introduction to the Keysight 5500
5
Keysight 5500 SPM User’s Guide
5-3
SPM Basics
Scanning Probe Microscopy (SPM) is a large and growing collection of
techniques for investigating the properties of a sample, at or near the
sample surface. The SPM instrument has a sharp probe (with radius of
curvature typically in the nanometers or tens of nanometers) that is in
near-contact, intermittent contact, or perpetual contact with the sample
surface.
An SPM is used to investigate sample properties at or near the sample
surface; that is, immediately beneath the surface (typically several
nanometers deep) and immediately above the surface (typically several
tens of nanometers high).
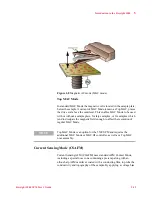
In SPM techniques, the sharp probe (tip) is scanned across a sample
surface, or the surface is scanned beneath the tip (
Interactions between the tip and sample are detected and mapped.
Different techniques sense different interactions, which can be used to
describe surface topography, adhesion, elasticity, electrostatic charge,
etc.
Figure 1-2
Scanning Probe Microscopy diagram
The small size of the probe tip is key to the SPM’s high resolution.
However, its small size also means that the tip must be scanned in order
to image a significant area of the sample. SPM techniques use “raster
scanning,” in which high resolution actuators, usually made of
piezoelectric materials, move the probe across the sample and back over
each line of the image area. For each X/Y coordinate pair, the
interaction of the tip and sample is recorded as one data point. The

