background image

Note:

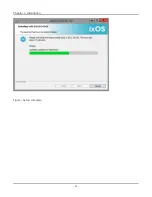
IxServer should not be up and running during installation. If it is, you will be prompted to

retry installation after closing IxServer.

5. Software License Agreement window appears. You must accept the terms, to continue the

installation. You need to license the product if it is not already licensed. See

Chapter 4, License

Management

. Click

Next

to proceed.

Chapter 2  Installation

– 44 –

Summary of Contents for Ixia IxOS

Page 1: ...IxOS Getting Started Guide Release 8 51 EA ...

Page 2: ...s standard commercial license which is embodied in its End User License Agreement EULA a copy of which can be found at http www keysight com find sweula or https support ixiacom com support services warranty license agreements The license set forth in the EULA represents the exclusive authority by which the U S government may use modify distribute or disclose the Software The EULA and the license ...

Page 3: ...This page intentionally left blank iii ...

Page 4: ...18 595 2599 support ixiacom com APAC Support 91 80 4939 6410 support asiapac ixiacom com EMEA Support 40 21 301 5699 support emea ixiacom com Greater China Region 400 898 0598 support china ixiacom com India Office 91 80 4939 6410 support india ixiacom com Japan Head Office 81 3 5326 1980 support japan ixiacom com Korea Office 82 2 3461 0095 support korea ixiacom com Singapore Office 656 494 8910 ...

Page 5: ...This page intentionally left blank v ...

Page 6: ...on 3 Unpacking the Ixia Chassis 3 Notes Cautions and Warnings 4 Installation 8 Installing and Removing Load Modules 32 Software Installation for Remote Operation 37 Automatic Update Feature 59 IxOS Silent Install 61 Multi Version Installation and Management 66 Repair Modify Uninstall using Windows Control Panel 72 Chapter 3 Using IxExplorer 77 Introducing IxExplorer 77 Packet Streams Transmit Gene...

Page 7: ...tistics 84 Chapter 4 License Management 89 Introduction 89 Types of Licenses 91 Licensing Models 92 Prerequisites 92 Tcl Notes for use with Licensing 93 Installation Scenarios 93 Installing Ixia Licensing Utility 97 INDEX 98 vii ...

Page 8: ...the notational and typographical conventions used in this documentation and provides a list of related documentation Section contents Note icons and messages ix Typographical conventions ix Textual conventions x Related documentation x viii ...

Page 9: ...names such as dialog boxes buttons menu selections and so forth l Command line interface commands and options l The name of a field option or parameter when used as part of an instruction For example Select the desired Inner Priority value Italic text Italic text indicates l A text reference to the name of a field option or parameter l Document and book titles l The first reference to a new term l...

Page 10: ...de Provides details on the structure and conventions of the IxExplorer Tcl API Also provides detailed information on all API commands You can obtain technical support for any Ixia product by contacting Ixia Technical Support by any of the methods mentioned on the inside cover of this guide Technical support from Ixia s corporate headquarters is available Monday through Friday from 06 00 to 18 00 P...

Page 11: ...This page intentionally left blank xi ...

Page 12: ...ext generation high performance platform capable of supporting XM form factor load modules XGS12 SD and XGS12 HS are 12 slot chassis with high speed backplane 160 Gbps between each adjacent two cards designed for aggregation across load modules These chassis are capable of testing high density multi Terabit bandwidth Carrier class core edge metro routers and data center switches This flexible plat...

Page 13: ...commonly pronounced as tickle Each Ixia chassis is equipped with one or more Intel processors The operating system installed on the chassis may be Windows XP Professional or Windows 7 Professional Note Ixia supports upgrades to the Microsoft operating system OS on Ixia chassis Contact Ixia Technical Support for assistance with Microsoft OS upgrade options Additional information on the operation of...

Page 14: ...tallation for Remote Operation l Server Operation Option l Hardware Manager Options l Installing a Demonstration IxServer l Shell Wrapper Installation l Automatic Update Feature l IxOS Silent Install l Uninstall Modify a Current Installation l Multi Version Installation and Management l Repair Modify Uninstall using Windows Control Panel Unpacking the Ixia Chassis Each chassis comes packed in its ...

Page 15: ... of used batteries according to the battery manufacturer s instructions Ventilation Requirements The following caution applies to equipment installed into equipment racks Reduced Air Flow Install the equipment in a rack so that the amount of air flow required for safe operation of the equipment is not reduced Do not block the back or sides of the chassis and leave approximately two inches of space...

Page 16: ... so that a hazardous condition is not caused due to uneven mechanical loading d Circuit Overloading Consider the connection of the equipment to the supply circuit and the effect that overloading of the circuits might have on current protection and supply wiring Pay attention to equipment nameplate ratings when addressing this concern e Reliable Earthing Maintain reliable earthing grounding of rack...

Page 17: ... and SFP Gigabit TXS and STXS l ACCELERON NP and XP l LSM1000XMV 4 8 12 16 port all models l LSM1000XMS12 12R l ASM1000XMV12X 12XRTP Use Ejector Tabs Properly Ejector tabs on load modules are to be used only to eject a load module from the chassis backplane connector They are not designed to support the weight of the load module Ejector tabs can bend if Chapter 2 Installation 6 ...

Page 18: ...blowing may likely indicate some internal problem you should report the problem to Ixia Technical Support We recommend cleaning of the ventilation intake grills periodically to permit good airflow intake Calibration of the Ixia chassis is not required There are no adjustable components in any Ixia chassis China RoHS Declaration The China RoHS Declaration can be found in the Ixia Platform Reference...

Page 19: ...oftware along with Windows 7 Professional The chassis includes an internal industry standard computer hardware platform To perform initial configuration it is necessary to obtain the components mentioned here and to attach them to the appropriate connectors on the back or front of the chassis l SVGA monitor l PS 2 style keyboard l PS 2 style mouse Debugability Daemon When you install IxOS on the c...

Page 20: ...guration for Windows XP Professional a monitor keyboard and mouse must be connected to the chassis To configure TCP IP do the following 1 Attach the monitor keyboard and mouse to the ports on the back of the XGS12 SD chassis or the front of the XM12 chassis as shown in the following figures Figure Rear View of IXIA XGS12 SD Chassis with USB Keyboard and Mouse Chapter 2 Installation 9 ...

Page 21: ...use and Monitor 2 Attach the power cord to the chassis and then to the wall socket Switch the master power switch to 1 on 3 Power on the chassis by pressing the power button in the front of the chassis 4 Verify that the IxServer window appears as shown in the following figure Chapter 2 Installation 10 ...

Page 22: ...ons Windows XP Professional TCP IP Configuration The network address of the chassis must be set even if the network is not used 1 To do this click in the following sequence of items Start in the lower left hand corner of your computer screen Settings Network and Dial up Connections and Local Area Connection as shown in the following figure Figure Mouse Clicks to Invoke Network Properties Chapter 2...

Page 23: ...ion Status window opens as shown in the following figure Figure Local Area Connection Status 2 Click Properties and the Local Area Connection Properties window opens as shown in the following figure Chapter 2 Installation 12 ...

Page 24: ...Properties window select the check box for the following item l Internet Protocol TCP IP 4 Double click the Internet Protocol TCP IP entry or click Properties to open the Internet Protocol TCP IP Properties window as shown in the following figure Chapter 2 Installation 13 ...

Page 25: ...ion of your chassis proceed to step 11 If no DHCP server computer is found on the network Windows XP Professional automatically assigns a unique IP address in the 169 254 0 0 169 254 255 255 range Again this might be appropriate for your network If you need to assign a particular IP address to your chassis fill in the fields as shown in the following figure and explained in Table Internet Protocol...

Page 26: ...s enabled Use the following IP address If selected the sub fields under this option are enabled for manual configuration of the IP address information IP Address The single IP address for this chassis Subnet Mask The IP subnet mask to be used with this IP address Default Gateway The IP address of the gateway for the network Table Internet Protocol TCP IP Settings Chapter 2 Installation 15 ...

Page 27: ... DNS server The IP address for the preferred DNS server Alternate DNS server The IP address for an alternate DNS server Advanced If clicked the Advanced TCP IP Settings dialog box appears 6 You need to refer to the Host ID at a later time when running IxExplorer This name must be assigned in the My Computer Identification Changes window First right click My Computer icon on the desktop A menu appe...

Page 28: ...e Computer Name Changes window appears as shown in the following figure Figure Computer Name Changes 9 The Computer Name shown in Figure Computer Name Changesis an example of the preconfigured name assigned to each chassis Each chassis name is of the form TYPE Chapter 2 Installation 17 ...

Page 29: ...onal General Configuration The Windows XP Professional initial configuration includes some features that make the chassis more robust and easier to use The features are mentioned in the following list 1 The latest Windows XP Professional Service Pack has been applied This Microsoft Certified software increases the operating system security 2 The time zone of the computer has been set to UTC with D...

Page 30: ...om the window and adjust the time zone and daylight savings time settings as appropriate as shown in the following figure Return to the Date Time tab to set the current time in your time zone Figure Date Time Properties Time Zone Tab Chapter 2 Installation 19 ...

Page 31: ...number is 400 1234567 the account name is ixia and the password is 1234567 The administrator is responsible for system maintenance and may perform any operation on the system The ixia user is automatically logged on when the chassis is powered on Windows 7 TCP IP Configuration The network address of the chassis must be set even if the network is not used 1 To do this click the following sequence o...

Page 32: ...window opens as shown in the following figure Figure Local Area Connection Properties 4 Double click the Internet Protocol Version 4 TCP IPv4 entry or click Properties to open the Internet Protocol Version 4 TCP IPv4 Properties window as shown in the following figure Chapter 2 Installation 21 ...

Page 33: ...iguration of your chassis proceed to step 11 If no DHCP server computer is found on the network Windows 7 automatically assigns a unique IP address in the 169 254 0 0 169 254 255 255 range Again this might be appropriate for your network If you need to assign a particular IP address to your chassis fill in the fields as shown in the following figure and explained in Table Internet Protocol TCP IP ...

Page 34: ... this chassis Subnet Mask The IP subnet mask to be used with this IP address Default Gateway The IP address of the gateway for the network Obtain DNS server address automatically If selected the IP address for the server computer providing Domain Name Service DNS for name resolution is obtained automatically from the local DHCP server computer Use the following DNS server addresses If selected the...

Page 35: ... TCP IP Settings dialog box appears 6 You need to refer to the Host ID at a later time when running IxExplorer This name must be assigned in the Computer System Properties window First right click Computer icon on the desktop A menu appears as shown in the following figure Figure Mouse Clicks to Properties 7 Click Properties You can view the basic information about your computer as shown in the fo...

Page 36: ...is an example of the pre configured name assigned to each chassis Each chassis name is of the form TYPE SERIALNO TYPE is corresponding to the type of chassis SERIALNO is the chassis serial number and is always six digits long By default each chassis is also a member of the IXIA workgroup This may be changed at this time to another workgroup or as a member of a Windows Chapter 2 Installation 25 ...

Page 37: ...o use The features are mentioned in the following list 1 The latest Windows 7 Service Pack has been applied This Microsoft Certified software increases the operating system security 2 The time zone of the computer has been set to UTC with Daylight Saving Time disabled To change this do the following i Right click the time in the notification area and click Adjust date time as shown in the followin...

Page 38: ...ne Figure Date and Time Properties Time Zone Settings 3 An NTP Network Time Protocol service automatically runs If your chassis is connected to the Internet it keeps the system clock on your chassis accurate If your chassis is not connected to the Internet the NTP service has no adverse effects 4 An anti virus scanner is installed but it does not run a scheduled full system scan Chapter 2 Installa...

Page 39: ... not able to browse through the network join a domain or have open file shares To allow a means of file transfer to and from a chassis an FTP server computer has been included and enabled on the chassis A remote user logged into another computer may look at or deposit files on a chassis by using FTP When accessing a chassis FTP server computer the C drive is set to read only and the D drive is set...

Page 40: ... the GUI installer your client computer must be configured with an operational X windows server computer Be sure to set your DISPLAY environment variable to the host name or IP address of the client computer on which you want the installer GUI to display The following examples explain the setting of the DISPLAY environment variable using various shells If you need environment configuration assista...

Page 41: ...xOS version Linux bin 5 Execute the IxOS installer file use the i gui option if your Linux version supports a graphical user interface Example IxOS version Linux bin 6 When the installer prompts you select Tcl version 8 5 required 7 Follow the rest of the instructions to complete the installation 8 Follow the installation prompts to complete the installation 9 After installation set the following ...

Page 42: ...e UNIX Linux computer The client computer connects to IxTclServer on the chassis For specific information on how to use IxTclServer and the Tcl client see the IxOS Tcl Development Guide There is also support for 64 bit Linux and the installer is ixos8 00 XXX XXXLinux64 bin Powering Up To power the chassis press the power button in the front of the chassis If a monitor is connected to the chassis t...

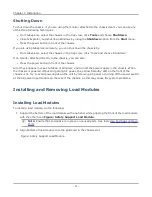
Page 43: ...tions invoke shutdown of Windows and turn off the power supply in the chassis When the chassis is powered off but still getting AC power the yellow Standby LED on the front of the chassis is lit Try to avoid powering down the unit by removing AC power or turning off the power switch at the AC power input module on the rear of the chassis as this may cause file system problems Installing and Removi...

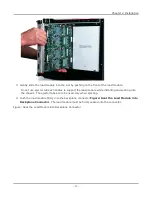
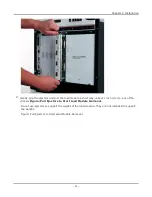
Page 44: ...ule while installing and seating into the chassis The ejector tabs are to be used only when ejecting 4 Push the load module firmly into the backplane connector Figure Seat the Load Module into Backplane Connector The load module must be firmly seated into the connector Figure Seat the Load Module into Backplane Connector Chapter 2 Installation 33 ...

Page 45: ...e from the chassis do the following 1 Press the ejectors at top and bottom of load module front to release the load module from the backplane connector Figure Press Ejectors to Eject Load Module Figure Press Ejectors to Eject Load Module Chapter 2 Installation 34 ...

Page 46: ...bout 1 inch 3 cm out of the chassis Figure Pull Ejectors to Start Load Module Removal Do not use ejectors to support the weight of the load module They are not intended to support the weight Figure Pull Ejectors to Start Load Module Removal Chapter 2 Installation 35 ...

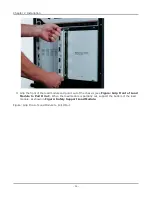
Page 47: ...he chassis see Figure Grip Front of Load Module to Pull It Out When the load module is partially out support the bottom of the load module as shown in Figure Safely Support Load Module Figure Grip Front of Load Module to Pull It Out Chapter 2 Installation 36 ...

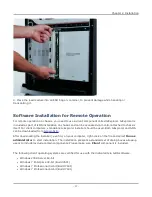
Page 48: ... IxExplorer and IxOS can be downloaded from Ixia website After downloading the installer exe file on your computer right click on the file and select Run as administrator to start installation The installation presents a standard set of dialog boxes allowing users to include exclude certain components Please make sure Client component is included The following client operating systems are certifie...

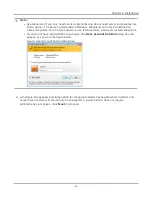
Page 49: ...istance with Microsoft Windows Operating System update options on Ixia Chassis l If the target drive has insufficient storage you may encounter 2755 error message during installation This is indicative of insufficient space on the system drive or target drive IxOS installation requires 13 GB of space on chassis and 5 5 GB of space on client IxExplorer installation requires 2 5 GB of space on clien...

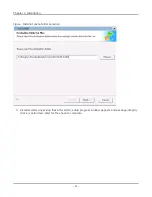
Page 50: ...also installs IxExplorer l If you do not have administration privileges the User Account Control dialog box will appear as shown in the figure below Figure User Account Control dialog box 2 A dialogue box appears providing option for changing Installer Cache path where installer and helper files are stored It should only be changed to a location which does not require administrative privileges Cli...

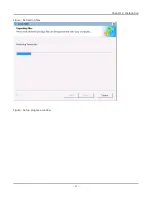
Page 51: ... Installer cache folder selection 3 Installer starts unpacking files after which setup progress window appears and package integrity check is performed Wait for the check to complete Chapter 2 Installation 40 ...

Page 52: ...Figure Extracting files Figure Setup progress window Chapter 2 Installation 41 ...

Page 53: ...4 After package integrity check passes a separate welcome dialog box appears indicating that setup is ready to begin Click Next Chapter 2 Installation 42 ...

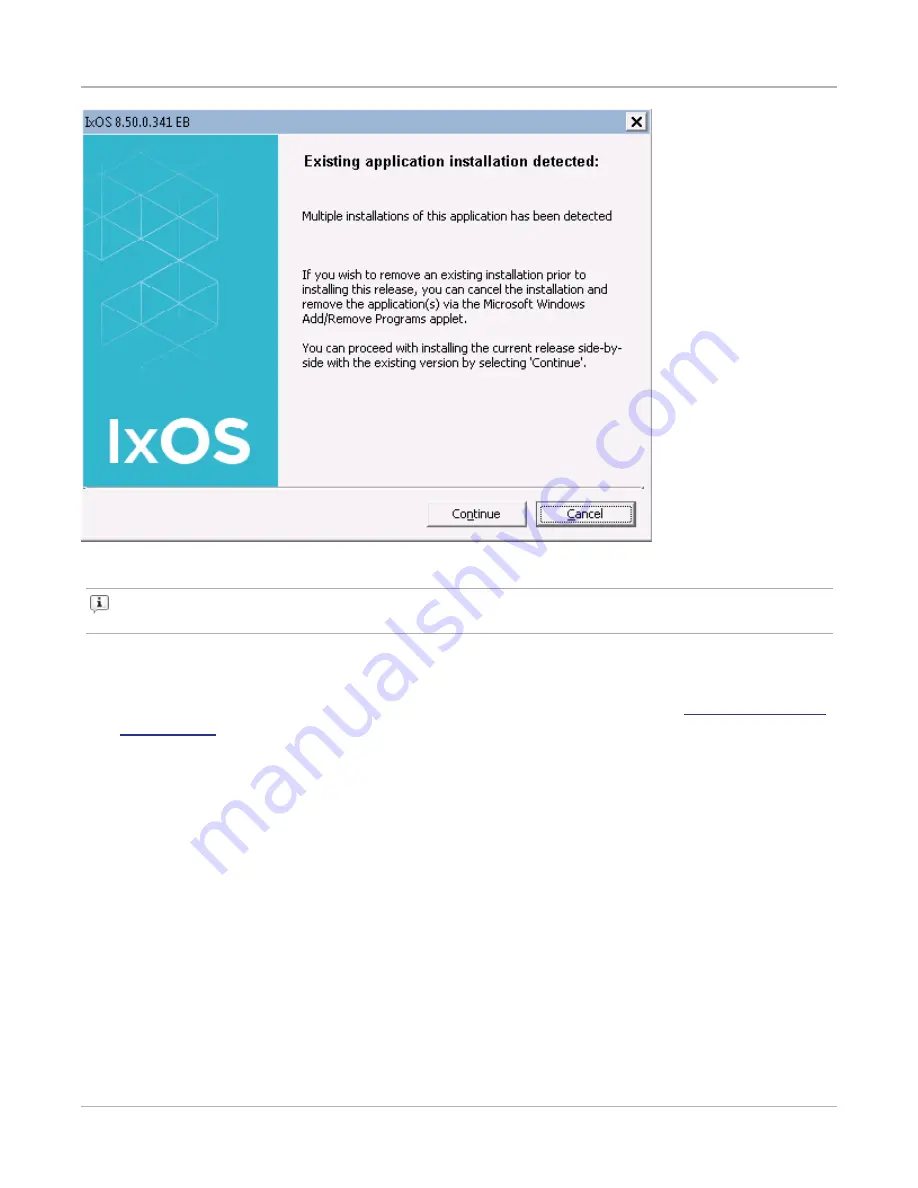
Page 54: ...OS or IxExplorer is already installed on the computer following dialog box will appear indicating multiple installation of same application Click Continue to proceed Figure Existing application detected Chapter 2 Installation 43 ...

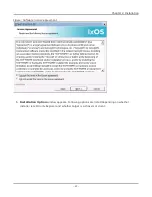
Page 55: ...ted to retry installation after closing IxServer 5 Software License Agreement window appears You must accept the terms to continue the installation You need to license the product if it is not already licensed See Chapter 4 License Management Click Next to proceed Chapter 2 Installation 44 ...

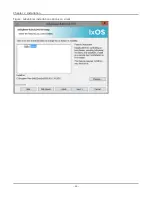
Page 56: ...ftware license agreement 6 Installation Option window appears Following options are listed depending on whether installer is IxOS or IxExplorer and whether target is a chassis or client Chapter 2 Installation 45 ...

Page 57: ...Figure IxExplorer installation options on client Chapter 2 Installation 46 ...

Page 58: ...Figure IxOS installation options on chassis Chapter 2 Installation 47 ...

Page 59: ...OS is installed on chassis n Demo Server A pseudo IxServer that imitates several configurable load modules No real traffic can be sent using the demonstration server computer Available only when IxOS is installed on client Refer to Installing a Demonstration IxServer for more information n Tcl Server Installs software module which implements an intermediate process needed to support nonWindows Uni...

Page 60: ... off chassis hardware manager See Hardware Manager Options for more details 7 This is an optional step which you will only see if you re using IxOS installer which might install two versions of TCL as shown in figure below Selecting any one of the TCL version will only change the version of default TCL interpreter spawned by TCL server when it receives a connection from TCL client This can be chan...

Page 61: ...in launcher 8 After you have selected the components as per your requirement the dialog box shows the selected components that are ready to install as shown in the following figure Click Install to proceed Chapter 2 Installation 50 ...

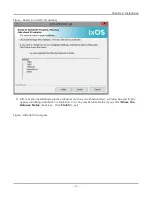
Page 62: ...ion progress windows such as one shown below a dialog box will finally appear indicating installation completion You can view Release Notes if you select Show the Release Notes check box Click Finish to exit Figure Installation progress Chapter 2 Installation 51 ...

Page 63: ...Figure Setup complete Chapter 2 Installation 52 ...

Page 64: ...Server Operation Option IxServer and Tcl Server start up has three control options as shown the following figure Chapter 2 Installation 53 ...

Page 65: ... run as a Windows service There are no desktop icons and no UI The server computers starts automatically with Windows To stop a server computer use the Windows Service Control Manager right click the My Computer icon select Manage and then Services From there you can disable or enable the server IxServerService For IxServer configuration the service must be stopped and the UI opened through the Ix...

Page 66: ... Note Hardware Manager is an IxOS component that manages the resources on an Ixia chassis Applications such as IxNetwork communicate with a chassis through Hardware Manager For further information refer to the Aptixia IxNetwork User Guide page 2 60 topic Off Chassis Hardware Manager Figure Hardware Manager Option dialog box As described in the dialog box it is advisable to install the Hardware Man...

Page 67: ...this case When starting the demo version of IxOS on that chassis the demo mode tries to start the services but fails because demo mode would not have installed any services l Similarly when both a demo mode and a real version of IxOS are installed on a computer and then the real version gets uninstalled the drivers are still present The demo mode running on the computer tries to read write inacces...

Page 68: ...Figure IxServer Installation Options For the demonstration server select the option Demo Server A menu appears as shown in Figure IxServer Installation Options Chapter 2 Installation 57 ...

Page 69: ...execute Tcl script execute ixnettcl lowLevelScriptName l ixnetperl Sets PERL5LIB and calls the ixiaperl5 18 link in usr bin To execute Perl script execute ixnetperl lowLevelScriptName l ixnetpython Sets PYTHONPATH and calls the ixiapython2 7 6 link in usr bin To execute Python script execute ixnetpython lowLevelScriptName l ixnetwish Sets TCLLIBPATH and calls the ixiawish8 5 17 link in usr bin To ...

Page 70: ...xOS5 10SP1exe Extract this to the network location This install package can be downloaded from the Ixia Website and it is included on the product CD 2 Extract the installer files from the install package by using the following command Ixos version version exe s e f extraction path 3 Install the chassis from the same network path Use the setup exe in the same folder to install the chassis Using Aut...

Page 71: ...igure IxOS Upgrade Option The dialog box that appears is shown in the following figure Figure IxOS Client Software Upgrade The IxOS Client Software Upgrade dialog box displays the current version of the client computer software and the server computer software Select Continue to begin upgrading the client computer software Chapter 2 Installation 60 ...

Page 72: ...yment You may use the IxAdmin package to perform remote silent installations on multiple computers at the same time If you want to use Silent Installation to install IxOS software on an Ixia chassis you must change the policy that controls Silent Installation See Preparing an Ixia Chassis for Silent Installation IxOS product silent install setup is discussed inIxOS Silent Install by exe Package Ix...

Page 73: ... the IxOS installer silently use the IxOS version X X exe package where version is the version of the software and X X is the build number for the particular package The command line to extract the setup is like IxOS_X XX_EA exe s extract only It caches to location Program Files IxiaInstallerCache IxOS X X X X where X X X X is the build number The setup exe file is located in this folder The follo...

Page 74: ...If no features are provided a default configuration is used Features represent the installer components that can be selected from the GUI in standalone mode The command prompt allows the combinations of these features Feature Definition F Client install Client F Server install Server F TclServer install Tcl Server F DemoServer install Demo Server F HWManager install Hardware Manager Properties P P...

Page 75: ...rate various options when setting up silent installation using the setup exe package l Silent Install IxOS Server Setup exe s F Server Yes l Quiet Install IxOS Server Setup exe q F Server Yes l Quiet Install IxOS Client with Tcl 8 5 Setup exe q i F Client Yes P TCLVERSION 8 5 l Silent Uninstall any config Setup exe s x The table below represents the detailed list of the configuration and correspon...

Page 76: ...es F TclServer Yes P TCLVERSION 8 5 P RUNMODE 1 TclServer with Server add both to startup setup exe s F Server Yes F TclServer Yes P TCLVERSION 8 5 P RUNMODE 2 TclServer with Server start both as services setup exe s F Server Yes F TclServer Yes P TCLVERSION 8 5 P RUNMODE 1 TclServer with Server start both manually setup exe s F Server Yes F TclServer Yes P TCLVERSION 8 5 P RUNMODE 3 Demo Server a...

Page 77: ...om the different versions of IxOS to maintain compatibility with the application that you are running Benefits The benefits of multi version installation are as follows l You can incorporate multiple versions of IxOS on a testbed l If you need to downgrade you no longer have to uninstall reinstall you can simply start the other version of IxOS l The Licensing model still remains the same l This ne...

Page 78: ...d to co exist with a current version it does not migrate the existing ixs It installs a new ixs in its own folder l ActiveState Tcl 8 5 is now be installed with IxOS See ActiveState Tcl 8 5 for details ActiveState Tcl 8 5 ActiveState Tcl 8 5 is installed with IxOS beginning with IxOS version 6 60 Existing scripts written with Ixia s version of Tcl 8 4 and Tcl 8 5 is compatible with Activestate Tcl...

Page 79: ... up in the Application Selector next time the Selector is opened Installation Changes The folder structure of the Ixia group has been modified Applications are no longer loaded to the Ixia folder but into specific folders for each application and each version The applications can be accessed through icons on the desktop or during installation you can choose not to install the icons When installing...

Page 80: ...Figure Multi version Installation During the IxOS installation process the following new dialog box appears as AppInfo is configured Figure Ixia AppInfo Installation Chapter 2 Installation 69 ...

Page 81: ...r is opened the window similar to the following figure is displayed Figure Initial Application Selector Window Select an application version in the left pane to view the dependencies in the right pane as shown in the following figure Chapter 2 Installation 70 ...

Page 82: ...indicates that for IxOS version 8 40 1400 5 the compatible version IxNetwork 8 50 1501 4 is installed It also indicates the default No override selection for the Tcl version Select the Tcl version and the dependencies are displayed as shown in the following figure Chapter 2 Installation 71 ...

Page 83: ...llows to add or remove specific components involved in the IxOS installation For example if only the Tcl client was installed and the Tcl Server was not installed you can use the Modify dialog box to install the Tcl Server Or if you have installed the Demo Server and want to remove it you can use this dialog box c Repair If you notice some missing files in the installation that may have been delet...

Page 84: ...ce dialog box appears The dialog box is shown in the following figure Figure Program Maintenance Dialog Box 4 Click Remove and then click Next Windows Installer opens the Remove the Program dialog box The dialog box is shown in the following figure Chapter 2 Installation 73 ...

Page 85: ...igure Remove the Program Dialog Box 5 Click Remove Windows Installer displays a dialog box as it removes IxOS from your computer The dialog box is shown in the following figure Chapter 2 Installation 74 ...

Page 86: ...Figure Uninstall Status Dialog Box After the uninstall operation is complete Windows Installer displays the Setup Complete dialog box as shown in the following figure Chapter 2 Installation 75 ...

Page 87: ...Figure Uninstall Complete dialog box 6 Click Finish 7 Close the Add or Remove Programs window Chapter 2 Installation 76 ...

Page 88: ...ows Explorer paradigm for a standard easy to use interface It is assumed that the person using this product is familiar with the Windows user interface and terminology such as double mouse click or right mouse click to either invoke an action or provide more information The IxExplorer software provides complete configuration control and monitoring of Ixia resources in the test network To establish...

Page 89: ...radigm for a standard easy to use interface Users who are familiar with Windows are likely to be able to configure and run a basic transmit and capture Ethernet packet stream test within two or three minutes of first power up IxExplorer configures and controls traffic generation monitors statistics views and decodes captured packets The scalable interface can be used across multiple chassis concur...

Page 90: ...s sequential interrupt or end stream with looping to the beginning of a list of streams In this way you can create complex and continuous data flows The first time a chassis is powered up after shipment from the factory each port has default settings for Packet Streams and Capture Filters The Packet Stream default configuration is to send a continuous stream of valid 64 byte packets with minimum i...

Page 91: ...isplay the ports for that card 5 Right click port 1 and click Start Transmit 6 You are now transmitting your first packet stream from port 1 on the card to port 2 on the card The indicators on the front of the card reflects this with the Tx Coll LED on port 1 lit and the Rx Err LED on port 2 lit Both LEDs should be green indicating good data You can stop the packet stream by right clicking the car...

Page 92: ...rst stop after this stream advance to next stream go to any stream with or without a count Inter Packet Gap From below minimum to many seconds Inter Burst Gap From below minimum to many seconds Inter Stream Gap From below minimum to many seconds Table Tutorial One Stream Control Tab It is very informative for a new user to experiment with these packet stream parameters and view the capture view re...

Page 93: ...Figure Default Packet Stream Settings Frame Data Figure Default Packet Stream Settings Stream Control Chapter 3 Using IxExplorer 82 ...

Page 94: ...ed in the top window The bottom pane contains the hexadecimal byte display of the contents of the selected packet Figure Example of the Capture View Window Tutorial 2 Capturing Your First Transmitted Data In this example we take a look at the actual packets that are transmitted when we run the packet stream in tutorial 1 We will be referring to the same card and ports as used in that tutorial 1 Ri...

Page 95: ...s There are also four user definable statistics counters that may be configured using the same matching conditions as the trigger and filter definitions Double click the Filter Statistics Receive Mode option in the right pane The dialog box as shown in the following figure appears Figure Default Capture Filter Settings Statistics The Statistics feature of IxExplorer allows to view all or a subset ...

Page 96: ...Figure Example of the Statistics Window for Gigabit Cards Chapter 3 Using IxExplorer 85 ...

Page 97: ...ows the count rate values for each counter in increments per second A complete listing of all items displayed in the statistics windows for different modes of operation can be found in the Ixia Platform Reference Guide Multiple Statistics View To display multiple ports statistics side by side right click Statistic Views in the pane and select New This opens a window where you can select the ports ...

Page 98: ... port right click the port on the pane and select Properties This allows to view and configure parameters such as loopback port speed duplex mode MII register settings and other port specific operating characteristics Useful Tricks To copy a port s properties from one port to another click a port and drag it on top of another port on the tree To start packet streams on all of the ports on one card...

Page 99: ...This page intentionally left blank 88 ...

Page 100: ...ivation and deactivation of licenses are also available now The Activation Code for the purchased Ixia product s is sent in an e mail message when you purchase an Ixia software Enter this Activation Code in ILU to generate a license For the licensed software to work properly licenses must be activated on site License activation for an Ixia product can be done after the software installation but mu...

Page 101: ...ppears Figure Licensing Prompt The following table explains the options in the licensing prompt Options Description Install permanent license Runs the registration process You must have purchased a license and received a licensing e mail with a registration number and password Selecting this option starts the license installation process Install license later Skips the licensing process and contin...

Page 102: ...es appears Types of Licenses Ixia provides the following types of licenses for its products l Node Locked Licenses l Floating Licenses l Evaluation Licenses Node Locked Licenses Node locked licenses are locked to a particular chassis or workstation and allow only certain product functions to run on that chassis or workstation Floating Licenses Floating licenses are stored on a license server and a...

Page 103: ... chassis and cannot be installed on a different license server Note For specific details on perpetual licenses please refer to the documentation of your product of interest Prerequisites Before activating a license you must have the following The e mail message from Ixia with the activation code The key contents of this e mail message are as follows l Entitlement Code If you provide the entitlemen...

Page 104: ...click New or else Edit 5 The name of the variable should be IXN_LICENSE_SERVER and the value should be the name or IP address of the license server computer Installation Scenarios These installation scenarios are described in the following sections l Licensing to a Chassis or Workstation via the Internet l Licensing to a License Server via the Internet l Licensing to a Chassis or Workstation witho...

Page 105: ...s connected to the Internet and licenses are installed on a central license server the license server and the installation host can be the same machine The installation host must also be connected to the license server and the workstation chassis if the license server and the installation host are not the same machine Chapter 4 License Management 94 ...

Page 106: ... Host can be the same computer The Installation Host must also be connected to the workstation chassis if they are not the same computer To complete the installation process an additional computer is necessary an Online Host as shown in the following figure This computer must be connected to the Internet It is necessary to transfer small amounts of information from the Online Host to the Installat...

Page 107: ...st must also be connected to the license server and the workstation chassis if the license server and the installation host are not the same machine In order to complete the installation process an additional computer is necessary an online host shown in the figure below This machine must be connected to the Internet It is necessary to transfer small amounts of information between the online host ...

Page 108: ...g to a License Server disconnected from the Internet Installing Ixia Licensing Utility For details on installing Ixia Licensing Utility refer to the Ixia Licensing Management User Guide Chapter 4 License Management 97 ...

Page 109: ...Server installing 56 L LicenseManagement 89 licensing scenarios server online 94 workstation chassis offline 95 workstation chassis online 93 licensing screnarios server online 96 S Software Installation 38 T typographical conventions ix W Warnings 4 INDEX 98 ...

Page 110: ...Ixia a Keysight Business 26601 West Agoura Road Calabasas California 91302 Keysight Technologies 2018 ...

Reviews: