


1
2
Keysight M9018A PXIe 18-Slot Chassis Startup Guide
STEP 2: Prepare the Hardware and Install the Software
STEP 2: Prepare the Hardware
and Install the Software
This section provides the following information:
-
Host controller hardware and software requirements
-
Setting up the chassis on a bench
-
Removing and installing filler panels
-
Installing an embedded controller in the chassis
-
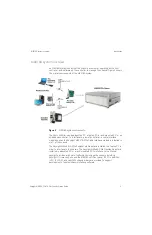
Connecting a host controller PC to the chassis
-
Installing software on the host controller PC
The following procedures should be followed to ensure safety and to minimize
the possibility of damaging electrical components:
-
This product is designed for use in Installation Category II and Pollution
Degree 2, per IEC 61010 and 664 respectively.
-
Mains wiring and connectors shall be compatible with the connector used in
the premise electrical system. Failure to ensure adequate earth grounding
by not using correct components may cause product damage and serious
injury.
-
Use only the power cord supplied with the chassis. Keysight power cords
ensure continuity between the chassis grounding-type power plug and the
safety ground terminal at the power outlet.
-
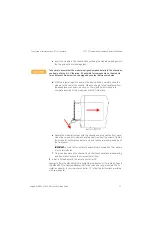
Install the chassis so that the detachable power cord is readily identifiable
and is easily reached by the operator. The detachable power cord is the
chassis disconnecting device. It disconnects the mains circuits from the
mains supply to the chassis before other parts of the chassis. The front panel
switch is only a standby switch and is not a LINE switch. Alternatively, an
externally installed switch or circuit breaker (which is readily identifiable and
is easily reached by the operator) may be used as a disconnecting device.
-
The chassis does not support hot-swapping of modules; i.e., inserting and
removing modules with the chassis powered up. Before installing modules in
the chassis, powered down the chassis and disconnected from AC power.
-
To minimize the possibility of electrostatic discharge (ESD) damage to a
module while installing it, follow the handling procedures described in
“Static-safe handling procedures” on page 11
.