Introduction
1
The U3606B in Brief
U3606B User’s Guide
23
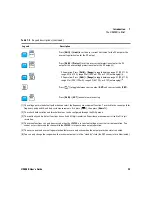
Press
[Shift]
>
[Limit]
to set the over-current limit value for the CV output or the
over-voltage limit value for the CC output.
Press
[Shift]
>
[Protect]
to set the over-current protection value for the CV
output or the over-voltage protection value for the CC output
[5]
.
•
CV operation: Press
[Shift]
>
[Range]
to toggle between range S1 (30 V/1 A),
range S2 (8 V/3 A), range S2m (1000 mV/3 A), or S1S2 (autoranging)
[6]
.
•
CC operation: Press
[Shift]
>
[Range]
to toggle between range S1 (30 V/1 A),
range S1m (30 V/100 mA), range S2 (8 V/3 A), or S1S2 (autoranging)
.
Press
[
]
to toggle between source output (
OUT
) and source standby (
SBY
).
Press
[Shift]
>
[EXT]
to enable remote sensing.
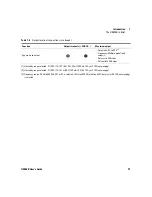
[1] The voltage path is the default path when you select the frequency measurement function. To switch to the current path for
frequency, pulse width, and duty cycle measurements, first press
[
]
, then press
[Hz ms %]
.
[2] The refresh hold variation and threshold values can be configured through the Utility menu.
[3] The continuity and diode test functions have a fixed 4½ digit resolution. Capacitance measurement is fixed to 3½ digit
resolution.
[4] The sweep functions can only be accessed when the U3606B is in constant voltage or constant current operation. You
cannot access the sweep functions while the U3606B is in square-wave output operation.
[5] The over-current and over-voltage protection features are only active when the output protection state is enabled.
[6] You can only change the range when the instrument output is in the “standby” state (the SBY annunciator is illuminated).
Table 1-4
Keypad descriptions (continued)
Legend
Description
O U T
S B Y
I
Summary of Contents for U3606B
Page 1: ...Keysight U3606B Multimeter DC Power Supply User s Guide ...
Page 2: ...THIS PAGE HAS BEEN INTENTIONALLY LEFT BLANK ...
Page 3: ...U3606B User s Guide I ...
Page 16: ...XIV U3606B User s Guide THIS PAGE HAS BEEN INTENTIONALLY LEFT BLANK ...
Page 25: ...Introduction 1 Preparing the U3606B U3606B User s Guide 7 Adjust the carry handle 1 2a 3 2b ...
Page 27: ...Introduction 1 Preparing the U3606B U3606B User s Guide 9 Figure 1 3 Rack mount dimensions ...
Page 120: ...3 DC Power Supply Operation Square Wave Operation 102 U3606B User s Guide Enable the output 7 ...


