background image

5

MODEL #A3000 – 3,000LB (1361KG) WINCH

CONTROLS AND fEATURES

2. 

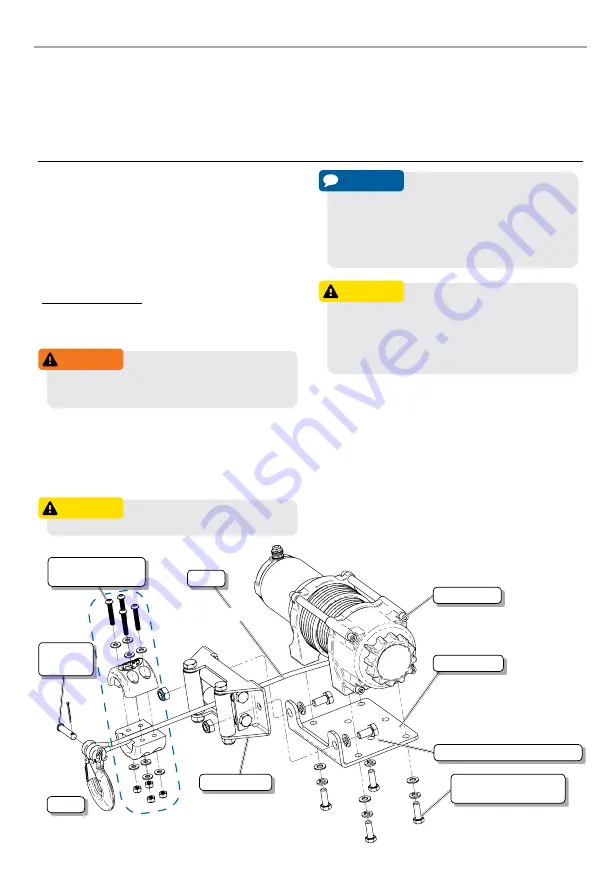
Attach the winch using supplied M8 x 25mm or 
30mm bolts and washers thru the fairlead bracket 
or model specific winch mount and into the winch.

3. 

Disengage the clutch by rotating the clutch cap to 
the RELEASE position. Release the synthetic cable 
and pull through the roller fairlead.

4. 

Attach the clevis hook to the cable and the hand 
saver strap to the clevis hook.

10. 

Fairlead Mount

 – Adapter to mount the winch and 

fairlead for utility applications.

11. 

Contactor

 – Power from the vehicle battery flows 

through the weather sealed solenoid switch before 
being directed to the winch motor.

12. 

Clevis Hook

 – Provides a means for connecting the 

looped ends of cables to an anchor.

13. 

Hand Saver Strap

 – Used to assist cable feed.

InsTallaTIon

This KFI 3,000 lb winch is designed with a bolt pattern 
that is standard for this class of winch. Many winch 
mounting kits are available that utilize this bolt pattern for 
the most popular ATVs and UTVs. You can find most of 
the ATV/UTV winch mounts on our website 
(www.kfiproducts.com).

Mount the Winch

1. 

Install the winch and fairlead with the supplied 
hardware per the instructions provided with the 
model specific winch mounting kit or prepare a flat, 
secure mounting location for the winch.

WarnInG

Before starting to install this winch, 

disconnect the vehicle ground and positive leads 
from the battery.

CauTIon

If you choose not to use a model 

specific mounting kit, you will need to drill holes in 
the structural support of the vehicle. Be certain that 
your structural support is sufficient for the pulling 
forces of this winch.

CauTIon

Mounting bolts must be SAE Grade 

5 or better and torqued to 17 ft. lbs.

noTICe

This kit includes mounting bolts 

with different lengths for fastening the winch (M8 x 
20, 25, and 30mm long). Use the length that best 
fits your mounting application. Refer to vehicle 
specific mount instructions for more information.

Winch Assembly - Generic Install

Winch Body

Mount Plate *
(*) Generic plate shown (Fairlead 

Mount) . Use vehicle specific 

mounting application and assem-

bly instructions for most installs.

Bolts - M10 x 20mm, Fairlead

Winch Bolts - 

M8 x 20, 25, or 30mm

See Notice above. Use longer 

bolts with multiple plates. Do not 

over tighten or strip threads! 

Roller Fairlead

Split Cable Hook 

Stopper (If included)

Hook

Clevis & 

Cotter Pin

Cable

Note: Cable must exit 

between spool and 

mounting surface!

Summary of Contents for A3000

Page 1: ... do so could result in serious injury This manual should remain with the product Specifications descriptions and illustrations in this manual are as accurate as known at the time of publication but are subject to change without notice KFI Products Kappers Fabricating Inc Spring Valley MN USA Place serial label here for reference Support MODEL A3000 3 000 LB 1361 KG Made in China REV 20220817 ATV W...

Page 2: ......

Page 3: ...dlebar Mounted Mini Rocker Switch 6 Mount the Hand Remote Socket 6 Wiring the Winch 7 Winch Wiring Diagram 8 Motor End Terminal Rotation 8 Controller Wiring Diagram 9 Cable Hook Stopper Installation and Use 9 General Tips for Safe Operation 10 Self Recovery 10 Winching Techniques 11 Snow Plow Usage 12 Maintenance 12 Motor 12 Lubrication 12 Cable Assembly Replacement 12 Specifications 13 Performanc...

Page 4: ......

Page 5: ...ION Safety Definitions The purpose of safety symbols is to attract your attention to possible dangers The safety symbols and their explanations deserve your careful attentions and understanding The safety warnings do not by themselves eliminate any danger The instructions or warnings they give are not substitutes for proper accident prevention measures Record the model as well as date and place of...

Page 6: ...on the winch cable This could result in cable breakage WARNING Pull only on area of the vehicle as specified by the vehicle manufacturer WARNING Do not use the winch to secure or hold a vehicle for a long period of time Do not use the winch to secure a vehicle for transport WARNING Disconnect the remote control and battery leads when not in use for extended periods WARNING Avoid shock loads by usi...

Page 7: ...fairlead and drum while the winch is under power CAUTION Use gloves to protect hands when handling the cable Never let the cable slide through your hands CAUTION Do not wrap the cable around any object and hook it back onto itself CAUTION Apply blocks to the wheels of the vehicle when on an incline CAUTION Duration of winching pulls should be kept as short as possible If the motor becomes uncomfor...

Page 8: ...s hook pin 12 4 Roller Fairlead When using the winch at an angle the roller fairlead acts to guide the steel cable onto the drum and minimize damage to the cable from abrasion on the winch mount or bumper 5 Free Spooling Clutch The clutch allows the operator to manually disengage Release the spooling drum from the gear train Engaging the clutch Engage locks the winch into the gear system 6 Braking...

Page 9: ...ll the winch and fairlead with the supplied hardware per the instructions provided with the model specific winch mounting kit or prepare a flat secure mounting location for the winch WARNING Before starting to install this winch disconnect the vehicle ground and positive leads from the battery CAUTION If you choose not to use a model specific mounting kit you will need to drill holes in the struct...

Page 10: ...ice the end of the red wire to an ignition controlled keyed power source using the supplied wire splice You may need to use a test light or multimeter to locate a suitable wire The wire should only have power when the key is in the ON position Mount the Hand Remote Socket optional 10 Determine a mounting location for the Hand Remote socket Be certain the area behind the selection location is clear...

Page 11: ...am page 8 18 Connect the mini rocker switch to the contactor block black to black green to green See diagram on page 9 19 Once all wiring is connected to the contactor finish mounting it to the contactor location using supplied M6 hardware See diagram page 8 20 Torque the contactor terminal nuts to 4 5 N m 40 in lbs Do NOT over tighten 21 Place all terminal boots over terminals and secure all cabl...

Page 12: ...h wire ends and the stock vehicle wiring Use two M6 x 20mm Bolts included if required Winch Wiring Diagram With some applications the motor terminals may need to be rotated to avoid interference with other components If rota tion is required please give us a call at 1 877 346 2050 for instructions or visit our website at www kfiproducts com and look in the support section Motor End Terminal Rotati...

Page 13: ...ase winch and pull out approximately 2 feet of cable 2 Assemble cable hook stopper as shown in diagram with the flat portion of the two halves resting against your fairlead Tighten fasteners 3 To stow hook engage clutch and retract cable onto winch spool until hook is snug against the hook stopper and fairlead 4 Position cable hook stopper at approx 3 4 of the total line distance towards the hook ...

Page 14: ...operation of the winch to minimize battery drain and maximize power and speed of the winch If the winch is used for a considerable time with the engine off the battery may be drained and too weak to restart the engine Get to know your winch before you actually need to use it We recommend that you set up a few test runs to familiarize yourself with rigging techniques the sounds your winch makes und...

Page 15: ... the drum The vehicle that is being winched can be slowly driven to add assistance to the winching process Avoid shock loads keep the cable under tension 15 The vehicle to be winched should be placed in neutral and the parking brake released Only release the loads to the winch This can damage the winch cable and vehicle 16 The winch is meant for intermittent use Under full load with a single line ...

Page 16: ...o internal lubrication is required under normal conditions If the winch is subjected to extreme conditions lubrication may be required using a high temperature lithium grease Retract Cable Assembly onto drum being careful not to allow kinking or over heating of the winch NOTICE Follow these precautions before using your Winch to lift a Plow Failure to do so may result in damage to your winch or ve...

Page 17: ... 680 907 1134 1361 Line Speed 12 VDC FPM 10 2 9 51 8 86 7 87 6 56 5 58 4 27 MPM 3 1 2 9 2 7 2 4 2 0 1 7 1 3 Max Current A 8 30 8 51 3 80 2 103 5 129 160 8 Run Time Minutes 1 1 1 1 1 1 1 Cooling Time Minutes 5 5 5 5 5 5 5 If the motor becomes uncomfortably hot to the touch stop winching immediately and let it cool down for 5 minutes Do not pull for more than one minute at or near the rated load Ele...

Page 18: ... 000LB 1361KG WINCH Specifications 33 32 41 37 38 40 34 35 41 9 39 36 31 2 3 5 12 28 26 24 23 14 15 16 19 20 21 17 18 29 22 25 27 13 11 10 8 7 6 4 30 1 41 41 Parts Diagram Note Beveled edge oriented towards clutch end ...

Page 19: ...19 Washer Above Clutch 1 26 WP 0020 Cam Clutch Gear 1 27 WP 0021 Gear Housing 1 28 WP 0095 Gear Ring 1 29 WP 0024 Gasket 1 30 WP 0023 Bushing Motor 1 31 SE A CAPKIT Motor End Cap Assembly 1 32 A WIRES WIN Wiring Winch 1 32 1 WP 0092 Terminal Protector 4 33 A WIRES BAT Wiring Battery 1 33 1 WP 0092 Terminal Protector 4 34 100495 Bracket Fairlead Standard 1 35 ATV RF Roller Fairlead 1 36 WP 0030 BLU...

Page 20: ...rect Wiring Check wiring diagram verify switch wires black green are properly connected and making good contact Defective or stuck Contactor Tap contactor to loosen plungers Defective Switch assembly Replace Switch assembly Contactor malfunctioning Contact KFI Technical Support Motor runs Spool does NOT turn Clutch not engaged Rotate Clutch Cap to Engage Broken Coupler stripped Shaft Replace Coupl...

Page 21: ...r repair when normal use has exhausted the life of a part or the equipment as a whole Installation Use and Maintenance This warranty will not apply to parts and or labor if this winch is deemed to have been misused neglected involved in an accident abused loaded beyond the winch s limits modified installed improperly or wired incorrectly to any electrical component Normal maintenance is not covere...

Page 22: ...G INC P O BOX 32 1015 INDUSTRIAL DR SPRING VALLEY MN 55975 Customer Service Mon Thr 8 00 AM 5 00 PM CST CDT Fri 7 00 AM 1 00 PM CST CDT Toll Free 1 877 346 2050 Opt 1 Fax No 1 507 346 2010 E mail sales kfiproducts com Technical Service Mon Thr 8 00 AM 5 00 PM CST CDT Thr 7 00 AM 1 00 PM CST CDT Toll Free 1 877 346 2050 Opt 2 E mail tech kfiproducts com Website https www kfiproducts com ...

Page 23: ...MODEL A3000 3 000LB 1361KG WINCH Notes ...

Page 24: ... PRODUCTS P O BOX 32 721 SATA DRIVE SPRING VALLEY MN 55975 www kfiproducts com CORPORATE OFFICE KAPPERS FABRICATING INC P O BOX 32 1015 INDUSTRIAL DR SPRING VALLEY MN 55975 USA MADE IN CHINA 2022 KAPPERS FABRICATING INC ...

Reviews: