background image

4

Schritt 4

step 4

étape 4

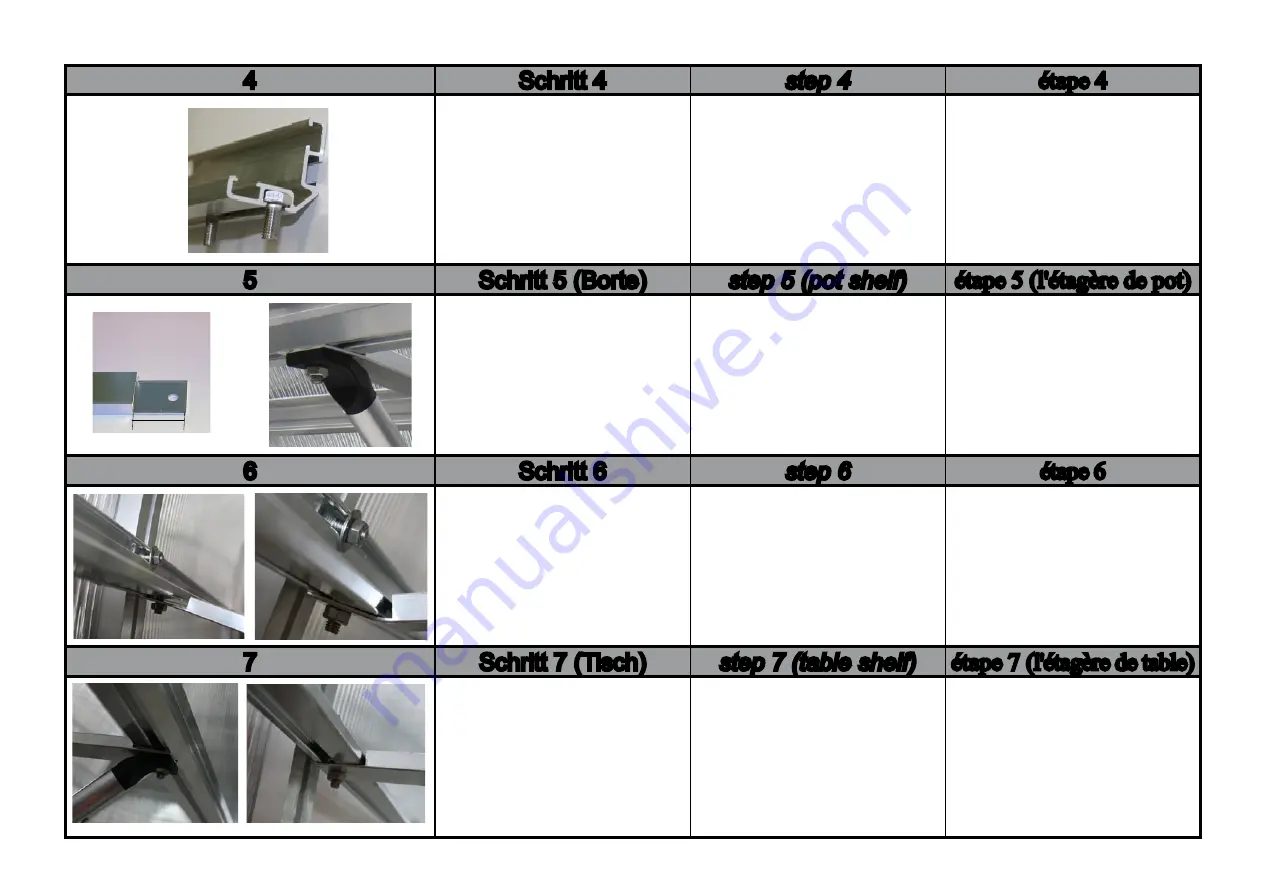
In den unteren Kanal, auf der 

Außenseite des Längspro-

fils (Pos. 1), ziehen Sie pro 

Gewächshaussprosse eine 

Schraube M6 x 16 (S5) vom 

Ende her ein.

In the lower channel on 

the outside of the longitu-

dinal profile (pos. 1) pull 

per greenhouse rung a 

bolt M6 x 16 (S5) from the 

end one.

Dans le canal inférieur à 

l'extérieur du profil en long 

(po. 1), serrer un boulon 

M6 x 16 (S5) chaque éche-

lon à partir des extrémités.

5

Schritt 5 (Borte)

step 5 (pot shelf)

étape 5 (l'étagère de pot)

Längere Ausklinkung zeigt 

nach außen. Befestigen 

Sie pro Gewächshaus-

Sprosse je 1 Querstrebe 

(Pos. 5) zusammen mit 

einer Strebe (Pos. 3).

Longer recess pointing 

outwards.

Fasten per greenhouse 

rung on cross-brace  

(pos. 5) together with a 

strut (pos. 3).

Plus encoche vers l'extérieur.

Fixer par échelon de serre 

un bar  transversale (po. 5) 

avec une entretoise (po. 3).

6

Schritt 6

step 6

étape 6

Im Bügelbereich wird der 

Schenkel der Querstrebe 

so weit gebogen, bis die 

Querstrebe waagerecht 

ist.

In the bow area the leg of 

the cross-brace is bent so 

far until the cross-brace is 

horizontal.

Dans la région de l'étrier 

des branches de l'élément 

transversale courbée mesure 

jusqu'à ce que la barre 

transversale est horizontal.

7

Schritt 7 (Tisch)

step 7 (table shelf)

étape 7 (l'étagère de table)

Verschrauben Sie die 

Streben (Pos. 3) und die 

Querstreben (Pos. 5) am 

Längsprofil (Pos. 1) und 

am Borten-/Stabilisie-

rungswinkel.

Screw the struts (pos. 

3) and the cross-braces 

(pos. 5) on the longitudi-

nal profile (pos.1) and the 

stabilization angle.

Visser les entretoises

(po. 3) et les barres 

transversales (po. 5) sur 

le profil en long (po. 1) et 

l'angle de stabilisation.

längere Lasche
zum Bügelprofil

33 mm

Summary of Contents for Rhodo III

Page 1: ...2015 Rhodo III IV Montageanleitung Borte Tisch assembly instructions pot shelf table shelf Instructiond assemblage d étagère depot d étagèredetable Technische Änderungen vorbehalten Subject to technical changes Sous réserve de modifications techniques ...

Page 2: ... entretoise 3 4 5 Winkelendstück schmal angle end tail narrow embout V36 8 10 Querstrebe cross brace barre transversale 5 4 5 Verbinder mit Madenschraube connectingplatewithgrubscrew internalhexandflatpoint plaque de connexion avec vis sans tête V161 2 2 Modell Rhodo model Rhodo modèle Rhodo part list pot shelf table shelf Stückliste Borte Tisch listes des pièces d étagère de pot d étagère de tabl...

Page 3: ... M6 x 16 mit Mutter hexagonal screw M6 x 16 with nut M6 vis à tête hexagonale M6 x 16 avec écrou M6 S5 S1 10 10 Hammerkopfschraube M6 x 16 mit Mutter M6 T head bolt M6 x 16 with nut M6 vis marteau tête carrée M6 x 16 avec écrou M6 S15 S1 10 10 Innensechskantschlüssel allen key une clé Allen V21 1 1 Modell Rhodo model Rhodo modèle Rhodo part list pot shelf table shelf Stückliste Borte Tisch listes ...

Page 4: ...m Ende der Streben Pos 3 aufstecken The angle end tail V36 attach each end of the struts pos 3 Les embouts d angles V36 à la fin des entretoises po 3 attachez 3 Schritt 3 step 3 étape 3 In den unteren Kanal auf der Außenseite des Bor ten Stabilisierungswin kels Pos 3 4 ziehen Sie jeweils eine Schraube M6 x 12 S12 pro Gewächshaussprosse ein In the lower channel on the outside of the stabilization a...

Page 5: ...ut pos 3 Plus encoche vers l extérieur Fixer par échelon de serre un bar transversale po 5 avec une entretoise po 3 6 Schritt 6 step 6 étape 6 Im Bügelbereich wird der Schenkel der Querstrebe so weit gebogen bis die Querstrebe waagerecht ist In the bow area the leg of the cross brace is bent so far until the cross brace is horizontal Dans la région de l étrier des branches de l élément transversal...

Page 6: ... Borte Tisch an den Spros sen verschrauben Hierzu die Streben mit Hammer kopfschrauben M6 x 16 anbringen Shelf screwed to green house rung For this the struts with T head bolt M6 x 16 Boulon d étagère sur le barreaux Pour cela les entrétoises avec un vis marteau tête carrée M6 x 16 10 Schritt 10 step 10 étape 10 Zum Schluß legen Sie die Einlegeplatten ein Finally insert the plates Enfin insérer le...

Reviews: