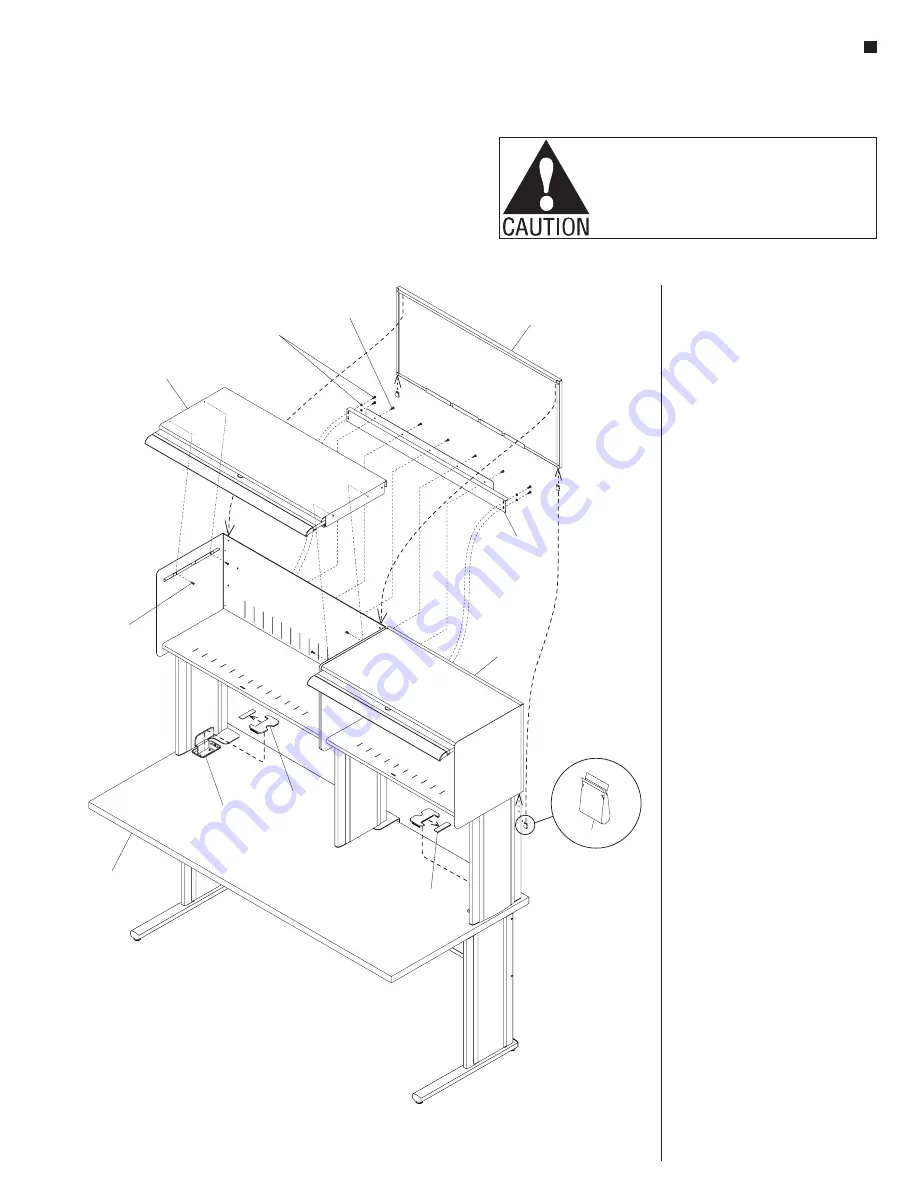
Assemble units as described herein only. To do otherwise
may result in instability. All screws, nuts and bolts must be
tightened securely and must be checked periodically after
assembly. Failure to assemble properly, or to secure parts
may result in assembly failure and personal injury.
11
WorkZone
®
Dual Universal Overhead Cabinet
Assembly Instructions
Figure 11
WorkZone
Desk
back
plate (36 )
"
stiffener
beam
top shelf &
cabinet door (36 )
"
barb clip
top shelf &
cabinet door (30 )
"
back
plate (30 )
"
#10-32 x /
1
2
"
screw & tooth
washer
#8-32 x /
1
2
"
screw
grommet
cover
grommet
hole
#8-32 x /
1
2
"
screw
grommet
knock-out
7. Carefully set each top shelf/cabinet
door up onto the top mounting
flanges of both cabinet sides. Align
mounting holes and secure using
two #8-32 x
1
/
2
” screws
at each end
per cabinet
(Figure 11).
8. Position the stiffener bar as
illustrated to the lower rear of each
back shelf, align mounting holes
and secure beam to shelf back
using the required number of
#8-32 x
1
/
2
” screws. Also, at each
end of the stiffener beam, use two
#10-32 x
1
/
2
” screws with tooth
washers and secure the beam to the
top rear of the right- and left-hand
stanchions (Figure 11).
9. Orient the back plates as illustrated
behind each cabinet, then hang it
onto the back of the cabinet such
that the top vertical flange of the
back plate captures the top inside
edge of the shelf back. Use the two
barb clips provided per cabinet and
press them up at the underside of
the cabinet to attach the bottom of
each back plate to the bottom, rear
of the corresponding shelf back
(Figure 11).
10. Take grommets removed in step one
and remove the knock-outs from
each. Snap the grommets back into
place in the grommet hole at the
installed stanchions (Figure 11).
Summary of Contents for WorkZone Series
Page 1: ...Assembly Instructions WorkZone Overheads December 2015 ...
Page 23: ......


